- How to connect Android to a PC via Wi-Fi
- How to connect Android to your PC via Wi-Fi
- Distribution of Wi-Fi from laptop
- Network installation in the command line
- How to connect Android to a PC via Wi-Fi: Video
- How Can I Connect My Android Phone via Wi-Fi?
- Step One. Download & Install the Latest Program on Your Computer
- Step Two. Choose «Connect via Wi-Fi» Option
- Step Three. Allow the Software to Pass Through the Firewall (On Windows Computer Only)
- Step Four. Install the Latest Assistant for Android (Android Version) on Your Phone
- Step Five. Scan the QR Code to Build A Wi-Fi Connection
- Ask Our Support Team for Help
How to connect Android to a PC via Wi-Fi
Nowadays, thanks to modern wireless communications technology, it is quite easy to connect Android to a PC via Wi-Fi. Moreover, there are several different options for how to do it. The user can not only access the files, but he also has an opportunity to fully remotely control the gadget.
Of course, to make this possible, we need to install special applications on both PC and smartphone (or tablet). But this should not be a problem. You can easily find any program on Google Play. So, let’s analyze how to connect the gadget with Android OS to a PC through the air.
How to connect Android to your PC via Wi-Fi
Here you need to determine, what purposes you want to connect for. The fact is that different applications are used for different purposes. For example, in order to access the files, you can use the “FTP-server” application. This app must be installed on your phone
After the launch, the application will assign the IP-address to your phone. You will need to type this IP in your browser or file explorer on the computer. After that, you will have an access to the smartphone’s files on your computer. There are other programs, such as “AirDroid”.
Here is a list of the most common applications that provide access to Android from the PC via Wi-Fi:
Note that the FTP-server allows you to work exclusively with files contained in the internal memory and the flash card. If you need the access to messages, phone book and other applications on your phone, you can use “MyPhoneExplorer”.
This is a handy utility that allows complete access. In this case, you are free to delete contacts, send messages and so on.
You need to install the client on your phone and computer to make this program work. After the start, select a connection method:
Next, the system will synchronize. In the settings of the utility on your phone, you can specify the PIN-code that is required for synchronization. To do this, click the “Settings” and select «WiFi-PIN»
Now you only have to enter the PIN-code and the name of the connected smartphone.
Moreover, the name can be any of your choice. It is entered for your convenience – in the future you will know which device you are working with.
Now you know how to get access to the Android phone from a PC via Wi-Fi.
Sometimes it is not over. The Wi-Fi connection is most commonly used to access the Internet on the smartphone. But what if you do not have a wireless router, but the laptop is connected to the Internet via cable? In this case, you can share a Wi-Fi from your laptop. At the same time, all connected devices will have access to the global network. Thus, let us explain how to do it in details.
Distribution of Wi-Fi from laptop
It is possible to distribute the network both from laptop and from the PC. But if the laptop is almost always equipped with a wireless adapter, the situation with the PC is more complicated. Before proceeding to the next steps, make sure that the latter is equipped with Wi-Fi module. Now we have two options, how to connect the Internet from a PC or laptop to an Android mobile phone via Wi-Fi:
The first option does not require you to find and install additional software. It implies PC configuring by using the command line. In fact, all you need is to execute two commands. Let’s analyze this process in details.
Network installation in the command line
To begin, launch the required service. This is done as follows: press the Start +R key combination. In the window that appears, write CMD and press «Enter».
In such a way we launched the command line. It now remains to type two commands:
- netsh wlan set hostednetwork mode=allow ssid=“My_virtual_WiFi” key=“12345678” keyUsage=persistent – This will install the appropriate driver and create a virtual Wi-Fi adapter. In addition, it will create a virtual wireless network. Here, the SSID is the name of the distribution; the KEY is the password that will be required to connect.
- Now you need to run the created distribution. To do this, type the following command – netsh wlan start hostednetwork.
- To stop the distribution, enter netsh wlan stop hostednetwork.
So, now you are distributing Wi-Fi, but users still cannot connect to you and do not have access to the Internet. To fix this, you need to configure the sharing. To do this, right-click the network icon in the system tray. Select “Network and Sharing Center”.
Open the “Change advanced sharing settings”. It is necessary to enable the detection and sharing at all points, and to disable password protection. Save the settings and return to the control center.
Go to “Change adapter settings”.
Here you can see all the available connections of the computer. Our virtual distribution will be called “Wireless Connection 2”. We need to select the connection which the computer connects to the Internet with. Right-click it and select “Properties”.
Go to the tab “Access”. Next, set a checkmark in the “Allow other network users to connect through this computer’s Internet connection” line.
Select your virtual network in the line “Home networking connection”. Click “OK”. The setup procedure is completed. Now all connected users will have access to the Internet.
There is another way to connect the Android phone to the laptop’s Internet via Wi-Fi. It implies the use of third-party programs, such as Virtual Router Plus. This program allows you to distribute the Internet via Wi-Fi. Configuring consists of three points:
- Entering the network name.
- Setting the password.
- Specify the Internet connection that provides access to the Internet.
As you can see, everything is easy. The first option is better by the fact that you don’t need to install any utilities. At the same time it works more stably and safely. The second option is more easy to setup and use, but sometimes there may be some problems and failures. But, it happens very rarely. It depends on you which option to choose.
How to connect Android to a PC via Wi-Fi: Video

How Can I Connect My Android Phone via Wi-Fi?

Most MobiKin programs for Android support 2 connection types — connect via USB or Wi-Fi (including MobiKin Assistant for Android, Transfer for Mobile, Eraser for Android or Backup Manager for Android). However, lots of users do not know how to complete that. So here, we would like to show you the detail steps to connect Android phone via Wi-Fi. Just read on to get the step-by-step tutorial.
Step One. Download & Install the Latest Program on Your Computer
The first step is to download the latest MobiKin program on your computer by clicking the download link below and then go with the tutorial to properly install it.
Download Links:
If you have already installed the software on your computer, please check if the program is updated to the latest version. Just click on » > Check for Update» to have a check. Supposed that there is a new version available, please follow the prompts to upgrade it at first.
Step Two. Choose «Connect via Wi-Fi» Option
Next, you should launch the installed software on your computer and then select the «Connect via Wi-Fi» option. Here, the methods to choose the option on 3 programs are different.
1) MobiKin Assistant for Android
— After launching the program, you will get the following interface:
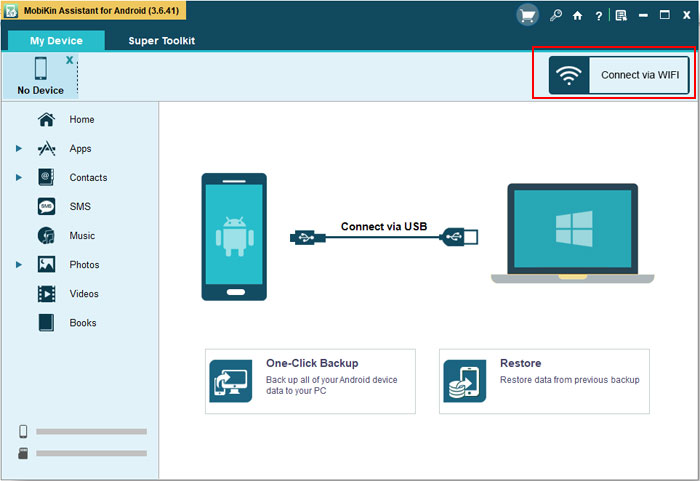
— As you can see, the «Connect via WIFI» option is at the top right corner of the screen. Just tap on it and you will get an interface as below:

2) MobiKin Transfer for Mobile
— Click on «Can’t recognize the device?» on the main interface.
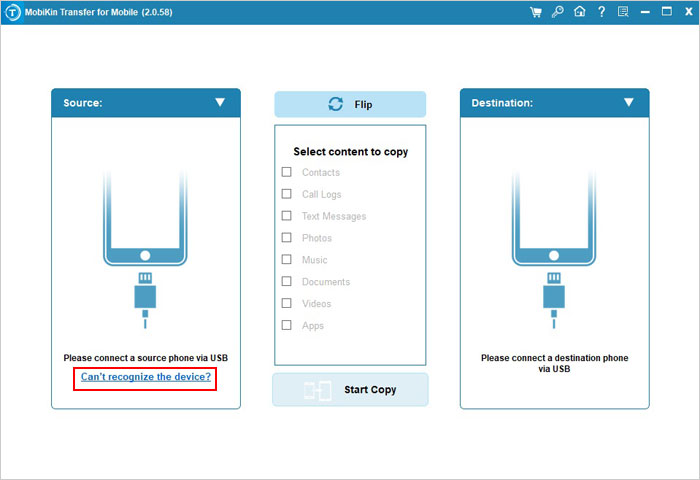
— After that, the following interface will pop up and you can tap on the option «Connect via Wi-Fi».
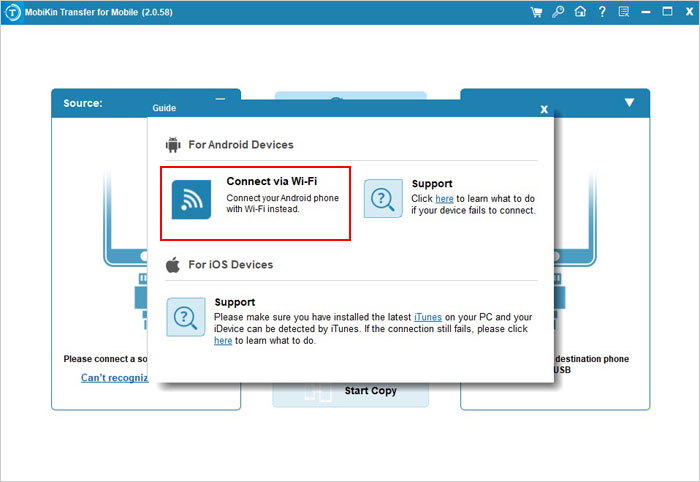
— When you tap on «Connect via Wi-Fi», you will see the following popup on computer:
3) MobiKin Eraser for Android
— Click the «Wi-Fi» icon on the interface that appears after launching the program.
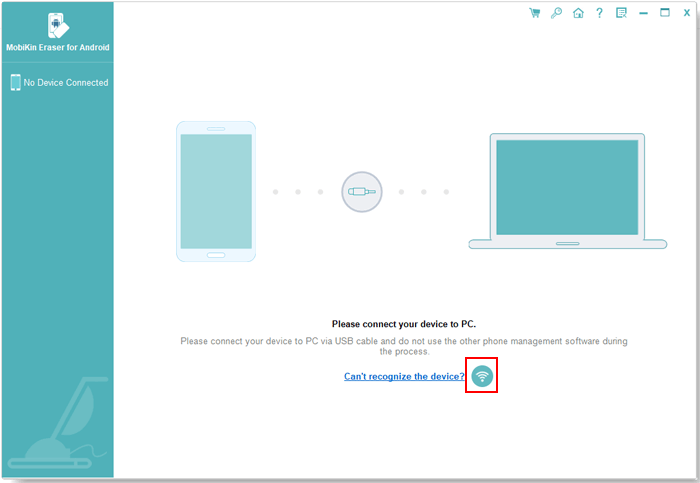
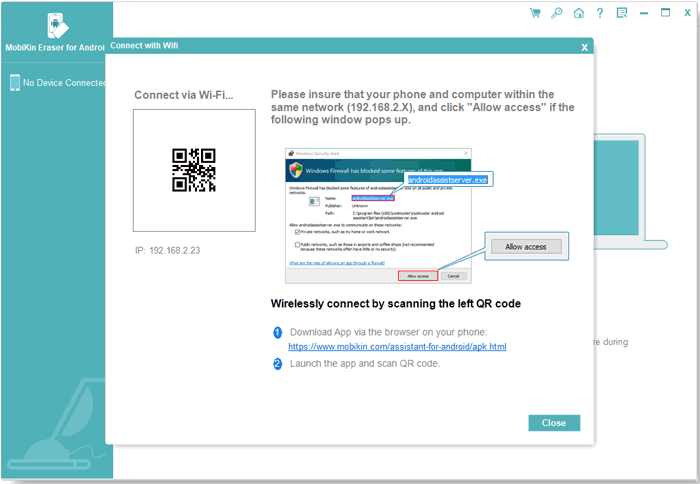
— After that, you will see an interface as below:
4) MobiKin Backup Manager for Android
— Launch the software on your PC and click the blue Wi-Fi icon below.
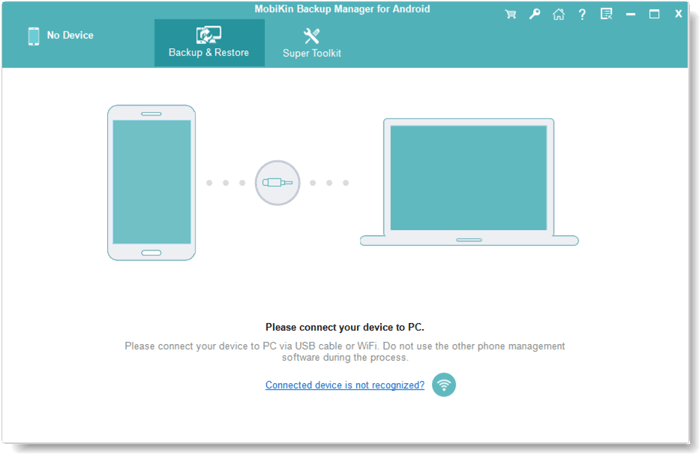
— Then you might see the following interface:
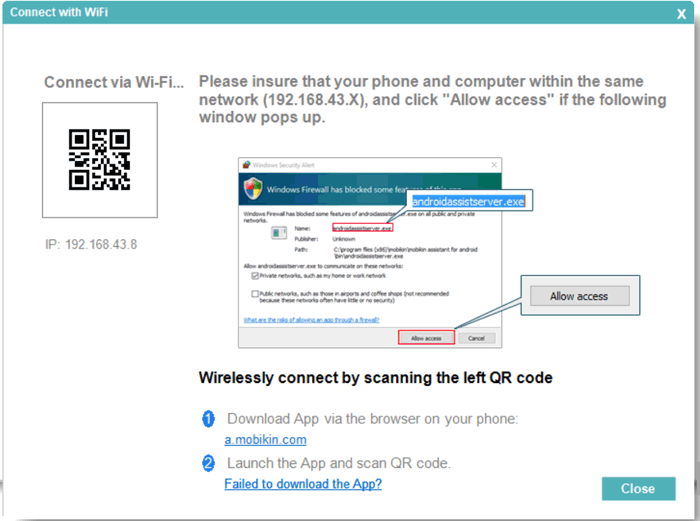
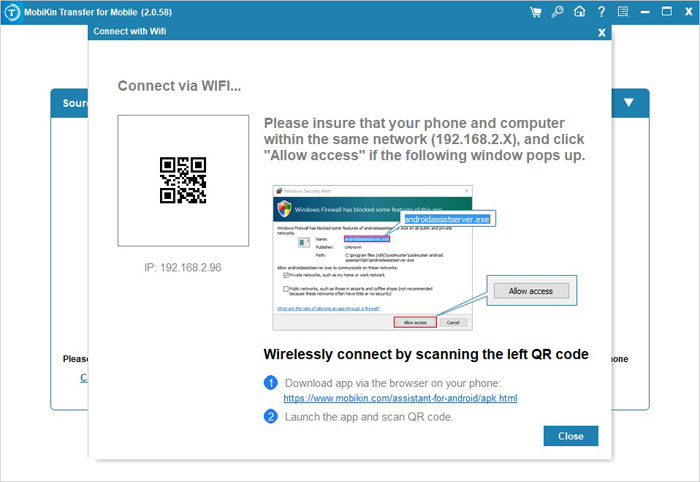
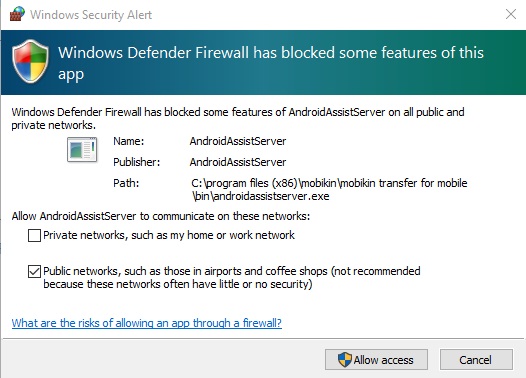
Step Three. Allow the Software to Pass Through the Firewall (On Windows Computer Only)
Supposed that it is your first time to connect mobile phone to the program, a «Windows Security Alert» window may pop up after you click on the «Connect via Wi-Fi» option. When it pops up on your Windows computer, you should tap on «Allow access».
Step Four. Install the Latest Assistant for Android (Android Version) on Your Phone
Now you should download and install the latest Assistant for Android (Android Version) on your Android phone. Here, you have 3 options to download the application on your mobile phone, including:
Option 1. Download the App by scanning the QR code on the right;
Option 2. Input website address in the browser on your phone to download the App: a.mobikin.com;
Option 3. Directly click the link to download the App to your Android phone: https://www.mobikin.com/downloads/MobikinAndroid.apk.
To get the detailed tutorial, you can go to the page «How to Download MobiKin Assistant for Android (Android Version) to Android». After completing the downloading, you can easily install the application on your device.
Please notice that:
— If you have installed the application on your device already, please ensure that you have updated the App to the latest version.
— In order to smoothly install and run the Assistant for Android (Android Version), please make sure there is enough space on your device.
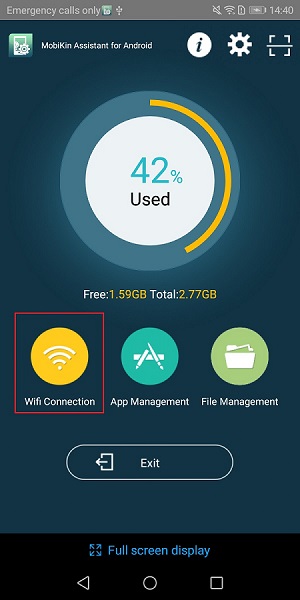
Step Five. Scan the QR Code to Build A Wi-Fi Connection
Then you need to set your Android phone and PC in the same network. Just launch the App and tap on «Wifi Connection» to scan the QR code on the program. When the scanning process is completed, your Android phone and PC would be connected to the same Wi-Fi. And now you can start to manage your phone data.
Only when your mobile phone and PC are set in the same network can you build a connection and use the program successfully.
Ask Our Support Team for Help
Still fail to connect via Wi-Fi? Please go to the page «What to Do If the Program Does Not Recognize My Android Device» to get the solutions or contact us via the email: support@mobikin.com with following information:
— What’s your Android device?
— What’s your Android OS version?
— What’s the operating system of your computer?
— Capture the interface you stop and send the picture to us. (To take a screenshot, Windows users can press «Print Screen SysRq» key on your keyboard and then click on «Start > All Programs > Accessories > Paint > press ctrl + V to paste the screenshot».)
If you have other problems about the software connection, recognition, installation or use, please go to the Product FAQ page to find the solutions.