- How to allow software access to any USB devices?
- 2 Answers 2
- How to Mount USB Drive on Linux
- 1) Plugin Your USB Drive into Your PC
- 2) Detecting the USB Drive on Your PC
- 3) Create a Mount Point
- 4) Creating a Directory in the USB Drive
- 5) Delete a Directory in USB Drive
- 6) Formatting the Mounted USB in Linux
- Conclusion
- About the author
- Zeeman Memon
- Connect USB devices
- Prerequisites
- Install the USBIPD-WIN project
- Install the USBIP tools and hardware database in Linux
- Attach a USB device
How to allow software access to any USB devices?
I have a libusb-based program that can’t open USB devices on a freshly installed Ubuntu because it lacks permissions. This solution will probably work for me, but it requires manually specifying each and every device — and I have quite a few. So I tried this (in a file /etc/udev/rules.d/41-cvs-permissions.rules ):
I’ve omitted VID and PID, hoping that it will simply apply the rule to ALL devices. It definitely has some effect, but the effect is rather weird: instead of detecting 5 devices that it can’t open, libusb only detects 2 now — both are USB host controllers, not actual devices. How to achieve what I want?
IMHO udev is frustratingly opaque and poorly documented: I think you may need to use attribute SUBSYSTEMS (plural) rather than SUBSYSTEM (singular). Someone might be able to give a better analysis if you edit your question to include the output of udevadm info —attribute-walk /dev/xxx where /dev/xxx is the actual devpath of your device.
@steeldriver: I don’t see my device having a /dev/ entry, so I don’t know how to invoke udevadm on it. All I have is bus, dev. number, VID and PID as shown by lsusb (and name).
2 Answers 2
The way I deal with USB devices is to give a specific group access to all of them.
echo 'SUBSYSTEM=="usb", MODE="0660", GROUP="plugdev"' > /etc/udev/rules.d/00-usb-permissions.rules udevadm control --reload-rules Essentially what this does is grant read and write access for any usb device to members of the plugdev group.
Every linux user is a member of at least one, and possibly more groups. So if for instance your username was violetg you could do: sudo usermod -a -G plugdev violetg to add yourself to the plugdev group, which would in turn give you access to usb devices (after logging out and back in again).
I agree that making rule match using VID/PID is not a definite solution. But you can much multiple devices in same rule without targeting blindly all USB devices the way you did. Example using DRIVER name ( usb-storage , usbhid . ) or KERNEL name ( tty* , sd* . ) even using minimal regex ( sd[a-z]9* , usb* ).
You should look for similarities in their attributes.
- Remove all those devices
- Save the current list of devices in /dev
$ colordiff /tmp/dev_list0.txt /tmp/dev_list.txt 85a86,87 > sdc > serial 89a92,93 > sg4 > sg5 93a98 > sr1 194a200,201 > ttyUSB0 > ttyUSB1 udevadm info --attribute-walk --name=/dev/ttyUSB0 Do the same for all devices you want. If you can’t figure out how, please upload their udevadm info —attribute-walk —name=. output and link them to your question.
Note that, not all USB devices create a node in /dev . Some you have look for them in SYSFS tree /sys . Then check their attributes using —path
udevadm info --attribute-walk --path=. Using same steps as above you can check which device nodes created by monitoring udev events:
How to Mount USB Drive on Linux
![]()
We live in the modern age of technology where there are multiple important variables to keep track of. But arguably, the biggest variable today is “data”. With some maturing and emerging technologies, everything is being centered around the quantity and quality of data. Thus, gathering and protecting data has become paramount.
These days, it’s quite common to see people carrying their data around at all times. Different devices and technologies are used for this purpose, including a certain device called USB (Universal Serial Bus).
A USB is an electronic communication protocol (ECP) most commonly used for computer accessories and other small-end electronic devices, either for data transfer or power transfer. Although USBs are being phased out slowly due to technologies such as “Cloud Computing”, there is a sense of privacy and security with using USBs that you don’t get with other methods.
Accessing USBs is straightforward. It is a plug-and-use device, so the stick only needs to be connected to your computer via a USB port. Usually, USBs mount themselves automatically to your system regardless of the operating system, but there are instances where there is a problem, and the USB refuses to connect.
For such times, if you are using a Linux distro, it is best to use the Terminal and execute your way to mount the USB in your computer. This article will be guiding you on how exactly you can achieve this task.
Although it is time-consuming, once you know how to mount a USB in Linux, you will feel lightened, and it will be easier for you to perform it the next time when needed. So follow these instructions to get a proper hang of it.
1) Plugin Your USB Drive into Your PC
First, you need to plug in your USB drive to your Linux-based personal computer (PC), in which you want to access the USB drive.
2) Detecting the USB Drive on Your PC
The second step is the most important and easy step to accomplish. After plugging in your USB to your computer, the system will add a new block device into the /dev/ directory. To check that, use the following command. But first, open your Command Terminal and then type the following command:
The resulting screen should be seen with an output like this:
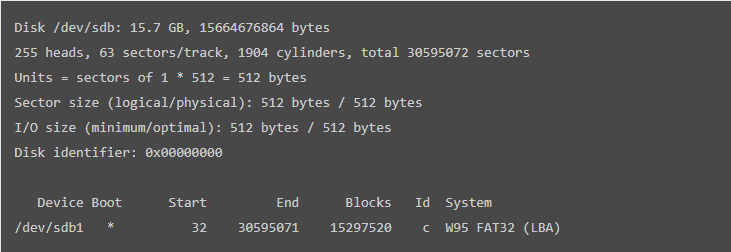
The result above shows that device boot, blocks, id, and system format are displayed. After this step, you need to create a mount point.
3) Create a Mount Point
For creating a mount point, just type the following command:
In the command mentioned above, “sbd1” refers to the name of your USB Device.
4) Creating a Directory in the USB Drive
We move on to the next step. In this step, you must create a directory in the mounted device. For that, use the following command:
The above commands will create a directory named “John” in the USB Drive. You can create the directory of your desired name by replacing it with John. For example.
This command will create a directory in the USB Drive with the name “Google”. After completing this step, you have now successfully mounted the USB drive in your Linux system.
5) Delete a Directory in USB Drive
After learning about creating a Directory on your USB, it’s time to learn about how you can delete a directory on your USB Drive. To delete a directory, write the following command.
The above-mentioned command will delete the drive named as “John”. But if you want to delete a directory with your desired name, just replace it with “John”. For example.
The above code deletes the directory named “Google”. Similarly, you can write any of your desired names to delete a directory on your USB Drive on a Linux-operated computer.
6) Formatting the Mounted USB in Linux
In order to format a USB Flash Drive, you need to unmount the drive first. Use the following command to unmount the USB.
In the aforementioned command, “sbd1” refers to the name of your USB Device. Next, you have to choose either of the following codes as per your USB Drive file systems:
For VFAT (FAT32) File System
To format VFAT (FAT32) file system, use:
In the command mentioned above, “sbd1” refers to the name of your USB Device.
For NTFS File System
To format NTFS file system USB Drive, use:
For EXT4 File System
For formatting EXT4 file system USB Drive, use:
Conclusion
This guide covered how to mount a USB drive in your Linux system. It also described the commands you can use to delete directories or format your USB device. We hope that we can help you out and that you can use your USB with your Linux without any problems.
About the author
Zeeman Memon
Hi there! I’m a Software Engineer who loves to write about tech. You can reach out to me on LinkedIn.
Connect USB devices
This guide will walk through the steps necessary to connect a USB device to a Linux distribution running on WSL 2 using the USB/IP open-source project, usbipd-win.
Setting up the USB/IP project on your Windows machine will enable common developer USB scenarios like flashing an Arduino or accessing a smartcard reader.
Prerequisites
- Running Windows 11 (Build 22000 or later). (Windows 10 support is possible, see note below).
- A machine with an x64/x86 processor is required. (Arm64 is currently not supported with usbipd-win).
- Linux distribution installed and set to WSL 2.
- Running Linux kernel 5.10.60.1 or later.
To check your Windows version and build number, select Windows logo key + R, type winver, select OK. You can update to the latest Windows version by selecting Start > Settings > Windows Update > Check for updates. To check your Linux kernel version, open your Linux distribution and enter the command: uname -a . To manually update to the latest kernel, open PowerShell and enter the command: ‘wsl —update`.
Windows 11 is recommended for connecting USB devices to a Linux distribution running on WSL 2. However, Windows 10 can be used to connect USB devices by building your own USBIP enabled WSL 2 kernel following the instructions in the USBIPD-WIN project repo.
Install the USBIPD-WIN project
Support for connecting USB devices is not natively available in WSL, so you will need to install the open-source usbipd-win project.
- Go to the latest release page for the usbipd-win project.
- Select the .msi file, which will download the installer. (You may get a warning asking you to confirm that you trust this download).
- Run the downloaded usbipd-win_x.msi installer file.
Alternatively, you can also install the usbipd-win project using Windows Package Manager (winget). If you have already installed winget, just use the command: winget install —interactive —exact dorssel.usbipd-win to install usbipd-win. If you leave out —interactive, winget may immediately restart your computer if that is required to install the drivers.
- A service called usbipd (display name: USBIP Device Host). You can check the status of this service using the Services app from Windows.
- A command line tool usbipd . The location of this tool will be added to the PATH environment variable.
- A firewall rule called usbipd to allow all local subnets to connect to the service. You can modify this firewall rule to fine tune access control.
Install the USBIP tools and hardware database in Linux
Once the USB/IP project has completed installing, you will need to install the user space tools and a database of USB hardware identifiers. These instructions are for Ubuntu — other distributions may require a different usbip client package.
On Ubuntu, run this command:
sudo apt install linux-tools-generic hwdata sudo update-alternatives --install /usr/local/bin/usbip usbip /usr/lib/linux-tools/*-generic/usbip 20 At this point a service is running on Windows to share USB devices, and the necessary tools are installed in WSL to attach to shared devices.
Attach a USB device
Before attaching your USB device, ensure that a WSL command line is open. This will keep the WSL 2 lightweight VM active.
- List all of the USB devices connected to Windows by opening PowerShell in administrator mode and entering the command:
To learn more about how this works, see the Windows Command Line Blog and the usbipd-win repo on GitHub.