Acronis boot disk linux
To create a Linux-based bootable media
- Start the Bootable Media Builder either from the management console, by selecting Tools > Create Bootable Media , or as a separate component.
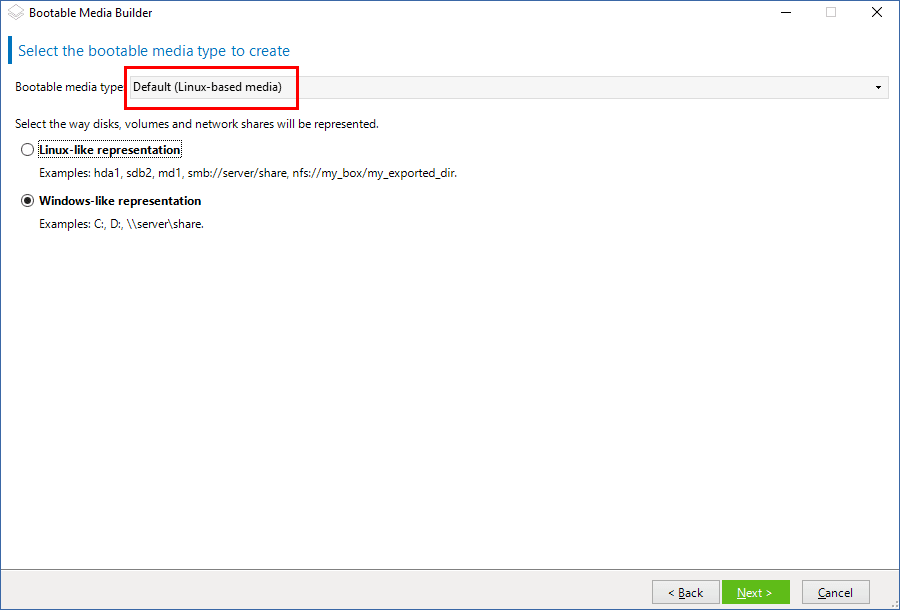
- Select Bootable media type: Default (Linux-based media) . Select the way volumes and network resources will be handled—called the media style:
- A media with Linux-style volume handling displays the volumes as, for example, hda1 and sdb2. It tries to reconstruct MD devices and logical (LVM) volumes before starting a recovery.
- A media with Windows-style volume handling displays the volumes as, for example, C: and D:. It provides access to dynamic (LDM) volumes.
- Follow the wizard steps to specify the following:
- [Optional] The parameters of the Linux kernel. Separate multiple parameters with spaces. For example, to be able to select a display mode for the bootable agent each time the media starts, type: vga=ask For a list of parameters, see Kernel parameters.
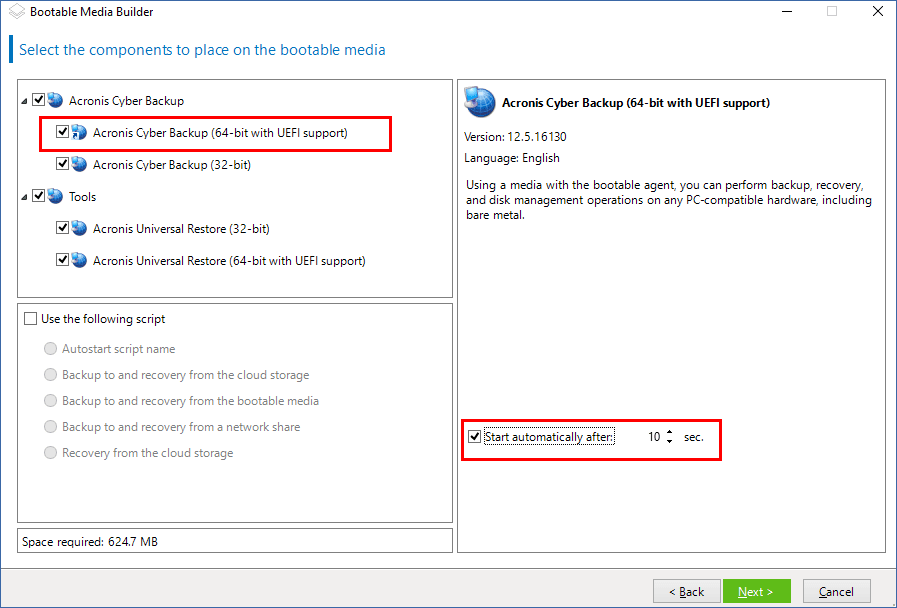
- The Acronis bootable components to be placed on the media. You can select 32-bit and/or 64-bit components. The 32-bit components can work on 64-bit hardware. However, you need 64-bit components to boot a machine that uses Unified Extensible Firmware Interface (UEFI). To use the media on different types of hardware, select both types of components. When booting a machine from the resulting media, you will be able to select 32-bit or 64-bit components on the boot menu.
- [Optional] The timeout interval for the boot menu plus the component that will automatically start on timeout.
- If not configured, the Acronis loader waits for someone to select whether to boot the operating system (if present) or the Acronis component.
- If you set, say, 10 sec. for the bootable agent, the agent will launch 10 seconds after the menu is displayed. This enables unattended onsite operation when booting from a PXE server or WDS/RIS.
- [Optional] Remote logon settings:
- User name and password to be entered on the console side at the connection to the agent. If you leave these boxes empty, the connection will be enabled without specifying credentials.
- [Optional] Network settings:
- TCP/IP settings to be assigned to the machine network adapters.
- [Optional] Network port:
- The TCP port that the bootable agent listens for incoming connection.
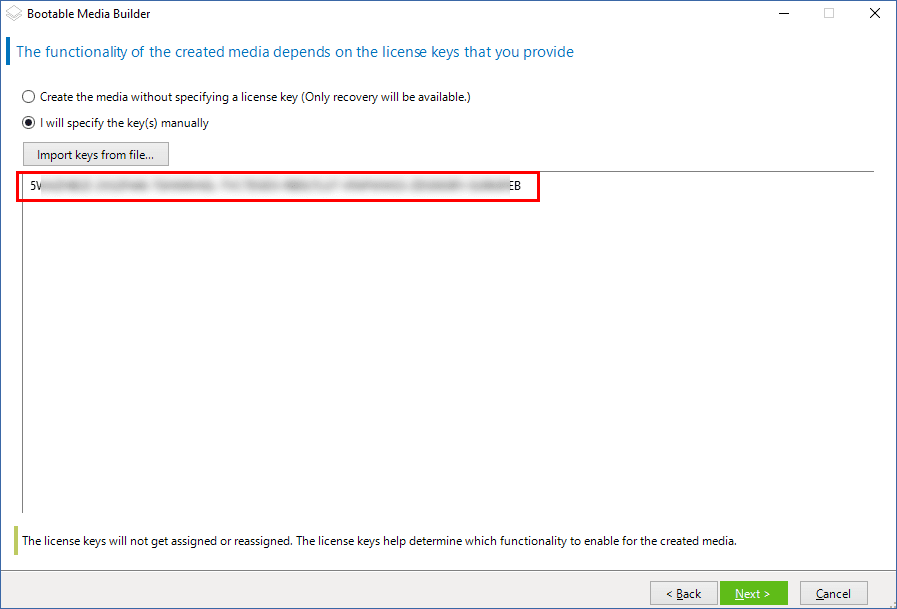
- Licenses to be used: If Agent for Windows or Agent for Linux is not installed on the machine, specify the license key or the license server with licenses. The licenses will not get assigned or reassigned. They determine which functionality to enable for the created media. Without a license, you can create media only for recovery from the cloud storage. If Agent for Windows or Agent for Linux is installed on the machine, the media inherits its functionality.
- The type of media to create. You can:
- Create CD, DVD or other bootable media such as removable USB flash drives if the hardware BIOS allows for boot from such media
- Build an ISO image of a bootable disc to burn it later on a blank disc
- Upload the selected components to Acronis PXE Server
- Upload the selected components to a WDS/RIS.
- Path to the media ISO file or the name or IP and credentials for PXE or WDS/RIS.
Загрузочные носители на основе Linux

- Запустите мастер создания загрузочных носителей .
- Чтобы создать полнофункциональный загрузочный носитель, укажите лицензионный ключ Acronis Cyber Backup . Этот ключ используется для определения функций, которые будут представлены на загрузочном носителе. Лицензии не будут отзываться.
Если не указать лицензионный ключ, полученный загрузочный носитель можно использовать только для операций восстановления и доступа к Acronis Universal Restore. - Выберите Тип загрузочного носителя: По умолчанию (носители на основе Linux) . Выберите способ представления томов и сетевых ресурсов:
- На носителе с представлением томов по типу Linux тома отображаются как, например, hda1 и sdb2. Перед началом восстановления предпринимается попытка реконструировать MD-устройства и LVM (диспетчер логических томов).
- На носителе с представлением томов по типу Windows тома отображаются как, например, C: и D:. Он обеспечивает ��оступ к динамическим томам (LDM).
- Укажите параметры ядра Linux. Несколько параметров разделяются пробелами. Например, чтобы включить выбор режима дисплея для загрузочного агента при каждом запуске носителя, введите: vga=ask Дополнительную информацию о доступных параметрах см. в разделе Параметры ядра.
- Выберите язык, который будет использоваться в загрузочном носителе.
- Выберите компоненты, которые будут размещены на носителе: загрузочный агент Acronis Cyber Backup и (или) Universal Restore, если вы планируете восстанавливать систему на отличающееся оборудование. Загрузочный агент позволяет выполнить операции резервного копирования, восстановления и управления дисками на любом ПК-совместимом оборудовании, включая «голое железо». Universal Restore позволяет загружать операционную систему, восстановленную на отличающееся оборудование или на виртуальную машину. Этот инструмент находит и устанавливает драйверы для устройств, необходимых для запуска операционной системы, таких как контроллеры памяти, системная плата или набор микросхем.
- Укажите время ожидания для меню загрузки и компонент, который будет автоматически запускаться по истечении этого времени. Для этого щелкните нужный компонент в левой верхней панели, и задайте интервал для него. Это позволяет автоматически выполнять операции на рабочем месте при загрузке из WDS или RIS.
Если эта настройка не задана, загрузчик ждет пока вы выберите, загружать ли операционную систему (если есть) или компонент. - Чтобы автоматизировать операции загрузочного агента, установите флажок Использовать следующий сценарий . Затем выберите один из сценариев и задайте его параметры.
- Выберите способ регистрации носителя на сервере управления при загрузке. Дополнительную информацию о настройках регистрации см. в разделе Сервер управления.
- Укажите сетевые параметры: Настройки TCP/IP для назначения сетевым адаптерам машины.
- Укажите сетевой порт: TCP-порт, который прослушивается загрузочным агентом для приема входящих подключений.
- Если в сети включен прокси-сервер, укажите его имя хоста или IP-адрес и порт.
- Выберите тип носителя. Можно сделать следующее:
- Создайте ISO-образ. Затем можно записать его на CD/DVD-диск, использовать для создания загрузочного флэш-накопителя USB или подключить его к виртуальной машине.
- Создайте ZIP-файл.
- Передать выбранные компоненты на PXE-сервер Acronis .
- Загрузить выбранные компоненты на WDS/RIS.
- Добавьте системные драйверы Windows для использования компонентом Universal Restore. Это окно отображается в том случае, если компонент Universal Restore добавлен на носитель и выбран носитель, отличный от WDS и RIS.
- При необходимости укажите имя хоста или IP-адрес и учетные данные для WDS или RIS либо путь к ISO-файлу носителя.
- Проверьте настройки в итоговом окне и щелкните Приступить .

Дата последней сборки: 6 марта 2023 г.
Веб-справка по Acronis Cyber Protect 15 Обновление 6 . © Acronis International GmbH, 2003-2023
Acronis boot disk linux
To create a Linux-based bootable media
- Start the Bootable Media Builder either from the management console, by selecting Tools > Create Bootable Media , or as a separate component.
- If Agent for Windows or Agent for Linux is not installed on the machine, specify the license key or the license server with licenses. The licenses will not get assigned or reassigned. They determine which functionality to enable for the created media. Without a license, you can create media only for recovery from the online backup storage. If Agent for Windows or Agent for Linux is installed on the machine, the media inherits its functionality, including Universal Restore and deduplication.
- Select Bootable media type: Default (Linux-based media) . Select the way volumes and network resources will be handled—called the media style:
- A media with Linux-style volume handling displays the volumes as, for example, hda1 and sdb2. It tries to reconstruct MD devices and logical (LVM) volumes before starting a recovery.
- A media with Windows-style volume handling displays the volumes as, for example, C: and D:. It provides access to dynamic (LDM) volumes.
- Follow the wizard steps to specify the following:
- [Optional] The parameters of the Linux kernel. Separate multiple parameters with spaces. For example, to be able to select a display mode for the bootable agent each time the media starts, type: vga=ask For a list of parameters, see Kernel parameters.
- The Acronis bootable components to be placed on the media. You can select 32-bit and/or 64-bit components. The 32-bit components can work on 64-bit hardware. However, you need 64-bit components to boot a machine that uses Unified Extensible Firmware Interface (UEFI). To use the media on different types of hardware, select both types of components. When booting a machine from the resulting media, you will be able to select 32-bit or 64-bit components on the boot menu.
- [Optional] The timeout interval for the boot menu plus the component that will automatically start on timeout.
- If not configured, the Acronis loader waits for someone to select whether to boot the operating system (if present) or the Acronis component.
- If you set, say, 10 sec. for the bootable agent, the agent will launch 10 seconds after the menu is displayed. This enables unattended onsite operation when booting from a PXE server or WDS/RIS.
- [Optional] Remote logon settings:
- User name and password to be entered on the console side at the connection to the agent. If you leave these boxes empty, the connection will be enabled without specifying credentials.
- [Optional] Network settings:
- TCP/IP settings to be assigned to the machine network adapters.
- [Optional] Network port:
- The TCP port that the bootable agent listens for incoming connection.
- The type of media to create. You can:
- Create CD, DVD or other bootable media such as removable USB flash drives if the hardware BIOS allows for boot from such media
- Build an ISO image of a bootable disc to burn it later on a blank disc
- Upload the selected components to Acronis PXE Server
- Upload the selected components to a WDS/RIS.
- [Optional] Windows system drivers to be used by Acronis Universal Restore. This window appears only if the Acronis Universal Restore add-on is installed and a media other than PXE or WDS/RIS is selected.
- Path to the media ISO file or the name or IP and credentials for PXE or WDS/RIS.