- Wi-Fi WAP2 EAP Active Directory
- Настройка на MikroTik:
- Настройка nps.msc
- Создание сертификата
- UPD 04/04/2021
- How to Integrate FreeRADIUS with Active Directory [Step-by-Step]
- FreeRADIUS: Active Directory Integration and PEAP-MschapV2 with Dynamic Vlan Assignment
- Integrate FreeRADIUS with Active Directory
- Configure FreeRADIUS
- Testing PEAP-MschapV2 with an Android device
- Final thoughts
- Инструкции по настройке MikroTik
- Что такое Radius сервер
- Как работает Radius сервер в MikroTik
- Настройка Radius сервера на домене Windows Server 2019
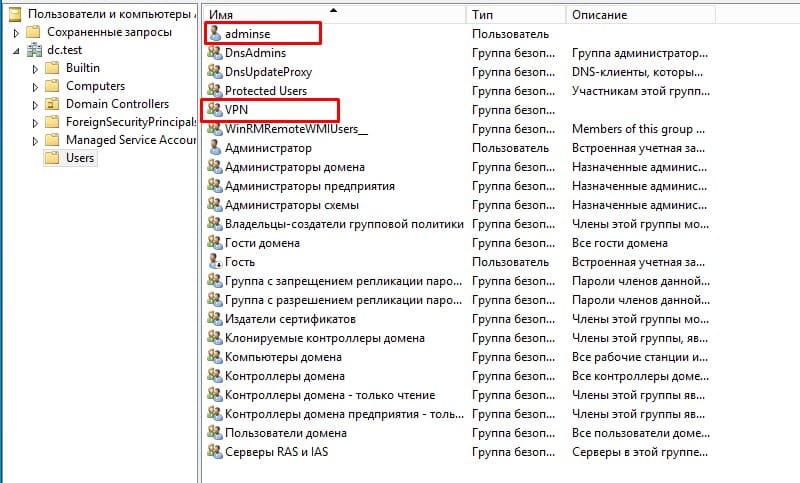
- Добавление тестового пользователя в группу доступа VPN
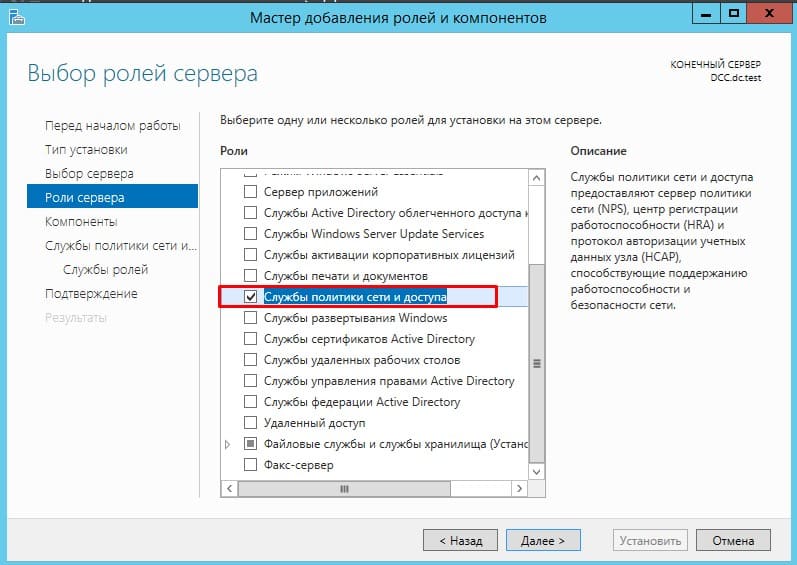
- Добавить новую роль на Widnows Server 2019
- Выбрать “Служба политики сети и доступа”
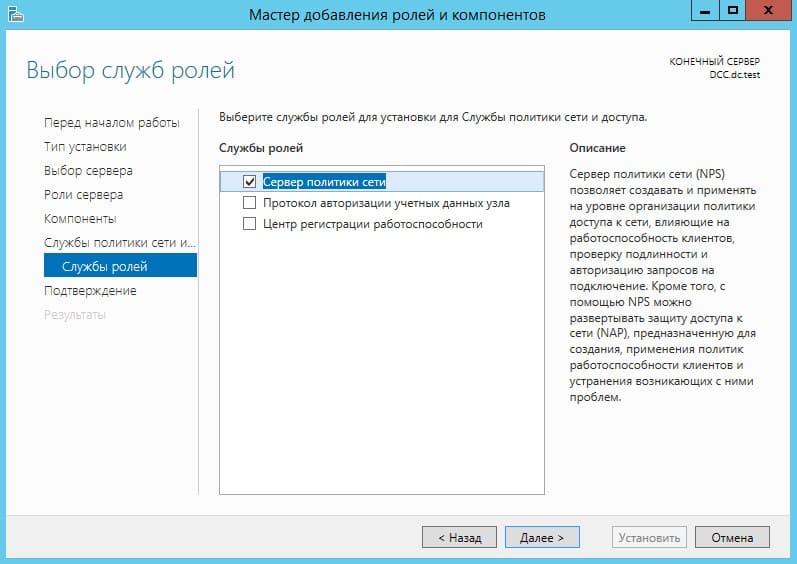
- Контроль выбора “Сервер политики сети”
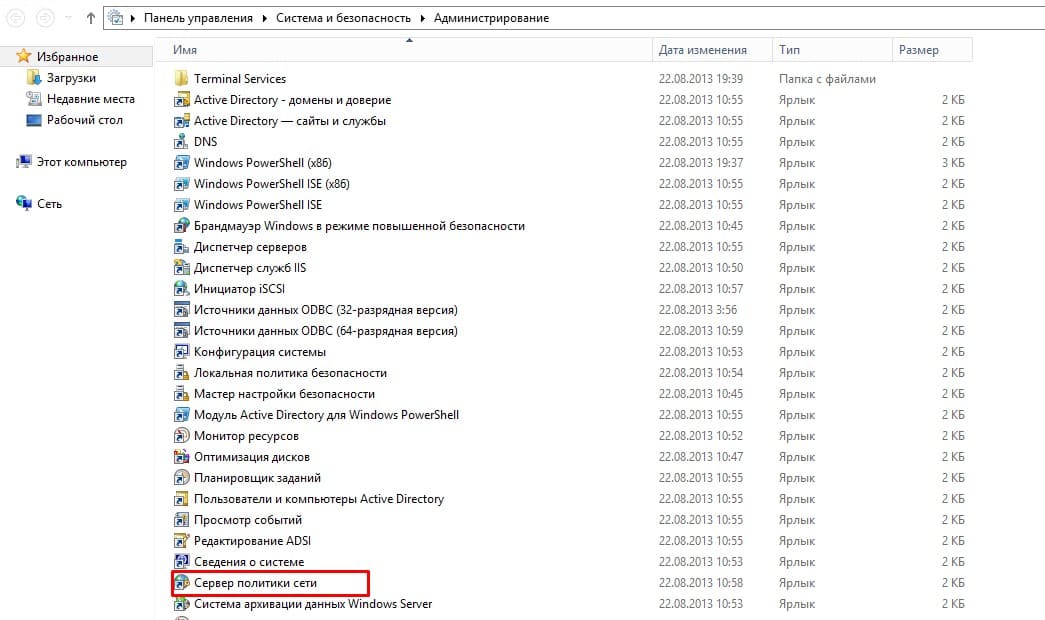
- Запуск “Сервер политики сети”
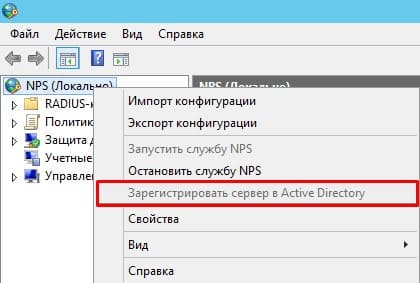
- Регистрация Radius сервера в Active Directory
- Добавление Radius клиента(маршрутизатора MikroTik)
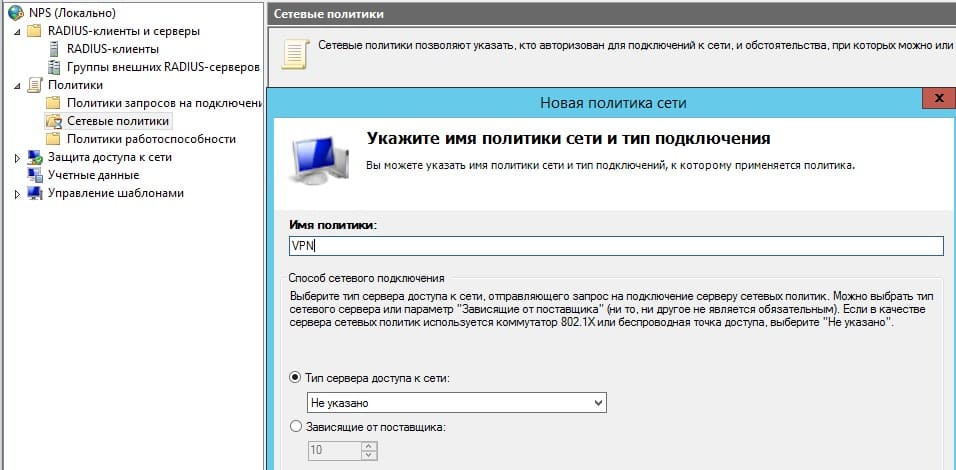
- Создание сетевой политики
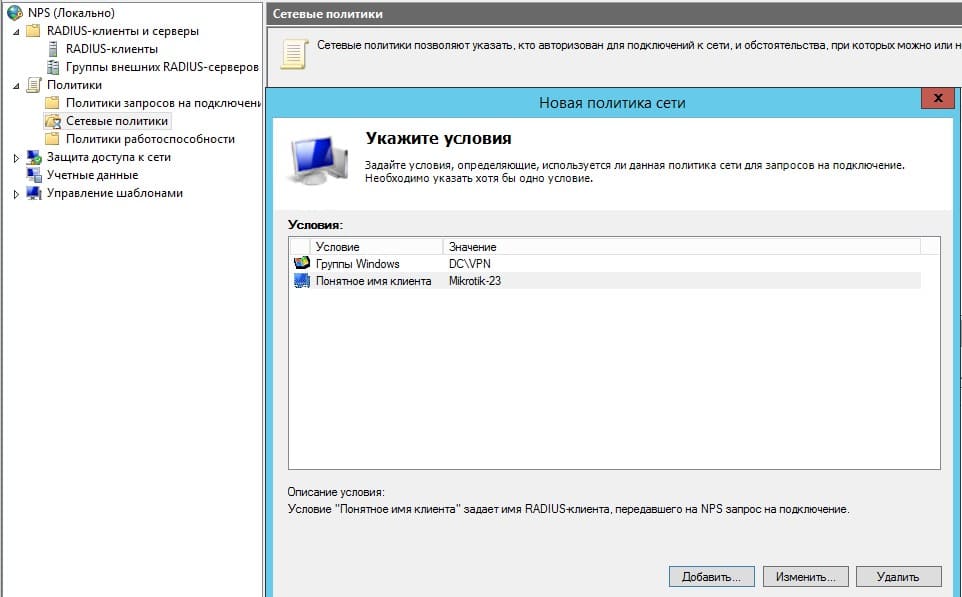
- Определение Radius клиента и группы доступа в Active Directory
- Следующие настройки можно оставить без изменений
- Обозначить тип удаленного доступа как VPN
- Проконтролировать присутствие стандарта PPP
- Настройка брандмауэра Windows для работы Radius сервера
- Настройка MikroTik Radius, вход для VPN L2Tp клиентов(домен Active Directory)
- Активация использования Radius авторизации
- Добавление записи для авторизации на Radius сервере
- Пробное подключение VPN клиента
- Не работает MikroTik SSTP при подключении к Radius
- adminse
- 7 комментариев к статье “Настройка MikroTik Radius, авторизация VPN через Windows Active Directory”
Wi-Fi WAP2 EAP Active Directory
В корпоративной среде более правильным будет индивидуальная авторизация по доменному логину и паролю. Это позволяет обезопасить сеть от уволившихся сотрудников и следить кто подключается. Ведь у каждого свои учетные данные!
Для начала нужен контроллер домена с установленной службой Network Policy Server (NPS). Как его ставить есть много материалов.
Настройка на MikroTik:

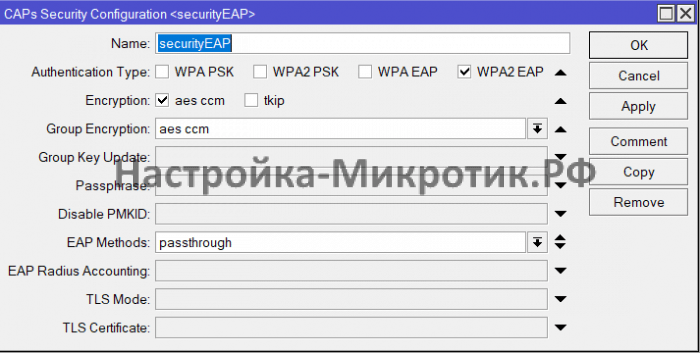
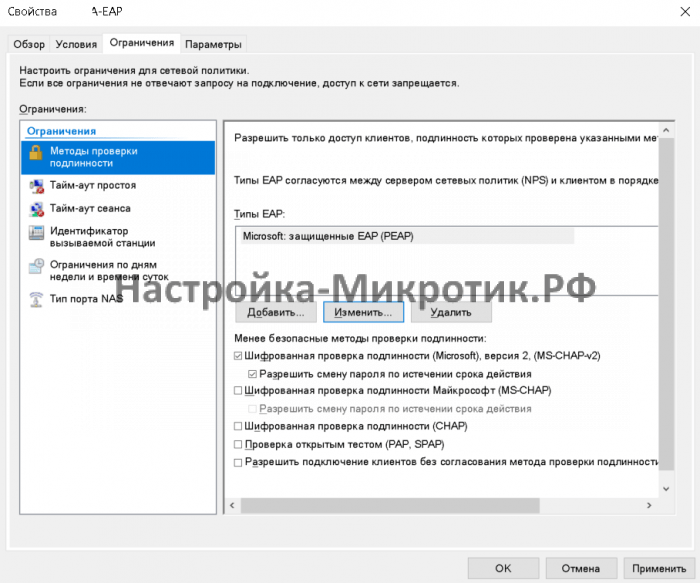
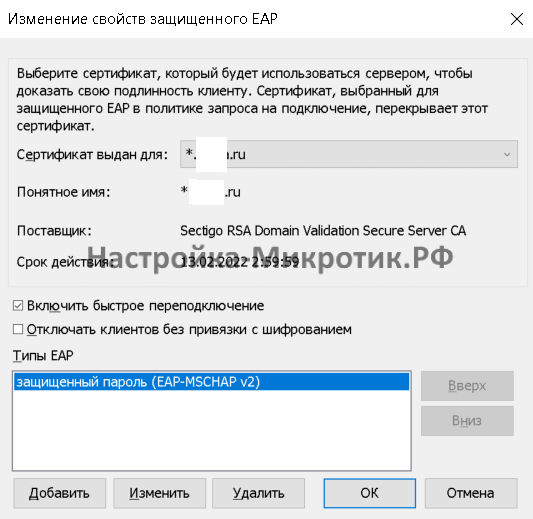
Настройка nps.msc
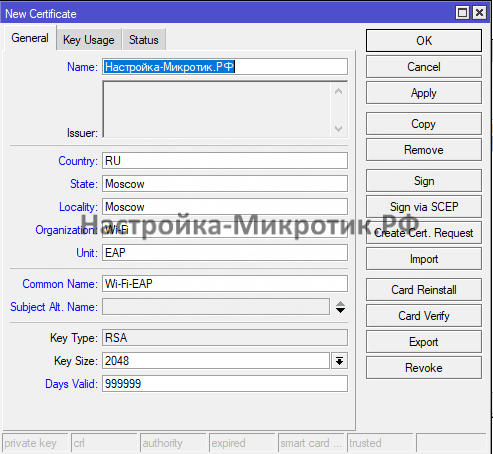
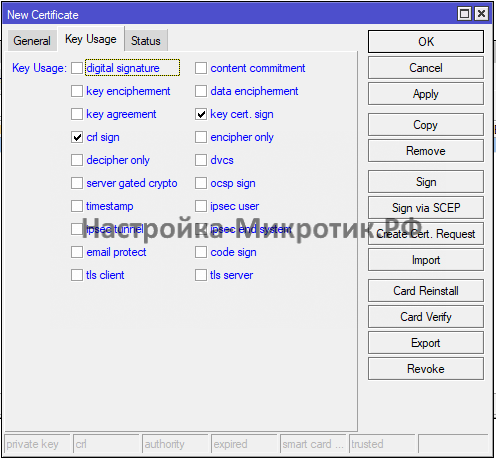
Создание сертификата

После этого экспортируем сертификат
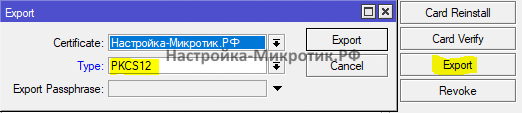
Теперь его можно использовать в Windows Server NPS
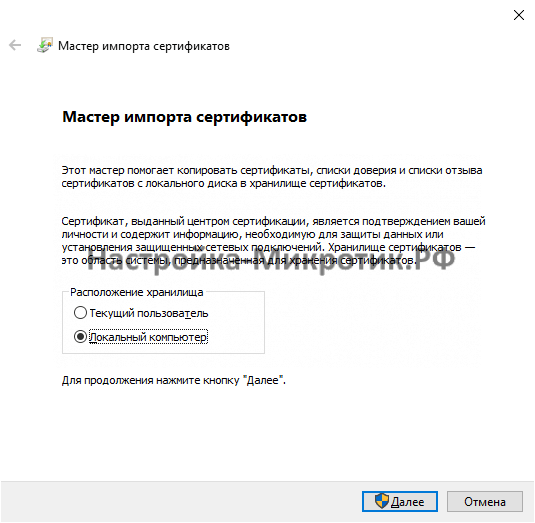
Далее устанавливаем данный сертификат во все наши устройства. Именно сертификат crt без закрытого ключа.
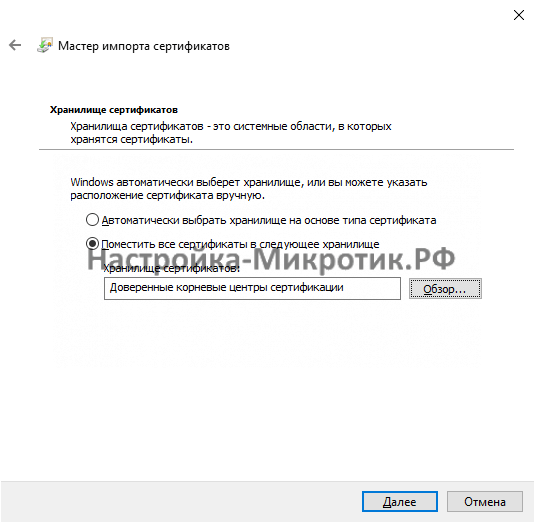
Теперь Windows устройства смогут подключиться к Wi-Fi EAP сети
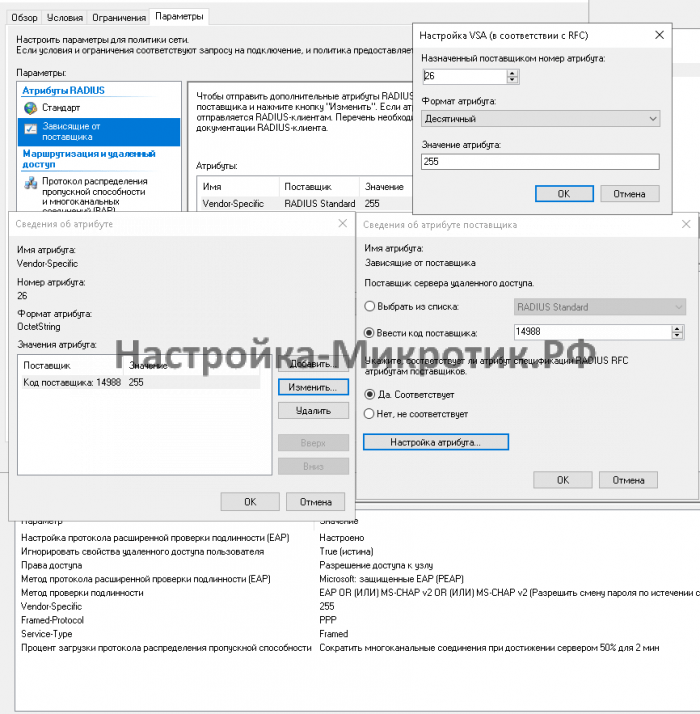
UPD 04/04/2021
Настройка назначения vlan:
Если не удается правильно настроить NPS, свяжитесь со мной, пришлю экспорт настроек.
How to Integrate FreeRADIUS with Active Directory [Step-by-Step]
FreeRADIUS: Active Directory Integration and PEAP-MschapV2 with Dynamic Vlan Assignment
We will setup authentication and authorization for a wireless network that can be used for a large organization, ensuring network users are able to securely authenticate to the network. Here’s what you’ll need:
- A FreeRADIUS Server
- A Domain Controller
- A Wireless Controller
- An Access Point (AP)
- Some Clients with Different Operating System
The clients will be classified depend on device type (Android, iPhone, Windows) and assigned to different vlans after being authenticated. We will use Protected Extensible Authentication Protocol (PEAP) with Mschapv2. My network topology will look like below.
![How to Integrate FreeRADIUS with Active Directory [Step-by-Step]](https://www.golinuxcloud.com/wp-content/uploads/wireshark-276.png)
Following table shows the device type and the vlans they will be assigned.
Integrate FreeRADIUS with Active Directory
Mschapv2 is a challenge-response based authentication protocol. Since it does not support sending client credentials in complete clear text, we will not be able to use LDAP database in Active Directory for authentication. There can be a workaround but, we will not cover that scenario in this article. Instead, we will use Active Directory integration which supports Mschapv2 authentication. We will use Samba server ant it’s utilities to join the Active Directory.
Followings steps show Samba installation and the other required tools.
Step-1: A fully qualified domain name (FQDN) must be defined. Open » /etc/hosts » file in your preferred text editor and add localhost IP address, FQDN and hostname respectively as below.
root@freeradius:/home/celal# nano /etc/hosts
My configuration is below.
![How to Integrate FreeRADIUS with Active Directory [Step-by-Step]](https://www.golinuxcloud.com/wp-content/uploads/wireshark-277.png)
Step-2: Verify the hostname and FQDN with the commands below.
root@freeradius:/home/celal# hostname freeradius root@freeradius:/home/celal# hostname -f freeradius.mydomain.com
Step-3: Update package information from all the configured sources.
root@freeradius:/home/celal# apt-get update
Step-4: Install the required packages with the command below.
root@freeradius:/home/celal# apt-get install samba winbind libnss-winbind krb5-user
During the installation, the window below will appear. Enter your domain name and click «OK«.
![How to Integrate FreeRADIUS with Active Directory [Step-by-Step]](https://www.golinuxcloud.com/wp-content/uploads/wireshark-278.png)
Enter your Domain Controllers FQDN. If you have more than one, then separate them with a space.
![How to Integrate FreeRADIUS with Active Directory [Step-by-Step]](https://www.golinuxcloud.com/wp-content/uploads/wireshark-279.png)
Enter the administrative server FQDN and click «OK«.
![How to Integrate FreeRADIUS with Active Directory [Step-by-Step]](https://www.golinuxcloud.com/wp-content/uploads/wireshark-280.png)
Step-5: After the installation, we need to configure Samba server. Open » /etc/samba/smb.conf » file with your preferred text editor and modify it the way it suits you. Mine is below.
root@freeradius:/home/celal# nano /etc/samba/smb.conf [global] workgroup = MYDOMAIN security = ads winbind use default domain = yes realm = MYDOMAIN.COM password server = mydc1.mydomain.com
Step-6: Although we configured Kerberos in step 4, we need to add more config. Open » /etc/krb5.conf » and modify it as below.
root@freeradius:/home/celal# nano /etc/krb5.conf [libdefaults] default_realm = MYDOMAIN.COM [realms] MYDOMAIN.COM = < kdc = mydc1.mydomain.com kdc = mydc2.mydomain.com admin_server = mydc1.mydomain.com >[domain_realm] .mydomain.com = MYDOMAIN.COM mydomain.com = MYDOMAIN.COM
Step-7: Now that we have installed and configured Samba server and Kerberos authentication, we need to join the Active Directory. Remember that when you join a windows client to an Active Directory, you must have an administrator account. Before joining the Active Directory, you provide your credentials. For Ubuntu, we will use «kinit» tool to obtain and cache Kerberos ticket-granting ticket then join the AD.
root@freeradius:/home/celal# kinit Administrator Password for Administrator@MYDOMAIN.COM:
Following output shows Kerberos obtaining ticket-granting ticket in packet level.
![How to Integrate FreeRADIUS with Active Directory [Step-by-Step]](https://www.golinuxcloud.com/wp-content/uploads/wireshark-281.png)
Join the Active Directory with command below.
root@freeradius:/home/celal# net ads -k join
Following figure shows joining the Active Directory in the packet level.
![How to Integrate FreeRADIUS with Active Directory [Step-by-Step]](https://www.golinuxcloud.com/wp-content/uploads/wireshark-282.png)
Step-8: Restart the services as below.
root@freeradius:/home/celal# service smbd restart root@freeradius:/home/celal# service nmbd restart root@freeradius:/home/celal# service winbind restart
Step-9: At this point, we have joined the Active Directory and will confirm if New Technology LAN Manager (NTLM) authentication works. FreeRADIUS uses «ntlm_auth» tool to allow external access to Winbind’s NTLM authentication function. Apply the command below to confirm if NTLM authentication works.
root@freeradius:/home/celal# ntlm_auth --request-nt-key --domain=mydomain.com --username=administrator --password=mypassword NT_STATUS_OK: The operation completed successfully. (0x0) root@freeradius:/home/celal# When the authentication is successful, it returns 0 (zero). Following screenshot shows that the ntlm authentication has made over Remote Procedure Call (RPC), which is a Microsoft proprietary protocol.
![How to Integrate FreeRADIUS with Active Directory [Step-by-Step]](https://www.golinuxcloud.com/wp-content/uploads/wireshark-283.png)
Configure FreeRADIUS
I assume that you have already installed FreeRADIUS. If not, please visit here (FreeRADIUS Installing and Configuring (Part 1)).
Step-1: The «default» virtual server contains too much settings. Thus, I will remove it and create my own simple server.
root@freeradius:/home/celal# rm /etc/freeradius/3.0/sites-enabled/default
Step-2: My Aruba testing wireless controller are able to classify a client based on its Operating System. It sends device type in an » Access-Request » packet, using » Aruba-Device-Type » vendor specific attribute. After authenticating the user, I use this attribute to distinguish the clients from each other, then I assign them the vlan accordingly with » post-auth » block. FreeRADIUS comes with many vendor specific dictionaries. They are stored in » /usr/share/freeradius/ » directory. If there is currently no dictionary for your vendor, you can create a new one in the directory. Change the configuration below to suit your needs.
root@freeradius:/home/celal# nano /etc/freeradius/3.0/sites-enabled/my_server server my_server < listen < ipaddr = * port = 1812 type = auth >authorize < preprocess mschap suffix eap files >authenticate < Auth-Type MS-CHAP < mschap >eap > post-auth < if (Aruba-Device-Type == "Android") < update reply < Reply-Message := "you are an Android" Tunnel-Type = 13, Tunnel-Medium-Type = 6, Tunnel-Private-Group-Id = "100" >> if (Aruba-Device-Type == "iPhone") < update reply < Reply-Message := "you are an iPhone" Tunnel-Type = 13, Tunnel-Medium-Type = 6, Tunnel-Private-Group-Id = "101" >> if (Aruba-Device-Type == "Win 10") < update reply < Reply-Message := "you are a windows" Tunnel-Type = 13, Tunnel-Medium-Type = 6, Tunnel-Private-Group-Id = "102" >> > >
Step-3: Define a RADIUS client in » /etc/freeradius/3.0/clients.conf » file.
client Wireless_Controller
Step-4: Change «default_eap_type» to «peap«. Some legacy clients may not support TLS version 1.2, so make the changes as you need. I commented out (disabled) some settings, and modified the TLS min and max values. Open «eap» module and follow below.
root@freeradius:/home/celal# nano /etc/freeradius/3.0/mods-available/eap eap < default_eap_type = peap --- --- --- tls-config tls-common < # disable_tlsv1_1 = yes # disable_tlsv1 = yes tls_min_version = "1.0" tls_max_version = "1.2" >>
Step-5: Open «mschap» module and configure it as below. FreeRADIUS will use an external program called «ntlm_auth» to authenticate the users.
nano /etc/freeradius/3.0/mods-available/mschap mschap < use_mppe = yes require_encryption = yes require_strong = yes ntlm_auth = "/usr/bin/ntlm_auth --request-nt-key --username=%:-%:-None>> --challenge=%:-00> --nt-response=%:-00>" >
Step-6: Add «freerad» user to «winbindd_priv» group which will be able to reach «winbind» program.
root@freeradius:/home/celal# usermod -a -G winbindd_priv freerad root@freeradius:/home/celal# chown root:winbindd_priv /var/lib/samba/winbindd_privileged/
Testing PEAP-MschapV2 with an Android device
I will connect my Service Set Identifier (SSID) using an Android device. During the authentication, I captured RADIUS packets between the wireless controller and FreeRADIUS. Because of most of packets are encrypted with TLS, I will omit them. Here is below the «Access-Request» packet.
![How to Integrate FreeRADIUS with Active Directory [Step-by-Step]](https://www.golinuxcloud.com/wp-content/uploads/wireshark-284.png)
As you see in the screenshot above, the wireless controller sends «Aruba-Device-Type» vendor specific attribute with value of «Android». After authentication, this attribute will be used in the policy to decide to which vlan a user will be assigned. Following shows the last RADIUS packet (Access-Accept).
![How to Integrate FreeRADIUS with Active Directory [Step-by-Step]](https://www.golinuxcloud.com/wp-content/uploads/wireshark-285.png)
The FreeRADIUS server insert vlan information (in this case vlan 100), Wi-Fi Protected Access (WPA) encryption and decryption keys into the «Access-Accept» packet. The wireless controller receives the packet and apply the policy accordingly, then it conveys the encryption and decryption keys to the Access Point (AP).
Final thoughts
FreeRADIUS can be integrated into many systems. Active Directory is just one of them. With a simple configuration, you can have a RADIUS integrated into Active Directory.
Didn’t find what you were looking for? Perform a quick search across GoLinuxCloud
If my articles on GoLinuxCloud has helped you, kindly consider buying me a coffee as a token of appreciation.

For any other feedbacks or questions you can either use the comments section or contact me form.
Thank You for your support!!
Инструкции по настройке MikroTik

Одним из существенным преимуществ Windows Server является наличие такой роли как Active Directory. И каждая интеграция этой службы с корпоративной инфраструктурой не только делает удобным общее использование(одна учётная запись), но и безопасным. Стоит отключить учётную запись со стороны Windows Server, у пользователя закроется доступ к: терминальному серверу, 1С, VPN, корпоративному сайту(Bitrix) и даже WiFi.

Что такое Radius сервер
Radius сервер это служба в Windows Server, которая выступает посредником между сетевым оборудованием(и другими клиентами) и Active Directory. Настройки данной службы содержат описание доступов и общие характеристики конкретной службы. В рассматриваемом примере это протокол PPP, под которым будут работать PPTP и L2TP клиенты.
RADIUS — протокол для реализации аутентификации, авторизации и сбора сведений об использованных ресурсах, разработанный для передачи сведений между центральной платформой и оборудованием. Этот протокол применялся для системы тарификации использованных ресурсов конкретным пользователем/абонентом
Как работает Radius сервер в MikroTik
Со стороны маршрутизатора(роутера) MikroTik создается запись, цель которой передать на Radius сервер запрос о легитимности учётной записи для доступа ко внутренним службам, которые обозначены Radius авторизацией. Схематически это выглядит так:

MikroTik в этой схеме выступает как Radius клиент.
Настройка Radius сервера на домене Windows Server 2019
В ходе визуальной инструкции будут продемонстрированы ключевые этапы, а все остальные настройки произведены в режиме “Далее”.
Добавление тестового пользователя в группу доступа VPN
Добавить новую роль на Widnows Server 2019

Выбрать “Служба политики сети и доступа”
Контроль выбора “Сервер политики сети”
Запуск “Сервер политики сети”
Регистрация Radius сервера в Active Directory
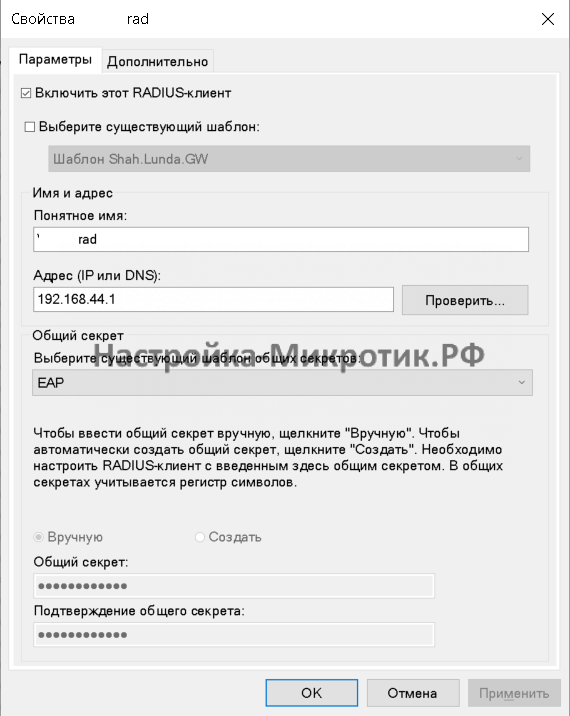
Добавление Radius клиента(маршрутизатора MikroTik)
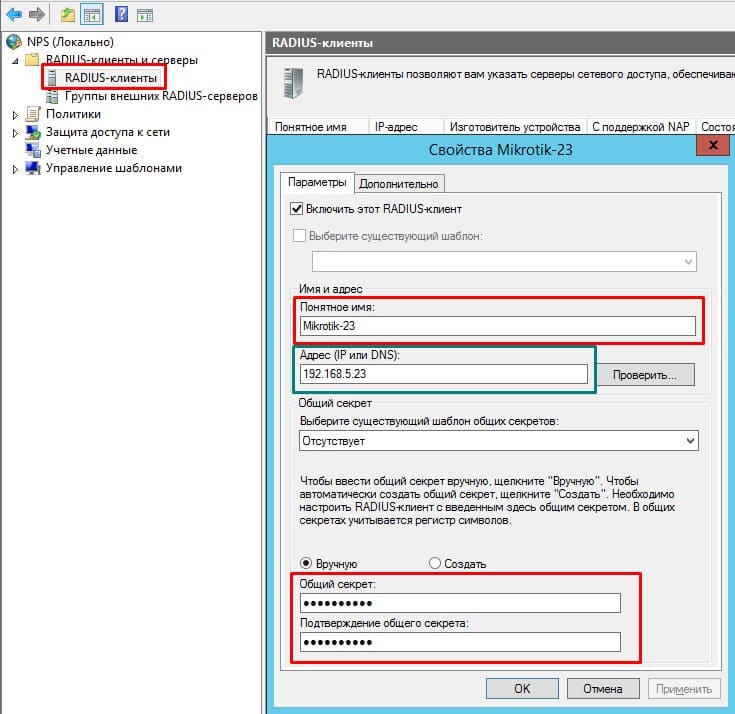
Пароль, указанный в этой настройке будет использоваться при подключении MikroTik
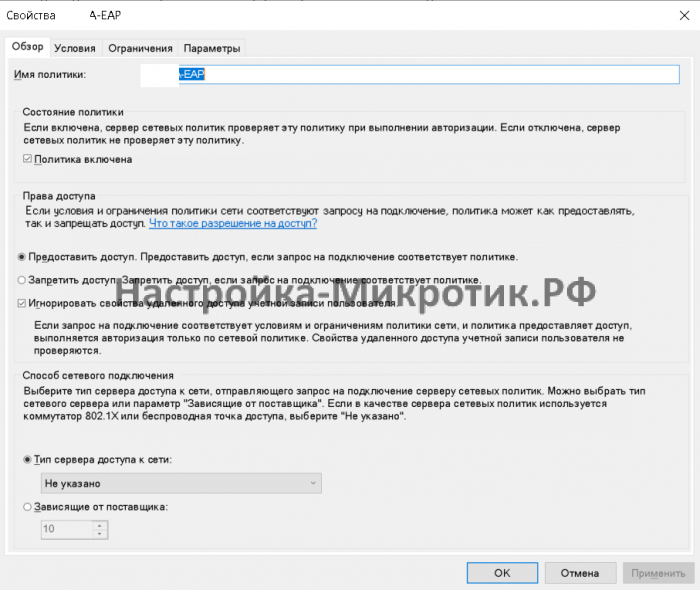
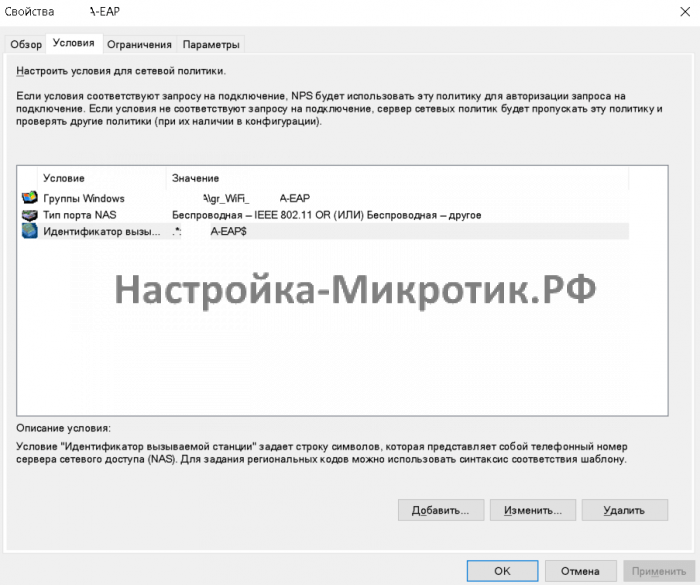
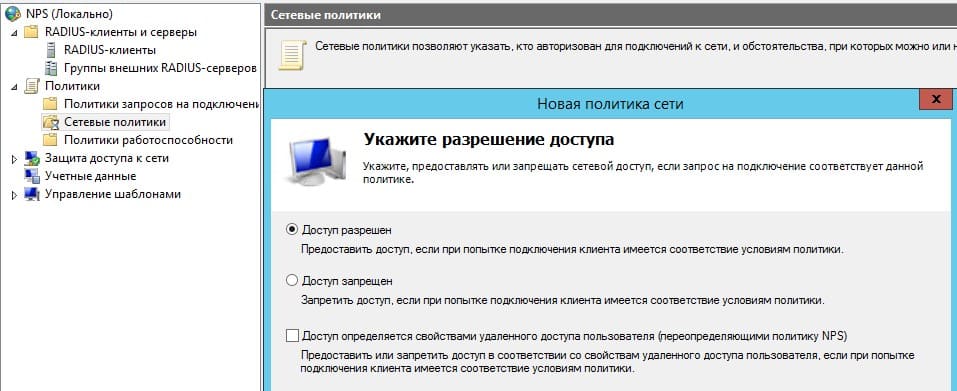
Создание сетевой политики
Определение Radius клиента и группы доступа в Active Directory
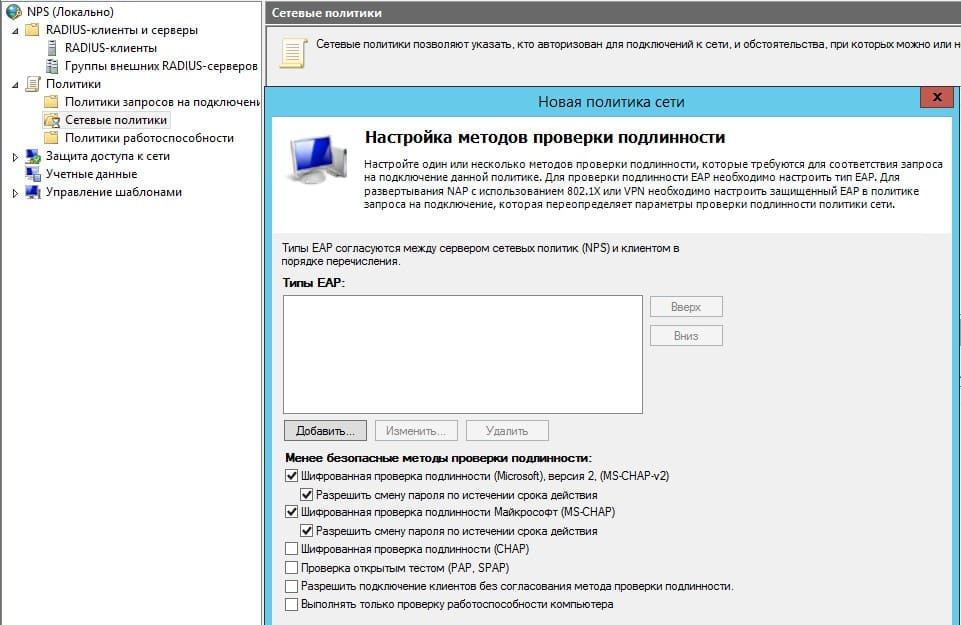
Следующие настройки можно оставить без изменений
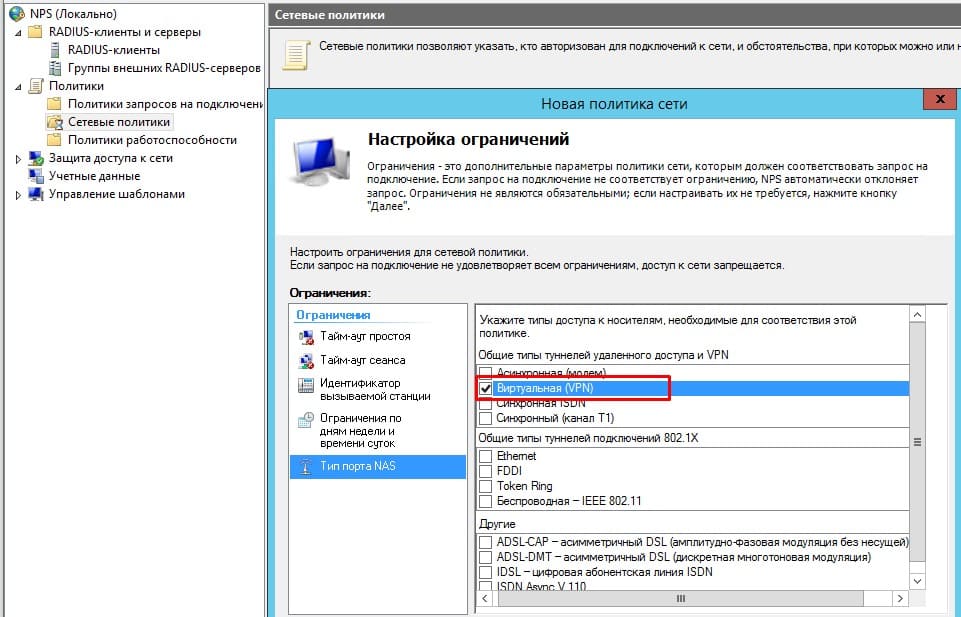
Обозначить тип удаленного доступа как VPN
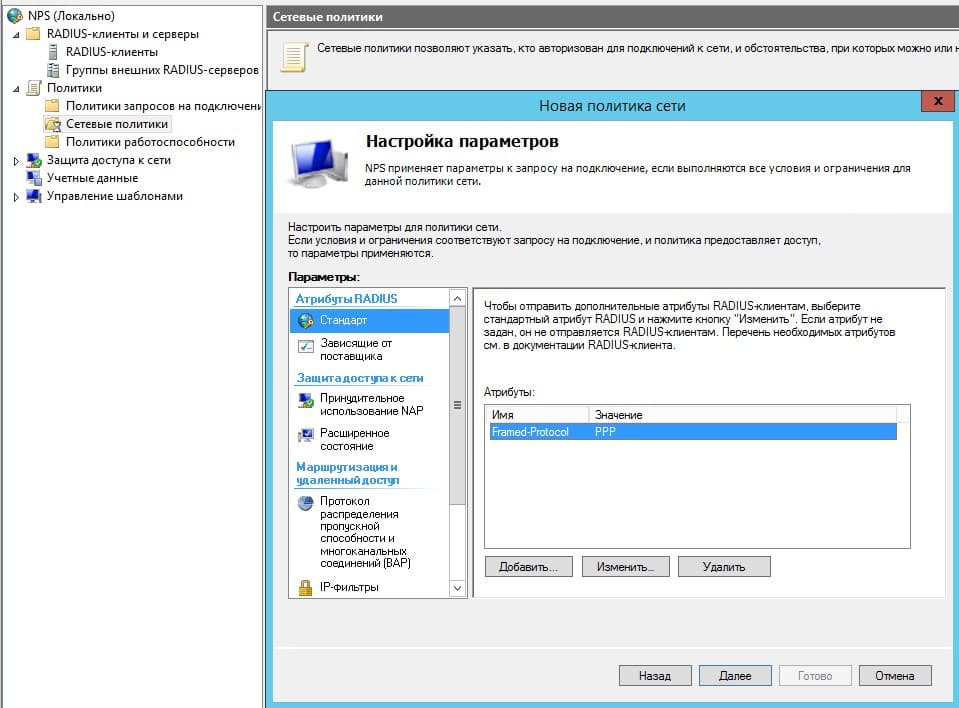
Проконтролировать присутствие стандарта PPP
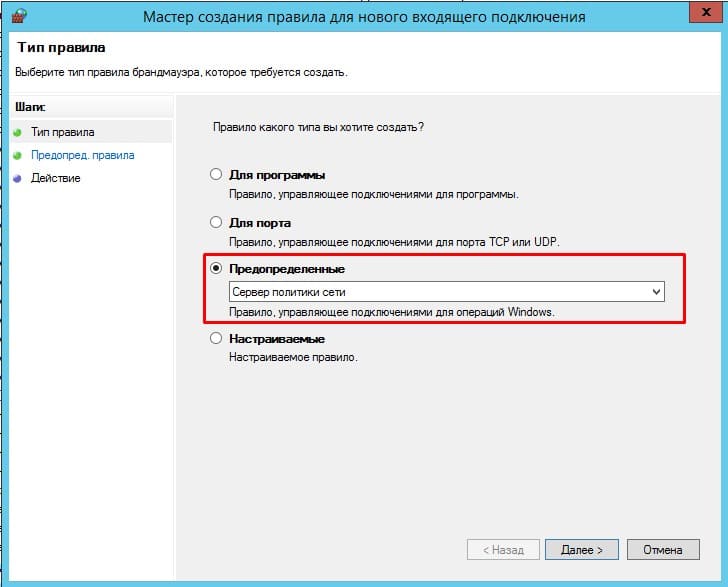
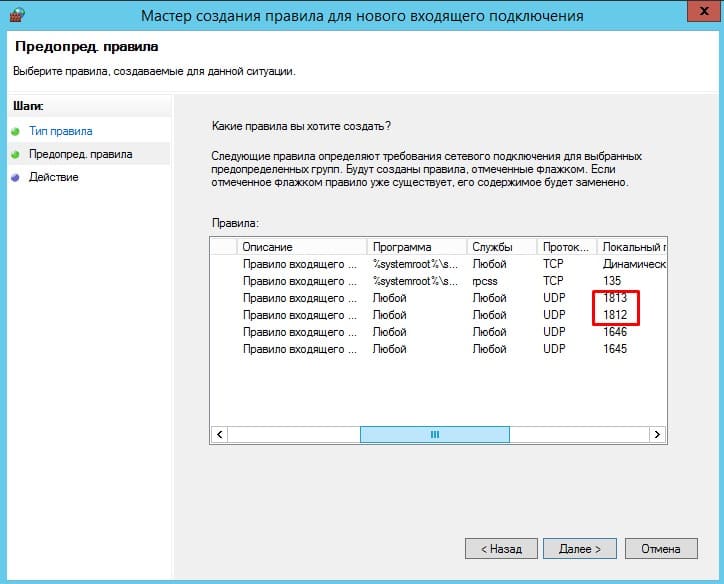
Настройка брандмауэра Windows для работы Radius сервера
Настройка MikroTik Radius, вход для VPN L2Tp клиентов(домен Active Directory)
Со стороны маршрутизатора(роутера) MikroTik нужно произвести две настройки:
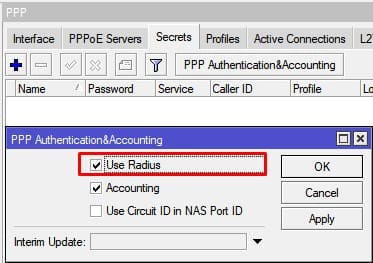
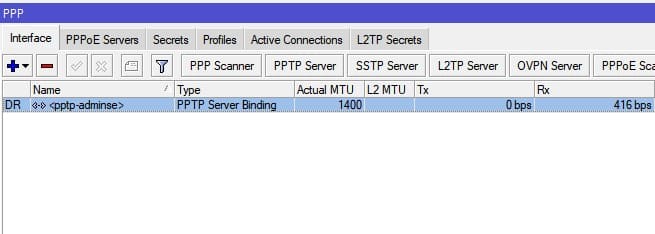
Активация использования Radius авторизации
Настройка находится в PPP→Secrets→PPP Authentication&Accounting
Добавление записи для авторизации на Radius сервере
Настройка находится в RADIUS
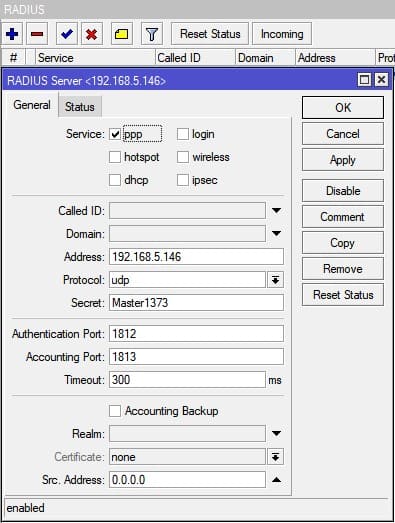
/radius add address=192.168.X.YYY secret=Radius-PASS service=ppp
Пробное подключение VPN клиента
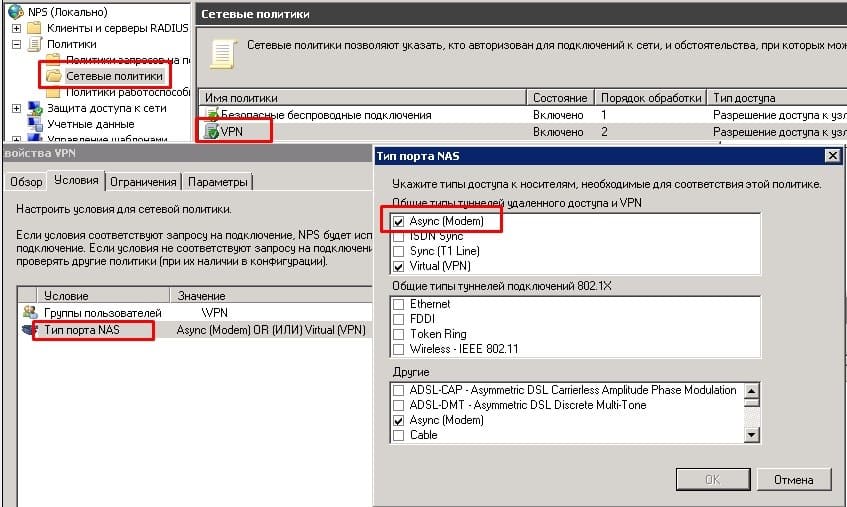
Не работает MikroTik SSTP при подключении к Radius
Для этого нужно открыть консоль “Сервер сетевых политик” и в свойствах сетевой политики указать значение условия Тип порта NAS = Async (Modem).
Есть вопросы или предложения по настройке RADIUS сервера в MikroTik? Активно предлагай свой вариант настройки! Оставить комментарий →
adminse
7 комментариев к статье “Настройка MikroTik Radius, авторизация VPN через Windows Active Directory”
Очень неплохо, что MikroTik умеет интегрироваться в Active Directory. Можно даже настроить аутентификацию через Radius сервер и WiFi клиентов
А может ли микротик интергироваваться в MS CA, чтобы, сертификаты брать из доменного СА, а не использовать ключ при подключении?
Есть ли возможность указать конкретный ip определенным пользователям?? Нужно для ограничения возможности входа на микротик не-админам