- Как интегрировать Linux-машину в среду домена Windows AD (Active Directory)
- Шаг 1. Установка пакетов и подготовка
- Шаг 2. Настройка DNS
- Шаг 3. Обнаружение домена, присоединение к нему и проверка результата.
- Шаг 4. Последние настройки и авторизация.
- Setup Linux DNS Server for Windows Active Directory
- Using Linux BIND DNS Servers for Active Directory Domains
- The Pros
- The Cons
- Server Configuration
- Install and Configure BIND
- Create the Active Directory Domain Zones
- Configure DNS Server to Query Itself
- Promote Your Windows Server to a Domain Controller
Как интегрировать Linux-машину в среду домена Windows AD (Active Directory)
В этой статье будет описан процесс добавления Linux-машины (Ubuntu 20.04) в домен Windows AD.
Шаг 1. Установка пакетов и подготовка
После этого установите требуемые пакеты.
sudo apt -y install realmd sssd sssd-tools libnss-sss libpam-sss adcli samba-common-bin oddjob oddjob-mkhomedir packagekit
Далее мы настроим все инструменты. Вам требуется знать:
Шаг 2. Настройка DNS
Откройте конфигурационный файл netplan:
Если вы видите там «dhcp4: true», то есть ваш DHCP-сервер настроен корректно, переходите к следующему шагу. Если вы настраиваете параметры сетевого подключения вручную, ознакомьтесь с примером настройки:
network:ethernets:enp0s3:addresses:- 192.168.0.15/24gateway4: 192.168.0.10nameservers:addresses: [192.168.0.1, 192.168.0.2]search:- office.localoptional: trueversion: 2
- addresses — это IP, назначаемый сетевой карте;
- gateway4 — IP роутера;
- nameservers — DNS-сервера;
- search — целевой домен.
Шаг 3. Обнаружение домена, присоединение к нему и проверка результата.
В первую очередь требуется обнаружить домен:
Вы увидите что-то подобное. Это означает, что настройки сети верны и машина получила ответ от домена. Если нет, вам необходимо проверить настройки сети, домен и работоспособность DNS.
Затем присоединитесь к домену AD. Замените admin1 на имя администратора и укажите пароль.
Проверьте, возможен ли прием информации о пользователе AD. Замените user1 на имя пользователя вашего домена.
id user1@office.localuid=687821651(user1@office.local) gid=687800512(user1@office.local) groups=687800512(domain users@office.local)
Шаг 4. Последние настройки и авторизация.
Необходимо произвести настройку, чтобы в будущем каждый раз не добавлять имя домена к имени пользователя.
Измените значение use_fully_qualified_names на False. Перезагрузите и проверьте:
sudo systemctl restart sssdid useruid=687821651(user1@office.local) gid=687800512(user1@office.local) groups=687800512(domain users@office.local)
Теперь нужно настроить создание домашних каталогов для пользователей AD при входе в систему.
sudo nano /etc/pam.d/common-session#add this line in the end of filesession optional pam_mkhomedir.so skel=/etc/skel umask=077
Войдите в систему как пользователь AD.
Это означает, что вы успешно вошли в систему как пользователь AD.
Также вы можете разрешить авторизацию для некоторых пользователей и групп AD или же ограничить других. В приведенном ниже примере настроен запрет для всех пользователей, кроме user0, user1 и группы Main Admins.
sudo realm deny –allsudo realm permit user0@office.local user1@office.localsudo realm permit -g ‘Main Admins’
Настройка пользователей AD для получения root-прав такая же, как и для локальных, но выполняется в другом файле.
Добавьте к нему нужные строки. Например:
Setup Linux DNS Server for Windows Active Directory
Setup Linux BIND DNS server to work with Windows Active Directory. All you need to do is to allow updates from the active directory domain subnet and you’re good to go. Since this article involves more of Linux than Windows I’ve placed this article in the category Linux. First install a Windows Server OS and a Linux distribution, any Linux flavour will do. Install BIND DNS on the Linux server and do the necessary basic configurations.
BIND users open the following file
BIND chroot users open the following file
Add the following lines to the end of the file
zone «example.com» type master;
allow-query < any; >;
allow-update < 192.168.0.0/24; >;
file «slaves/ddns/example.com.zone»;
>;
zone «0.168.192.in-addr.arpa» type master;
allow-query < any; >;
allow-update < 192.168.0.0/24; >;
file «slaves/ddns/0-168-192.zone»;
>;
The IP prefix entered in the allow-update option represents the entire domain example.com, if your domain spans more than one subnet add those IP prefixes also. The same applies to the reverse DNS zone. In the above example my network part of the IP address is 192.168.0 hence the zone 0.168.192.in-addr.arpa Note that the zone files are stored in the slave folders. This is because when dynamic DNS updates are sent the named process creates temporary files in the directory of the zone file, so if you place the file in the usual location temporary files will not be created due to insufficient permissions. Our next step is to create the ddns directory inside the slaves directory to distinguish zone files acquiring dynamic DNS updates and create zone files inside them.
mkdir /var/named/slaves/ddns
chown named:named /var/named/slaves/ddns
chmod 755 /var/named/slaves/ddns
chcon -t named_cache_t /var/named/slaves/ddns
touch /var/named/slaves/ddns/example.com.zone
chown named:named /var/named/slaves/ddns/example.com.zone
touch /var/named/slaves/ddns/0-168-192.zone
chown named:named /var/named/slaves/ddns/0-168-192.zone
mkdir /var/named/chroot/var/named/slaves/ddns
chown named:named /var/named/chroot/var/named/slaves/ddns
chmod 755 /var/named/chroot/var/named/slaves/ddns
chcon -t named_cache_t /var/named/chroot/var/named/slaves/ddns
touch /var/named/chroot/var/named/slaves/ddns/example.com.zone
chown named:named /var/named/chroot/var/named/slaves/ddns/example.com.zone
touch /var/named/chroot/var/named/slaves/ddns/0-168-192.zone
chmod named:named /var/named/chroot/var/named/slaves/ddns/0-168-192.zone
Edit the zone files and just create SOA and NS records
BIND /var/named/slaves/ddns/example.com.zone
BIND chroot /var/named/chroot/var/named/slaves/ddns/example.com.zone
$TTL 86400
@ IN SOA ns1.example.com. dnsadmin.example.com. (
[serial]
[refresh]
[retry]
[expire]
[minimum-ttl]
)
@ IN NS ns1.example.com.
ns1 IN A [ip-of-dns-server]
BIND /var/named/slaves/ddns/0-168-192.zone
BIND chroot /var/named/chroot/var/named/slaves/ddns/0-168-192.zone
$TTL 86400
@ IN SOA ns1.example.com. dnsadmin.example.com. (
[serial]
[refresh]
[retry]
[expire]
[minimum-ttl]
)
@ IN NS ns1.example.com.
Replace [serial], [refresh], [retry], [expire], [minimum-ttl] with their respective values in seconds. Set proper SELinux booleans
setsebool -P named_write_master_zones 1
The boolean is set to allow named to write the DNS updates to the zone file. Allow port 53 through the Linux firewall
iptables -I INPUT -p tcp —dport 53 -j ACCEPT
iptables -I INPUT -p udp —dport 53 -j ACCEPT
service iptables save
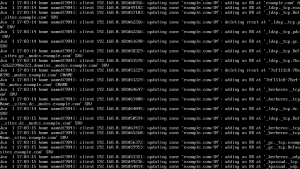
Go to the Windows Server, open your network connection properties and enter the preferred DNS address as the address of the Linux DNS server. Go to Start -> run, enter dcpromo and hit enter. Follow the steps in the wizard, if you’re using windows server 2008 just uncheck DNS installation option and continue installation of Active Directory. After the Windows server reboots check the /var/log/messages file in your Linux server you’ll see the updates that have taken place.
Just remember to set the preferred DNS server of the client computers to the IP address of the Linux DNS server before joining them to the domain.
Using Linux BIND DNS Servers for Active Directory Domains
Active Directory relies on DNS to function correctly. Without it, many of the services would fail and most of your client computers would be unable to find the domain controllers. Typically, as recommended by Microsoft, your Active Directory domains should be hosted on a Windows DNS server. However, since Windows DNS is strongly based on BIND DNS version 9, a BIND server may also host Active Directory domains.
An example of an environment where you would use a Linux-based BIND DNS server for your Active Directory is one that has a very large LinuxUnix install base. In this scenario, you may want your Active Directory zones hosted on your already existing infrastructure.
Another example is having a DNS appliance from a third-party vendor, like Infoblox, power your internal name service. These appliances are usually based on BIND, are very powerful, and provide advanced enterprise features not found in basic BIND installation, like the one we’ll be doing.
The Pros
A Linux BIND server is a very light-weight and fast DNS server. You will not need a lot of hardware to power it in medium to large environments. Another benefit is, arguably, Linux can be more secure as there are fewer known vulnerabilities.
The Cons
You will lose some Active Directory features. Without complex third-party packages, BIND domain zones may only have a single master, unlike with Windows DNS. A Windows name server in an Active Directory environment is capable of multi-master, giving you much higher availability.
Another con is most Windows environments do not have strong Linux skillsets available. You may find your resources are unable to properly maintain and administer the Linux BIND DNS server.
Server Configuration
Our servers for this lab have the following configuration. This information is provided to make it easier to follow along. I do not include hardware specifications, because those are strongly based on uniqueness of your environment.
| Hostname | Operating System | Roles | IP Address | Domain |
|---|---|---|---|---|
| NS01 | CentOS 6.5 | DNS Name Server | 172.30.0.5 | corp.serverlab.intra |
| DC01 | Windows Server 2012 R2 | Domain Controller | 172.30.0.10 | corp.serverlab.intra |
The name server will have the following zones created for Active Directory. These must be created before DC01, our first domain controller, is promoted to be an Active Directory domain controller. Without the zones, DC01 will not be able to register the required DNS records for Active Directory to function properly.
| DNS Domain Zone | Our Lab’s Zone | |
|---|---|---|
| your-fqdn-domain-name | corp.serverlab.intra | Required |
| _msdcs.your-fqdn-domain-name | _msdcs.corp.serverlab.intra | Optional |
| _sites.your-fqdn-domain-name | _sites.corp.serverlab.intra | Optional |
| _tcp.your-fqdn-domain-name | _tcp.corp.serverlab.intra | Optional |
| _udp.your-fqdn-domain-name | _udp.corp.serverlab.intra | Optional |
The first domain zone is required. The remaining zones are only needed if you want to organize your records into different databases, which may be for administrative or performance reasons. If you do not create these zones, they will automatically be created in the first zone’s database.
Install and Configure BIND
- Log onto your CentOS server with an account that has administrative privileges.
- Install BIND.
options < listen-on port 53 < 127.0.0.1; >; listen-on-v6 port 53 < ::1; >; directory "/var/named"; dump-file "/var/named/data/cache_dump.db"; statistics-file "/var/named/data/named_stats.txt"; memstatistics-file "/var/named/data/named_mem_stats.txt"; allow-query < localhost; >; recursion yes;
options < listen-on port 53 < 172.30.0.5; >; listen-on-v6 port 53 < ::1; >; directory "/var/named"; dump-file "/var/named/data/cache_dump.db"; statistics-file "/var/named/data/named_stats.txt"; memstatistics-file "/var/named/data/named_mem_stats.txt"; allow-query < 172.30.0.0/24; >; recursion yes;
Create the Active Directory Domain Zones
- With the configuration file still open, add the following lines. Remember to rename the fully qualified domain names of zones to match your environment.
zone "corp.serverlab.intra" IN < type master; file "dynamic/corp.serverlab.intra"; allow-update < 172.30.0.0/24; 192.168.1.0/24; >; >;
zone "_msdcs.corp.serverlab.intra" IN < type master; file "dynamic/_msdcs.corp.serverlab.intra"; allow-update < 172.30.0.0/24; 192.168.1.0/24; >; >;
cp ../named.empty corp.serverlab.intra
cp ../named.empty _msdcs.corp.serverlab.intra
$TTL 3H @ IN SOA @ rname.invalid. ( 0 ; serial 1D ; refresh 1H ; retry 1W ; expire 3H ) ; minimum NS @ A 127.0.0.1 AAAA ::1
$TTL 3H @ IN SOA ns01.corp.serverlab.intra. admin.corp.serverlab.intra. ( 0 ; serial 1D ; refresh 1H ; retry 1W ; expire 3H ) ; minimum NS ns01.corp.serverlab.intra. ns01 IN A 172.30.0.5
$TTL 3H @ IN SOA ns01.corp.serverlab.intra. admin.corp.serverlab.intra. ( 0 ; serial 1D ; refresh 1H ; retry 1W ; expire 3H ) ; minimum NS ns01.corp.serverlab.intra.
Configure DNS Server to Query Itself
search corp.serverlab.intra search _msdcs.corp.serverlab.intra nameserver 127.0.0.1
Promote Your Windows Server to a Domain Controller
You are all set. All that’s remaining is for you to point your Windows server to the linux BIND server for DNS, and then promote it to an Active Directory domain controller. The required DNS records will automatically be registered, and you will have a fully functional Active Directory domain, aside from the multi-master replication.