- How to Add a New Disk to an Existing Linux Server
- How to Add a New Disk Drive to a Linux Machine
- Contents
- Mounted File-systems or Logical Volumes
- Getting Started
- Finding the New Hard Drive in RHEL 6.x
- Creating Linux Partitions
- Creating a File System on an RHEL 6.X Disk Partition
- Mounting a Filesystem
- Configuring RHEL 6 to Automatically Mount a File System
- Добавление нового диска в Ubuntu
- Как подключить дополнительный жесткий диск в Ubuntu. Способ 1
- 2. Создание разделов на HDD в Ubuntu
- 3. Форматирование раздела
- 4. Монтирование раздела
How to Add a New Disk to an Existing Linux Server
As system administrators, we would have got requirements wherein we need to configure raw hard disks to the existing servers as part of upgrading server capacity or sometimes disk replacement in case of disk failure.
In this article, I will take you through the steps by which we can add the new raw hard disk to an existing Linux server such as RHEL/CentOS or Debian/Ubuntu.
Important: Please note that the purpose of this article is to show only how to create a new partition and doesn’t include partition extension or any other switches.
I am using fdisk utility to do this configuration.
I have added a hard disk of 20GB capacity to be mounted as a /data partition.
fdisk is a command line utility to view and manage hard disks and partitions on Linux systems.
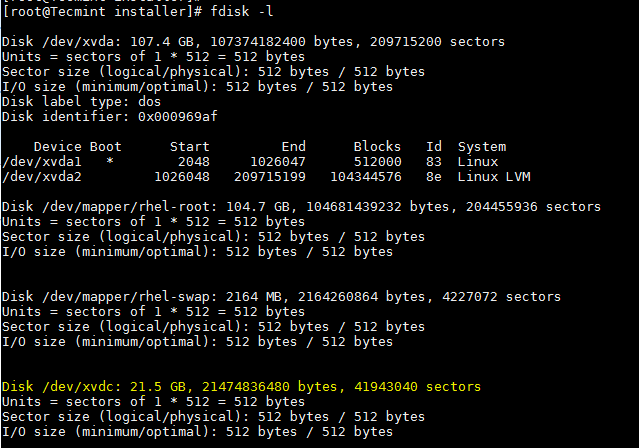
This will list the current partitions and configurations.
After attaching the hard disk of 20GB capacity, the fdisk -l will give the below output.
New disk added is shown as /dev/xvdc . If we are adding physical disk it will show as /dev/sda based of the disk type. Here I used a virtual disk.
To partition a particular hard disk, for example /dev/xvdc.
Commonly used fdisk commands.
- n – Create partition
- p – print partition table
- d – delete a partition
- q – exit without saving the changes
- w – write the changes and exit.
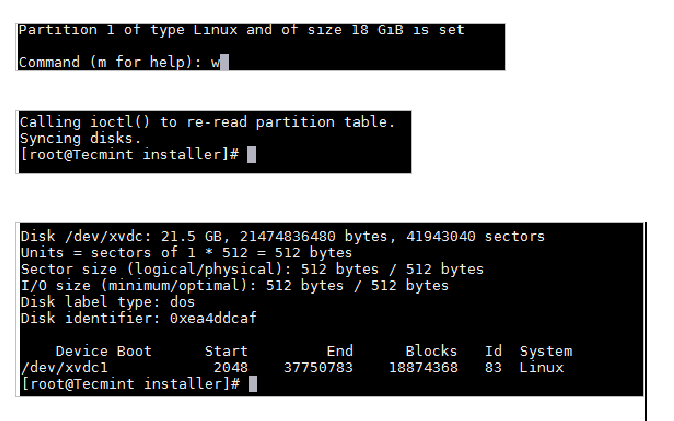
Here since we are creating a partition use n option.
Create either primary/extended partitions. By default we can have upto 4 primary partitions.
Give the partition number as desired. Recommended to go for the default value 1 .
Give the value of the first sector. If it is a new disk, always select default value. If you are creating a second partition on the same disk, we need to add 1 to the last sector of the previous partition.
Give the value of the last sector or the partition size. Always recommended to give the size of the partition. Always prefix + to avoid value out of range error.
Save the changes and exit.
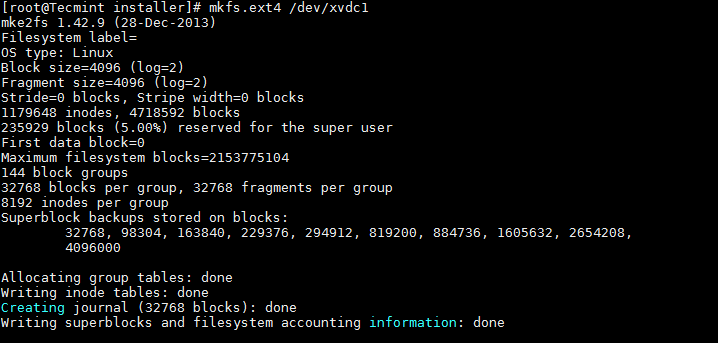
Now format the disk with mkfs command.
Once formatting has been completed, now mount the partition as shown below.
Make an entry in /etc/fstab file for permanent mount at boot time.
/dev/xvdc1 /data ext4 defaults 0 0
Conclusion
Now you know how to partition a raw disk using fdisk command and mount the same.
We need to be extra cautious while working with the partitions especially when you are editing the configured disks. Please share your feedback and suggestions.
How to Add a New Disk Drive to a Linux Machine
This article helps you to configure and add a new disk to the Linux box. This is one of the most common problems encountered by system administrators these days since the servers are tending to run out of disk space to store excess data. Fortunately, disk space is now one of the cheapest. We shall look at the steps necessary to configure on Red Hat Enterprise Linux 6. x to add more space by installing the disk.
Contents
- Mounted Filesystems or Logical Volumes
- Getting Started
- Finding the New Hard Drive in RHEL 6
- Creating Linux Partitions
- Creating a Filesystem on an RHEL 6 Disk Partition
- Mounting a Filesystem
- Configuring RHEL 6 to Automatically Mount a Filesystem
Mounted File-systems or Logical Volumes
One very simplest method is to create a Linux partition on the new disk. Create a Linux file system on those partitions and then mount the disk at a specific mount point so that they can be accessed.
Getting Started
This article assumes that the new physical hard drive has been installed on the system and is visible to the operating system.
Finding the New Hard Drive in RHEL 6.x
Assuming the drive as visible to the BIOS, it should automatically be detected by the operating system. Typically, the disk drives in a system are assigned to a device name beginning with hd or sd followed by a letter to indicate the device number. For example, the first device might be /dev/sda, the second /dev/sdb and so on.
The following is the output from a system with only one physical disk drive –
# ls /dev/sd* /dev/sda /dev/sda1 /dev/sda2
This shows that the disk drive is represented by /dev/sda itself divided into 2 partitions, represented by /dev/sda1 and /dev/sda2. The following would be the output for the same system if we attach second hard disk drive.
# ls /dev/sd* /dev/sda /dev/sda1 /dev/sda2 /dev/sdb
As shown above, the new hard drive has been assigned to the device file /dev/sdb. Currently, the drive has no partitions shown (because we have yet to create any).
At this point, we have a choice of creating partitions and file systems on the new drive and mounting them for access or adding the disk as a physical volume as part of a volume group.
Creating Linux Partitions
The next step is to create one or more Linux partitions on the new disk drive. This is achieved using the fdisk utility which takes as a command-line argument on the device to be partitioned.
# fdisk /dev/sdb The Device contains neither a valid DOS partition table, nor Sun, SGI or OSF disklabel Building a new DOS disklabel with disk identifier 0xd1082b01. Changes will remain in memory only, until you decide to write them. After that, of course, the previous content won't be recoverable. Warning: invalid flag 0x0000 of partition table 4 will be corrected by w(rite) WARNING: DOS-compatible mode is deprecated. It's strongly recommended to switch off the mode (command 'c') and change display units to sectors (command 'u'). Command (m for help): As instructed, switch off DOS compatible mode and change the units to sectors by entering the c and u commands: Command (m for help): c DOS Compatibility flag is not set Command (m for help): u Changing display/entry units to sectors In order to view the current partitions on the disk enter the p command: Command (m for help): p Disk /dev/sdb: 34.4 GB, 34359738368 bytes 255 heads, 63 sectors/track, 4177 cylinders Units = cylinders of 16065 * 512 = 8225280 bytes Sector size (logical/physical): 512 bytes / 512 bytes I/O size (minimum/optimal): 512 bytes / 512 bytes Disk identifier: 0xd1082b01 Device Boot Start End Blocks Id System
As we can see from the above, the fdisk output of the disk currently has no partitions because it is a previously unused disk. The next step is to create a new partition on the disk, a task which is performed by entering “n” (for new partition) and “p” (for primary partition)
Command (m for help): n Command action e extended p primary partition (1-4) p Partition number (1-4):
In this example, we only plan to create one partition which will be partition 1. Next, we need to specify where the partition will begin and end. Since, this is the first partition, we need to start at the first available sector and as we want to use the entire disk to specify the last sector at the end. Note that, if you wish to create multiple partitions, you can specify the size of each partition by sectors, bytes, kilobytes or megabytes.
Partition number (1-4): 1 First sector (2048-67108863, default 2048): Using default value 2048 Last sector, +sectors or +size (2048-67108863, default 67108863): Using default value 67108863 Now that we have specified the partition we need to write it to the disk using the w command: Command (m for help): w The partition table has been altered! Calling ioctl() to re-read partition table. Syncing disks.
If we now look at the devices again we will see that the new partition is visible as /dev/sdb1:
# ls /dev/sd* /dev/sda /dev/sda1 /dev/sda2 /dev/sdb /dev/sdb1
The next step is to create a filesystem on our new partition.
Creating a File System on an RHEL 6.X Disk Partition
We now have a new disk installed, it is visible to RHEL 6 and we have configured a Linux partition on the disk. The next step is to create a Linux file system on the partition so that the operating system can use it to store files and data. The easiest way to create a file system on a partition is to use the mkfs.ext4 utility which takes as arguments the label and the partition device
# /sbin/mkfs.ext4 -L /backup /dev/sdb1 mke2fs 1.41.12 (17-May-2010) Filesystem label=/backup OS type: Linux Block size=4096 (log=2) Fragment size=4096 (log=2) Stride=0 blocks, Stripe width=0 blocks 2097152 inodes, 8388352 blocks 419417 blocks (5.00%) reserved for the super user First data block=0 Maximum filesystem blocks=4294967296 256 block groups 32768 blocks per group, 32768 fragments per group 8192 inodes per group Superblock backups stored on blocks: 32768, 98304, 163840, 229376, 294912, 819200, 884736, 1605632, 2654208,4096000, 7962624 Writing inode tables: done Creating journal (32768 blocks): done Writing superblocks and filesystem accounting information: done
This filesystem checks automatically after 36 mounts or 180 days, whichever comes first. Use tune2fs -c or -i to override.
Mounting a Filesystem
Now that we have created a new filesystem on the Linux partition of our new disk drive, we need to mount it so that it is accessible. In order to do this we need to create a mount point. A mount point is simply a directory or folder into which the filesystem will be mounted. For the purposes of this example, we will create a /backup directory to match our filesystem label (although it is not necessary that these values match)
The file system may then be manually mounted using the mount command
Running the mount command with no arguments shows us all currently mounted filesystems (including our new filesystem):
# mount /dev/mapper/vg_rhel6-lv_root on / type ext4 (rw) proc on /proc type proc (rw) sysfs on /sys type sysfs (rw) devpts on /dev/pts type devpts (rw,gid=5,mode=620) tmpfs on /dev/shm type tmpfs (rw,rootcontext="system_u:object_r:tmpfs_t:s0") /dev/sda1 on /boot type ext4 (rw) none on /proc/sys/fs/binfmt_misc type binfmt_misc (rw) sunrpc on /var/lib/nfs/rpc_pipefs type rpc_pipefs (rw) /dev/sr0 on /media/RHEL_6.0 x86_64 Disc 1 type iso9660 (ro,nosuid,nodev,uhelper=udisks,uid=500,gid=500,iocharset=utf8,mode=0400,dmode=0500) /dev/sdb1 on /backup type ext4 (rw)
Configuring RHEL 6 to Automatically Mount a File System
In order to configure the system so that the new disk is automatically mounted at the time boot we need an entry to be added to the /etc/fstab file.
The below is the sample configuration file which shows an fstab file configured to auto mount our /backup partition
/dev/mapper/vg_rhel6-lv_root / ext4 defaults 1 1 UUID=4a9886f5-9545-406a-a694-04a60b24df84 /boot ext4 defaults 1 2 /dev/mapper/vg_rhel6-lv_swap swap swap defaults 0 0 tmpfs /dev/shm tmpfs defaults 0 0 devpts /dev/pts devpts gid=5,mode=620 0 0 sysfs /sys sysfs defaults 0 0 proc /proc proc defaults 0 0 LABEL=/backup /backup ext4 defaults 1 2
After this configuration and demo, we can add new disks to the existing Linux machine without any issues and extends the space for storing the backups with another drive with easy steps. Hope this information helps!
An investment in knowledge pays the best interest
Добавление нового диска в Ubuntu
Как подключить дополнительный жесткий диск в Ubuntu. Способ 1
Для выполнения этих команд нужны права рута (root). Чтобы перед каждой командой не набирать sudo вводим sudo su.
Список дисков покажет программа fdisk:
В Ubuntu жесткие диски обозначаются /dev/sda, /dev/sdb, /dev/sdc и т.д. В данном случае диск обозначается /dev/sdb.
2. Создание разделов на HDD в Ubuntu
Для разметки диски снова воспользуемся программой fdisk. Запускаем fdisk с указанием HDD, на котором нужно создать раздел:
fdisk запустится в командном режиме. Чтобы посмотреть список всех доступных команд нужно ввести m. Но для наших целей нужно всего несколько основных команд:
p — просмотр текущей таблицы разделов диска;
n — создание нового раздела;
d — удаление существующего раздела;
w — запись таблицы разделов на диск и последующий выход;
q — выход без записи новой таблицы на жесткий диск.
Проверяем наличие разделов на диске командой p, если их нет, то создаем новый раздел командой n. При создании раздела придется ответить на несколько вопросов, если планируется создать не больше 4-х разделов, то создаем основной раздел. Далее указываем номер раздела — 1. И в конце нужно указать начальный и конечный цилиндры раздела, можно просто нажимать Enter, программа сама все задаст. Снова проверяем список разделом и видим вновь созданный раздел, который обозначается /dev/sdb1. Обязательно сохраняем изменения командой w.
3. Форматирование раздела
Теперь раздел есть, но этого мало. Его нужно отформатировать, это делается очень просто одной командой
4. Монтирование раздела
Смонтировать раздел в пустоту не получится, поэтому нам нужен каталог, который будет точкой монтирования. Создадим каталог /hdd в директории /media, в которую монтируются все подключаемые устройства (внешние диски, cd-rom, флешки и т.д.)
Монтируем раздел в созданный каталог:


