- Linux, Cloud & Windows tutorials for beginners
- This is the blog, how to add new network interface in Linux Ubuntu 16.04 TLS.
- 1 — Requirement :- In my scenario, I am using Ubuntu 16.04 TLS box running on the Virtual box.
- 2 — Check Current Interfaces :-
- Настройка дополнительного сетевого интерфейса Ubuntu Server 16.04
- Вывод интерфейсов
- Редактирование интерфейса
- Запускаем интерфейс
- How do you create a new network eth?
- 4 Answers 4
- How to add new network interface permanent
- 2 Answers 2
- You must log in to answer this question.
- Related
- Hot Network Questions
- Subscribe to RSS
Linux, Cloud & Windows tutorials for beginners
This is the blog, how to add new network interface in Linux Ubuntu 16.04 TLS.
For a System Administrator, It is a common task which is required on demand to add additional Network Interface. It may be required for different purpose i.e. Setup Bridge Interface, Setting up VLAN etc.
1 — Requirement :- In my scenario, I am using Ubuntu 16.04 TLS box running on the Virtual box.
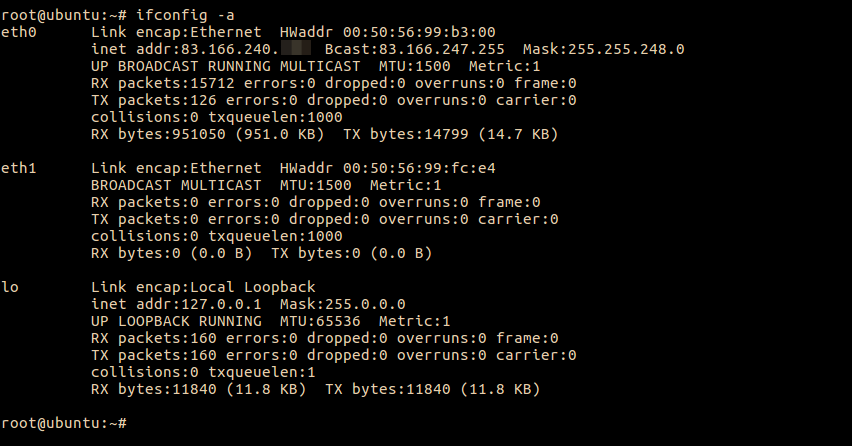
2 — Check Current Interfaces :-
root@U16:~# ifconfig -a enp0s3 Link encap:Ethernet HWaddr 08:00:27:ae:86:3c inet addr:10.0.0.161 Bcast:10.0.1.255 Mask:255.255.254.0 inet6 addr: fe80::a00:27ff:feae:863c/64 Scope:Link UP BROADCAST RUNNING MULTICAST MTU:1500 Metric:1 RX packets:1906 errors:0 dropped:0 overruns:0 frame:0 TX packets:894 errors:0 dropped:0 overruns:0 carrier:0 collisions:0 txqueuelen:1000 RX bytes:1646594 (1.6 MB) TX bytes:73845 (73.8 KB) lo Link encap:Local Loopback inet addr:127.0.0.1 Mask:255.0.0.0 inet6 addr: ::1/128 Scope:Host UP LOOPBACK RUNNING MTU:65536 Metric:1 RX packets:160 errors:0 dropped:0 overruns:0 frame:0 TX packets:160 errors:0 dropped:0 overruns:0 carrier:0 collisions:0 txqueuelen:1 RX bytes:11840 (11.8 KB) TX bytes:11840 (11.8 KB) root@U16:~# ip link 1: lo: mtu 65536 qdisc noqueue state UNKNOWN mode DEFAULT group default qlen 1 link/loopback 00:00:00:00:00:00 brd 00:00:00:00:00:00 2: enp0s3: mtu 1500 qdisc pfifo_fast state UP mode DEFAULT group default qlen 1000 link/ether 08:00:27:ae:86:3c brd ff:ff:ff:ff:ff:ff root@U16:~# 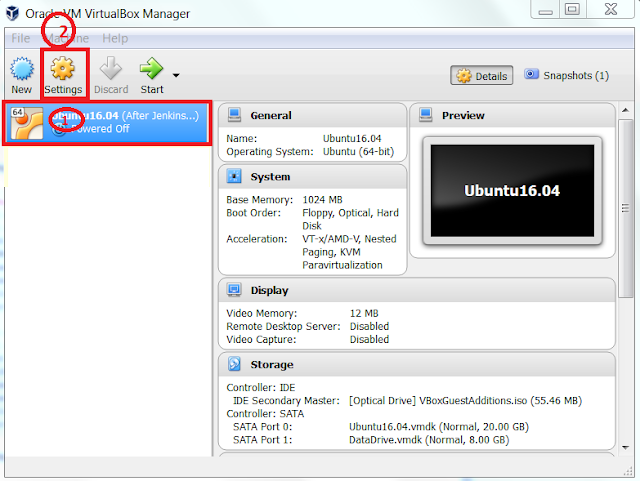
— Select (1) Network from left side menu, Choose (2) Network adapter 2 , select check box (3) enable network Adapter and Select (4) Bridge Adapter from drop down list Attached to option.

root@U16:~# ifconfig -a enp0s3 Link encap:Ethernet HWaddr 08:00:27:ae:86:3c inet addr:10.0.0.161 Bcast:10.0.1.255 Mask:255.255.254.0 inet6 addr: fe80::a00:27ff:feae:863c/64 Scope:Link UP BROADCAST RUNNING MULTICAST MTU:1500 Metric:1 RX packets:723 errors:0 dropped:0 overruns:0 frame:0 TX packets:114 errors:0 dropped:0 overruns:0 carrier:0 collisions:0 txqueuelen:1000 RX bytes:67371 (67.3 KB) TX bytes:16991 (16.9 KB) enp0s8 Link encap:Ethernet HWaddr 08:00:27:98:ec:88 BROADCAST MULTICAST MTU:1500 Metric:1 RX packets:0 errors:0 dropped:0 overruns:0 frame:0 TX packets:0 errors:0 dropped:0 overruns:0 carrier:0 collisions:0 txqueuelen:1000 RX bytes:0 (0.0 B) TX bytes:0 (0.0 B) lo Link encap:Local Loopback inet addr:127.0.0.1 Mask:255.0.0.0 inet6 addr: ::1/128 Scope:Host UP LOOPBACK RUNNING MTU:65536 Metric:1 RX packets:160 errors:0 dropped:0 overruns:0 frame:0 TX packets:160 errors:0 dropped:0 overruns:0 carrier:0 collisions:0 txqueuelen:1 RX bytes:11840 (11.8 KB) TX bytes:11840 (11.8 KB) root@U16:~# vi /etc/network/interfaces auto enp0s8 iface enp0s8 inet dhcp root@U16:~# service networking restart root@U16:~# ifconfig enp0s3 Link encap:Ethernet HWaddr 08:00:27:ae:86:3c inet addr:10.0.0.161 Bcast:10.0.1.255 Mask:255.255.254.0 inet6 addr: fe80::a00:27ff:feae:863c/64 Scope:Link UP BROADCAST RUNNING MULTICAST MTU:1500 Metric:1 RX packets:6811 errors:0 dropped:0 overruns:0 frame:0 TX packets:381 errors:0 dropped:0 overruns:0 carrier:0 collisions:0 txqueuelen:1000 RX bytes:627377 (627.3 KB) TX bytes:80855 (80.8 KB) enp0s8 Link encap:Ethernet HWaddr 08:00:27:98:ec:88 inet addr:10.0.0.81 Bcast:10.0.1.255 Mask:255.255.254.0 inet6 addr: fe80::a00:27ff:fe98:ec88/64 Scope:Link UP BROADCAST RUNNING MULTICAST MTU:1500 Metric:1 RX packets:2246 errors:0 dropped:0 overruns:0 frame:0 TX packets:8 errors:0 dropped:0 overruns:0 carrier:0 collisions:0 txqueuelen:1000 RX bytes:209378 (209.3 KB) TX bytes:1192 (1.1 KB) lo Link encap:Local Loopback inet addr:127.0.0.1 Mask:255.0.0.0 inet6 addr: ::1/128 Scope:Host UP LOOPBACK RUNNING MTU:65536 Metric:1 RX packets:160 errors:0 dropped:0 overruns:0 frame:0 TX packets:160 errors:0 dropped:0 overruns:0 carrier:0 collisions:0 txqueuelen:1 RX bytes:11840 (11.8 KB) TX bytes:11840 (11.8 KB) Настройка дополнительного сетевого интерфейса Ubuntu Server 16.04

Это руководство объяснит, как настроить конфигурацию сетевого интерфейса.
Вывод интерфейсов
Введём команду которая выведет все интерфейсы сервера
Редактирование интерфейса
Откроем конфигурационный файл редактором , введем команду
nano /etc/network/interfacesОткрылся конфигурационный файл интерфейсов
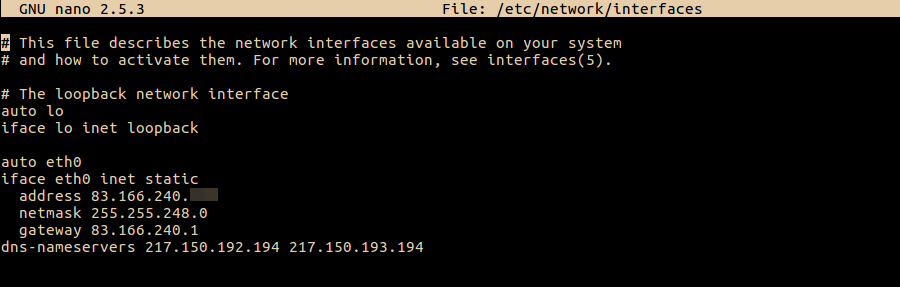
Отступаем вниз и добавляем конфигурацию для eth1:
auto eth1 iface eth1 inet static address 192.168.0.1 netmask 255.255.255.0Выглядеть должно примерно так
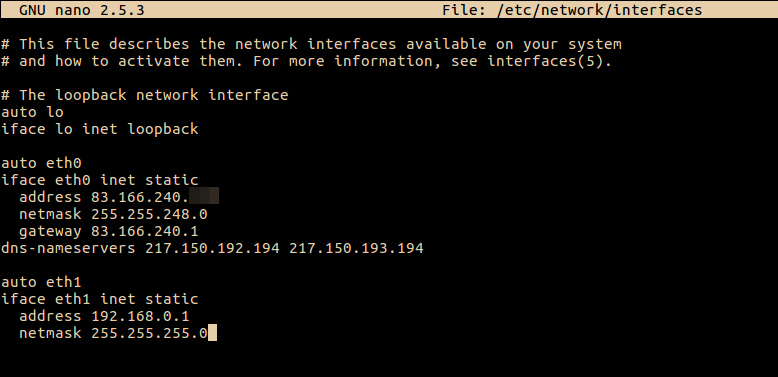
Сохраняем изменения „Ctrl + O“ и «Enter» , выходим из редактора „Ctrl + X“
Запускаем интерфейс
Перезагружаем сетевую службу сервера
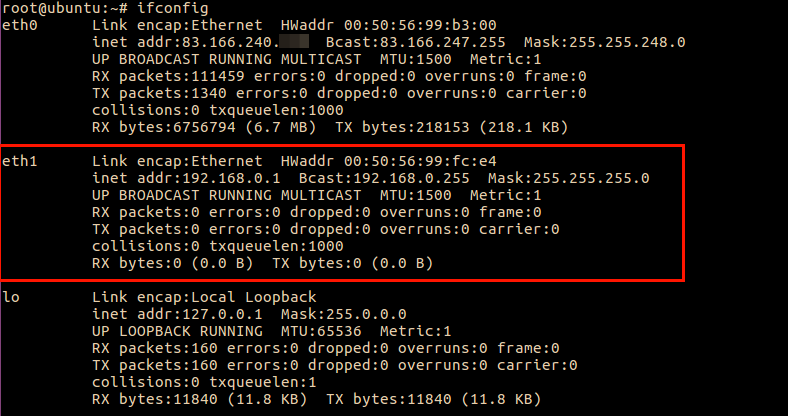
service networking restartИ увидем что новые настройки приняты, и eth1 присвоен IP — адрес
Мы перезвоним в будни с 9:30 до 18:30(по московскому времени).
NeoServer Виртуальный сервер VDS (VPS) под Linux Выделенный виртуальный сервер (ВДС) с операционной системой Linux. На базе серверов HP Proliant, система хранения Raid10, резервное копирование. Тест бесплатно. 180
NeoServer Виртуальный сервер VDS (VPS) под Windows Выделенный виртуальный сервер (ВПС) с операционной системой Windows. Доступен онлайн 24 часа, резервное копирование. Тест бесплатно. 645
How do you create a new network eth?
I have a machine that has eth0 and eth1, and now I want to create an eth2 and assign it some IP address. What’s the command for doing this?
Based on your description I believe this answer will suite your demands better: http://stackoverflow.com/questions/2082722/how-do-i-create-virtual-ethernet-devices-in-linux
4 Answers 4
On Linux machines, eth0 and eth1 correspond to real network ports. To add an eth2, you’ll need to add another NIC, either by adding an internal PCI(e) network card, or by adding a USB network adapter. See Redhat network interface configuration.
If all you want is another IP address, you can create an ethernet alias on one of your existing adapters. An alias is like a virtual network card — it lets you assign another IP address to an existing port. Let’s assume your eth0 has the IP address 192.168.1.5.
To do this once, run (as root) ifconfig eth0:0 192.168.1.6 up . (Use eth0:1 for a second alias on eth0, eth0:2 for a third, or eth1:0 to alias eth1 instead of eth0.) This configuration will be lost at reboot.
To configure it permanently, add it to a configuration script. Make a copy of /etc/sysconfig/network-scripts/ifcfg-eth0 to the file ifcfg-eth0:0 in the same directory. Change the new file so it looks like this:
DEVICE=eth0:0 IPADDR=192.168.1.6 NETMASK=255.255.255.0 NETWORK=192.168.1.0 ONBOOT=yes NAME=eth0:0 The remove or comment out any GATEWAY lines in both files, and add the GATEWAY line to your /etc/sysconfig/network file. Then you can start the new alias with ifup eth0:0 or restart networking entirely with service network restart .
From the way the question is asked it is not clear what is meant when it is said that the machine only has eth0 and eth1 . Other answerers have made an assumption that there are only two NIC cards, but it is also possible that the third NIC is already installed on the compute, but has not been «brought up» (or has been explicitly shut down).
Let us assume that you are sure that you have 3 NIC cards, but somehow when you do ifconfig your output is something along the lines of:
lo Link encap:Local Loopback inet addr:127.0.0.1 Mask:255.0.0.0 inet6 addr: ::1/128 Scope:Host UP LOOPBACK RUNNING MTU:65536 Metric:1 RX packets:439793 errors:0 dropped:0 overruns:0 frame:0 TX packets:439793 errors:0 dropped:0 overruns:0 carrier:0 collisions:0 txqueuelen:0 RX bytes:412415058 (412.4 MB) TX bytes:412415058 (412.4 MB) eth0 Link encap:Ethernet HWaddr [mac address] [. ] eth1 Link encap:Ethernet HWaddr [mac address] [. ] There seems to be a contradiction, you have 3 NIC cards, but only two ports. That is because ifconfig only shows those ports which are «up». So the only thing that you need to do is to run the command:
Keep in mind that it needs to be run as root, do that as is required in your distribution.
You can combine setting the IP address with «bringing the port up»:
ifconfig eth2 192.168.222.2 netmask 255.255.255.0 up The «up» should be after other things on this line, but it will still work.
How to add new network interface permanent
How to add new network interface permanent I use virtualbox running centos 6, I create a new eth1 network interface, but after I reboot machine then it’s gone.. how to add it auto add when boot the machine
sudo ifconfig eth1 192.168.56.10 netmask 255.255.255.0 up If you want to add a new interface for your vm(for eg:eth1), add a new config file ifcfg-eth1 with the ip address. Then go to the virt manager and shutdown the vm and delete only the vm not the volume. use the same volume and create a vm adding a new network hardware. It worked for me.
2 Answers 2
# nmcli connection add type ethernet ifname etho con-name name autoconnect yes ip4 xxx.xxx.xxx.xxx/cidr ipv4.gateway xxx.xxx.xxx.xxx ipv4.dns xxx.xxx.xxx.xxx Or you can use gui based too
vi /etc/sysconfig/network-scripts/ifcfg-eth1 DEVICE=eth1 TYPE=Ethernet ONBOOT=yes BOOTPROTO=static DEFROUTE=no PEERDNS=no PEERROUTES=yes NAME=eth1 IPADDR=192.168.56.10 NETMASK=255.255.255.0 You must log in to answer this question.
Related
Hot Network Questions
Subscribe to RSS
To subscribe to this RSS feed, copy and paste this URL into your RSS reader.
Site design / logo © 2023 Stack Exchange Inc; user contributions licensed under CC BY-SA . rev 2023.7.14.43533
Linux is a registered trademark of Linus Torvalds. UNIX is a registered trademark of The Open Group.
This site is not affiliated with Linus Torvalds or The Open Group in any way.
By clicking “Accept all cookies”, you agree Stack Exchange can store cookies on your device and disclose information in accordance with our Cookie Policy.