- Создание пользователя в Linux. Команды adduser и useradd
- В чем отличия adduser и useradd?
- Команда adduser
- Создание пользователя командой adduser
- Команда useradd
- Синтаксис команды useradd
- Создание нового пользователя
- Создание нового пользователя с домашней директорией в /home
- Создание нового пользователя с произвольной домашней директорией
- Создание нового пользователя с произвольными UID, GID
- Создание пользователя с указанием оболочки (shell)
- Создать пользователя и добавить его в группы
- Заключение
- How To Add and Delete Users on a CentOS 7 Server
- Prerequisites
- Adding Users
- Granting Sudo Privileges to a User
- Managing Users with Sudo Privileges
- Deleting Users
- Conclusion
- How To Create a New Sudo-enabled User on Ubuntu 20.04 [Quickstart]
- Step 1 — Logging Into Your Server
- Step 2 — Adding a New User to the System
- Step 3 — Adding the User to the sudo Group
- Step 4 — Testing sudo Access
- Conclusion
Создание пользователя в Linux. Команды adduser и useradd

Для создания пользователей в Linux можно использовать графические утилиты, предоставляемые дистрибутивом, или воспользоваться командной строкой.
Для создания пользователей из командной строки обычно используют утилиты adduser или useradd. Рассмотрим, использование данных утилит.
В чем отличия adduser и useradd?
useradd — это низкоуровневая утилита для создания пользователей в Linux.
adduser — представляет собой более простое решение для создания пользователей и по факту является надстройкой над useradd, groupadd и usermod.
Утилита adduser доступна не во всех дистрибутивах Linux. Реализация adduser также может отличаться. Если в дистрибутиве присутствует утилита adduser, то для создания пользователей рекомендуется использовать именно ее.
Команда adduser
Создание пользователя командой adduser
Рассмотрим, как создать обычного пользователя командой adduser
Чтобы создать нового пользователя, выполняем команду adduser и указываем имя пользователя (вместо pupkin укажите имя пользователя, которого вы создаете):
После запуска данной команды, вы должны ввести пароль для нового пользователя. Затем будет предложено ввести дополнительную информацию о пользователе: имя, номер комнаты (кабинета), телефоны и комментарий. Вводить эту информацию необязательно. Просто нажимайте Enter , чтобы пропустить ввод данных.
$ sudo adduser pupkin [sudo] пароль для pingvinus: Добавляется пользователь «pupkin» . Добавляется новая группа «pupkin» (1001) . Добавляется новый пользователь «pupkin» (1001) в группу «pupkin» . Создаётся домашний каталог «/home/pupkin» . Копирование файлов из «/etc/skel» . Новый пароль : Повторите ввод нового пароля : passwd: пароль успешно обновлён Изменение информации о пользователе pupkin Введите новое значение или нажмите ENTER для выбора значения по умолчанию Полное имя []: Vasiliy Pupkin Номер комнаты []: 123 Рабочий телефон []: Домашний телефон []: Другое []: Janitor Данная информация корректна? [Y/n] y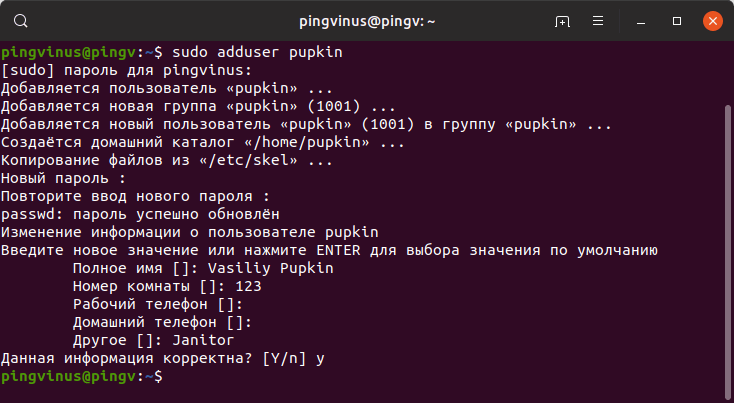
В результате выполнения команды adduser будут выполнены следующие действия:
- Создается новый пользователь с именем, которое вы указали при выполнении команды.
- Создается группа с тем же именем.
- Создается домашний каталог пользователя в директории /home/имяпользователя
- В домашний каталог копируются файлы из директории /etc/skel
Команда useradd
Синтаксис команды useradd
Команда useradd принимает в качестве аргумента имя пользователя, а также различные опции.
Синтаксис команды следующий:
Создание нового пользователя
Чтобы просто создать пользователя используется команда useradd без каких-либо опций. Указывается только имя пользователя.
Данная команда создает нового пользователя с системными параметрами по умолчанию, которые прописаны в файле /etc/default/useradd
Чтобы пользователь мог войти в систему, необходимо задать для него пароль. Для этого используем команду:
Создание нового пользователя с домашней директорией в /home
Создадим пользователя и его домашнюю директорию.
Домашняя директория создается по умолчанию в каталоге /home . Имя директории совпадает с именем пользователя.
Создание нового пользователя с произвольной домашней директорией
Чтобы создать пользователя с домашней директорией, расположенной в произвольном месте, используется опция -d , после которой указывается путь до директории. Директорию необходимо создать заранее.
Создаем домашнюю директорию для будущего пользователя:
Копируем файлы и директории, которые по умолчанию создаются в домашней директории пользователя в данной системе. Данные файлы находятся в директории /etc/skel
sudo cp -rT /etc/skel /users/pupkinСоздаем пользователя и указываем домашнюю директорию:
sudo useradd -d /users/pupkin pupkinМеняем права доступа у домашней директории:
sudo chown -R pupkin:pupkin /users/pupkinЗадаем пароль для пользователя:
Можно просмотреть информацию о пользователе, которая сохранена в файле /etc/passwd
cat /etc/passwd | grep pupkin pupkin:x:1001:1001::/users/pupkin:/bin/sh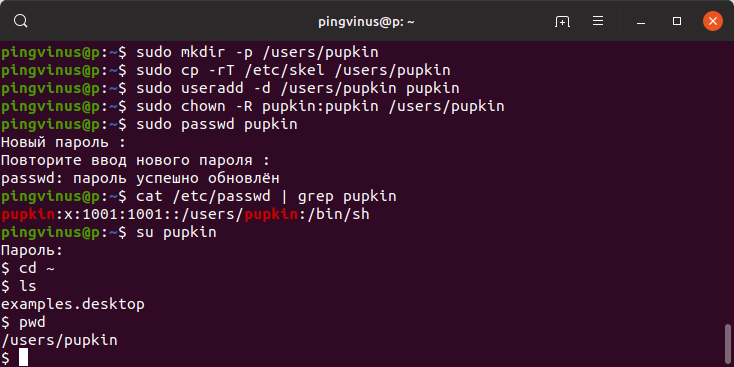
Создание нового пользователя с произвольными UID, GID
Каждый пользователь в Linux имеет свой числовой идентификатор — UID, а также идентификатор основной группы пользователя — GID.
При создании пользователя можно задать произвольные номера UID и/или GID. При указании номера группы, группа с этим номером должна быть создана заранее.
useradd -u 1234 -g 1222 pupkinСоздание пользователя с указанием оболочки (shell)
По умолчанию новые пользователи создаются с оболочкой /bin/sh Чтобы задать другую оболочку, используется опция -s /путь/до/оболочки
sudo useradd -m -s /bin/bash pupkinСоздать пользователя и добавить его в группы
Обычно пользователи в Linux принадлежат нескольким группам. Чтобы при создании нового пользователя задать группы, к которым он будет принадлежать, используется опция -G список,групп
sudo useradd -m -G adm,cdrom,wheel -s /bin/bash pupkinЗаключение
Мы рассмотрели примеры создания нового пользователя в Linux с использованием команд adduser и useradd . Команда adduser более простая и в большинстве случаев рекомендуется использовать именно ее.
How To Add and Delete Users on a CentOS 7 Server

When you first start using a fresh Linux server, adding and removing users is often one of the first things you’ll need to do. In this guide, you will learn how to create user accounts, assign sudo privileges, and delete users on a CentOS 7 server.
Prerequisites
To complete this tutorial, you will need:
- A CentOS 7 server with a non-root sudo -enabled user. If you are logged in as root instead, you can drop the sudo portion of all the following commands. For guidance, please see our tutorial Initial Server Setup with CentOS 7.
Adding Users
Throughout this tutorial we will be working with the user sammy. Please substitute with the username of your choice.
You can add a new user by typing:
Next, you’ll need to give your user a password so that they can log in. To do so, use the passwd command:
You will be prompted to type in the password twice to confirm it. Now your new user is set up and ready for use! You can now log in as that user, using the password that you set up.
Note: if your SSH server disallows password-based authentication, you will not yet be able to connect with your new username. Details on setting up key-based SSH authentication for the new user can be found in step 4 of Initial Server Setup with CentOS 7.
Granting Sudo Privileges to a User
If your new user should have the ability to execute commands with root (administrative) privileges, you will need to give the new user access to sudo .
We can do this by adding the user to the wheel group (which gives sudo access to all of its members by default).
To do this, use the usermod command:
sudo usermod -aG wheel sammy Now your new user is able to execute commands with administrative privileges. To do so, simply type sudo ahead of the command that you want to execute as an administrator:
You will be prompted to enter the password of your user account (not the root password). Once the correct password has been submitted, the command you entered will be executed with root privileges.
Managing Users with Sudo Privileges
To see which users are part of the wheel group (and thus have sudo ), you can use the lid function. lid is normally used to show which groups a user belongs to, but with the -g flag, you can reverse it and show which users belong in a group:
The output will show you the usernames and UIDs that are associated with the group. This is a good way of confirming that your previous commands were successful, and that the user has the privileges that they need.
Deleting Users
If you have a user account that you no longer need, it’s best to delete the old account.
If you want to delete the user without deleting any of their files, type:
If you want to delete the user’s home directory along with the user account itself, type:
With either command, the user will automatically be removed from any groups that they were added to, including the wheel group if they were given sudo privileges. If you later add another user with the same name, they will have to be added to the wheel group again to gain sudo access.
Conclusion
You should now have a good grasp on how to add and remove users from your CentOS 7 server. Effective user management will allow you to separate users and give them only the access that is needed for them to do their job. You can now move on to configuring your CentOS 7 server for whatever software you need, such as a LAMP or LEMP web stack.
For more information about how to configure sudo , check out our guide on how to edit the sudoers file.
Thanks for learning with the DigitalOcean Community. Check out our offerings for compute, storage, networking, and managed databases.
How To Create a New Sudo-enabled User on Ubuntu 20.04 [Quickstart]
When managing a server, you’ll sometimes want to allow users to execute commands as “root,” the administrator-level user. The sudo command provides system administrators with a way to grant administrator privileges — ordinarily only available to the root user — to normal users.
In this tutorial, you’ll learn how to create a new user with sudo access on Ubuntu 20.04 without having to modify your server’s /etc/sudoers file.
Note: If you want to configure sudo for an existing user, skip to step 3.
Step 1 — Logging Into Your Server
SSH in to your server as the root user:
Step 2 — Adding a New User to the System
Use the adduser command to add a new user to your system:
Be sure to replace sammy with the username that you want to create. You will be prompted to create and verify a password for the user:
OutputEnter new UNIX password: Retype new UNIX password: passwd: password updated successfully Next, you’ll be asked to fill in some information about the new user. It is fine to accept the defaults and leave this information blank:
OutputChanging the user information for sammy Enter the new value, or press ENTER for the default Full Name []: Room Number []: Work Phone []: Home Phone []: Other []: Is the information correct? [Y/n] Step 3 — Adding the User to the sudo Group
Use the usermod command to add the user to the sudo group:
Again, be sure to replace sammy with the username you just added. By default on Ubuntu, all members of the sudo group have full sudo privileges.
Step 4 — Testing sudo Access
To test that the new sudo permissions are working, first use the su command to switch to the new user account:
As the new user, verify that you can use sudo by prepending sudo to the command that you want to run with superuser privileges:
For example, you can list the contents of the /root directory, which is normally only accessible to the root user:
The first time you use sudo in a session, you will be prompted for the password of that user’s account. Enter the password to proceed:
Output:[sudo] password for sammy: Note: This is not asking for the root password! Enter the password of the sudo-enabled user you just created.
If your user is in the proper group and you entered the password correctly, the command that you issued with sudo will run with root privileges.
Conclusion
In this quickstart tutorial, we created a new user account and added it to the sudo group to enable sudo access.
For your new user to be granted external access, please follow our section on Enabling External Access for Your Regular User.
If you need more detailed information on setting up an Ubuntu 20.04 server, please read our Initial Server Setup with Ubuntu 20.04 tutorial.
Get Ubuntu on a hosted virtual machine in seconds with DigitalOcean Droplets! Simple enough for any user, powerful enough for fast-growing applications or businesses.