- How to Manage Users with Groups in Linux
- Creating the users
- Creating groups and adding users
- Giving groups permissions to directories
- Using access control lists
- All the control you need
- adduser command in Linux
- Linux adduser command
- adduser Examples
- 1. Add a new normal user
- 2. Add a user with a different home directory
- 3. Adding a new user to a group
- 4. Add a User with no password
- 5. Add a user with disabled password
- 6. Use a different config file
- 7. Add a user with a different shell
- adduser command Options
- Conclusion
How to Manage Users with Groups in Linux
When you administer a Linux machine that houses multiple users, there might be times when you need to take more control over those users than the basic user tools offer. This idea comes to the fore especially when you need to manage permissions for certain users. Say, for example, you have a directory that needs to be accessed with read/write permissions by one group of users and only read permissions for another group. With Linux, this is entirely possible. To make this happen, however, you must first understand how to work with users, via groups and access control lists (ACLs).
We’ll start from the beginning with users and work our way to the more complex ACLs. Everything you need to make this happen will be included in your Linux distribution of choice. We won’t touch on the basics of users, as the focus on this article is about groups.
For the purpose of this piece, I’m going to assume the following:
You need to create two users with usernames:
You need to create two groups:
Olivia needs to be a member of the group editors , while nathan needs to be a member of the group readers. The group readers needs to only have read permission to the directory /DATA , whereas the group editors needs to have both read and write permission to the /DATA directory. This, of course, is very minimal, but it will give you the basic information you need to expand the tasks to fit your much larger needs.
I’ll be demonstrating on the Ubuntu 16.04 Server platform. The commands will be universal—the only difference would be if your distribution of choice doesn’t make use of sudo . If this is the case, you’ll have to first su to the root user to issue the commands that require sudo in the demonstrations.
Creating the users
The first thing we need to do is create the two users for our experiment. User creation is handled with the useradd command. Instead of just simply creating the users we need to create them both with their own home directories and then give them passwords.
The first thing we do is create the users. To do this, issue the commands:
sudo useradd -m olivia sudo useradd -m nathan
We have now created our users. If you look in the /home directory, you’ll find their respective homes (because we used the -m option, which creates a home directory).
Next each user must have a password. To add passwords into the mix, you’d issue the following commands:
sudo passwd olivia sudo passwd nathan
When you run each command, you will be prompted to enter (and verify) a new password for each user.
That’s it, your users are created.
Creating groups and adding users
Now we’re going to create the groups readers and editors and then add users to them. The commands to create our groups are:
addgroup readers addgroup editors
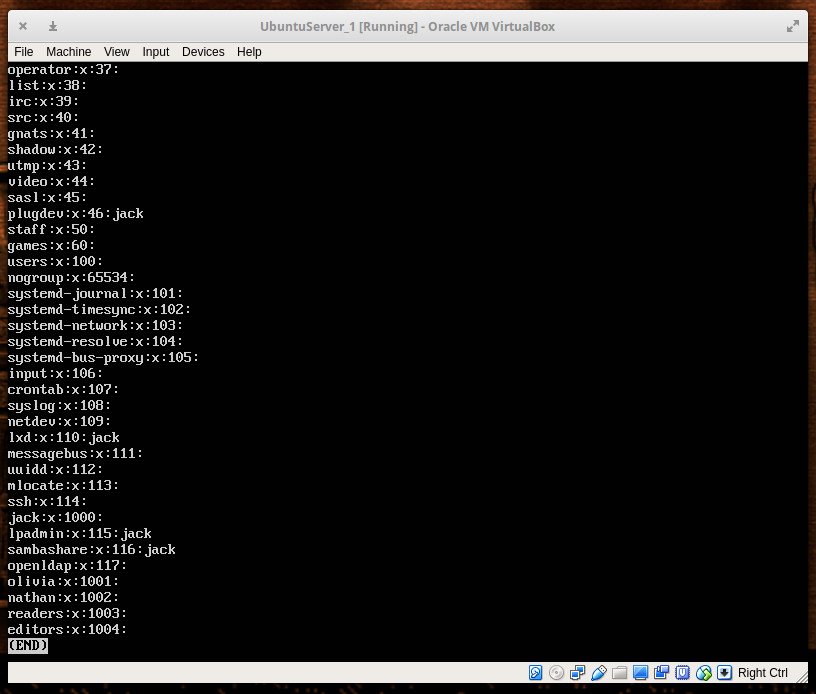
That’s it. If you issue the command less /etc/group , you’ll see our newly created groups listed ( Figure 1 ).
With our groups created, we need to add our users. We’ll add user nathan to group readers with the command:
sudo usermod -a -G readers nathan We’ll add the user olivia to the group editors with the command:
sudo usermod -a -G editors olivia Now we’re ready to start managing the users with groups.
Giving groups permissions to directories
Let’s say you have the directory /READERS and you need to allow all members of the readers group access to that directory. First, change the group of the folder with the command:
sudo chown -R :readers /READERS Next, remove write permission from the group with the command:
Now we remove the others x bit from the /READERS directory (to prevent any user not in the readers group from accessing any file within) with the command:
At this point, only the owner of the directory (root) and the members of the readers group can access any file within /READERS .
Let’s say you have the directory /EDITORS and you need to give members of the editors group read and write permission to its contents. To do that, the following command would be necessary:
sudo chown -R :editors /EDITORS sudo chmod -R g+w /EDITORS sudo chmod -R o-x /EDITORS
At this point, any member of the editors group can access and modify files within. All others (minus root) have no access to the files and folders within /EDITORS .
The problem with using this method is you can only add one group to a directory at a time. This is where access control lists come in handy.
Using access control lists
Now, let’s get tricky. Say you have a single folder— /DATA— and you want to give members of the readers group read permission and members of the group editors read/write permissions. To do that, you must take advantage of the setfacl command. The setfacl command sets file access control lists for files and folders.
The structure of this command looks like this:
setfacl OPTION X:NAME:Y /DIRECTORY Where OPTION is the available options, X is either u (for user) or g (for group), NAME is the name of the user or group, and DIRECTORY is the directory to be used. We’ll be using the option -m for modify. So our command to add the group reader for read access to the /DATA directory would look like this:
sudo setfacl -m g:readers:rx -R /DATA Now any member of the readers group can read the files contained within /DATA , but they cannot modify them.
To give members of the editors group read/write permissions (while retaining read permissions for the readers group), we’d issue the command;
sudo setfacl -m g:editors:rwx -R /DATA The above command would give any member of the editors group both read and write permission, while retaining the read-only permissions to the readers group.
All the control you need
And there you have it. You can now add members to groups and control those groups’ access to various directories with all the power and flexibility you need. To read more about the above tools, issue the commands:
- man usradd
- man addgroup
- man usermod
- man sefacl
- man chown
- man chmod
Learn more about Linux through the free “Introduction to Linux” course from The Linux Foundation and edX.
adduser command in Linux

As Linux is a multi-user system, it requires users to run software, configurations and commands. Those users require essential permissions to gain access to the system resources.
In this tutorial, we will learn about adduser command in Linux with examples.
Linux adduser command
adduser command is used to create a new user in Linux. It is a front-end tool that simplifies the low-level useradd command. You can easily create a user or add a new user to the group using it. In the backend, it uses a Perl script to provide a nice interactive high-level tool. It uses the configuration information in /etc/adduser.conf to perform actions.
While creating a user, adduser command by default creates a home directory, adds a skeleton and set passwords and other user details — that made it a favorite tool for many Linux fans. Like deluser, It is another recommended command when it comes to creating a new user in Debian and its family distributions.
adduser command is by default available on most Linux distributions. In case not found you can easily install it using the package manager from the default repositories.
The basic syntax of adduser command:
adduser Examples
Let’s look into some of the most common use cases of the adduser command.
1. Add a new normal user
By default, adduser command adds a normal user to the system. To add a new user simply type adduser followed by the name of the user.
This add a user account with the home directory and set with a password.
For example to add a normal user with name bob, type:
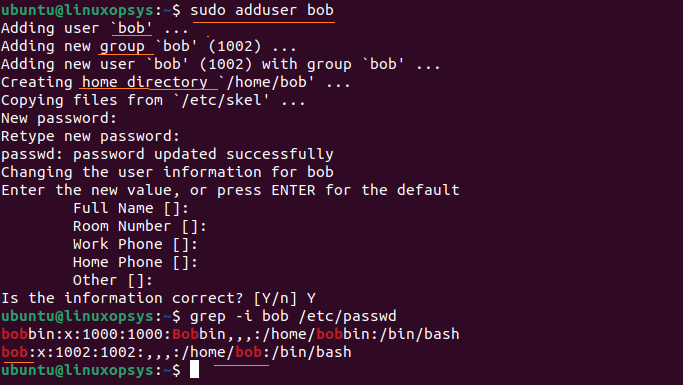
adduser command does the following by default when adding a new user:
- Creates a user using the username provided. Choose the first available UID from the range specified in the configuration file.
- Creates a group having the same name as the user. Choose available GID.
- Adds user to the group created.
- Creates a home directory for the user (/home/).
- Starts passwd command to set up the user’s password.
- Asks for additional user details.
To add an organizational user account ie system account use —system option. The difference between a normal user is it has no expiry date and uid is below 999.
2. Add a user with a different home directory
By default adduser command creates user’s home directory under /home. You can add —home option to create a new user account with a different directory.
adduser [username] --home [directory-path]For example to create a user named tom with home directory /mnt/data/tom, type:
sudo adduser tom --home /mnt/data/tom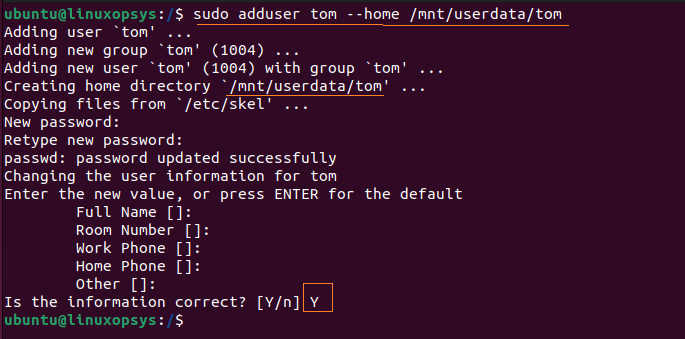
3. Adding a new user to a group
Using adduser command you can easily add an existing user to an existing group.
sudo adduser [existing-username] [exiting-group-name]For example to add a user named john to the group named developers, type:
sudo adduser tom developers
Make sure the user name and group already exist in the system.
4. Add a User with no password
The adduser with —disabled-login allows to you to add a user with no password. Until the password is set the user won’t be able to login.
sudo adduser --disabled-login [username]For example to add a user named bobs with no password, type:
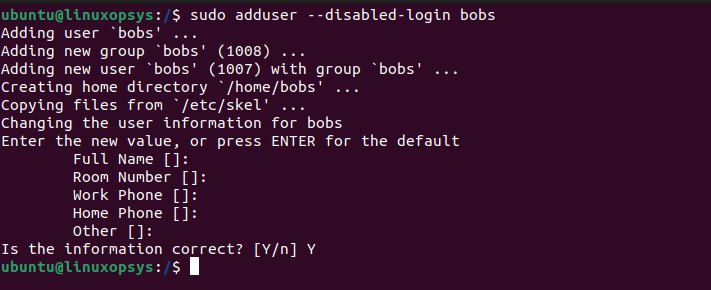
This command doesn’t prompt for a password. Later if you want the user to login, create a password using passwd command.
5. Add a user with disabled password
The adduser command with —disabled-password option allows you to add a user account with no password. But the user can still possible to login the system using SSH keys.
sudo adduser --disabled-password [username]For example to add a user named john with no password, type:
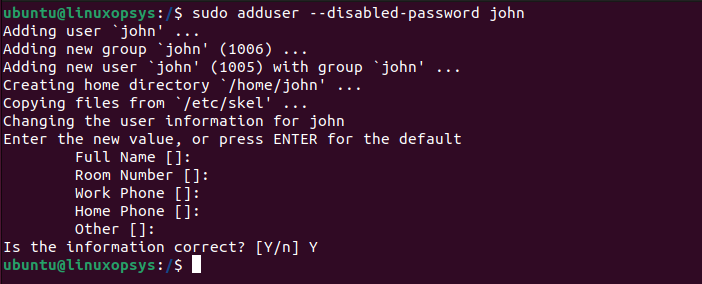
This is useful when you need a user with only ssh key login for secure authentication.
You can use —gecos option with empty string to avoid asking for finger information such as Full Name, Room Number, Work Phone, Home Phone, and Other. Example:
sudo adduser --disabled-password --gecos "" bob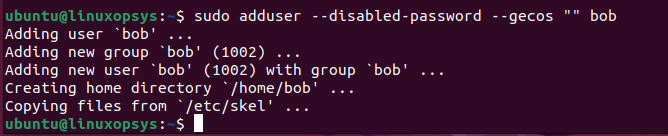
6. Use a different config file
Instead of using the default configuration file, we can instruct adduser command to use a custom config file. Use adduser command with —conf option for this.
sudo adduser [username] --conf [custom-config.conf]sudo adduser thomas --conf custom-config.conf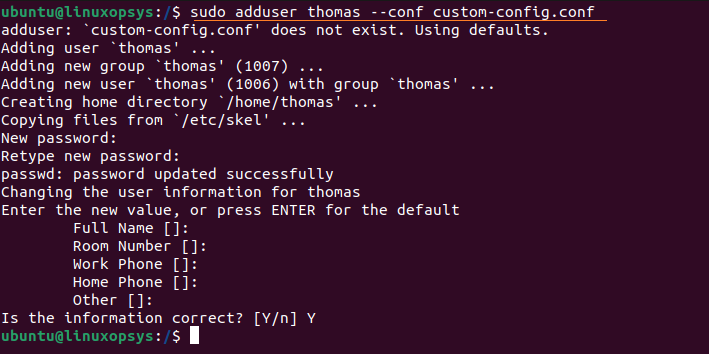
7. Add a user with a different shell
Instead of the default shell, you can manually specify the users login shell using —shell option. The default shell is specified in the /etc/adduser.conf configuration file — normally /bin/bash or /bin/sh is used.
You can use cat /etc/shells to list all your available shells in your Linux system. From the list choose your desired shell.
For example, to add a user named tomas with login shell zsh, type:
sudo adduser tomas --shell /bin/zsh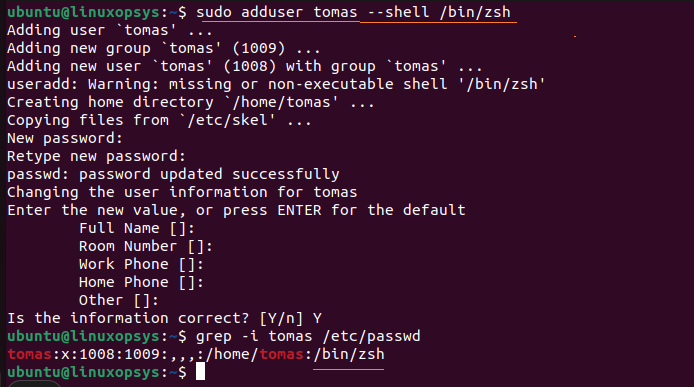
You can verify the login shell of the user by listing passwd file as follows:
adduser command Options
The following table describes some of the useful options for adduser command:
| Options | Description |
|---|---|
| —conf file-path | Use a different configuration file |
| —disabled-login | Disables login to a user’s account until the password is set. |
| —disabled-password | Disables login using a password. Though users can still log in using SSh RSA keys. |
| —gecos GECOS | If this option is given, adduser will not ask for finger information. |
| —gid ID | When creating a group, this option forces the new group-id to be the given number. When creating a user, this option will put the user in that group. |
| —home DIR | This uses the DIR directory as the user’s home directory, rather than the default specified by the configuration file. If the directory does not exist, it is created and skeleton files are copied. |
| —shell SHELL | This option uses SHELL as the user’s login shell, rather than the default specified by the configuration file. |
| —ingroup GROUP | It adds the new user to GROUP instead of a user’s group or the default group defined by USERS_GID in the configuration file. This affects the user’s primary group. |
| —no-create-home | It does not create the home directory, even if it doesn’t exist. |
| —quiet | It suppresses informational messages, only show warnings and errors. |
| —debug | It is most useful if you want to nail down a problem with adduser. |
| —system | It creates a system user or group. |
| —uid ID | It forces the new userid to be the given a number. The adduser command will fail if the userid is already taken. |
| —firstuid ID | It overrides the first uid in the range that the uid is chosen from (overrides FIRST_UID specified in the configuration file). |
| —lastuid ID | It overrides the last uid in the range that the uid is chosen from ( LAST_UID ) |
| —add_extra_groups | It adds a new user to extra groups defined in the configuration file. |
Conclusion
To conclude I can say adduser command is a more user-friendly version of useradd that is typically used on Debian-based systems.
For more information browse adduser manual page or type adduser —help on the terminal.
Navigate all-in-one place of Linux Commands for more learning.
If this resource helped you, let us know your care by a Thanks Tweet. Tweet a thanks