How to Manage Users with Groups in Linux
When you administer a Linux machine that houses multiple users, there might be times when you need to take more control over those users than the basic user tools offer. This idea comes to the fore especially when you need to manage permissions for certain users. Say, for example, you have a directory that needs to be accessed with read/write permissions by one group of users and only read permissions for another group. With Linux, this is entirely possible. To make this happen, however, you must first understand how to work with users, via groups and access control lists (ACLs).
We’ll start from the beginning with users and work our way to the more complex ACLs. Everything you need to make this happen will be included in your Linux distribution of choice. We won’t touch on the basics of users, as the focus on this article is about groups.
For the purpose of this piece, I’m going to assume the following:
You need to create two users with usernames:
You need to create two groups:
Olivia needs to be a member of the group editors , while nathan needs to be a member of the group readers. The group readers needs to only have read permission to the directory /DATA , whereas the group editors needs to have both read and write permission to the /DATA directory. This, of course, is very minimal, but it will give you the basic information you need to expand the tasks to fit your much larger needs.
I’ll be demonstrating on the Ubuntu 16.04 Server platform. The commands will be universal—the only difference would be if your distribution of choice doesn’t make use of sudo . If this is the case, you’ll have to first su to the root user to issue the commands that require sudo in the demonstrations.
Creating the users
The first thing we need to do is create the two users for our experiment. User creation is handled with the useradd command. Instead of just simply creating the users we need to create them both with their own home directories and then give them passwords.
The first thing we do is create the users. To do this, issue the commands:
sudo useradd -m olivia sudo useradd -m nathan
We have now created our users. If you look in the /home directory, you’ll find their respective homes (because we used the -m option, which creates a home directory).
Next each user must have a password. To add passwords into the mix, you’d issue the following commands:
sudo passwd olivia sudo passwd nathan
When you run each command, you will be prompted to enter (and verify) a new password for each user.
That’s it, your users are created.
Creating groups and adding users
Now we’re going to create the groups readers and editors and then add users to them. The commands to create our groups are:
addgroup readers addgroup editors
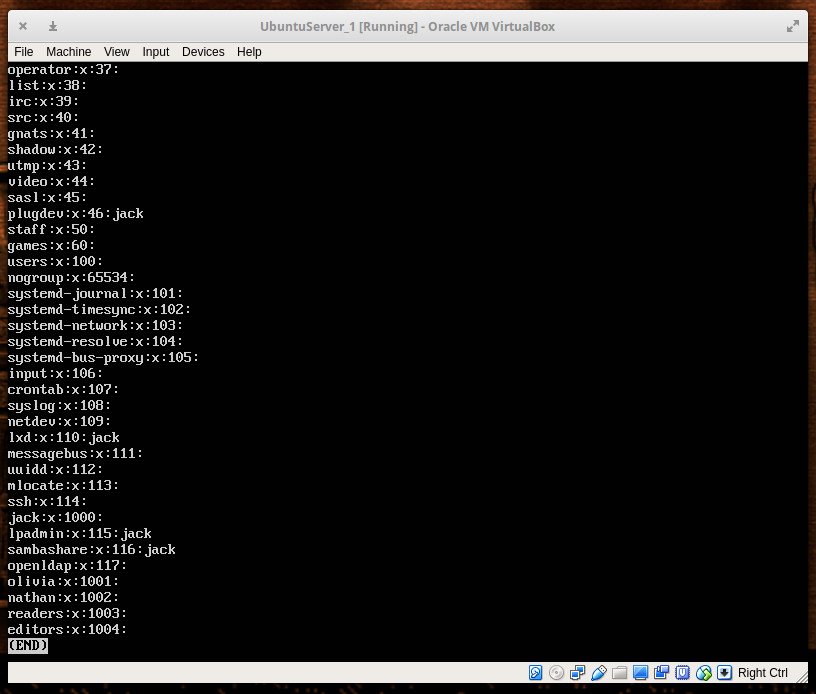
That’s it. If you issue the command less /etc/group , you’ll see our newly created groups listed ( Figure 1 ).
With our groups created, we need to add our users. We’ll add user nathan to group readers with the command:
sudo usermod -a -G readers nathan We’ll add the user olivia to the group editors with the command:
sudo usermod -a -G editors olivia Now we’re ready to start managing the users with groups.
Giving groups permissions to directories
Let’s say you have the directory /READERS and you need to allow all members of the readers group access to that directory. First, change the group of the folder with the command:
sudo chown -R :readers /READERS Next, remove write permission from the group with the command:
Now we remove the others x bit from the /READERS directory (to prevent any user not in the readers group from accessing any file within) with the command:
At this point, only the owner of the directory (root) and the members of the readers group can access any file within /READERS .
Let’s say you have the directory /EDITORS and you need to give members of the editors group read and write permission to its contents. To do that, the following command would be necessary:
sudo chown -R :editors /EDITORS sudo chmod -R g+w /EDITORS sudo chmod -R o-x /EDITORS
At this point, any member of the editors group can access and modify files within. All others (minus root) have no access to the files and folders within /EDITORS .
The problem with using this method is you can only add one group to a directory at a time. This is where access control lists come in handy.
Using access control lists
Now, let’s get tricky. Say you have a single folder— /DATA— and you want to give members of the readers group read permission and members of the group editors read/write permissions. To do that, you must take advantage of the setfacl command. The setfacl command sets file access control lists for files and folders.
The structure of this command looks like this:
setfacl OPTION X:NAME:Y /DIRECTORY Where OPTION is the available options, X is either u (for user) or g (for group), NAME is the name of the user or group, and DIRECTORY is the directory to be used. We’ll be using the option -m for modify. So our command to add the group reader for read access to the /DATA directory would look like this:
sudo setfacl -m g:readers:rx -R /DATA Now any member of the readers group can read the files contained within /DATA , but they cannot modify them.
To give members of the editors group read/write permissions (while retaining read permissions for the readers group), we’d issue the command;
sudo setfacl -m g:editors:rwx -R /DATA The above command would give any member of the editors group both read and write permission, while retaining the read-only permissions to the readers group.
All the control you need
And there you have it. You can now add members to groups and control those groups’ access to various directories with all the power and flexibility you need. To read more about the above tools, issue the commands:
- man usradd
- man addgroup
- man usermod
- man sefacl
- man chown
- man chmod
Learn more about Linux through the free “Introduction to Linux” course from The Linux Foundation and edX.
Users and groups
Users and groups are used on GNU/Linux for access control—that is, to control access to the system’s files, directories, and peripherals. Linux offers relatively simple/coarse access control mechanisms by default. For more advanced options, see ACL, Capabilities and PAM#Configuration How-Tos.
Overview
A user is anyone who uses a computer. In this case, we are describing the names which represent those users. It may be Mary or Bill, and they may use the names Dragonlady or Pirate in place of their real name. All that matters is that the computer has a name for each account it creates, and it is this name by which a person gains access to use the computer. Some system services also run using restricted or privileged user accounts.
Managing users is done for the purpose of security by limiting access in certain specific ways. The superuser (root) has complete access to the operating system and its configuration; it is intended for administrative use only. Unprivileged users can use several programs for controlled privilege elevation.
Any individual may have more than one account as long as they use a different name for each account they create. Further, there are some reserved names which may not be used such as «root».
Users may be grouped together into a «group», and users may be added to an existing group to utilize the privileged access it grants.
Note: The beginner should use these tools carefully and stay away from having anything to do with any other existing user account, other than their own.
Permissions and ownership
The UNIX operating system crystallizes a couple of unifying ideas and concepts that shaped its design, user interface, culture and evolution. One of the most important of these is probably the mantra: «everything is a file,» widely regarded as one of the defining points of UNIX. This key design principle consists of providing a unified paradigm for accessing a wide range of input/output resources: documents, directories, hard-drives, CD-ROMs, modems, keyboards, printers, monitors, terminals and even some inter-process and network communications. The trick is to provide a common abstraction for all of these resources, each of which the UNIX fathers called a «file.» Since every «file» is exposed through the same API, you can use the same set of basic commands to read/write to a disk, keyboard, document or network device.
A fundamental and very powerful, consistent abstraction provided in UNIX and compatible operating systems is the file abstraction. Many OS services and device interfaces are implemented to provide a file or file system metaphor to applications. This enables new uses for, and greatly increases the power of, existing applications — simple tools designed with specific uses in mind can, with UNIX file abstractions, be used in novel ways. A simple tool, such as cat, designed to read one or more files and output the contents to standard output, can be used to read from I/O devices through special device files, typically found under the /dev directory. On many systems, audio recording and playback can be done simply with the commands, » cat /dev/audio > myfile » and » cat myfile > /dev/audio ,» respectively.
Every file on a GNU/Linux system is owned by a user and a group. In addition, there are three types of access permissions: read, write, and execute. Different access permissions can be applied to a file’s owning user, owning group, and others (those without ownership). One can determine a file’s owners and permissions by viewing the long listing format of the ls command:
total 13740 drwxr-xr-x 2 root root 4096 Jan 12 00:33 grub -rw-r--r-- 1 root root 8570335 Jan 12 00:33 initramfs-linux-fallback.img -rw-r--r-- 1 root root 1821573 Jan 12 00:31 initramfs-linux.img -rw-r--r-- 1 root root 1457315 Jan 8 08:19 System.map26 -rw-r--r-- 1 root root 2209920 Jan 8 08:19 vmlinuz-linux
The first column displays the file’s permissions (for example, the file initramfs-linux.img has permissions -rw-r—r— ). The third and fourth columns display the file’s owning user and group, respectively. In this example, all files are owned by the root user and the root group.
total 16 drwxrwx--- 1 root vboxsf 16384 Jan 29 11:02 sf_Shared
In this example, the sf_Shared directory is owned by the root user and the vboxsf group. It is also possible to determine a file’s owners and permissions using the stat command: