- How to Add a New Disk to an Existing Linux Server
- Добавление жесткого диска в Linux через консоль
- Идентифицируем жесткий диск
- Создание файловой системы
- Добавление нового диска в Ubuntu
- Как подключить дополнительный жесткий диск в Ubuntu. Способ 1
- 2. Создание разделов на HDD в Ubuntu
- 3. Форматирование раздела
- 4. Монтирование раздела
- How to add new disk in Linux
- Adding raw disk to Linux machine
- Identifying newly added disk in Linux
- Add new disk in LVM
- Mounting volume from new disk on mount point
How to Add a New Disk to an Existing Linux Server
As system administrators, we would have got requirements wherein we need to configure raw hard disks to the existing servers as part of upgrading server capacity or sometimes disk replacement in case of disk failure.
In this article, I will take you through the steps by which we can add the new raw hard disk to an existing Linux server such as RHEL/CentOS or Debian/Ubuntu.
Important: Please note that the purpose of this article is to show only how to create a new partition and doesn’t include partition extension or any other switches.
I am using fdisk utility to do this configuration.
I have added a hard disk of 20GB capacity to be mounted as a /data partition.
fdisk is a command line utility to view and manage hard disks and partitions on Linux systems.
This will list the current partitions and configurations.

After attaching the hard disk of 20GB capacity, the fdisk -l will give the below output.
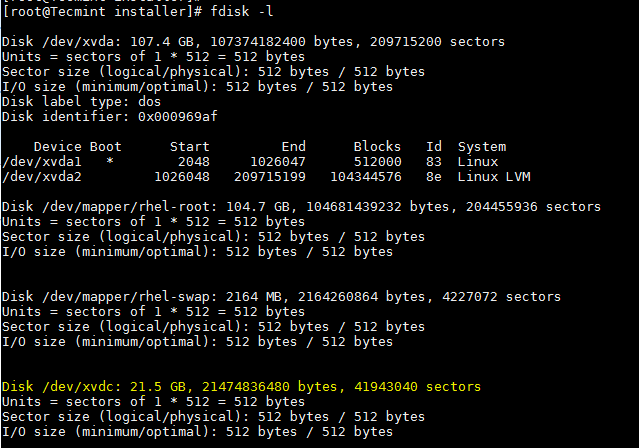
New disk added is shown as /dev/xvdc . If we are adding physical disk it will show as /dev/sda based of the disk type. Here I used a virtual disk.
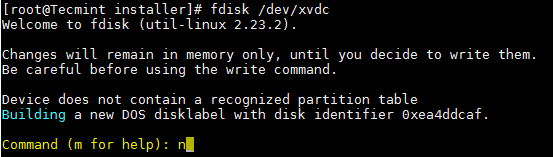
To partition a particular hard disk, for example /dev/xvdc.
Commonly used fdisk commands.
- n – Create partition
- p – print partition table
- d – delete a partition
- q – exit without saving the changes
- w – write the changes and exit.
Here since we are creating a partition use n option.
Create either primary/extended partitions. By default we can have upto 4 primary partitions.
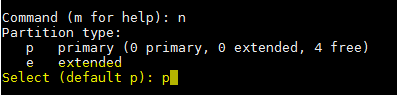
Give the partition number as desired. Recommended to go for the default value 1 .
![]()
Give the value of the first sector. If it is a new disk, always select default value. If you are creating a second partition on the same disk, we need to add 1 to the last sector of the previous partition.
![]()
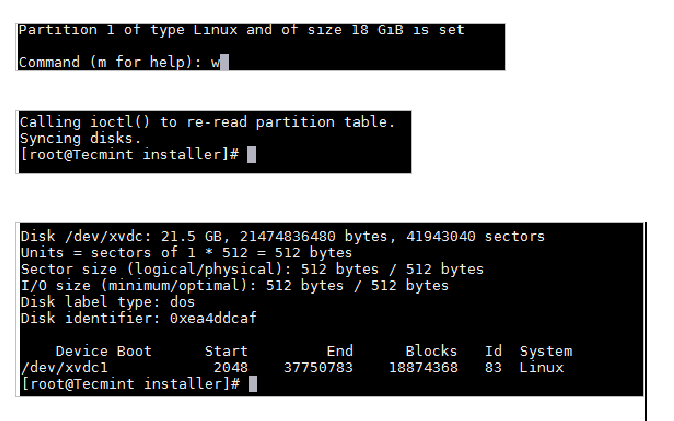
Give the value of the last sector or the partition size. Always recommended to give the size of the partition. Always prefix + to avoid value out of range error.
![]()
Save the changes and exit.
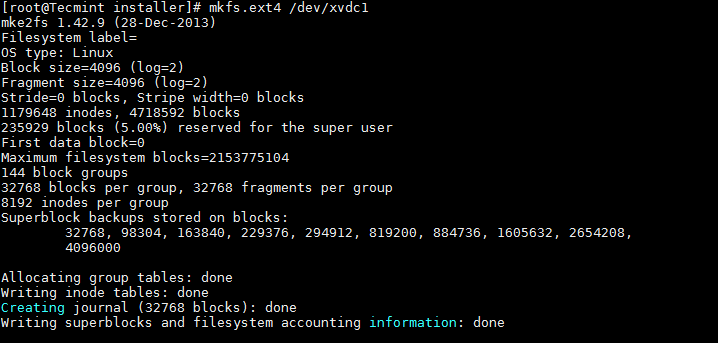
Now format the disk with mkfs command.
Once formatting has been completed, now mount the partition as shown below.
Make an entry in /etc/fstab file for permanent mount at boot time.
/dev/xvdc1 /data ext4 defaults 0 0
Conclusion
Now you know how to partition a raw disk using fdisk command and mount the same.
We need to be extra cautious while working with the partitions especially when you are editing the configured disks. Please share your feedback and suggestions.
Добавление жесткого диска в Linux через консоль
Добавление жесткого диска в Linux — операция достаточно легкая, хотя и кажется на первый взгляд достаточно тяжелой. Ниже предоставлена подробная инструкция того, как добавить жесткий диск в операционных системах семейства Linux.
Все действия проводились на компьютере под управлением операционной системы Debian 8.4, однако они должны подойти и к другим дистрибьютивам Linux.
Идентифицируем жесткий диск
Начнем с того, что найдем под каким именем скрывается жесткий диск в системе. Для этого используем команду ls:
/dev/sda /dev/sda2 /dev/sdb1 /dev/sdc /dev/sda1 /dev/sdb /dev/sdb2 /dev/sddДля понимания стоит отметить, что /dev/sda /dev/sdb/ и т. д. (без цифр) — это сами жесткие диски, а вот /dev/sda1, /dev/sda2 — это разделы на жестких дисках.
Создание файловой системы
Если жесткий диск новый, то на нем не должно быть никакой файловой системы. Нам остается лишь получить информацию по этому жесткому диску с помощью утилиты fdisk. Вводим:
Disk /dev/sdc: 931.5 GiB, 1000204886016 bytes, 1953525168 sectors Units: sectors of 1 * 512 = 512 bytes Sector size (logical/physical): 512 bytes / 4096 bytes I/O size (minimum/optimal): 4096 bytes / 4096 bytesУбедившись в том, что это нужный диск, приступаем. Для начала нужно будет создать новый раздел, для этого опять используем программу fdisk:
Welcome to fdisk (util-linux 2.25.2). Changes will remain in memory only, until you decide to write them. Be careful before using the write command. Command (m for help):Partition type p primary (0 primary, 0 extended, 4 free) e extended (container for logical partitions)Если планируется создавать один раздел, или больше (но не более четырех), то выбираем пункт p. У Partition number, First sector и Last sector оставляем все по умолчанию и просто нажимаем Enter. Если все прошло успешно, то появится сообщение примерно следующего содержания:
Created a new partition 1 of type 'Linux' and of size 931.5 GiB.Теперь нужно сохранить эти изменения — вводим команду w, которая укажет программе fdisk о необходимости выйти, предварительно записав изменения на диск. Если же что-то было сделано не так, то можно выйти без изменений введя команду q. Далее нужно создать файловую систему на жестком диске. Пусть это будет ext4:
Так же может оказаться, что диск уже до этого использовался, и там вполне может быть уже существующая файловая система. В таком случае при форматировании раздела появится следующее сообщение:
/dev/sdc1 contains a ntfs file system Proceed anyway? (y,n)Если на жестком диске нет никаких нужных данных, и не планируется использование файловой системы NTFS, то нужно ответить y. Осталось смонтировать (добавить) раздел в систему. Допустим это будет папка backup, расположенная в корне. Создаем папку:
/dev/sdc1: UUID="360ca23a-300t-asdd-8c8e-a3xdf46dlpf1" TYPE="ext4"Находим нужный, и запоминаем его UUID. Теперь открываем /etc/fstab, и добавляем туда следующую строчку:
UUID=360ca23a-300t-asdd-8c8e-a3xdf46dlpf1 /backup ext4 errors=remount-ro 0 1echo "UUID=360ca23a-300t-asdd-8c8e-a3xdf46dlpf1 /backup ext4 errors=remount-ro 0 1" | sudo tee -a /etc/fstabЭтим мы объясняем системе, что при загрузке следует смонтировать раздел с определенным UUID как папку /backup и файловой системой ext4.
Проверить правильность предыдущих действий можно с помощью команды:
Если никаких ошибок не выявлено, значит все было сделано правильно. Для того, чтобы примонтировать раздел прямо сейчас, можно выполнить следующую команду:
sudo mount -t ext4 /dev/sdc1 /backupДобавление нового диска в Ubuntu

Как подключить дополнительный жесткий диск в Ubuntu. Способ 1
Для выполнения этих команд нужны права рута (root). Чтобы перед каждой командой не набирать sudo вводим sudo su.
Список дисков покажет программа fdisk:
В Ubuntu жесткие диски обозначаются /dev/sda, /dev/sdb, /dev/sdc и т.д. В данном случае диск обозначается /dev/sdb.
2. Создание разделов на HDD в Ubuntu
Для разметки диски снова воспользуемся программой fdisk. Запускаем fdisk с указанием HDD, на котором нужно создать раздел:
fdisk запустится в командном режиме. Чтобы посмотреть список всех доступных команд нужно ввести m. Но для наших целей нужно всего несколько основных команд:
p — просмотр текущей таблицы разделов диска;
n — создание нового раздела;
d — удаление существующего раздела;
w — запись таблицы разделов на диск и последующий выход;
q — выход без записи новой таблицы на жесткий диск.
Проверяем наличие разделов на диске командой p, если их нет, то создаем новый раздел командой n. При создании раздела придется ответить на несколько вопросов, если планируется создать не больше 4-х разделов, то создаем основной раздел. Далее указываем номер раздела — 1. И в конце нужно указать начальный и конечный цилиндры раздела, можно просто нажимать Enter, программа сама все задаст. Снова проверяем список разделом и видим вновь созданный раздел, который обозначается /dev/sdb1. Обязательно сохраняем изменения командой w.
3. Форматирование раздела
Теперь раздел есть, но этого мало. Его нужно отформатировать, это делается очень просто одной командой
4. Монтирование раздела
Смонтировать раздел в пустоту не получится, поэтому нам нужен каталог, который будет точкой монтирования. Создадим каталог /hdd в директории /media, в которую монтируются все подключаемые устройства (внешние диски, cd-rom, флешки и т.д.)
Монтируем раздел в созданный каталог:
How to add new disk in Linux
In this article, we will walk you through steps to add a new disk in the Linux machine. Adding a raw disk to the Linux machine may vary depending upon the type of server you have but once the disk is presented to the machine, the procedure of getting it to mount points is almost the same.
Objective: Add a new 10GB disk to the server and create a 5GB mount point out of it using LVM and newly created volume group.
Adding raw disk to Linux machine
If you are using the AWS EC2 Linux server, you may follow these steps to add raw disk. If you are on VMware Linux VM you will have a different set of steps to follow to add disk. If you are running a physical rack-mount/blade server then adding disk will be a physical task.
Now once the disk is attached to the Linux machine physically/virtually, it will be identified by the kernel and then our rally starts.
Identifying newly added disk in Linux
After the attachment of the raw disk, you need to ask the kernel to scan a new disk. Mostly it’s done now automatically by the kernel in new versions.
First thing is to identify the newly added disk and its name in the kernel. There are numerous ways to achieve this. I will list a few –
- You can observer lsblk output before and after adding/scanning disk to get a new disk name.
- Check newly created disk files in /dev filesystem. Match timestamp of file and disk addition time.
- Observer fdisk -l output before and after adding/scanning disk to get a new disk name.
For our example, I am using the AWS EC2 server and I added 5GB disk to my server. here is my lsblk output –
[root@kerneltalks ~]# lsblk NAME MAJ:MIN RM SIZE RO TYPE MOUNTPOINT xvda 202:0 0 10G 0 disk ├─xvda1 202:1 0 1M 0 part └─xvda2 202:2 0 10G 0 part / xvdf 202:80 0 10G 0 disk
You can see xvdf is our newly added disk. Full path for disk is /dev/xvdf .
Add new disk in LVM
We are using LVM here since its widely used and flexible volume manager on the Linux platform. Make sure you have lvm or lvm2 package installed on your system. If not, install lvm/lvm2 package.
Now, we are going to add this RAW disk in Logical Volume Manager and create 10GB of mount point out of it. List of commands you need to follow are –
If you are willing to add a disk to the existing mount point and use its space to extend mount point then vgcreate should be replaced by vgextend .
Sample outputs from my session –
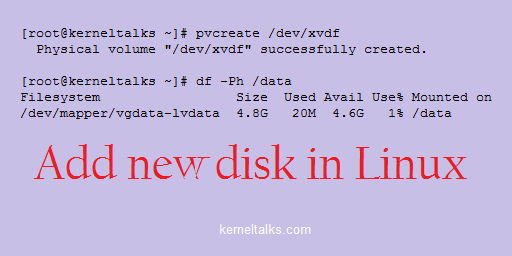
[root@kerneltalks ~]# pvcreate /dev/xvdf Physical volume "/dev/xvdf" successfully created. [root@kerneltalks ~]# vgcreate vgdata /dev/xvdf Volume group "vgdata" successfully created [root@kerneltalks ~]# lvcreate -L 5G -n lvdata vgdata Logical volume "lvdata" created.
Now, you have a logical volume created. You need to format it with the filesystem on your choice and mount it. We are choosing ext4 filesystem here and formatting using mkfs.ext4 .
[root@kerneltalks ~]# mkfs.ext4 /dev/vgdata/lvdata mke2fs 1.42.9 (28-Dec-2013) Filesystem label= OS type: Linux Block size=4096 (log=2) Fragment size=4096 (log=2) Stride=0 blocks, Stripe width=0 blocks 327680 inodes, 1310720 blocks 65536 blocks (5.00%) reserved for the super user First data block=0 Maximum filesystem blocks=1342177280 40 block groups 32768 blocks per group, 32768 fragments per group 8192 inodes per group Superblock backups stored on blocks: 32768, 98304, 163840, 229376, 294912, 819200, 884736 Allocating group tables: done Writing inode tables: done Creating journal (32768 blocks): done Writing superblocks and filesystem accounting information: done
Mounting volume from new disk on mount point
Lets mount the logical volume of 5GB which we created and formatted on /data mount point using mount command.
[root@kerneltalks ~]# mount /dev/vgdata/lvdata /data [root@kerneltalks ~]# df -Ph /data Filesystem Size Used Avail Use% Mounted on /dev/mapper/vgdata-lvdata 4.8G 20M 4.6G 1% /data
Verify your mount point with df command as above and you are all done! You can always add an entry in /etc/fstab to make this mount persistent over reboots.
You have attached a 10GB disk to the Linux machine and created a 5GB mount point out of it!