- Add a new user account
- How do you Add a User to Linux
- Adding New User in Linux
- Creating a User With a Different Home Directory
- Creating a User With a Specific User ID
- Creating a User With a Specific Group ID
- Adding a User to Multiple Groups
- Adding a User Without the Home Directory
- Creating a User with an Account Expiry Date
- Creating a User with Password Expiry Date
- Adding a User with Custom Comments
- Changing User Login Shell
- Adding a User With Specific Home Directory, Default Shell, and Customized Comment
- Conclusion
- About the author
- Simran Kaur
Add a new user account
You can add multiple user accounts to your computer. Give one account to each person in your household or company. Every user has their own home folder, documents, and settings.
You need administrator privileges to add user accounts.
- Open the Activities overview and start typing Users .
- Click on Users to open the panel.
- Press Unlock in the top right corner and type in your password when prompted.
- Press the + Add User. button under Other Users to add a new user account.
- If you want the new user to have administrative access to the computer, select Administrator for the account type. Administrators can do things like add and delete users, install software and drivers, and change the date and time.
- Enter the new user’s full name. The username will be filled in automatically based on the full name. If you do not like the proposed username, you can change it.
- You can choose to set a password for the new user, or let them set it themselves on their first login. If you choose to set the password now, you can press the icon to automatically generate a random password. To connect the user to a network domain, click Enterprise Login .
- Click Add . When the user has been added, Parental Controls and Language settings can be adjusted.
If you want to change the password after creating the account, select the account, Unlock the panel and press the current password status.
In the Users panel, you can click the image next to the user’s name to the right to set an image for the account. This image will be shown in the login window. The system provides some stock photos you can use, or you can select your own or take a picture with your webcam.
How do you Add a User to Linux
![]()
Linux provides you the most commonly used command that is “useradd” or “adduser.” It allows you to add or create the user to the Linux system and some properties that may differ from another user. These users can access some files or directories, and some users may not depend on what access they have. Whenever a user is added or created, access is given to that user as per the requirement.
The “useradd ” command may vary for various Linux distributions, so it is recommended that you read the documentation properly before you create a new user account in Linux. We highlight the methods on how you can add or create a new user within the Linux system.
Whenever you run the “adduser” command on the terminal, it will perform the following tasks.
- You are allowed to make changes to the mentioned Linux files – /etc/passwd, /etc/shadow, /etc/group, and /etc/gshadow whenever you create a new user account.
- You are allowed to create and populate the user’s home directory whenever you create the new user.
- You are allowed to set permissions and ownerships for the new users to the home directory.
Syntax of the “adduser” command as follows
Adding New User in Linux
For adding or creating a new user, use the “adduser” or the “useradd” command along with the username. The username can be a login name for login into the Linux system. You can add only one user and must be different from another user existing on the system.
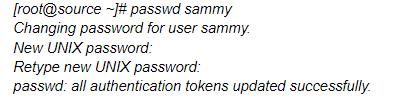
Suppose you want to add the user named “Sammy,” then run the below-mentioned command on the terminal.
If you use the “useradd” command, the user is created in the locked state, and for unlocking that user account, set a password for that account using the “passwd” command as shown below.
After creating the new user, you will see a new entry automatically added to the “/etc/passwd” file, and it will store the user’s information in a unique format, as shown below.
The above information will specify the following fields separated by a colon in respective order.
- Username: specifies the user login name for logging into the system and should be up to 32 characters long.
- Password: this user credential is stored in the /etc/shadow file as an encrypted format.
- User ID (UID): every user has a User ID known as a User Identification Number.
- Group ID (GID): stands for Group Identification Number and is stored in /etc/group file along with the other details of the user.
- User Info (optional) will store extra information, such as full user name and others.
- Home Directory: it helps in defining the absolute location of the user’s home directory.
- Shell specifies the absolute location of a user’s shell, i.e.,/bin/bash.
Creating a User With a Different Home Directory
Whenever you run the “adduser” command, it will create the user’s home directory under the /home directory along with the username. If you want to change the location of the home directory for the new user, use the “-d” option along with the “adduser” command.
The below command will create the user “nick” with the home directory as “/data/nick.”
If we check the content of the /etc/passwd file, you will find the following information about the user nick.
[ root @ source ~ ] # cat /etc/passwd | grep nick
nick:x: 505 : 505 :: / data / nick: / bin / bash
Creating a User With a Specific User ID
A Unique Identification Number (UID) is borne by every user. While creating the new user in Linux, the system will assign the numbers 500, 501, 502, etc., by default. However use the “-u” option along with the “adduser” command if you want to assign a specific user ID to the newly created user,
Here, we add a user “diva” and assign a new UID as “1122,” as shown below.
To check the added details about the user, check the content of the “/etc/passwd” file, and you will see the following user details.
[ root @ source ~ ] # cat /etc/passwd | grep diva
diva:x: 1122 : 1122 :: / home / diva: / bin / bash
Creating a User With a Specific Group ID
Every user on the Linux system has a Group Identification System. You can use the “-g” option along with the “useradd” command for creating a user with a specific group ID. in the below example; we are adding a user named “geet” with a specific GID and UID using the “-u” and “-g” options.
For checking the detail of the newly added user to the system, check the content of the /etc/passwd file as shown below.
[ root @ source ~ ] # cat /etc/passwd | grep geet
geet:x: 1000 : 500 :: / home / geet: / bin / bash
Adding a User to Multiple Groups
If you wish to add a new user to multiple groups, mention the “-G” option along with the “adduser” command. You can separate the various groups using commas without any space, as shown below.
You can check the multiple groups assigned to the user using the “id” command as shown below.
[ root @ source ~ ] # id downey
uid = 1001 ( downey ) gid = 1001 ( downey )
groups = 1001 ( downey ) , 500 ( admins ) , 501 ( webadmin ) , 502 ( developers )
context =root:system_r:unconfined_t:SystemLow-SystemHigh
Adding a User Without the Home Directory
Suppose you don’t want to assign a home directory to the newly added user due to security users than the “-M” option along with the “adduser” command. Here we are creating a new user, “Nancy” without a home directory for it.
If you want to check the user is created without the home directory, use the below-mentioned “ls” command as shown below.
[ root @ source ~ ] # Is -l/home/nancy
Is: cannot access / home / nancy: No such file or directory
Creating a User with an Account Expiry Date
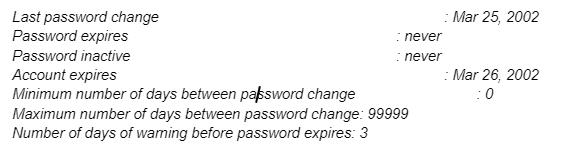
Whenever we add the user using the “adduser” command, the account will never expire as the expiry date is zero. But you can add the expiry date for the user using the “-e” option and the “useradd” command, as shown below.
It will create a temporary account for the specified time given in the “YYYY-MM-DD” format.
For checking the account age and password of the user, you can use the “chage” command for the “Nancy” user.
Creating a User with Password Expiry Date
If you want to define the number of days after the expiration of a password, you can use the “-f” option along with the “useradd” command. The “0” value will remain inactive for the user as the password expires. By default, the password expiry value is “-1,” which means it will not expire. But if you want to create a temporary user with some password expiration date, use the “-f” option along with the “useradd” command, as shown below.
Adding a User with Custom Comments
If you want to add some comments to the user’s details in the /etc/passwd file, use the “-c” option and the “useradd” command. Add the comment as a single line without having any space, as shown below.
Here, we add a user “mathew” along with the full name “mathew stellar”.
You can see the added details in the /etc/passwd file as shown below.
[ root @ source ~ ] # tail -1 /etc/passwd
mathew:x: 1006 : 1008 :Mathew Stellarr: / home / mathew: / bin / sh
Changing User Login Shell
Whenever we add a new user, they do not have to do anything with the login shell. However, often there is a need to assign a different login shell to the users. Linux allows assigning different login shells to each user using the “-s” option along with the “useradd” command.
Here we add the user “dash” without the login shell (/sbin/nologin) shell.
You can check the details under the /etc/passwd file.
[ root @ source ~ ] # tail -1 /etc/passwd
dash:x: 1002 : 1002 :: / home / dash: / sbin / nologin
Adding a User With Specific Home Directory, Default Shell, and Customized Comment
We are using the following command for adding a new user “raj” with the home directory as “/var/www/xyz,” with default shell as “/bin/bash,” and adding some extra information regarding the user.
In the above example, the -m and -d options are used for creating a new user with the specified home directory, and the -s option will set the default shell for that user, and the -c option will add the required comment for the user. Check the added information in the /etc/passwd file.
Conclusion
The Linux system has a different way of adding a new user and related details stored in files present on the Linux system. You can use either the “useradd” or “adduser” command as your Linux distribution to add a new user to the system. Also, you will get to use various options along with the command for adding additional details for changing the default settings for the added user. You can go through this article and understand the detailed use of the “useradd” command and its various options.
About the author
Simran Kaur
Simran works as a technical writer. The graduate in MS Computer Science from the well known CS hub, aka Silicon Valley, is also an editor of the website. She enjoys writing about any tech topic, including programming, algorithms, cloud, data science, and AI. Travelling, sketching, and gardening are the hobbies that interest her.