- Samba In Ubuntu Linux – Adding Samba Users
- Adding Samba user on Ubuntu Server
- Adding Samba user on Ubuntu Desktop
- Install and Configure Samba
- What you’ll learn
- What you’ll need
- 2. Installing Samba
- 3. Setting up Samba
- What we’ve just added
- 4. Setting up User Accounts and Connecting to Share
- Connecting to Share
- If you’d like to take your configuration further…
- 🛠️ Как добавить пользователя Samba на Linux
- Добавление пользователя
- Добавление существующего локального пользователя в samba
- Пункт о добавлении пользователей в Samba версии 4.x
- Удаление пользователя samba
- Заключение
Samba In Ubuntu Linux – Adding Samba Users
This is the second post of our series about installing, configuring and managing Samba in Ubuntu Linux. The first post can be found here.
In this post, we’re going to show you how to add Samba user so that the user can access shares on Ubuntu or Linux machine from a remote computer. Adding Samba user is important because without it, it might prevent the user from accessing shares from a remote computer.
Samba has an access control list (smbpasswd file) of users who should have access to Samba shares. These users must already be active on the Linux machine before they can be added to Samba user list.
If a user does not have an account on the machine, he/she can’t be added to smbpasswd file.
Adding Samba user on Ubuntu Server
To add Samba user on Ubuntu server, open the terminal and run the commands below.
username should be replaced with the actual user account name .
When you run the command above, it should prompt you to create a password for the user. Create one, maybe one that matches your Ubuntu account password.
Next, to give the user access to a particular share, open the smb.conf file at /etc/samba/smb.conf and create share as followed below.
replace username with the actual account name and save the file .
Adding Samba user on Ubuntu Desktop
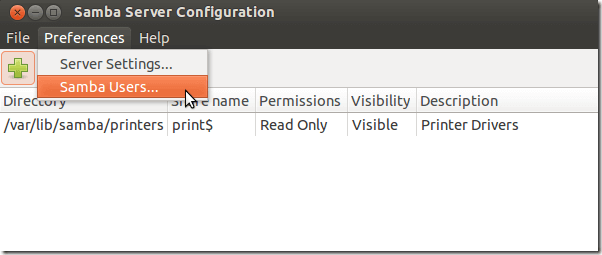
The above steps above should also work on Ubuntu desktops. However, since most desktop users use GUI to manage stuff, open Samba from Unity Dash.
Next, select Preferences –> Samba Users
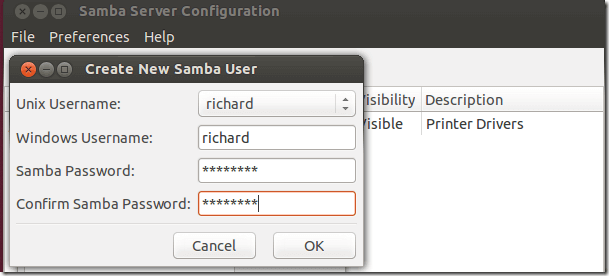
Then click ‘Add’ and select an existing user account, then create the Windows username and password for the account. This is the same as what we did for Ubuntu server setup.
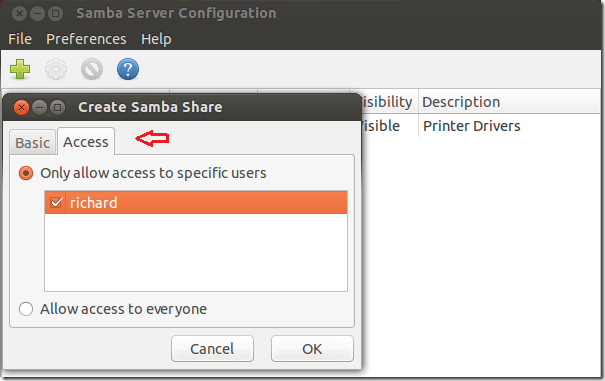
To give the user access to shares, create a share and select Access tab, then select the username you wish to have access to the shares and save.
This is how Samba users are create and provided access to resources.
Install and Configure Samba
A Samba file server enables file sharing across different operating systems over a network. It lets you access your desktop files from a laptop and share files with Windows and macOS users.
This guide covers the installation and configuration of Samba on Ubuntu.
What you’ll learn
What you’ll need
If you have everything ready, let’s dive straight into the installation process on the next step!
Originally authored by Aden Padilla.
2. Installing Samba
sudo apt update sudo apt install samba We can check if the installation was successful by running:
The following should be its output:
samba: /usr/sbin/samba /usr/lib/samba /etc/samba /usr/share/samba /usr/share/man/man7/samba.7.gz /usr/share/man/man8/samba.8.gz 3. Setting up Samba
Now that Samba is installed, we need to create a directory for it to share:
The command above creates a new folder sambashare in our home directory which we will share later.
The configuration file for Samba is located at /etc/samba/smb.conf . To add the new directory as a share, we edit the file by running:
sudo nano /etc/samba/smb.conf At the bottom of the file, add the following lines:
[sambashare] comment = Samba on Ubuntu path = /home/username/sambashare read only = no browsable = yes Then press Ctrl-O to save and Ctrl-X to exit from the nano text editor.
What we’ve just added
Now that we have our new share configured, save it and restart Samba for it to take effect:
sudo service smbd restart Update the firewall rules to allow Samba traffic:
4. Setting up User Accounts and Connecting to Share
Since Samba doesn’t use the system account password, we need to set up a Samba password for our user account:
sudo smbpasswd -a username Note
Username used must belong to a system account, else it won’t save.
Connecting to Share

On Ubuntu: Open up the default file manager and click Connect to Server then enter:

On macOS: In the Finder menu, click Go > Connect to Server then enter:
On Windows, open up File Manager and edit the file path to:
Note: ip-address is the Samba server IP address and sambashare is the name of the share.

You’ll be prompted for your credentials. Enter them to connect!
If you’d like to take your configuration further…
🛠️ Как добавить пользователя Samba на Linux

Samba – это бесплатная сетевая служба с открытым исходным кодом, работающая по модели клиент-сервер.
Она позволяет обмениваться файлами в операционных системах Windows и Linux/Unix и использует протоколы SMB (Server Messaging Block) и CIFS (Common Internet File system) для беспрепятственного совместного использования ресурсов в сети. Совместное использование Samba считается одним из наиболее эффективных и экономичных способов совместного использования ресурсов в локальной сети – LAN.
Файловый ресурс в Samba называется общим ресурсом samba.
Общий ресурс samba может быть любым – файлом, каталогом или даже принтером.
В сетевой конфигурации клиент посылает серверу Samba запрос на файл, каталог или общий принтер.
В свою очередь, сервер Samba отвечает на эти запросы, отказывая или предоставляя клиенту доступ к запрашиваемым общим ресурсам.
Чтобы получить доступ к общему ресурсу , в Linux необходимо добавить нового пользователя в качестве пользователя samba.
Затем пользователь samba может подключиться к серверу Samba, используя пароль samba, и получить доступ к общим ресурсам.
В этом руководстве мы расскажем вам о процедуре добавления пользователя samba.
Добавление пользователя
Теперь давайте сосредоточимся на том, как добавить нового пользователя в Samba.
Сначала создайте новую учетную запись пользователя, как это делается в любой системе Linux.
В этом примере мы создадим новую учетную запись для пользователя по имени ‘joe’.
Затем добавьте пользователя samba, назначив новому пользователю пароль samba с помощью команды ‘smbpasswd’, как показано на далее:
Вам будет предложено ввести новый пароль samba, а затем подтвердить его, как показано ниже
New SMB password: Retype new SMB password: added user joe.После создания пользователя samba необходимо добавить его в общий ресурс samba путем редактирования файла samba smb.conf, который является конфигурационным файлом Samba.
Прокрутите и найдите общий ресурс samba, в данном случае ‘documents’, и добавьте пользователя в список допустимых пользователей, как показано в 4-й строке конфигурационного блока ниже.
[documents] comment = Departmental documents share path = /srv/documents valid users = joe public = no writable = yes browsable = yesТеперь сохраните изменения и выйдите из файла конфигурации.
Чтобы изменения сохранились, перезапустите демон Samba, как показано далее:
sudo systemctl restart smbДобавление существующего локального пользователя в samba
Если в вашей системе уже есть существующий пользователь, то добавить его в samba довольно просто.
Просто используйте команду ‘smbpasswd’, как показано ниже:
sudo smbpasswd -a existing_userЗатем измените конфигурационный файл и добавьте существующего пользователя в список допустимых пользователей samba, как было показано ранее.
valid users = existing_userПункт о добавлении пользователей в Samba версии 4.x
Начиная с Samba версии 4.x и выше, Samba имеет возможность работать в качестве контроллера домена AD.
Вам не нужно иметь стандартного пользователя Linux или Unix в Linux для каждого создаваемого пользователя Samba.
Чтобы добавить пользователей в Samba Active directory, используйте показанную команду:
samba-tool user add usernameУдаление пользователя samba
Если вы хотите удалить пользователя Samba из вашей системы, используйте команду ‘smbpasswd’ с опцией -x, за которой следует имя пользователя.
Если вы хотите, вы можете полностью удалить пользователя вместе с домашним каталогом с помощью команды userdel, как показано далее:
Заключение
Мы рассмотрели, как можно добавить и удалить пользователя Samba в системе Linux.
Как было сказано ранее, Samba версии 4.x теперь поддерживает аутентификацию через Active directory, в отличие от предыдущих версий Samba.