- 10 Things to Do After Installing Arch Linux (2023)
- Content
- 1. Configure pacman
- 2. Make bash colorful
- 3. Automatic cleaning the package cache
- 4. Install AUR helper
- 5. Create user directory folders
- 6. Install essential programs
- 7. Install Microcode
- 8. Disable GRUB delay
- 9. Set up firewall
- 10. Back up your system
- Bonus
- Brilliant
- What to do after installing Arch Linux?
- 1. Update The System
- 2. Install A Display Server
- 3. Install A Desktop Environment
- 4. Install A Display Manager
- 5. Install An AUR Helper
- 6. Install Additional Kernels
- 7. Install Microcode
- 8. Rank Mirrorlists
- Conclusion
10 Things to Do After Installing Arch Linux (2023)
I assume you have installed Arch Linux with a bare minimum graphical desktop environment as I showed in my previous post. This post describes 10 essential things to do after minimal installation of Arch Linux with a graphical desktop
Content
- 1. Configure pacman
- 2. Make bash colorful
- 3. Automatic cleaning the package cache
- 4. Install AUR helper
- 5. Create user directory folders
- 6. Install essential programs
- 7. Install Microcode
- 8. Disable GRUB delay
- 9. Set up firewall
- 10. Back up your system
- Bonus
- Brilliant

1. Configure pacman
We will start with the heart of Arch Linux – pacman – the package manager. By default, pacman displays everything in black and white. We gonna change that there is some color in the pacman’s output.
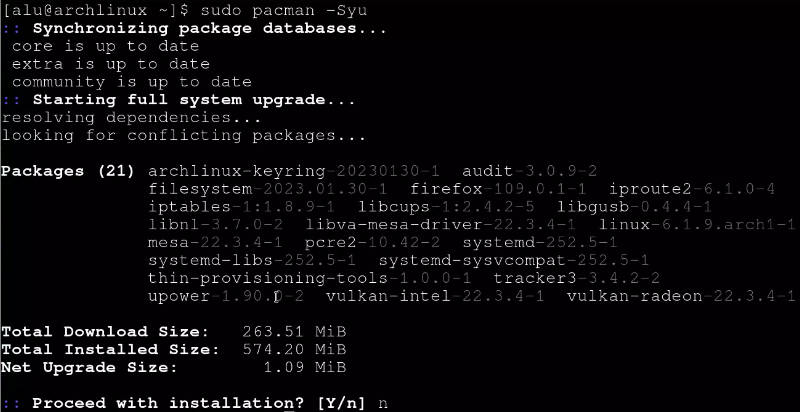
Open the pacman configuration file:
Uncomment Color to make the output colorful. If you want more fun, you can also add IloveCandy in the config file right after the color option.
If you have a good Internet connection, you can also uncomment ParallelDownloads , so pacman will download several packages simultaneously (5 by default). This will save you time when you update your system and with Arch Linux you gonna do it very often.
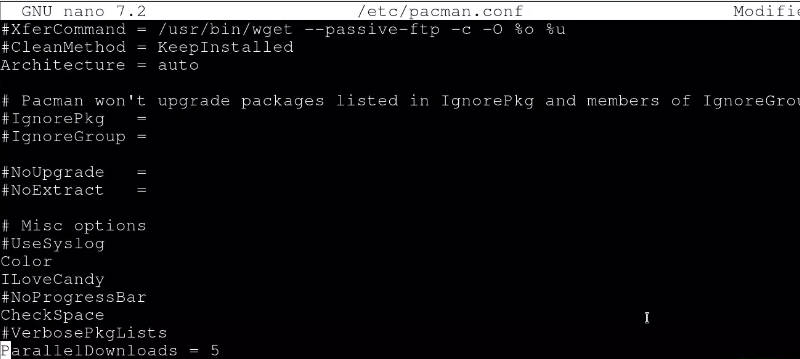
After you have done all the changes in the /etc/pacman.conf press Ctrl + O then Enter to save and Ctrl + X to exit.
2. Make bash colorful
Since we started adding some color, let’s make everything colorful in the terminal and thus more appealing. I have a dedicated post where I share how I configured my BASH colors.
I will skip the details on how you can customize the color scheme of your BASH. To copy my color scheme, just download my configuration files.
Unzip them. You may need to install unzip command before.
sudo pacman -S unzip unzip Linux_terminal_color.zip There are three files in the archive. Move them to your system folders as follows:
sudo mv bash.bashrc /etc/bash.bashrc sudo mv DIR_COLORS /etc/ mv .bashrc ~/.bashrc Close and open the terminal. Now, bash looks much better, doesn’t it?
3. Automatic cleaning the package cache
As I said earlier, you gonna download updates very often and quite soon you will discover that your package cache directory is unacceptably large. For example, my package cache folder exceeded 1G after 2 weeks already.
Check the size of your package cache:
You can clean it manually from time to time, but it is better to automate such a thing. That is possible with the paccache script that will clean it weekly by removing old packages and keeping 3 the most recent version of each package in case you need to downgrade some packages.
paccache is a part of pacman contributed scripts, so install them:
sudo pacman -S pacman-contrib And activate the paccache timer:
sudo systemctl enable paccache.timer Now, paccache will check your package cache directory and clean it if necessary every week.
There are also other more efficient ways to run it. For example, you can run paccache automatically after every system update, but it requires setting up a hook. I think weekly cleaning is fine for a new Arch Linux user.
4. Install AUR helper
The Arch User Repository (AUR) is a community-driven repository of Arch Linux. Right now it contains more than 80 000 packages. If a package exists for Linux but it is not present in the official Arch repository, you will always find it in the AUR.
To install an AUR package, you need to compile it. I explained how to compile and install a program from the AUR. However, most Arch users prefer to use AUR helpers that automate the compilation process and make it easier to interact with the AUR repository.
I prefer to use yay helper. Let’s install it.
sudo pacman -S --needed base-devel git mkdir Programs cd Programs git clone https://aur.archlinux.org/yay.git cd yay makepkg -si After you have got yay, you can install any package from the AUR. For example, if you need Zoom for video conferencing. Run:
You can see that it is listed under the number 2. Press 2 and follow the instructions and install it.

In a moment, you will have Zoom installed on your Arch Linux.
5. Create user directory folders
After the Arch Linux installation, you have no familiar user directories such as Documents, Pictures, Videos etc. You can create them manually, but there is an easier way.
sudo pacman -S xdg-user-dirs Now, all the user directory folders are created.
6. Install essential programs
Install desktop-independent essential packages such as fonts, spell-checking dictionaries, java, and others.
sudo pacman -S enchant mythes-en ttf-liberation hunspell-en_US ttf-bitstream-vera pkgstats adobe-source-sans-pro-fonts gst-plugins-good ttf-droid ttf-dejavu aspell-en icedtea-web gst-libav ttf-ubuntu-font-family ttf-anonymous-pro jre8-openjdk languagetool libmythes If you need an office suite, I recommend LibreOffice:
sudo pacman -S libreoffice-fresh You can also install VLC as a video and audio player.
7. Install Microcode
Microcode is an essential part of your processor functionality. So, it must be secure and up-to-date. To acquire microcode updated you need to install microcode package.
Depending on the processor, install microcode
sudo pacman -S amd-ucode # for AMD processors, 8. Disable GRUB delay
To speed up your boot process, you can disable the GRUB screen that shows GRUB menu with 5-sec countdown and start booting right away. If you ever need the GRUB menu, you can call it by holding the Esc key during boot.
To enable this functionality, first open the GRUB config:
Add set GRUB_TIMEOUT_STYLE=hidden .
To remind you use Ctrl + O to save and Ctrl + X to exit the nano editor.
sudo grub-mkconfig -o /boot/grub/grub.cfg Reboot and your system will boot 5 second faster.
9. Set up firewall
I have a dedicated post on the Linux firewall where you can learn why and how to use the Linux firewall.
I usually recommend UFW uncomplicated firewall. Install it:
Enable its autostart with the system:
sudo systemctl enable ufw.service And you have firewall protection.
10. Back up your system
Maybe it should have been the first thing to do after installing Arch Linux 😄. It is always good to have a backup of your system and files.
You can use some graphical programs to do a backup but since you are an Arch Linux user, I recommend learning rsync – that is a command line tool but it is super powerful.
You can use this command to backup everything except for some not necessary files:
sudo rsync -aAXv --delete --dry-run --exclude=/dev/* --exclude=/proc/* --exclude=/sys/* --exclude=/tmp/* --exclude=/run/* --exclude=/mnt/* --exclude=/media/* --exclude="swapfile" --exclude="lost+found" --exclude=".cache" --exclude="Downloads" --exclude=".VirtualBoxVMs"--exclude=".ecryptfs" / /mnt/backup_destination/ I explained it in my previous post where I back up and restore the whole system with rsync. If you not only want to have a backup but also want to test it, follow that post. I also explain how to configure automatic backups in Linux
Bonus
If you do not like the default look of your Arch Linux desktop, you can customize it with different themes. I showed some of my favorite GNOME, Plasma, XFCE, Mate and Cinnamon themes previously. It will be your 11th thing to do after installing Arch Linux.
Brilliant
As you see knowing some programming can greatly improve your Linux experience.
Want to learn programming or better understand how computers work, Brilliant.org – the sponsor of this post – can help you get started.
You can start by learning Python — one of the most in-demand programming languages. I also highly recommend the course Algorithm Fundamentals that I am taking right now. It helps me to better understand how to make a computer do what I want. The hand-on approach makes learning fun and efficient.
Brilliant.org is the best way to learn math, science, and computer science interactively. There are thousands of courses and new courses are added every month.
Keep exploring at http://brilliant.org/AverageLinuxUser/. Get started for FREE, and hurry — the first 200 people get 20% off an annual premium subscription.
Average Linux UserFollow I am the founder of the Average Linux User project, which is a hobby I work on at night. During the day I am a scientist who uses computers to analyze genetic data.
What to do after installing Arch Linux?

While we believe that this content benefits our community, we have not yet thoroughly reviewed it. If you have any suggestions for improvements, please let us know by clicking the “report an issue“ button at the bottom of the tutorial.
A vanilla Arch Linux installation gives you your base operating system with no utilities, allowing you to choose what you want your Operating System to behave like. This allows the user to have complete access over their operating system. A vanilla installation leaves you with nothing more than just a black screen which is for you to customize. In this module, we’ll be walking through the essential things to do after installing Arch Linux.
1. Update The System
2. Install A Display Server
To get a GUI environment, first we need to install a Display Server. The go-to option is to install xorg, which is one of the oldest and the most popular display servers out there.
3. Install A Desktop Environment
$ sudo pacman -S xfce4 xfce4-goodies $ sudo pacman -S gnome gnome-extra $ sudo pacman -S cinnamon nemo-fileroller $ sudo pacman -S mate mate-extra 4. Install A Display Manager
Next up, we would need a Display Manager which would enable us to login to our Desktop Environments. The popular choices are :
$ sudo pacman -S lightdm lightdm-gtk-greeter lightdm-gtk-greeter-settings $ sudo systemctl enable lightdm $ sudo systemctl enable lxdm.service $ sudo systemctl enable sddm 5. Install An AUR Helper
One of the main reasons is the Arch User Repository (AUR) which has a vast array of packages and application. However, we cannot fetch these packages directly using pacman. To fetch packages from AUR we need special programs called AUR Helpers. There are many such helpers available but the one we recommend is paru.
$ sudo pacman -S base-devel git --needed $ cd paru $ makepkg -si Now we can fetch packages from AUR with:
6. Install Additional Kernels
It is considered good practice to have multiple kernels at your disposal, just in case the main kernel runs into any issues.
The popular kernels apart from the mainline Linux Kernel are :
To install the LTS kernel:
$ sudo pacman -S linux-lts linux-lts-headers To install the Hardened kernel:
$ sudo pacman -S linux-hardened linux-hardened-headers To install the Zen kernel:
$ sudo pacman -S linux-zen linux-zen-headers 7. Install Microcode
Processor manufacturers release stability and security updates to the processor microcode. These updates provide bug fixes that can be critical to the stability of your system. Without them, you may experience spurious crashes or unexpected system halts that can be difficult to track down. It is recommended to install it after Arch install just for the sake of stability.
$ sudo pacman -S intel-ucode $ sudo grub-mkconfig -o /boot/grub/grub.cfg $ sudo pacman -S linux-firmware $ sudo grub-mkconfig -o /boot/grub/grub.cfg 8. Rank Mirrorlists
In order to have faster updates, you can rank your mirrors according to their speed. To do so, first backup your current mirrorlist.
# mv /etc/pacman.d/mirrorlist /etc/pacman.d/mirrorlist.bak Next up, to rank all mirrors based on their speed with:
# rankmirrors /etc/pacman.d/mirrorlist.bak > /etc/pacman.d/mirrorlist Conclusion
Thus in this module we covered the essential things to be done after an Arch install. There’s still a lot to do, especially regarding the installation of essentials but we would leave that to the reader as to what applications they want to work with !
Thanks for learning with the DigitalOcean Community. Check out our offerings for compute, storage, networking, and managed databases.