- Как использовать ssh-agent в Ubuntu — Linux Hint
- Предпосылки:
- Синтаксис:
- Различные варианты ssh-agent:
- Использование команды ssh-agent для неинтерактивной аутентификации:
- Используйте ssh-add, чтобы добавить парольную фразу закрытого ключа в ssh-agent:
- Скопируйте файл с клиента на сервер:
- Удалите все кешированные приватные ключи ssh-agent:
- Вывод:
- How to use ssh-agent on Ubuntu
- Prerequisites:
- Syntax:
- Different options of ssh-agent:
- Using ssh-agent command for non-interactive authentication:
- Use ssh-add to add the private key passphrase to ssh-agent:
- Copy file from client to server:
- Remove all cached ssh-agent private keys:
- Conclusion:
- About the author
- Fahmida Yesmin
Как использовать ssh-agent в Ubuntu — Linux Hint
ssh-агент настроен для автоматического выполнения в Ubuntu. Если он не запускается автоматически при входе в систему, его можно запустить вручную командой eval. Пароль закрытого ключа SSH может быть создан вручную дескриптором пользователя с помощью ssh-агент. Это называется агентом аутентификации. Ssh-agent использует переменную среды SSH_AUTH_SOCK для аутентификации. Если эта переменная установлена правильно, то ssh-агент будет работать нормально. Использование ssh-агент в Ubuntu для различных целей были объяснены в этом руководстве.
Предпосылки:
Перед тем, как приступить к действиям этого руководства, необходимо выполнить следующие действия.
Включите службу SSH в Ubuntu, если она не была включена ранее.
Сгенерируйте пары ключей SSH для выполнения команд на удаленном сервере. Выполните следующую команду, чтобы создать открытый и закрытый ключи. Закрытый ключ будет храниться на удаленном сервере, а открытые ключи будут надежно храниться на клиенте.
Выполните следующую команду, чтобы открыть
sshd_config файл с помощью редактора nano, чтобы добавить некоторые необходимые конфигурации.
$ судо нано / так далее / ssh / sshd_config
Добавьте в файл следующие строки, чтобы включить учетную запись root и аутентификацию на основе пароля.
ПарольАутентификация да
PermitRootLogin да
Выполните следующую команду, чтобы перезапустить службу SSH.
$ судо служба ssh начать сначала
Синтаксис:
Ниже приведены два разных синтаксиса ssh-agent. Значение параметров, используемых с этой командой, описано в следующей части этого руководства.
ssh-агент [ -c | -s ] [ -Dd ] [ -a bind_address ] [ -E fingerprint_hash ] [ -т жизнь ] [ команда [ аргумент . ] ]
ssh-агент [ -c | -s ] -k
Различные варианты ssh-agent:
Команда ssh-agent имеет много параметров. Ниже приведены варианты использования.
| Вариант | Цель |
| -a bind_address | Он используется для принудительной привязки сокета домена UNIX к заданному пути к файлу вместо использования сокета по умолчанию. |
| -c | Он используется для генерации команд C-оболочки на stdout. По умолчанию оболочка определяется автоматически. |
| -d | Он используется для включения режима отладки. |
| -E fingerprint_hash | Он используется для определения алгоритма, используемого для генерации отпечатков ключей SSH. md5 и sha256 — допустимые значения. |
| -k | Он используется для уничтожения работающего в данный момент агента. |
| -s | Он используется для принудительной генерации команд оболочки Bourne (/ bin / sh) на stdout. По умолчанию оболочка определяется автоматически. |
| -т жизнь | Он используется для определения максимального количества секунд, используемых для сохранения личности агента. Значение этой опции определяется в секундах, но может определяться различными суффиксами, такими как m для минут, h для часов, d для дней и w для недель. Если этот параметр не используется, агент будет хранить ключи в памяти до тех пор, пока он работает. Это значение будет переопределено при выполнении команды ssh-add. |
Здесь показано использование опции -t. Выполните следующую команду, чтобы сохранить идентификационные данные агентов в течение 60 секунд.
После выполнения указанной выше команды появится следующий вывод.

Использование команды ssh-agent для неинтерактивной аутентификации:
Выполните следующую команду на сервере, чтобы запустить ssh-agent для неинтерактивной аутентификации.
После выполнения указанной выше команды появится следующий вывод. ssh-agent сейчас работает. Здесь имя пользователя серверной машины — «fahmida».

Используйте ssh-add, чтобы добавить парольную фразу закрытого ключа в ssh-agent:
ssh-add команда потребует указать парольную фразу для закрытых ключей ssh. Теперь войдите на клиентский компьютер и запустите ssh-add команда из терминала.

После добавления закрытого ключа к ssh-agent с клиентского компьютера могут выполняться различные типы команд SSH, такие как scp, sftp, ssh и т. Д.
Скопируйте файл с клиента на сервер:
В scp команда для копирования файла с клиента на сервер и ssh команда для подключения к серверу для проверки того, скопирован ли файл или не показан в этой части руководства. Создайте текстовый файл с именем testfile.txt со следующим содержанием.
Это тестовый файл, созданный на клиентской машине.
Выполните следующую команду, чтобы проверить содержимое testfile.txt файл перед выполнением `scp` команда.
После выполнения указанной выше команды появится следующий вывод.

Выполните следующую команду, чтобы скопировать testfile.txt файл с клиентской машины на Документы папка серверной машины.
$ scp testfile.txt fahmida @ fahmida-VirtualBox: ~ / Документы /
Следующий вывод появится после выполнения указанной выше команды, если файл успешно скопирован на сервер. Здесь имя пользователя серверной машины «Фахмида», а имя пользователя клиентской машины ‘Ясмин.

Выполните следующую команду, чтобы установить соединение с сервером, используя ssh команда.
$ ssh Фахмида @ fahmida-VirtualBox
Выполните следующую команду, чтобы перейти к Документы папка на сервере, чтобы проверить, был ли скопирован текстовый файл сюда или нет.
Выполните следующую команду, чтобы проверить список файлов и папок в Документы папка.
Следующий вывод показывает, что текстовый файл существует в Документы папка серверной машины.
Теперь выполните следующую команду, чтобы проверить содержимое файла testfile.txt на сервере.
Следующие выходные данные показывают, что содержимое testfile.txt на машине-сервере совпадает с содержимым textfile.txt на клиентской машине.

Удалите все кешированные приватные ключи ssh-agent:
Выполните следующую команду ssh-add с параметром -D, чтобы удалить все закрытые ключи кэшированного ssh-агента.
После выполнения указанной выше команды появится следующий вывод.

Вывод:
С использованием ssh-агент — это один из способов подключения к удаленному компьютеру с клиентского компьютера для выполнения различных задач. Любой файл можно скопировать с клиентского компьютера на серверный, запустив агент SSH, показанный в этом руководстве, чтобы помочь читателю узнать, как использовать эту команду.
How to use ssh-agent on Ubuntu
![]()
ssh-agent is configured to execute on Ubuntu automatically. If it is not started at the login automatically, it can be started manually by the `eval` command. The password of the SSH private key can be created manually by the user handle by ssh-agent. It is called an authentication agent. The ssh-agent uses the SSH_AUTH_SOCK environment variable for authentication. If this variable is set properly, then the ssh-agent will work properly. The uses of ssh-agent on Ubuntu for different purposes have been explained in this tutorial.
Prerequisites:
Before starting the steps of this tutorial, the following steps will be required to complete.
Enable the SSH service on Ubuntu if it is not enabled before.
Generate the SSH Key pairs to execute the commands in the remote server. Run the following command to create the public key and the private key. The private key will be stored in the remote server, and the public keys will be stored in the client securely.
Run the following command to open the sshd_config file using nano editor to add some necessary configurations.
Add the following lines in the file to enable the root login and password-based authentication.
Run the following command to restart the SSH service.
Syntax:
Two different syntaxes of the ssh-agent have given below. The meaning of the options used with this command is described in the next part of this tutorial.
ssh-agent [ -c | -s ] [ -Dd ] [ -a bind_address ] [ -E fingerprint_hash ] [ -t life ] [ command [ arg . ] ]
Different options of ssh-agent:
the ssh-agent command has many options. The uses of the options are given below.
| Option | Purpose |
| -a bind_address | It is used to bind the UNIX domain socket to the given file path forcefully instead of using the default socket. |
| -c | It is used to generate the C-shell commands on stdout. The shell is automatically detected by default. |
| -d | It is used to enable the debug mode. |
| -E fingerprint_hash | It is used to define the algorithm used to generate the SSH key fingerprints. md5 and sha256 are the valid values. |
| -k | It is used to kill the currently running agent. |
| -s | It is used to generate the Bourne shell (/bin/sh) commands on stdout forcefully. The shell is automatically detected by default. |
| -t life | It is used to define the maximum number of seconds used to keep the agent’s identity. The value of this option defines in seconds, but it can be defined by different suffixes, such as m for minutes, h for hours, d for days, and w for weeks. If this option is not used, the agent will keep the keys in the memory as long as it runs. This value will be overridden when the ssh-add command will be executed. |
The use of the -t option has been shown here. Run the following command to keep the identity of the agents for 60 seconds.
The following output will be appeared after executing the above command.

Using ssh-agent command for non-interactive authentication:
Run the following command from the server machine to start the ssh-agent for non-interactive authentication.
The following output will be appeared after executing the above command. ssh-agent is running now. Here, the username of the server machine is ‘fahmida.’

Use ssh-add to add the private key passphrase to ssh-agent:
the ssh-add command will require providing the passphrase for the ssh private keys. Now, log in to the client machine and run the ssh-add command from the terminal.

After adding the private key to the ssh-agent, different types of SSH commands, such as scp, sftp, ssh, etc., can be executed from the client machine.
Copy file from client to server:
The scp command to copy the file from the client to the server and ssh command to connect with the server for checking the file is copied or not shown in this part of the tutorial. Create a text file named testfile.txt with the following content.
It is a testing file created in the client machine.
Run the following command to check the content of the testfile.txt file before executing the `scp` command.
The following output will be appeared after executing the above command.

Run the following command to copy the testfile.txt file from the client machine to the Documents folder of the server machine.
The following output will be appeared after executing the above command if the file is copied successfully to the server location. Here, the username of the server machine is ‘fahmida,’ and the username of the client machine is ‘Yasmin.

Run the following command to establish a connection with the server using ssh command.
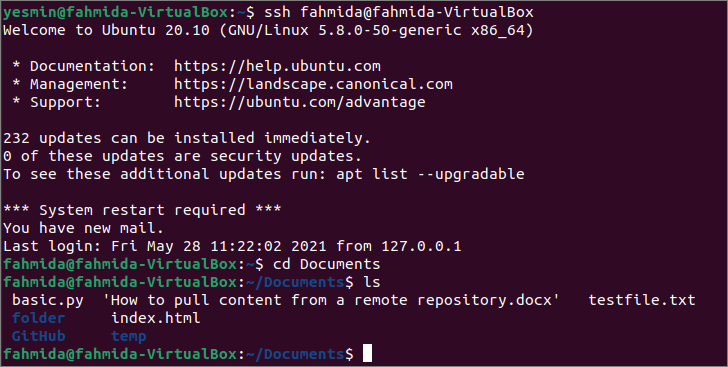
Run the following command to go to the Documents folder of the server machine to check the text file has been copied here or not.
Run the following command to check the list of the files and folders of the Documents folder.
The following output shows that the text file exists in the Documents folder of the server machine.

Now, run the following command to check the content of the testfile.txt file of the server machine.
The following output shows that the content of testfile.txt of the server machine is the same as the content of the textfile.txt of the client machine.

Remove all cached ssh-agent private keys:
Run the following ssh-add command with the -D option to remove all private keys of the cached ssh-agent.
The following output will be appeared after executing the above command.

Conclusion:
Using ssh-agent is one way to connect with the remote machine from the client machine to do different tasks. Any file can be copied from the client machine to the server machine by running an SSH agent shown in this tutorial to help the reader know the use of this command.
About the author
Fahmida Yesmin
I am a trainer of web programming courses. I like to write article or tutorial on various IT topics. I have a YouTube channel where many types of tutorials based on Ubuntu, Windows, Word, Excel, WordPress, Magento, Laravel etc. are published: Tutorials4u Help.