- How WiFi Connection Works
- 802.11 Authentication and Association
- The 4-way Handshake Phase
- Reading WPA Supplicant Logs
- Getting a DHCP address via D-O-R-A
- Reading DHCP logs
- Troubleshooting WiFi Connection Testing with NetBeez
- All You Need to Know About Wifi Connection
- What is Wifi?
- How Wifi Works?
- Wifi Frequencies
- The advantage of Using of Wifi
- Steps to Connect to a Wifi
How WiFi Connection Works
To better understand how a WiFi client connects to a wireless network, it’s worth familiarizing yourself with two client processes. The first one being WPA supplicant. WPA stands for ‘WiFi Protected Access’. The second one is the DHCP client, in which DHCP stands for ‘Dynamic Host Configuration Protocol’. Let’s see how these two system processes come into play.
The WPA supplicant process handles the 802.11 Authentication and Association of the client with a BSSID. The 802.11 Authentication and Association is then followed by the 4-way handshake, which establishes a secure and authenticated channel between the client and the access point. Once that step is completed, the DHCP client requests a dynamic IP address that is used to connect to the network and exchange communication with the outside world.
802.11 Authentication and Association
At the beginning of the 802.11 Authentication and Association process, the client scans all of the available frequencies in search of SSIDs to join. The client sends probe request frames which contain supported data rates and 802.11 capabilities. Access points in proximity reply with probe response frames that contain the SSID and BSSID, which corresponds to the access point’s MAC address.
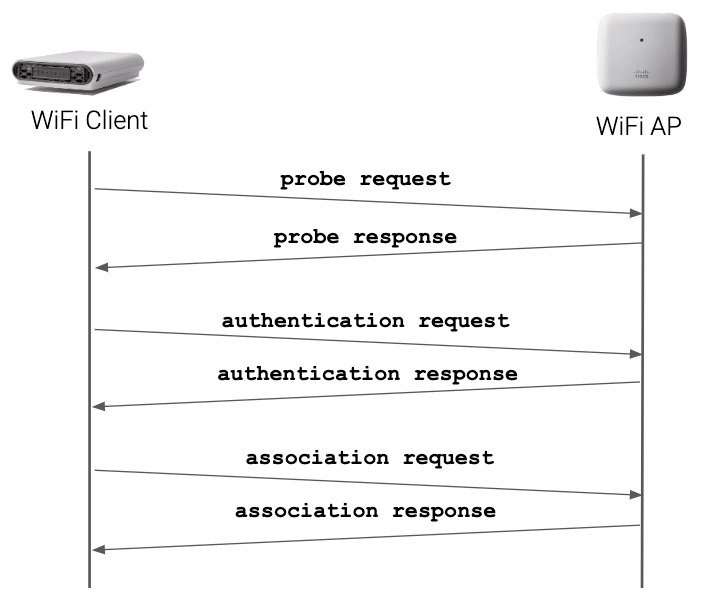
When the client finds an SSID that matches its configuration, it will send an authentication request probe. Important to note is that the authentication request and response probes exchanged in this phase don’t provide encryption. That function is implemented by the 4-way handshake. Here, the authentication request and response exchange is only used to register the client’s MAC address. This information is also used in case MAC filtering is implemented. If the client is allowed to connect to the network, it will associate to the access point with the stronger signal.
Our friend, Rowell Dionicio (host of ‘Clear to Send’ podcast), wrote a more detailed article on the 802.11 Authentication and Association process. Once the 802.11 Authentication and Association process is completed, the WPA supplicant client initiates the 4-way handshake.
The 4-way Handshake Phase
The 4-way handshake is used to authenticate the WiFi client and encrypt all communications with the access point. The handshake is established by exchanging EAPoL frames between the WPA supplicant running on the client and the authenticator running on the access point.
If the SSID is configured with WPA2-Personal, the 4-way handshake uses a pre-shared key. If the SSID is configured with WPA2-Enterprise, the client will also execute an EAP transaction with an 802.1x authentication server (Radius). Here, I won’t cover in detail how the 4-way handshake process works, but if you want to learn more about the 4-way handshake , I have linked another article written by Rowell Dionicio. If you want to learn more about 802.1x, check out the 802.1x Wikipedia page , and the page on the IANA website about EAP methods .
Once the 4-was handshake is completed, the client can now request an IP address to complete the WiFi connection.
Reading WPA Supplicant Logs
In Linux, the 802.11 Authentication and Association and the 4-way handshake are handled by the WPA supplicant process. The following table reports the different stage transitions that are logged by WPA supplicant. The default location of the file on many Linux distributions is /var/log/wpa_supplicant/wpa_supplicant.log.
| State transition logged | Meaning |
| SCANNING -> ASSOCIATING | The WiFi client has completed the scan and has initiated the 802.11 Authentication and Association |
| ASSOCIATING -> ASSOCIATED | The 802.11 Authentication and Association process is completed |
| ASSOCIATED -> 4WAY_HANDSHAKE | The WiFi client has begun the 4-way handshake |
| 4WAY_HANDSHAKE -> 4WAY_HANDSHAKE | The 4-way handshake is occurring |
| 4WAY_HANDSHAKE -> GROUP_HANDSHAKE | The 4-way handshake is completed and the exchange of the group keys has begun |
| GROUP_HANDSHAKE -> COMPLETED | The group keys exchange is completed |
If you want to learn more about reading WPA logs in Linux, check out the article I have linked written by Panos Vouzis.
Getting a DHCP address via D-O-R-A
Once the 4-way handshake is completed, the client moves to the “network phase” of the connection to request a dynamic IP address. Getting a DHCP address for WiFi clients is the same process as it is for Ethernet ones. The DHCP transaction between the DHCP client and the server is called D-O-R-A. This acronym relates to the frames exchanged during the transaction between client and server (see below image).
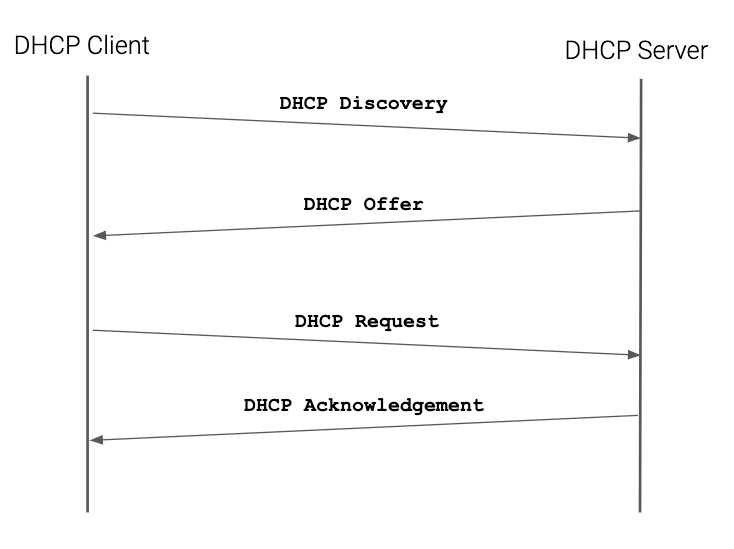
The transaction begins with a DHCP discovery frame. Here, the DHCP client sends broadcasts to all the hosts in the local subnet. If a DHCP server is available, it will reply with a DHCP offer containing an IP address available for use. The client then verifies with an ARP lookup that no other hosts are improperly using the address offered by the server. If no other host replies to the ARP request, the client confirms the intent to use that IP with a DHCP request. The DHCP server acknowledges the IP address confirming with a DHCP acknowledgement. That marks the end of the D-O-R-A transaction.
Reading DHCP logs
This section will help you troubleshoot DHCP issues on a WiFi client running Linux. If it’s not enabled yet, it’s recommended that you can configure the dhclient to log messages on /var/log/dhcpd.log rather than sending them to syslog. This way, it will be easier to review DHCP logs. In the dhcpd.log, you’ll find messages containing the following strings for the D-O-R-A transaction:
Another important thing to notice is that these messages are exchanged when the DHCP state machine is between the PREINIT and BOUND stage. Here’s a list of the most important DHCP stages that will help you troubleshoot what’s going with the DHCP process.
| Stage | Meaning |
| PREINIT | In this state, the DHCP client is initializing. |
| BOUND | The client has obtained a DHCP lease. |
| RENEW | The client is trying to renew its DHCP lease. |
| REBIND | The client didn’t renew the lease on time and requests a lease extension to any available server. |
| TIMEOUT | The client timed out and didn’t get a DHCP lease from a server. |
| FAIL | The client failed to obtain a DHCP lease for some other reasons. |
If you want to learn more about DHCP messages, check out the IANA page on DHCP . For more information about the DHCP stages, check out the online TCP/IP guide on DHCP .
Troubleshooting WiFi Connection Testing with NetBeez
NetBeez exposes the WPA supplicant and DHCP client logs of its WiFi agents (called Beez) on the dashboard. This feature helps engineers easily troubleshoot WiFi connection issues when they occur. By setting a connection timer on the monitored WiFi network profile, the WiFi Beez will periodically reconnect to the SSID, testing 802.11 association and authentication. This is a good way to proactively detect misconfigured access points, exhausted DHCP pools, and so on. Let’s see how we have implemented this functionality.
On the NetBeez dashboard, the user has to navigate to the Agents tab, then click on the WiFi agent deployed. In the wireless section of the agent details view, the user can access all WiFi metrics related to that particular agent, including logs. The following screenshot shows the filtered log messages from the WPA supplicant process running on the WiFi Beez:

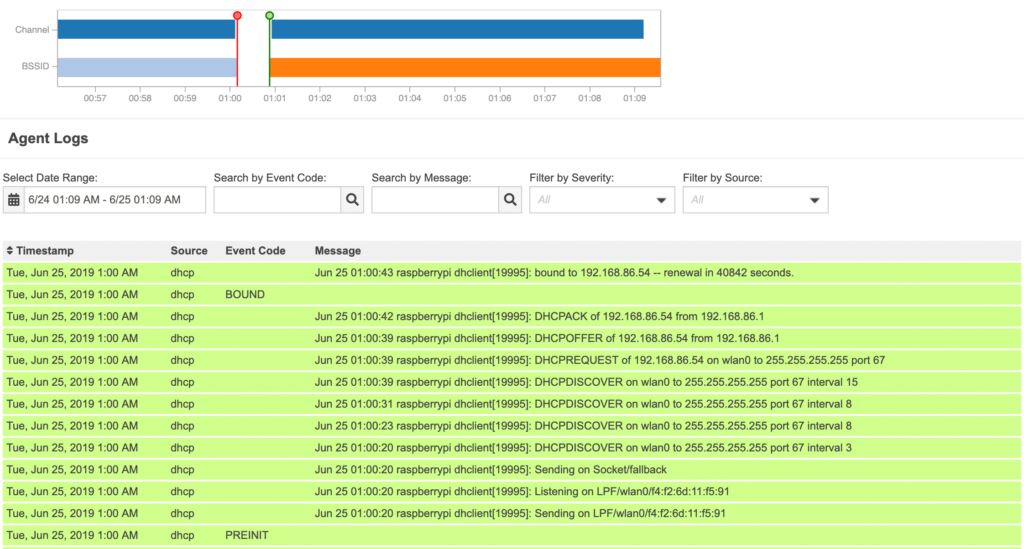
In the next screenshot, I have filtered the DHCP messages logged when a WiFi Beez is requesting a DHCP address. You can easily identify the D-O-R-A transaction between the Beez and the access point.
If you want to see this in action, I have recorded a live demo on our YouTube channel.

Familiarizing yourself with the WPA supplicant and DHCP client processes is important to understand how 802.11 networks work. To proactively detect problems on WiFi networks, engineers can configure dedicated WLAN agents to periodically reconnect to the network, testing 802.11 authentication and association, as well as DHCP.
Spot VPN, ISP, WiFi issues and more with Netbeez
All You Need to Know About Wifi Connection

In the age of globalization, most of us are now digitally connected wherever we go and we’re helped along by the free or customer wifi access offered by businesses, hotels and restaurants and shops. You can use your BYOD device like a laptop, mobile phone, computer or tablet to connect to the Internet via someone else’s wifi connection and we’re happy to use it even if most of us don’t know how it actually works. In this article we provide the basics of wifi connection.
What is Wifi?
Wifi or wireless networking is the wireless technology that provides wireless high-speed Internet with the help of radio waves. Wifi connection is provided to the devices with the help of a wireless adapter to create hotspots in and around the wireless router. Wireless router is a box that helps in the transmission of wireless signals.
Once the hotspot is set, the Internet connection is provided to the connected devices through frequencies between 2.4 GHz-5GHz as per the data available on the wifi network. All the internet-enabled devices are then connected to the Internet without the need of ethernet cables.
How Wifi Works?
A wifi network transmits information across a network. It needs a wireless adapter that converts data into radio signals. The signals are then transmitted through antenna to the router that decodes the signals. As the signal is decoded by the router, it is sent to the Internet via a wired Ethernet connection.
Wifi Frequencies
Generally, wireless networks uses the frequency level of 2.4GHz or 5GHz. Then the OFDM (The Orthogonal Frequency-Division Multiplexing) breaks the radio signals into smaller signals before entering the router. So, the basic 802.11 networking standards differ based on the user’s needs.
Frequency such as 802.11a transmits data in the level of 5GHz frequency. Again the OFDM (The Orthogonal Frequency-Division Multiplexing) breaks the signals into smaller signals before entering the router. It transmits around 54 megabits of data per second.
802.11b is another frequency that emits a slow speed frequency level of 2.4GHz. Thus, it can transmit a maximum of 11 megabits of data per second.
802.11g is a wifi frequency level that transmits data at 2.4GHz and emits around 5 megabits of data per second with the help of OFDM coding.
The advantage of Using of Wifi
The main advantage is the freedom of accessing the Internet with any device without needing to plug in an ethernet cable and your home data plan will be more cost effective than your mobile plan so you can use your mobile to access the Internet via your wifi network without chewing through your mobile data. With wifi connection at your home, you can sit in your balcony and do your work while enjoying the pleasant weather. You can also connect multiple devices to the Internet wirelessly without any glitch and in office, you can take your BYOD and connect wirelessly to the wifi.
Steps to Connect to a Wifi
Now that you know the basics of wifi, here’s how to connect to a wifi network around you. Suppose when you want to use wifi at a restaurant, airport or at a hotel, the following steps are to connect to the Internet through wifi.
- First of all, you must have a device that can be connected to the internet and wifi.
- Then search for the name of the wifi network of your location. Every network got their unique name. Basically, the name is random numbers or letters by default which most of users personalized by providing a unique name to distinguish it the network from other wifi connection. Therefore, you need to identify the name first. You can ask in the reception for the name of the network if you are in a restaurant or hotel.
- When you the network name, the next step is to connect to the wifi connection. The process of connecting to the wifi network may differ from devices to devices. But broadly, the steps are more or less similar. Here is the process:Navigate to wifi settings>turn on Wifi>Click on the name of the wifi network>click “connect”
- Most of the networks are secure with restricted access with a password. In such cases, you have to enter the password to access the wifi network in your device. So, you have to find out the password from the reception to use the wifi network. Once you enter the password, you are good to go.
As a business it pays to offer your staff basic IT security tips which include being aware of using free wifi connections and how to check they are secure before connecting to them.