- Базовая установка Alpine Linux
- Необходимые требования
- Пару слов об Alpine Linux
- Подготовка
- Работа с ISO образом
- Работа с Дисками
- Установка
- Раскладка клавиатуры
- Hostname
- Настройка сети
- Root user + TimeZone + Proxy
- Выбор основного репозитория
- Добавление нового пользователя
- Выбор ssh сервера
- Разметка диска
- Первоначальная настройка
- Добавляем community репозиторий
- Работа с менеджером пакетов
- Опционально: добавляем QEMU Agent
- Setting up a new user
- Overview
- Creating a new user
- Options
- adduser
- addgroup
- Home directory permissions
- Legacy
- Common permission groups
- Old newbie notes
- User creation and defaults
- User management and system access
Базовая установка Alpine Linux
Этот дистрибутив долгое время попадал в поле моего внимания. Я попробовал его и не пожалел. Сегодня расскажу об установке базовой версии Alpine linux в качестве custom iso на виртуальном хостинге.
Необходимые требования
рекомендуется: 2048 MB RAM
Пару слов об Alpine Linux
Дистрибутива Alpine Linux обладает несколькими сильными преимуществами:
- Во первых он основан на Musl и BusyBox, что в свою очередь сильно повлияло на итоговый размер дистрибутива.
- За счёт своего небольшого размера и подхода разработчиков дистрибутив славится более продвинутой безопасностью. Чем меньше bloated кода, тем меньше векторов для атаки.
- В третьих, опять таки за счёт размера и других отличий таких как инит OpenRC вместо systemd этот дистрибутив является более шустрым для более слабого железа.
Учитывая все эти особенности, Alpine Linux прекрасно подходит для размещения на нём Docker контейнеров.
Минусы конечно тоже присутствуют.
- Например эта система не такая популярная и я пока нигде не встречал возможность установки этого дистрибутива нативно у хостеров, её придётся устанавливать из своёго iso, это не сложно и я опишу этот процесс ниже.
- Также опять таки из за небольшой популярности по сравнению с другими дистрибутивами, придётся погуглить некоторые моменты, но когда это нас останавливало?
Подготовка
Работа с ISO образом
Я опишу процесс установки Alpine на хостинге firstbyte, если у вас другой хостинг действуйте по такому же принципу что и в посте, поидее должно сработать везде где есть возможно ставить со своего ISO.
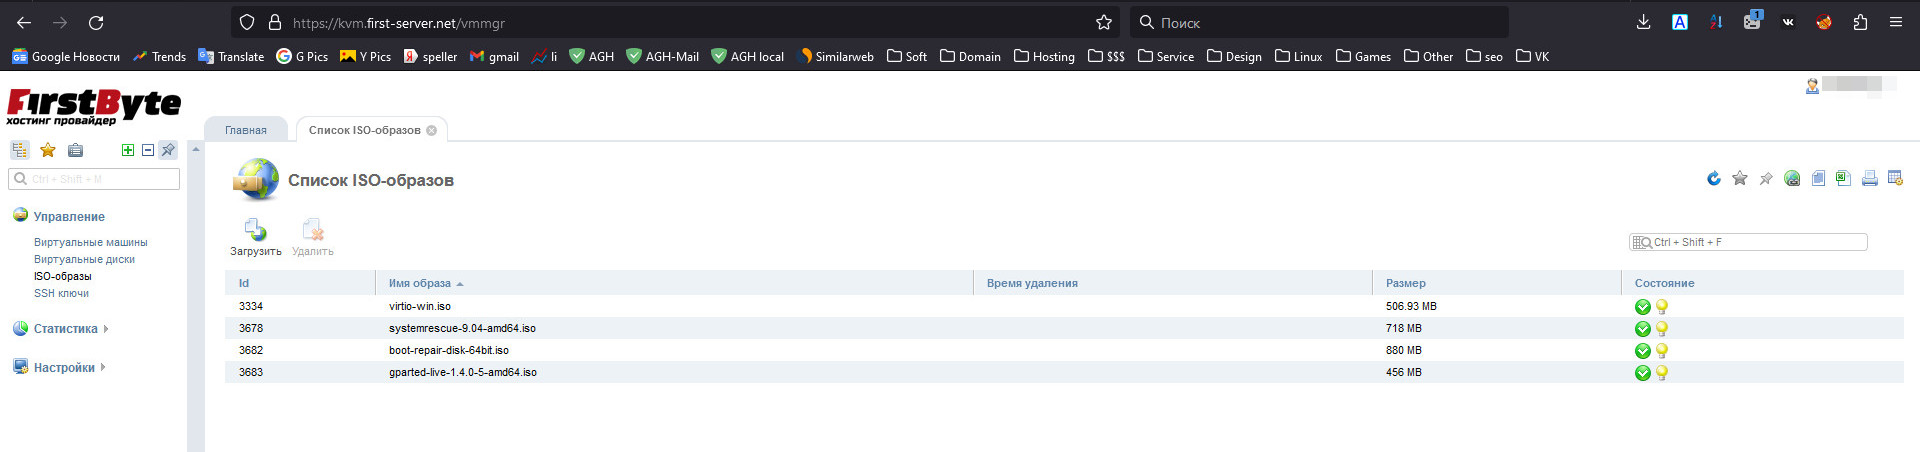
Первым делом отправляемся панельку управления впс серверами. В раздел ISO-образы
Добавляем наш новый Alpine Linux ISO
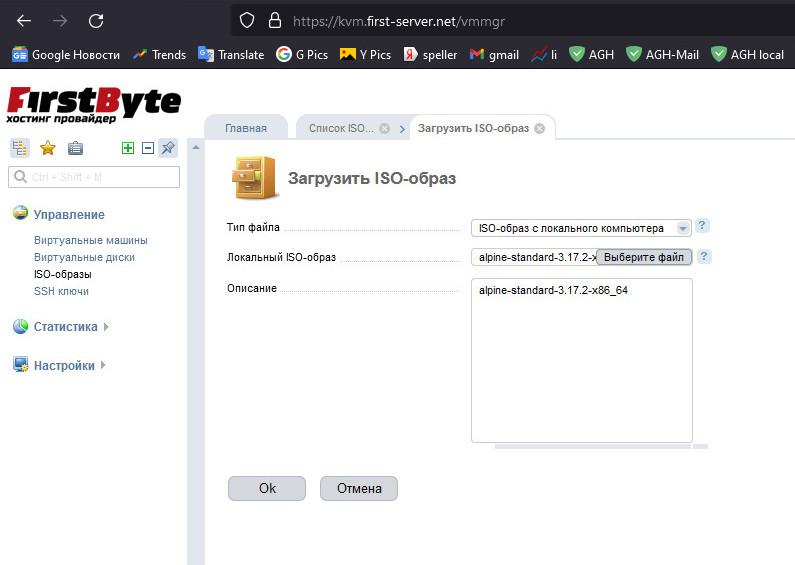
Дожидаемся окончания загрузки.
В результате успешной загрузки образ отобразится в списке доступных образов

Работа с Дисками
Отправляемся в главный раздел управления впс и останавливаем ту впску на которую хотим поставить Alpine. После этого снова выделяем её в списке и переходим в пункт диски

Нас интересует раздел ISO нажимаем на него, после чего выбираем из списка загруженную ранее alpine-standard-3.17.2-x86_64 (у вас скорее всего будет уже другое название). И делаем все как на картинке
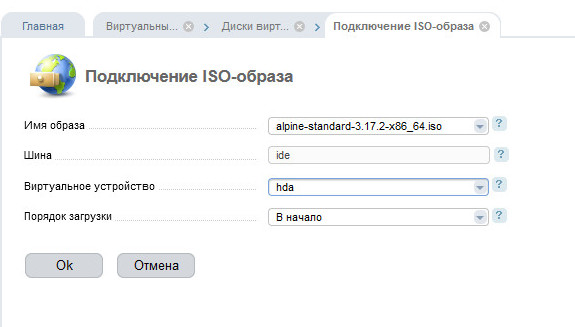
Соглашаемся, нажав «ok». В результате раздел будет иметь вид

Отлично, всё готово для установки.
Установка
Для того чтобы начать установку сначала стартуем впс и после этого кликаем по иконке VNC

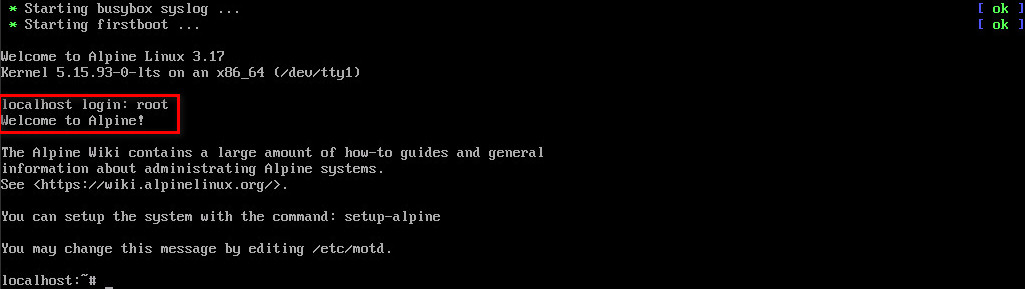
В открывшемся окне мы увидим уже знакомую многим картину. Первым делом нам необходимо авторизоваться, вводим имя пользователя root
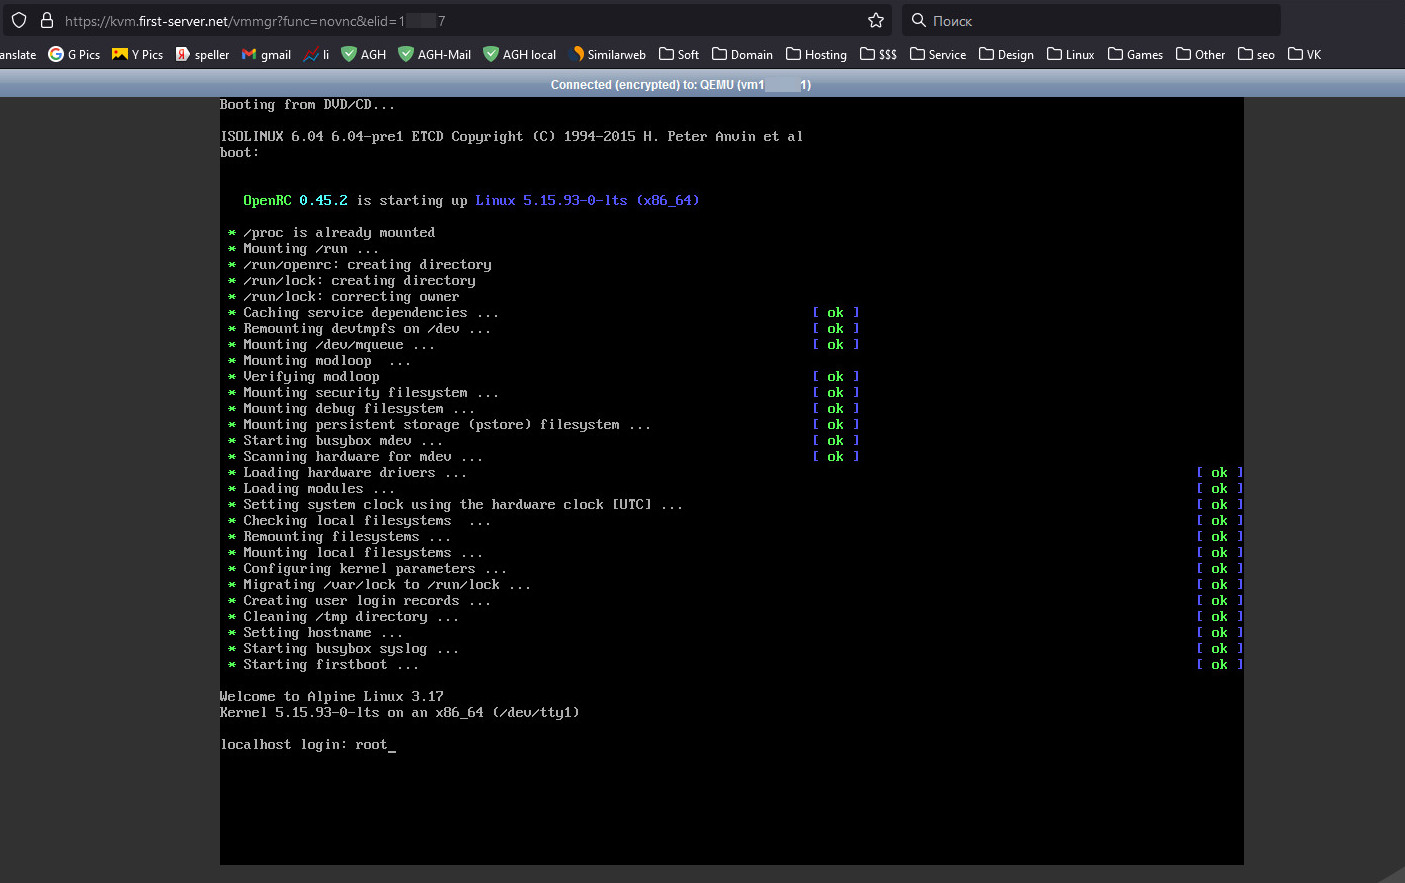
После ввода пользователя root, пароль у нас никто не запрашивает и мы успешно авторизуемся под админской учёткой. Это сделано для облегчения процесса установки, разумеется позже мы сами зададим пароль для root.
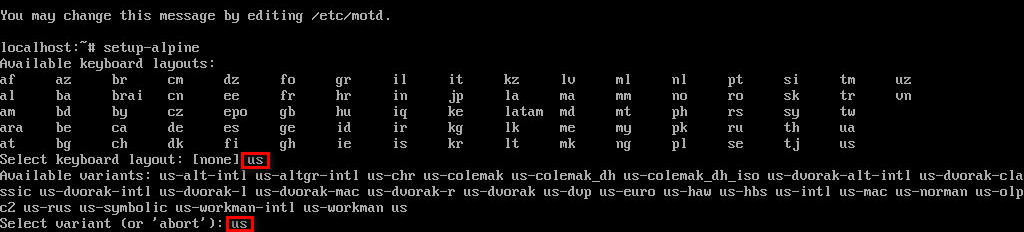
Чтобы приступить к установке вписываем команду
Вся установка текстовая и сводится к тому что мы просто вдумчиво отвечаем на вопросы инсталлятора, приступаем.
Раскладка клавиатуры
Первое о чём нас спрашивают это раскладка клавиатуры. Я отвечаю US и далее опять уточняю US. Вписывайте свою или просто повторяйте за мной
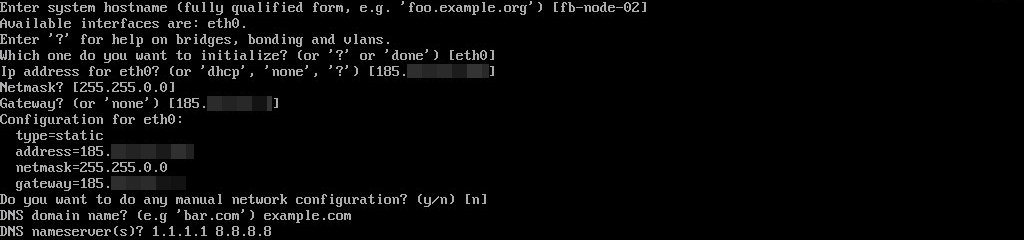
Hostname
В качестве хостнейма вписываю fb-node-02. Впишите своё название или просто согласитесь с дефолтным localhost
Настройка сети
Далее у нас идёт настройка сети, если у вас все параметры получаются по DHCP то просто нажмите ENTER. В моём случае мне необходимо было вручную указать сетевые настройки. Зачастую их можно посмотреть в самой панельке в разделе ip-адрес.
Либо на каком нибудь уже установленном дистре линукса:
для ip адреса вписать hostname —ip-address
для gateway вписать sudo route -n
и взять значения оттуда.
Просто отвечаем по порядку, вписывая ip адрес, маску подсети и gateway. После того как впишем, нам вновь отобразят настройки и спросят хотим ли мы ещё что то поменять. Мне тут больше ничего не нужно отвечаю n.
Также у нас спросят дефолтный домен, если нет домена или пока не определились можно вписать example.com
DNS сервера вписал такие 1.1.1.1 8.8.8.8
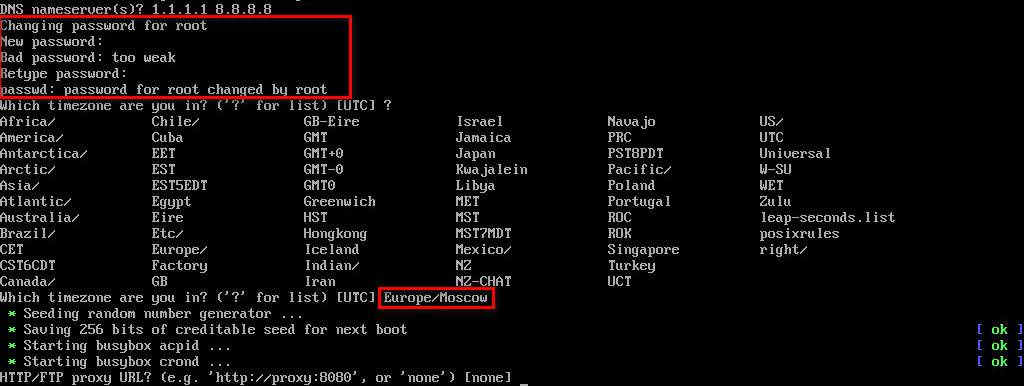
Root user + TimeZone + Proxy
Задаём пароль руту. А также устанавливаем часовой пояс. Те, кому это надо, вписывают настройки прокси, у меня сеть работает без прокси, поэтому тут я просто нажимаю ENTER.
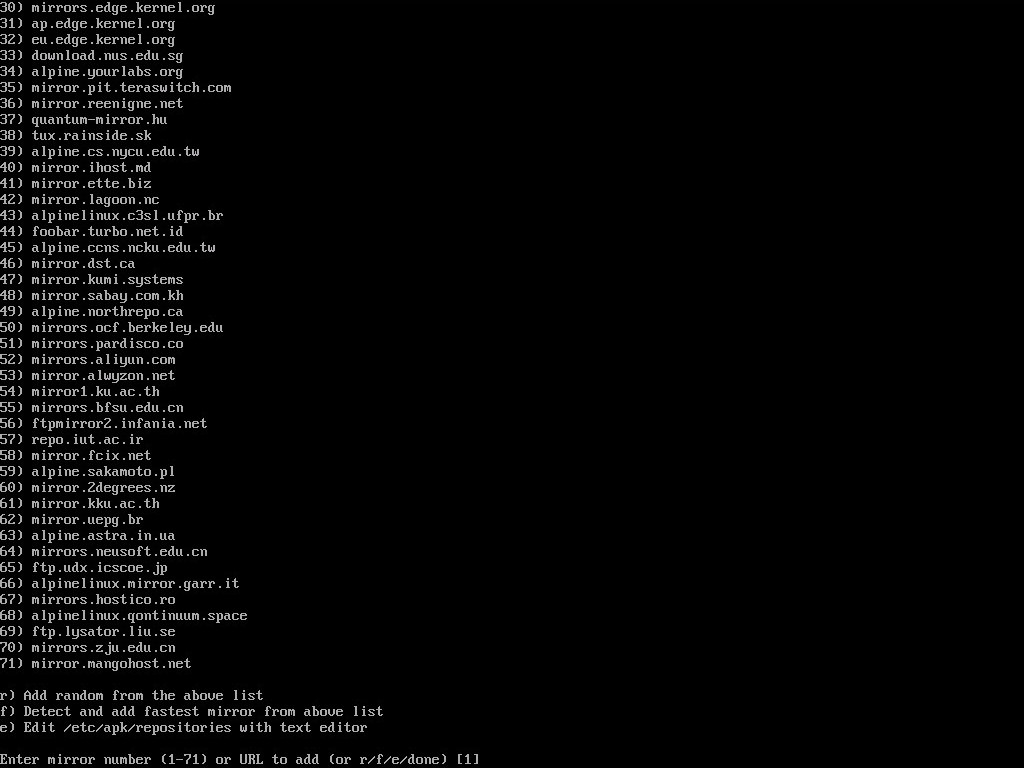
Выбор основного репозитория
Теперь нам предлагают выбрать главный репозиторий. Чтобы пролистать сразу весь список нажимаем пробел и выбираем номер репозитория. Я выбираю пункт F: Detect and add fastest mirror from above list, название говорит само за себя. (Чтобы пролистнуть список репозиториев, вместо того чтобы постоянно нажимать ENTER — можно 1 раз нажать Q)
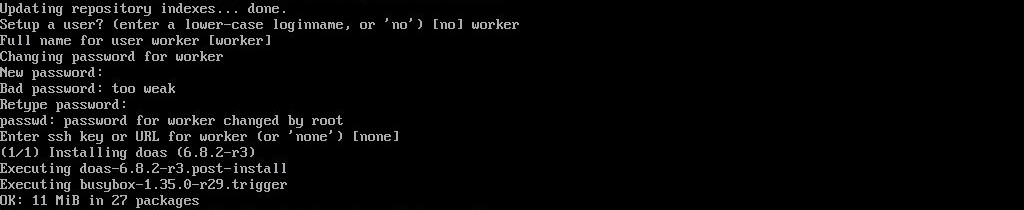
Добавление нового пользователя
Придумываем и вписываем имя пользователя. А также задаём ему пароль.
Выбор ssh сервера
Можем выбрать openssh или dropbear в зависимости от вашей конфигурации. Рекомендовано выбирать openssh.

Разметка диска
Нам предлагают на выбор несколько вариантов разметки диска. Sys, Data, Crypt или lvm. Для того чтобы узнать больше можно выбрать пункт ?. На этом шаге я выбираю самый распространённый вариант разметки Sys.
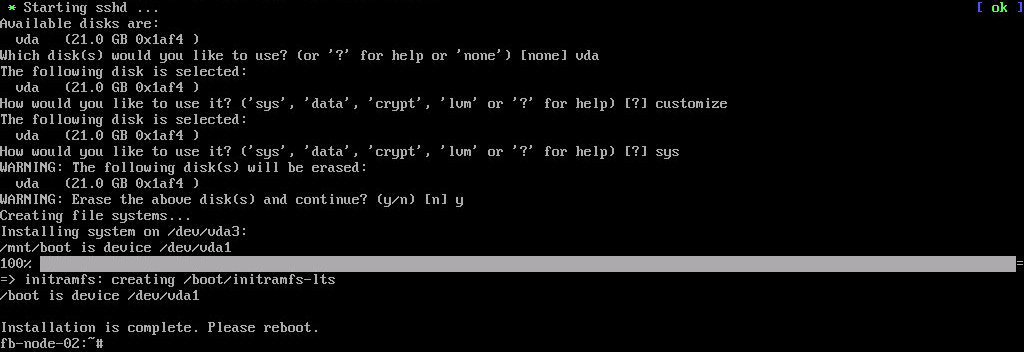
Этот шаг является финальным. После успешной разметки диска и копирования фаилов видим что нам предлагают ребутнуться, но мы поступаем немного иначе, вписываем команду
Переходим обратно в панель управления впс и в меню диски — отключаем наш подключенный ранее iso. И теперь уже можем загружаться в свежеустановленную систему. Для этого просто стартуем впс.
Т.к. установка завершена, то можем уже подключатся через привычный нам ssh клиент, вкладка с VNC уже не нужна.
Первоначальная настройка
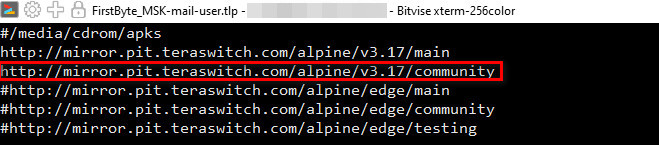
Добавляем community репозиторий
Мы попали в нашу новую систему. Рекомендуется обновить инфу о репозиториях и сами пакеты в системе. Но перед этим сначала раскомментируем community репозиторий, чтобы увеличить количество пакетов.
И раскомментируем репозиторий community
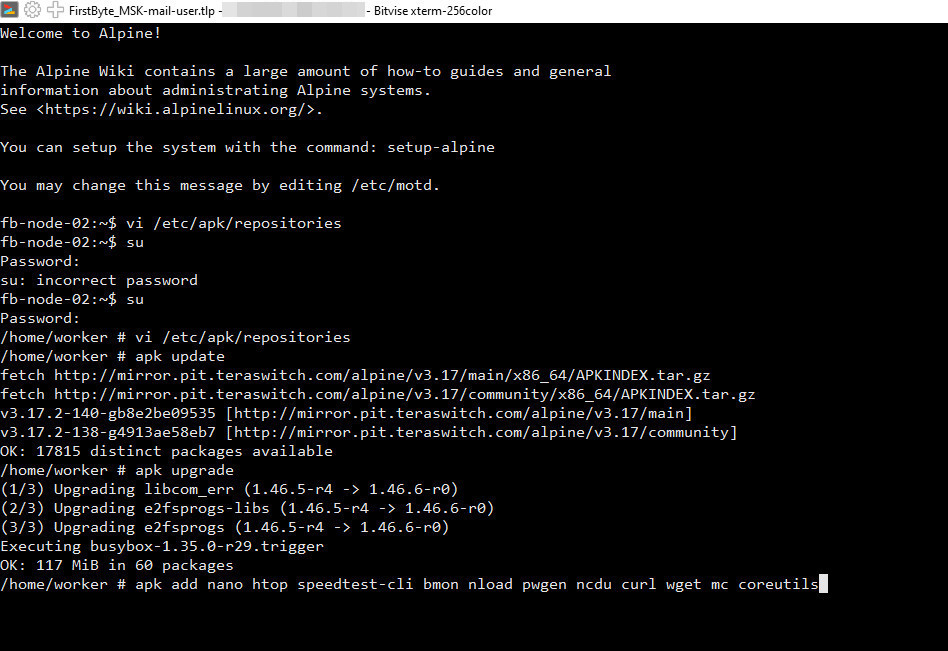
Работа с менеджером пакетов
Для того чтобы обновить информацию о репозиториях выполняем команду
Для того чтобы обновить пакеты в системе выполняем
Я советую сразу поставить такой набор
Для того чтобы удалить какой то пакет пишем
Опционально: добавляем QEMU Agent
Для правильного отображения ресурсов впс, некоторые пользователи захотят поставить себе QEMU Agent, для этого сначала устанавливаем его
Добавляем службу в автозагрузку
Можем сразу запустить службу
Setting up a new user
The root account should be used only for local administrative purposes that require elevated access permissions.
This page shows how to create non-privileged user accounts. i.e. those used for daily work, including desktop use and remote logins.
Overview
Creating user accounts provides users with their own $HOME directory and allows you (the root user) to limit the access those user accounts have to the operating system configuration files.
Using them increases security, because they limit possible actions and thus possible damage (even from accidental errors).
Creating a new user

Warning: If using a «diskless» or «data» disk mode installation, it’s important to make the /home directory persistent.
- Either the /home filesystem needs to be mounted from a writable partition, or
- the /home directories have to be added to the lbu backup, and a new local backup needs to be committed after creating the user:
# lbu include /home # lbu commit
(Not recommended, as reverting to an older .apkovl will also revert the files in /home).
Regular user accounts can be created with:
- prompt you to set a password for the new user
- create a home directory in /home/
- set the shell to the one used by the root account (ash by default)
- assign user ID and group ID starting at 1000
- set the GECOS (full name) field to «Linux User. «
This can be very useful to specify. Setting this string — at least equal to the username — makes the user distinguishable, e.g. when they are listed at the login screen of a display manager.
If a user really must be allowed to have access to the root account, the can be added to the wheel group and
# adduser -g "" # adduser wheel # apk add doas
You will want to allow members of the wheel group to use root privileges with doas . To do this, open the doas config file:
Add the following line and save the file:
Warning: It’s recommended to not run complete applications, like editors, as root just to modify administrative files.
- doasedit or sudoedit (being deprecated in favour of doas ) enables starting an editor with a temporary copy of a file, which overwrites the original file after the user modifies and saves it. For example, sudoedit /etc/apk/lbu.conf
- Many desktop environments and file browsers support using admin:/// in their address bars, to access files through a local gvfs-admin mount.
The sudo package is an alternative to using the BSD-like doas , but is a much larger package. It may be used as follows: adding a custom user configuration file to avoid having to deal with manually changing configuration files later during package upgrades.
apk add sudo NEWUSER='yourUserName' adduser -g "$" $NEWUSER echo "$NEWUSER ALL=(ALL) ALL" > /etc/sudoers.d/$NEWUSER && chmod 0440 /etc/sudoers.d/$NEWUSER
Now you should be able to issue the command exit and login to the new account.
Options
adduser
adduser [OPTIONS] USER [GROUP] Create new user, or add USER to GROUP -h --home DIR Home directory -g --gecos GECOS GECOS field -s --shell SHELL Login shell named SHELL by example /bin/bash -G --ingroup GRP Group (by name) -S --system Create a system user -D --disabled-password Don't assign a password, so cannot login -H --no-create-home Don't create home directory -u --uid UID User id -k SKEL Skeleton directory (/etc/skel)
If —ingroup isn’t set, (default) the new user is assigned a new GID that matches the UID. If the GID corresponding to a provided UID already exists, adduser will fail.
This ensures new users default to having a «user’s private group» (UPG) as primary group. These allow the system to use a permission umask (002), which creates new files automatically as group-writable, but only by the user’s private group. In special set-group-id (collaboration) directories, new files can be automatically created writable by the directory’s group.
addgroup
addgroup [-g GID] [-S] [USER] GROUP Create a group or add a user to a group -g --gid GID Group id -S --system Create a system group
Home directory permissions
`adduser` creates home directories with permissions `rwxr-sr-x`. This makes the directory readable by all other users on the system. If you prefer to not allow other users to read your home directory, the permissions can be changed:
Legacy
Common permission groups
This material is work-in-progress .
Need to note a few security implications outlined on debian/wiki SystemGroups
(Last edited by ShawCross on 17 Jan 2023.)
Groups are needed for certain operations on your system.
adm Used for system monitoring tasks. disk Raw access to disks. Mostly equivalent to root access. lp Members of this group can enable and use printers. wheel Administrator group, members can use doas to run commands as root if enabled in the doas configuration. floppy Access to floppy drives and other removable (non-optical) dirves (like USB flash drives). audio Direct access to sound hardware (the soundcard or a microphone). cdrom For access to disk writers and mounting DVD, BR or CD-ROM disk as normal user. dialout Full and direct access to serial ports. input Access to input devices. tape Needed to give a set of users access to a tape drive. video Access to video capture devices (like a webcam). netdev For network connections management as normal user. kvm Needed to use the KVM acceleration of virtual machines. games Access to some game software. cdrw Needed to write RW-DVD, RW-BR or RW-CD disk on a disk writing device. usb Needed to access special USB devices, deprecated group. users Needed if you plan to used common files for all users, mandatory as desktop usage.
To add your user to a group use the following command:
To see what group(s) a is in, use the following command:
Old newbie notes
User creation and defaults
The following commands will set up root environment login, then assign a new password:
By default, remote management cannot be done directly with the root account. Because of SSH security we need to set up a remote connection account that will be used to switch to the root user via the su command, once connected.
Here’s an example: create user named «remote» and a user named «general». We will set up a hardened, limited, user environment and create those two users:
mkdir -p /etc/skel/ cat > /etc/skel/.logout /etc/skel/.cshrcTip: "general" is the name of the user. That name MUST contain ONLY lowercase letters, NO spaces and NO symbols
Note that those users are created with minimal privilege settings.
User management and system access
By default, a newly created user will not have enough privileges for most desktop purposes.
To add newly created users to groups that may come in handy for desktop useage, you run this command as root:
for u in $(ls /home); do for g in disk lp floppy audio cdrom dialout video netdev games users; do addgroup $u $g; done;done