- Alpine Install: from a iso to a virtualbox machine with external disc
- Terminology
- Requirements
- Preparing the medium origin to install
- Preparing the medium target to install
- Preparing the virtual machine to install
- Booting the Alpine ISO disc
- Finishing the installation
- QEMU
- Install Alpine Linux in QEMU
- Before You Start
- Create the Virtual Machine
- Booting the Virtual Machine
- Live mode
- Letting the .iso image load an apkovl
- Advanced network configuration
- Using Xorg inside QEMU
- Run a guest OS on Alpine Linux using KVM/QEMU
Alpine Install: from a iso to a virtualbox machine with external disc
Overall description: Alpine Installation from a official disc/iso downloaded to a real hard disk by the usage of VirtualBox machine as the real machine, where will be single OS only.
This document will guide you to install Alpine into a real hard disk device but through the VirtualBox virtual machine acting as real machine, use if want to install to a real hard disk device externally but no way to boot it so can use in VirtualBox virtual machine .
Terminology
- Host machine: will be your real machine with installed operating system that have installed the VirtualBox software and «will host» the target operating system, in that case Alpine.
- Guest machine: will be your target machine where Alpine will be installed, emulated by the host operating system using the VirtualBox software installed in the real machine.
- Reserved RAM: will be the amount of RAM that will be need to share exclusively to the virtual machine created by the VirtualBox software in the host machine, stolen from the real RAM.
- External disc: will be the storage medium device attached as target for the emulated machine or «guest machine», where the Alpine will be installed.
Requirements
- In the host machine we need installed the virtualbox program from VirtualBox software
- In the host machine we need at least 1Gb of RAM, recommended 2Gb of RAM installed
- The guest machine need 512Mb RAM, but recommended 1Gb reserved if desktop software will be installed
- In the host machine we need installed wget or a web browser to download install medium
Preparing the medium origin to install
Download the source medium to install and put into your home, there’s more hardware medium sources to download, like the s390x and ppc64le, but due VirtualBox only emulates x86, x64 and arm hardware only, will list those here.
The source medium to install will be as following format: http://dl-cdn.alpinelinux.org/alpine/v/releases//alpine-netboot-.0-.iso where ARCH and VERSION could be the following for VirtualBox virtual machines:
- will be
- x86: The popular i386/i686 compatible 32-bit x86 based machines, i386 recommended for olders.
- x86_64: The popular AMD64 compatible 64-bit x86 based machines, recommended for newer/lasted hardware.
- latest-stable for a more up to date without taking care of numbered
- 3.10 the most recommended for machines between 2016 to 2018
So using 3.10 version and i386 flavor the available links to download will be: http://dl-cdn.alpinelinux.org/alpine/v3.10/releases/x86/alpine-standard-3.10.0-x86.iso
Graphical download: Just point the web browser to that url and the download of the iso file will start. A file with .iso extension type, with name like «alpine-standard-3.10.0-x86_64.iso» will be downloaded commonly into the Download directory of your home documents filesystem.
Command line method: in unix-like terminal execute: wget -c -t8 —no-check-certificate http://dl-cdn.alpinelinux.org/alpine/v3.10/releases/x86/alpine-standard-3.10.0-x86.iso , and where you run the command, in that place/dir will be downloaded the file.
Preparing the medium target to install
Please take care of your attached devices.. for best care results only use those involved in the process, so only put the disc (that can be a USB flash, MMC card or external drive) attached, and remove all others that will no to be use. We will assume only one internal disc (that obviously cannot be removed) and one external disk attached.
The external disc will be detected and the operating system will create a new device representation, such like /dev/sdb commonly. In Linux systems you can detect the recently attached disk with following command:
/bin/dmesg | tail -n 50| grep ‘Attached SCSI’ | cut -d’ ‘ -f4
This will output [sde] for our example installation. Caution due that previously command only will work if you recently attached the new external disk where the system will be installed.
Later with the detection of the disk, create the representation for the VirtualBox virtual machine, the detection will be put in /dev/ parameter.. so if the disk was detect as [sde] you must use it without «[«/»]» sings, the command for creating the virtual disk will be:
VBoxManage internalcommands createrawvmdk -rawdisk /dev/sde -filename $HOME/rawdisk-sdb.vmdk
Tip: in Linux if you don’t have «disk» group access need to perform permission to device to 666, so take care of

Warning: We assume there are only two disk, the internal and the external, here detected as [sde] for practical reasons, commonly will be detected as [sdb]
Preparing the virtual machine to install
Start the VirtualBox software program.

- In the main window create a new virtual machine by clicking the blue spark New button. Will open a new window with the following questions:
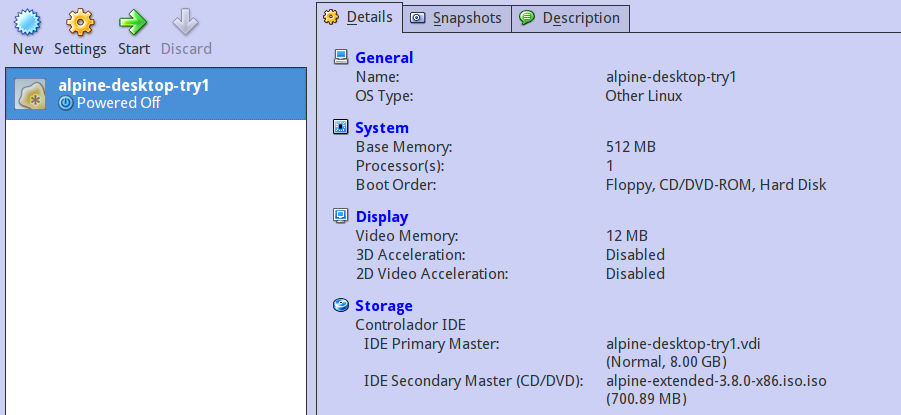
- Will ask for a name for the virtual like «alpine-desktop-try1».
- The Type of the Operating system choose «linux»
- The version choose «other linux» and must match with the choosed (like x86)
- By push «Next» button to continue to create the machine
- Second are RAM of the virtual machine, choose memory as 512MB minimum amount of. and push «Next» button.
- A new windows with a Hard disk assistant will opened
- First choose the option «Choose a existing hard disk drive» and push the «Folder button» aside.
- An open file dialog window will be opened, search for the «VMDK» file rawdisk-sdb.vmdk and choose it
- Choose the dynamically allocated and push the «Next» button.
- By push on «Create» the virtual machine will be ready to use
- Now the main window show you the «alpine-desktop-try1» created virtual machine, select them
- By push on «Configuration» yellow button go to the storage part and push it over
- Select the disc drive icon for CD/DVD rom and push on the again CD/DVD drive icon at the right
- Mini menu will opened, choose to select and external file event the host CD/DVD drive
- A file open dialog will open.. search to the downloaded iso of Alpine and select it
- Once defined the iso file to boot, push on the «Ok» button and virtual machines are finished.
- Push on the green arrow that said «Start» to start the virtual machine and boot up the iso
Booting the Alpine ISO disc
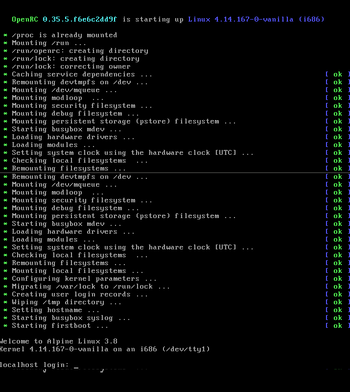
When the machine start, you must be sure to choose the Optical drive (commonly named CD/DVD Rom drive), so the disc/iso will boot and after a while a command line shell will show you:
Tip: If your system are not configure to boot from a CD/DVD drive must be configure in the BIOS, ask to your vendor or technical support, VirtualBox need to hit the F12 key to choose boot medium
TODO: restore original template of normal steps here! (inclusions)
Finishing the installation
After al the scripts setup ends, a «reboot» will be offered, just type «reboot» and press enter, remobe the boot media and new installed system will be booted.
If you try to start that installation maybe you cannot see a graphical window system? take easy and get calm down.. in Alpine all are made by the right way.. so if user need a desktop.. user can install a desktop follow the next: Alpine newbie packages or bypass and go directly to Alpine newbie desktops
QEMU
QEMU is a very flexible open source virtual machine and emulator. QEMU is able to virtualize or emulate x86, PowerPC, ARM, and S390 guests.
Install Alpine Linux in QEMU
This material is proposed for merging .
It should be merged with Installing_Alpine_in_a_virtual_machine#KVM_/_QEMU. Installing Alpine in QEMU and installing QEMU in Alpine should be handled separately. (Discuss)
Before You Start
- Download the latest Alpine image.
- Install QEMU on your system (e.g. sudo apt install qemu on Ubuntu, yum -y install qemu on Fedora)
If you are using alpine linux, you will like need to install:
# apk add qemu qemu-img qemu-system-x86_64 qemu-ui-gtk
Create the Virtual Machine
Create a disk image if you want to install Alpine Linux.
qemu-img create -f qcow2 alpine.qcow2 8G
The following command starts QEMU with the Alpine ISO image as CDROM, the default network configuration, 512MB RAM, the disk image that was created in the previous step, and CDROM as the boot device.
qemu-system-x86_64 -m 512 -nic user -boot d -cdrom alpine-standard-3.10.2-x86_64.iso -hda alpine.qcow2 -display gtk -enable-kvm
Log in as root (no password) and run:
Run poweroff to shut down the machine.
Booting the Virtual Machine
After the installation, QEMU can be started from disk image ( -boot c ) without CDROM.
qemu-system-x86_64 -m 512 -nic user -hda alpine.qcow2
Live mode
To just give Alpine Linux a try in diskless mode, qemu can be used to boot the .iso file without any need for a virtual HDD image or further configuration.
qemu -m 512 -cdrom alpine-3.2.0-x86_64.iso
at boot prompt to avoid being forced into graphical mode and losing access.
Letting the .iso image load an apkovl
This works by mounting a persistent filesystem under /media and selecting it to store the apkovl and the apkcache.
Preparing a KVM with a virtual drive:
mkdir -p /media/usb/images qemu-img create -f raw /media/usb/images/mykvm.config 32M qemu-system-x86_64 -enable-kvm -m 384 \ -name mykvm \ -cdrom /media/usb/images/alpine-3.2.0-x86_64.iso \ -drive file=/media/usb/images/mykvm.config,if=virtio \ -net lan \ -boot d &
And inside the KVM (running Alpine Linux):
fdisk /dev/vda #creating a partition mkdosfs /dev/vda1 mkdir -p /media/vda1 echo "/dev/vda1 /media/vda1 vfat rw 0 0" >> /etc/fstab mount -a setup-alpine # (select vda1 for saving configs) lbu commit
The next reboot then loads the generated apkovl and apkcache found on /dev/vda1 — completely running-from-ram based on the latest official ISO.
Advanced network configuration
To get networking running correctly, you can use the tun/tap interface, which then becomes a real interface. The key is to define the virtual network interface on the correct virtual vlan, and the correct ifup script.
You need 2 net commands on the command line interface, one for the host:
-net tap,vlan=[somenumber],ifname=[host if],script=[some script]
So to have a single NIC on the qemu virtual system that is connected to tap0 on the physical host:
qemu -net tap,vlan=0,ifname=tap0,script=./qemu-ifup -net nic,vlan0 \ -boot d -cdrom alpine*.iso>>
To create a qemu guest with more than one nic, just repeat the -net commands
qemu -net tap,vlan=0,ifname=tap0,script=./qemu-ifup -net nic,vlan0 \ -net tap,vlan=0,ifname=tap1,script=./qemu-ifup -net nic,vlan0 \ -net tap,vlan=0,ifname=tap2,script=./qemu-ifup -net nic,vlan0 \ -boot d -cdrom alpine*.iso>>
Now your alpine guest will have 3 NICs, mapped to tap0, tap1, and tap2 respectively.
What’s actually happening is you are effectively creating a point-to-point tunnel, with the phys tap0 device being one endpoint, and the virtual box’s eth0 being on the other point of the tunnel.
So you need to assign ip addresses to BOTH sides of the tunnel. The qemu-ifup script is what does that for the host. Here’s an example:
#!/bin/sh case $1 in tun0 | tap0 ) sudo /sbin/ip addr add 192.168.1.100/24 dev $1 sudo /sbin/ip link set $1 up ;; tap1 | tun1 ) sudo /sbin/ip addr add 192.168.2.100/24 dev $1 sudo /sbin/ip link set $1 up ;; tap2 | tun2 ) sudo /sbin/ip addr add 192.168.3.100/24 dev $1 sudo /sbin/ip link set $1 up ;; esac
In your alpinebox, create an interfaces file like this:
iface eth0 inet static address 192.168.1.1 netmask 255.255.255.0 gateway 192.168.1.100 iface eth1 inet static address 192.168.2.1 netmask 255.255.255.0 iface eth0 inet static address 192.168.3.1 netmask 255.255.255.0
If on your host you now add a MASQUERADE rule for tap0 to your host’s default nic, and you turn on ip_forward on your host, you can now do svn updates, surf, run tranmission, etc right from your qemu guest.
Using Xorg inside QEMU
The video driver needed for Xorg inside QEMU is xf86-video-modesetting .
Tip: Probably for KVM/Qemu guests you want to use qxl Video and Display Spice. For this purpose install xf86-video-qxl on guest and run a Spice client on the host
If you decided to use a qxl Video on KVM/Qemu guest, add this configuration to `/etc/X11/xorg.conf`
Section «Device» Identifier «qxl» Driver «qxl» Option «ENABLE_SURFACES» «False» EndSection
Run a guest OS on Alpine Linux using KVM/QEMU
# apk add qemu-system-x86_64 qemu-modules libvirt libvirt-qemu
Add your user to the kvm and qemu groups
Logout for the group changes to take effect
# rc-update add libvirt-guests
Starting the services now:
# rc-service libvirt-guests start
If you are interested in using a bridged network (so that the guest machine can be reached easily from the outside), see Bridge.