Already mounted or mount point busy linux
The issue you facing is as follows: you are trying to mount a partition on the command line. You’ve done this a thousand times before. Only now, for some odd reason, the system informs you that the particular partition you’re trying to use is already mounted or mount point busy . This is an annoying and unexpected error.
I’ve encountered this issue while merrily testing OpenSUSE Leap 15. I wanted to check the contents of two specific partitions, in order to figure out which one was which — two different distros, and one had to be sacrificed for the upcoming openSUSE installation. But the installation wizard didn’t have any labels, so I had to manually mount. Except I could not do this. I decided to explore the issue in more detail, and so this tutorial was born. After me.
Problem in more detail
You are trying to perform some kind of maintenance on your disks and partitions. To that end, you need to manually mount a device, e.g. inspect the folder hierarchy or permissions, copy files, search for a file, etc. But you cannot do this, because you get an error like:
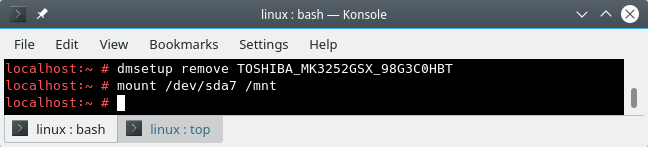
mount /dev/sda7 /mnt
mount: /mnt: /dev/sda7 already mounted or mount point busy.
If you check with the commands like mount and df -l, you can see that the specific partition is NOT mounted, but something is holding it. Then, on further inspection, you also notice that the fdisk command returns a different notation to what you expect, something like:
/dev/mapper/vendor-ser-part1 4094 625141035 625136942 298.1G 5 Ext
/dev/mapper/vendor-ser-part5 4096 8392703 8388608 4G 82 Lin
/dev/mapper/vendor-ser-part6 8394752 417994751 409600000 195.3G 83 Lin
/dev/mapper/vendor-ser-part7 * 417996800 520397190 102400391 48.8G 83 Lin
/dev/mapper/vendor-ser-part8 520398848 625141035 104742188 50G 83 Lin
Instead of /dev/sdXY, you get something called /dev/mapper and the disks are listed with vendor/manufacturer, followed by serial number, followed by partition number.
The reason for this notation is because the operating system uses the device mapper, which maps the underlying physical devices into a higher-level hierarchy, like LVM, software RAID and disk encryption, as well as snapshots. If you’re using openSUSE with BTRFS, this makes sense, as BTRFS has a snapshotting capability.
But if you are NOT using any of the above on your PHYSICAL DEVICES, you do not need the device mapping functionality. We need to fix this somehow.
Solution
So what I’m going to show you is how to restore your «classic» functionality. Please note that we will use the dmsetup command, which is a low-level LVM utility. We will remove the mapped devices, and this will allow you to utilize your disks as you expect.
We will not disable the kernel module, though. You may at some point want to use encryption or LVM, but not necessarily with your system disk (or any other specific device). This means we will not be running intrusive or destructive operations. Still, before we move on, a quick checklist:
- The device or the mountpoint you’re trying to access is not in use (check with mount, df, lsof).
- You are not using BTRFS on the affected disks/partitions.
- You are not using LVM or software RAID on the affected disks/partitions.
- You are not using encryption (system or home) on the affected disks/partitions.
Now, we can safely remove the devices. First, list the devices:
dmsetup ls
TOSHIBA_MK3252GSX_98G3C0HBT-part8 (254:5)
TOSHIBA_MK3252GSX_98G3C0HBT-part7 (254:4)
TOSHIBA_MK3252GSX_98G3C0HBT-part6 (254:3)
TOSHIBA_MK3252GSX_98G3C0HBT-part5 (254:2)
TOSHIBA_MK3252GSX_98G3C0HBT-part1 (254:1)
TOSHIBA_MK3252GSX_98G3C0HBT (254:0)
Then, one by one, let’s remove them:
dmsetup remove TOSHIBA_MK3252GSX_98G3C0HBT-part8
dmsetup remove TOSHIBA_MK3252GSX_98G3C0HBT-part7
.
Once the dmsetup command returns an empty list, you’re good to go. Problem solved.
More reading
Please also take a look at the following guides:
Conclusion
There you go. You can safely perform these actions without any damage or data loss if you are not using LVM volumes. If you are, then you need to figure out why you’re using them, and then use the relevant commands to examine the disk and partition contents (vg*, lv* tools), mount the mapped devices directly, or explore them through the existing mount points, if possible. But that’s a separate topic.
We gathered here to work around an unexpected issue. If you are using advanced storage options, you will probably not be reading this. But if you’re merely looking for simple ways to access and explore your partitions, and this little guide gives you the tools to do that. Once again, please be careful, don’t do any hasty actions, and make sure you know exactly what you’re doing with your disks. Backups, right! And we’re done.
Unable to mount Raid 5 array «already mounted or mount point busy»
I’ve been trying to google and search and can’t seem to find an answer to my specific problem even though many people have posted similar issues. Here we go. Trying to mount my raid 5 array to a folder /mnt/raid. Added to fstab:
UUID=202483d5-808d-9a85-5361-c119c4bdbda4 /mnt/raid ext4 defaults 0 2 /dev/sdc: UUID="202483d5-808d-9a85-5361-c119c4bdbda4" UUID_SUB="9a17b921-7b72-8031-71de-8049fddda330" LABEL="homeserver:0" TYPE="linux_raid_member" /dev/sdb: UUID="202483d5-808d-9a85-5361-c119c4bdbda4" UUID_SUB="501b9b14-5c17-f798-78a5-dbd9afdeaba3" LABEL="homeserver:0" TYPE="linux_raid_member" /dev/sde: UUID="202483d5-808d-9a85-5361-c119c4bdbda4" UUID_SUB="bafc7cbe-294d-70a5-10fa-8b4412c3a2b9" LABEL="homeserver:0" TYPE="linux_raid_member" /dev/sdd: UUID="202483d5-808d-9a85-5361-c119c4bdbda4" UUID_SUB="76ad59f4-aa6e-1cde-2026-3077310841f8" LABEL="homeserver:0" TYPE="linux_raid_member" sudo mount /mnt/raid mount: /mnt/raid: /dev/sdb already mounted or mount point busy. sudo mount -t ext4 /dev/md0 /mnt/raid mount: /mnt/raid: wrong fs type, bad option, bad superblock on /dev/md0, missing codepage or helper program, or other error. sudo mdadm --detail /dev/md0 /dev/md0: Version : 1.2 Creation Time : Wed Nov 24 05:49:18 2021 Raid Level : raid5 Array Size : 23441682432 (22355.73 GiB 24004.28 GB) Used Dev Size : 7813894144 (7451.91 GiB 8001.43 GB) Raid Devices : 4 Total Devices : 4 Persistence : Superblock is persistent Intent Bitmap : Internal Update Time : Fri Nov 26 02:22:04 2021 State : clean Active Devices : 4 Working Devices : 4 Failed Devices : 0 Spare Devices : 0 Layout : left-symmetric Chunk Size : 512K Consistency Policy : bitmap Name : homeserver:0 (local to host homeserver) UUID : 202483d5:808d9a85:5361c119:c4bdbda4 Events : 9306 Number Major Minor RaidDevice State 0 8 16 0 active sync /dev/sdb 1 8 32 1 active sync /dev/sdc 2 8 48 2 active sync /dev/sdd 4 8 64 3 active sync /dev/sde sudo dmraid -r no raid disks I checked smart status on each disk, just in case it was a bad drive, and they all pass. I don’t think this is an lvm (unless I’m missing something). I’ve scoured the internet and can’t seem to find an answer. Any suggestions on how I might do this? I can’t seem to figure out what I’m missing. Running Ubuntu Server 20.04.03LTS
/mnt/nvme0n1 already mounted or mount point busy
I am trying to mount nvme /dev/nvme0n1 to /mnt/chroot I have created the directory /mnt/chroot when I «sudo mount /dev/nvme0n1 /mnt/chroot» I get «mount: /mnt/chroot: /dev/nvme0n1 already mounted or mount point busy.» I have tried on an arch live usb and now on a Fedora 30 live usb.
returns nothing meaning nvme0n1 is not mounted. But how can the mount point be busy if I just created the mount directory /mnt/chroot and nvme0n1 is not mounted? My objective is to build chroot with root, /sys , /proc , /boot and /boot/efi mounted. I’m weak on the cli for this task.
lsblk -f NAME FSTYPE LABEL UUID FSAVAIL FSUSE% MOUNTPOINT loop0 squashfs loop1 ext4 Anaconda b44431ef-901f-4c18-9b7b-224b8bb98af6 ├─live-rw ext4 Anaconda b44431ef-901f-4c18-9b7b-224b8bb98af6 822.1M 87% / └─live-base ext4 Anaconda b44431ef-901f-4c18-9b7b-224b8bb98af6 loop2 └─live-rw ext4 Anaconda b44431ef-901f-4c18-9b7b-224b8bb98af6 822.1M 87% / sda ├─sda1 vfat 1078-26A1 ├─sda2 xfs 7d8928c4-baa1-4eaa-a13c-e937031f8dfa └─sda3 LVM2_member OjAFDa-Il7s-Vj0h-Lian-culw-97um-9GYjOo ├─centos-swap swap df903e75-89f5-4646-aad1-981f17e032e9 [SWAP] ├─centos-home xfs c3dea145-a219-4896-ae9f-8419f91a13aa └─centos-root xfs 66a1a58a-c06f-4407-8d47-1fd4266c6b75 sdb ext4 ssd2 0be3be76-a16d-4777-ab09-c7cc372ed1bc └─sdb1 ext4 ssd2 c90f13b9-f228-4051-a586-7b6083f50105 sdc linux_raid_member orcacomputers.orcainbox:0 4ca9118c-3a55-7d0f-db72-3ff2e8b9a521 └─md127 ext4 d52b3913-2ed2-4142-9309-3fdf641141f0 sdd linux_raid_member orcacomputers.orcainbox:0 4ca9118c-3a55-7d0f-db72-3ff2e8b9a521 └─md127 ext4 d52b3913-2ed2-4142-9309-3fdf641141f0 sde linux_raid_member orcacomputers.orcainbox:0 4ca9118c-3a55-7d0f-db72-3ff2e8b9a521 └─md127 ext4 d52b3913-2ed2-4142-9309-3fdf641141f0 sdf iso9660 ARCH_202010 2020-10-01-15-07-58-00 ├─sdf1 iso9660 ARCH_202010 2020-10-01-15-07-58-00 0 100% /run/media/liveuser/ARCH_202010 └─sdf2 vfat ARCHISO_EFI 137A-1EE8 sdg iso9660 Fedora-WS-Live-30-1-2 2019-04-26-02-34-40-00 ├─sdg1 iso9660 Fedora-WS-Live-30-1-2 2019-04-26-02-34-40-00 0 100% /run/initramfs/live ├─sdg2 vfat ANACONDA E385-716D └─sdg3 hfsplus ANACONDA 8f5370e2-fd7c-3f3a-9d01-aa72345be183 sr0 nvme0n1 ├─nvme0n1p1 LVM2_member CjuOUt-h2bH-EjCp-ALwd-c8BW-ZckJ-cpB322 ├─nvme0n1p2 LVM2_member M1em0l-TY0y-ZuIt-DK2i-0yJp-OHNz-7RfupC │ └─nvmeVg-var ext4 3985016b-fa34-44ca-96ad-7c2e5d5f8221 ├─nvme0n1p3 LVM2_member qkaPsI-FLzs-wt4Y-bnhm-BpGK-aOcR-fheulP │ ├─nvmeVg-var ext4 3985016b-fa34-44ca-96ad-7c2e5d5f8221 │ ├─nvmeVg-home ext4 540c7358-e018-43bc-b692-6e2398911b38 │ └─nvmeVg-root ext4 6f9437cd-c9af-4f88-a9b4-7d98e46979aa ├─nvme0n1p4 LVM2_member CTkIFV-Ebvf-Ps5w-rysY-s7U0-VLhs-6jLVRV │ └─nvmeVg-home ext4 540c7358-e018-43bc-b692-6e2398911b38 ├─nvme0n1p5 LVM2_member Sjii2Q-zkwB-9Nhb-0g6o-4rt3-O9gy-4CMtEI │ └─nvmeVg-home ext4 540c7358-e018-43bc-b692-6e2398911b38 ├─nvme0n1p6 LVM2_member QLUYbk-TzNY-RZHz-ck60-gbqA-kPtk-QT2Tm4 │ └─nvmeVg-root ext4 6f9437cd-c9af-4f88-a9b4-7d98e46979aa ├─nvme0n1p7 LVM2_member nQg41G-8A3m-wMog-LBzJ-U09n-W1md-lgVEdQ │ └─nvmeVg-root ext4 6f9437cd-c9af-4f88-a9b4-7d98e46979aa ├─nvme0n1p8 LVM2_member D5HOGp-nLA3-zypn-edIj-uPon-Pzrj-N6JcB5 ├─nvme0n1p9 LVM2_member puKdcF-J2PT-THK1-nSqx-RMhe-98ZB-EnDPV0 ├─nvme0n1p10 LVM2_member 0XEQEc-pHGc-2B02-d4lp-581f-ZMYv-vKTgpG ├─nvme0n1p11 LVM2_member NF82AB-ZUaP-D9FF-PLVP-HMuA-pWFz-NIZFRG └─nvme0n1p12 ext4 3e5f9f87-3178-4ae3-bc51-f0f5134c5fb6 df -h Filesystem Size Used Avail Use% Mounted on devtmpfs 32G 0 32G 0% /dev tmpfs 32G 4.0K 32G 1% /dev/shm tmpfs 32G 2.8M 32G 1% /run tmpfs 32G 0 32G 0% /sys/fs/cgroup /dev/sdg1 1.9G 1.9G 0 100% /run/initramfs/live /dev/mapper/live-rw 6.4G 5.6G 823M 88% / tmpfs 32G 76K 32G 1% /tmp vartmp 32G 0 32G 0% /var/tmp tmpfs 6.3G 3.5M 6.3G 1% /run/user/1000 /dev/sdf1 681M 681M 0 100% /run/media/liveuser/ARCH_202010