- AWS — How to install java11 on an EC2 Linux machine?
- 4 Answers 4
- Как установить Java в Amazon Linux
- Шаг 1 — Установка Java в Amazon Linux
- Шаг 2 — Проверка версии Java
- Шаг 3 — Переключение между установленными версиями Java
- Похожие записи:
- How to install Java 8/11 on Amazon Linux 2023
- Step 1: Update Your System:
- Step 2: Install Corretto or Java on Amazon 2023
- For Java 8:
- For Java 11:
- Step 3: Check installed JAVA Version
- Step 4: How to Switch between Java versions
- Leave a Comment Cancel reply
- How to Install Java JDK on Amazon EC2
- Step 1: Creating an EC2 Amazon Linux Instance
- Step 2: Connect to the EC2 Amazon Linux Instance
- Step 3: Install JDK on Amazon Linux
- Optional: Installing Complete JDK 8 on Amazon Linux
- Optional: Choosing the JDK version to Use
- Conclusion
- About the author
- Abdul Mannan
- How to Install Java 11/8 on Amazon Linux
- Step 1 – Install Java on Amazon Linux
- Step 2 – Check Active Java Version
- Step 3 – Switch Java Version
- Conclusion
AWS — How to install java11 on an EC2 Linux machine?
I tried this Downloading Java JDK on Linux via wget is shown license page instead but I keep getting a 404 error. This command «sudo amazon-linux-extras install java-openjdk11» just states that amazon-linux-extras doesnt exist.
amazon-linux-extras is only available on Amazon Linux 2 (and does work). If you’re using a different Linux distribution, then you have to use one of the other suggested options below.
4 Answers 4
Another option might be running the following commands:
In order to install java 11:
sudo amazon-linux-extras install java-openjdk11
For java 8 you can try:
sudo yum install java-1.8.0-openjdk
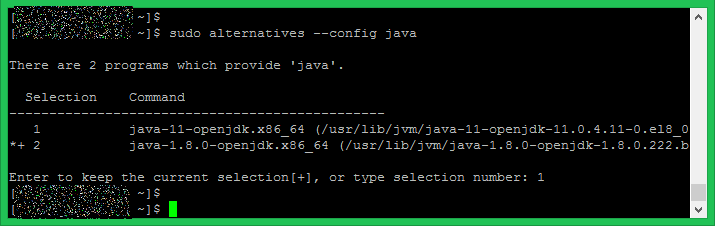
Finally, if you want to switch between java versions run:
sudo alternatives —config java
This works only if you open up outbound https in your Security Group assigned to your EC2 instance! lol
I need to install java 11 in aws code build virtual machine and its not working for me. OS details Ubuntu 18.04.4 LTS architecture 4.14.275-207.503.amzn2.x86_64
Sharing my simple working approach
Downloading the JDK
curl -LO https://corretto.aws/downloads/latest/amazon-corretto-11-x64-linux-jdk.tar.gz
note: check the ec2 instance’s platform ie., x64, aarch64, x86, aarch32 etc.,because the wrong platform jdk installation will leads to /bin/java: /bin/java: cannot execute binary file
Extracting the JDK to /usr/java/
sudo tar -xvzf amazon-corretto-11-x64-linux-jdk.tar.gz -C /usr/java/ Run the below single line command to change the soft link for java files in (/usr/bin) directory
cd /usr/java/amazon-corretto-*-linux-x64/bin for i in java javac jfr; do path=$(find `pwd`/$i -type f); echo $path; sudo alternatives --install /usr/bin/$i $i $path 20000 ; sudo update-alternatives --config $i ; done after the above command execution, there will be a command prompt that will ask you to choose the selection number which represents the file residing path and we should choose the number which refers to path /usr/java/amazon-corretto-*-linux-x64/bin/
The amazon-corretto jdk version may vary based on the timeline that you download. Currently the java version is 11.0.12.7.1
That’s it execute java -version , you can see the java version as
openjdk version "11.0.12" 2021-07-20 LTS OpenJDK Runtime Environment Corretto-11.0.12.7.1 (build 11.0.12+7-LTS) OpenJDK 64-Bit Server VM Corretto-11.0.12.7.1 (build 11.0.12+7-LTS, mixed mode) Как установить Java в Amazon Linux
В этой статье я расскажу как установить Java в Amazon Linux. Java 8 и Java 11 от Oracle требуют регистрацию для загрузки, поэтому мы будем использовать вместо нее OpenJDK.
Шаг 1 — Установка Java в Amazon Linux
Используйте одну из нижеуказанных команд для установки требуемой версии Java на вашу Amazon Linux. Вы также можете установить обе версии Java и использовать их в зависимости от ваших требований. Java 8 доступна в стандартном репозитории, а Java 11 только в Amazon Linux Extras.
Установка Java 11:
amazon-linux-extras install java-openjdk11
Установка Java 8
yum install java-1.8.0-openjdk
Шаг 2 — Проверка версии Java
После установки Java, проверим ее работоспособность. Стоит учитывать, что при установке одновременно двух версий — только одна будет доступна по умолчанию в системе (т.е. по команде java), а вторая только при указании полного пути.
java -version openjdk version "1.8.0_222" OpenJDK Runtime Environment (build 1.8.0_222-8u222-b10-1ubuntu1~18.04.1-b10) OpenJDK 64-Bit Server VM (build 25.222-b10, mixed mode)
Шаг 3 — Переключение между установленными версиями Java
Чтобы переключить версию по умолчанию — выполните следующую команду:
В результате вам будет показан список установленных версий Java, путь к ним, а также какая из версий в данный момент активна.
Для смены версии — введите номер этой версии (из первого столбца) и нажмите Enter, если вы не хотите менять версию — просто нажмите Enter
После смены версии, проверим текущую версию:
java -version openjdk version "11.0.2" 2019-01-15 LTS OpenJDK Runtime Environment 18.9 (build 11.0.2+7-LTS) OpenJDK 64-Bit Server VM 18.9 (build 11.0.2+7-LTS, mixed mode, sharing)
Похожие записи:
How to install Java 8/11 on Amazon Linux 2023
Here we go through the commands available to install Java 11 or 8 on Amazon Linux 2023 for production or business applications in your cloud infrastructure. Java is available through the Amazon 2023 repositories as Corretto.
But, what is Amazon Corretto?
Amazon Corretto is a distribution of the Open Java Development Kit (OpenJDK) developed and maintained by the Amazon Web Services (AWS) Team. This is designed to use on the AWS Linux platform to get a number of benefits when running Java applications. Here are some of the reasons why you should choose Java Corretto to develop or run applications on Amazon:
- Amazon Corretto is meant to provide high performance and stability by providing bug fixes, and security patches.
- Long-Term Support (LTS) for major Java versions typically for at least 8 years from the initial release.
- Corretto is designed with security in mind.
- It undergoes rigorous testing and verification processes to ensure compatibility with popular Java applications, libraries, and frameworks.
- Free of charge
- Supported by a large and active community of Java developers and AWS users.
Step 1: Update Your System:
Access your Amazon Linux 2023 command terminal using SSH and then execute the system update command. It will install the latest available updates, if any, plus rebuild the DFN package index cache.
Step 2: Install Corretto or Java on Amazon 2023
Unlike Amazon Linux 2, AWS’s Corretto is a production-ready distribution of OpenJDK available through the default system repository of Amazon Linux 2023. So, we can install Java without adding any extra repository.
Just in your command terminal type:
For Java 8:
sudo dnf install java-1.8.0-amazon-correttosudo dnf install java-1.8.0-amazon-corretto-develFor Java 11:
sudo dnf install java-11-amazon-correttosudo dnf install java-11-amazon-corretto-devel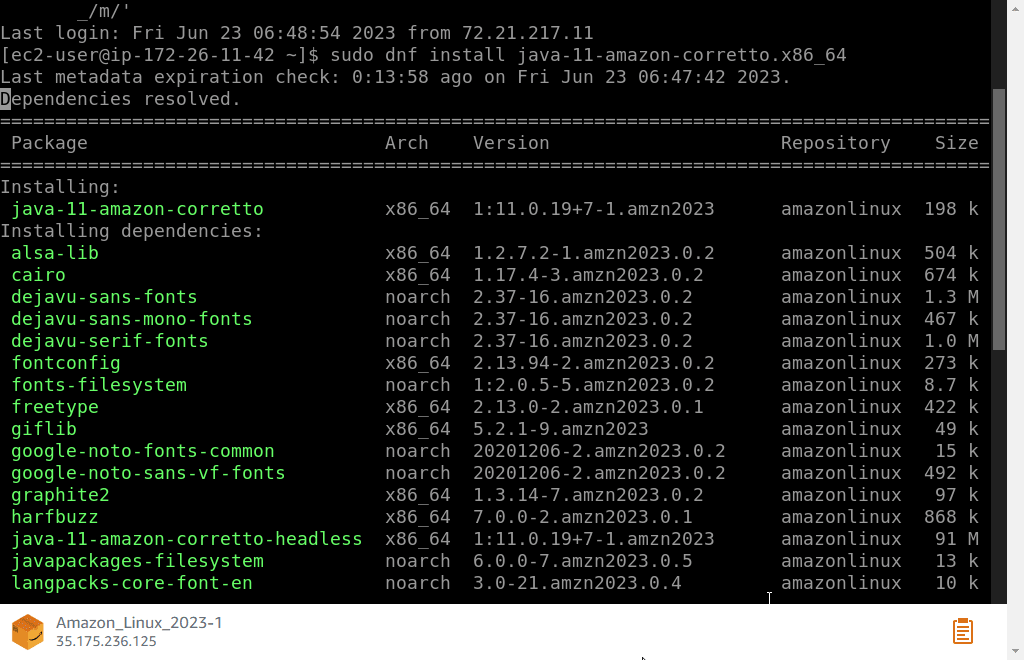
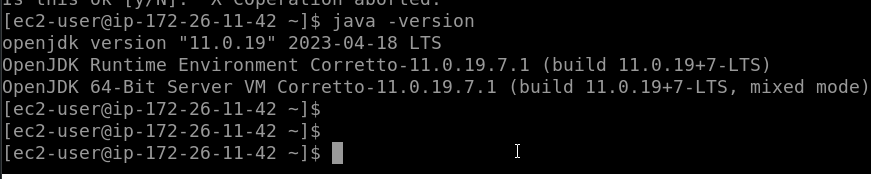
Step 3: Check installed JAVA Version
By following the above commands you will definitely have the Java version you want to install on your Amazon Linux 2023. To confirm that we can use the given command.
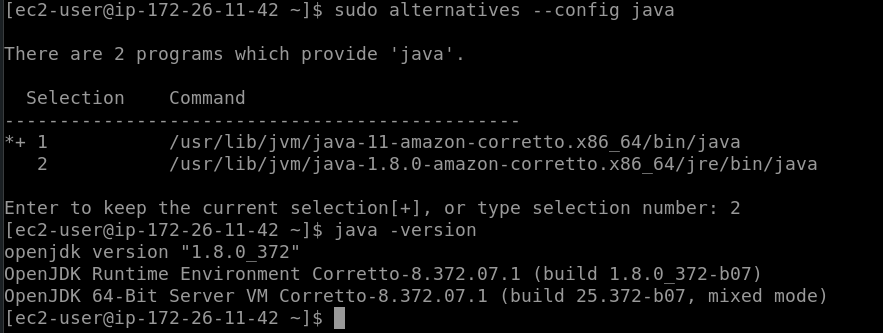
Step 4: How to Switch between Java versions
If you have multiple Java versions installed on your Amazon Linxu 2023 let’s say you have both Java 8 and Java 11 on your system. Now, to switch between and make any one of them the default Java version of your system, we can use the “alternative –config” command.
Type the Selection number of the Java you want to set as default system one and hit the Enter key.
Other Articles:
Leave a Comment Cancel reply
This site uses Akismet to reduce spam. Learn how your comment data is processed.
How to Install Java JDK on Amazon EC2
![]()
JDK, or the Java Development Kit, provides an environment for the user to develop certain Java applications. Apart from development, JDK is sometimes necessary to run the applications on the local machine, such as the Apache Tomcat Server. Suppose the user is working with Amazon Linux on the EC2 virtual machine and wants to run a specific application that requires Java. In that case, the user must manually install JDK into the Amazon Linux EC2 instance.
This post will teach how to install JDK in the EC2 instance running Amazon Linux.
Step 1: Creating an EC2 Amazon Linux Instance
Simply head on over to the AWS Console and then head inside the EC2 Management Console:
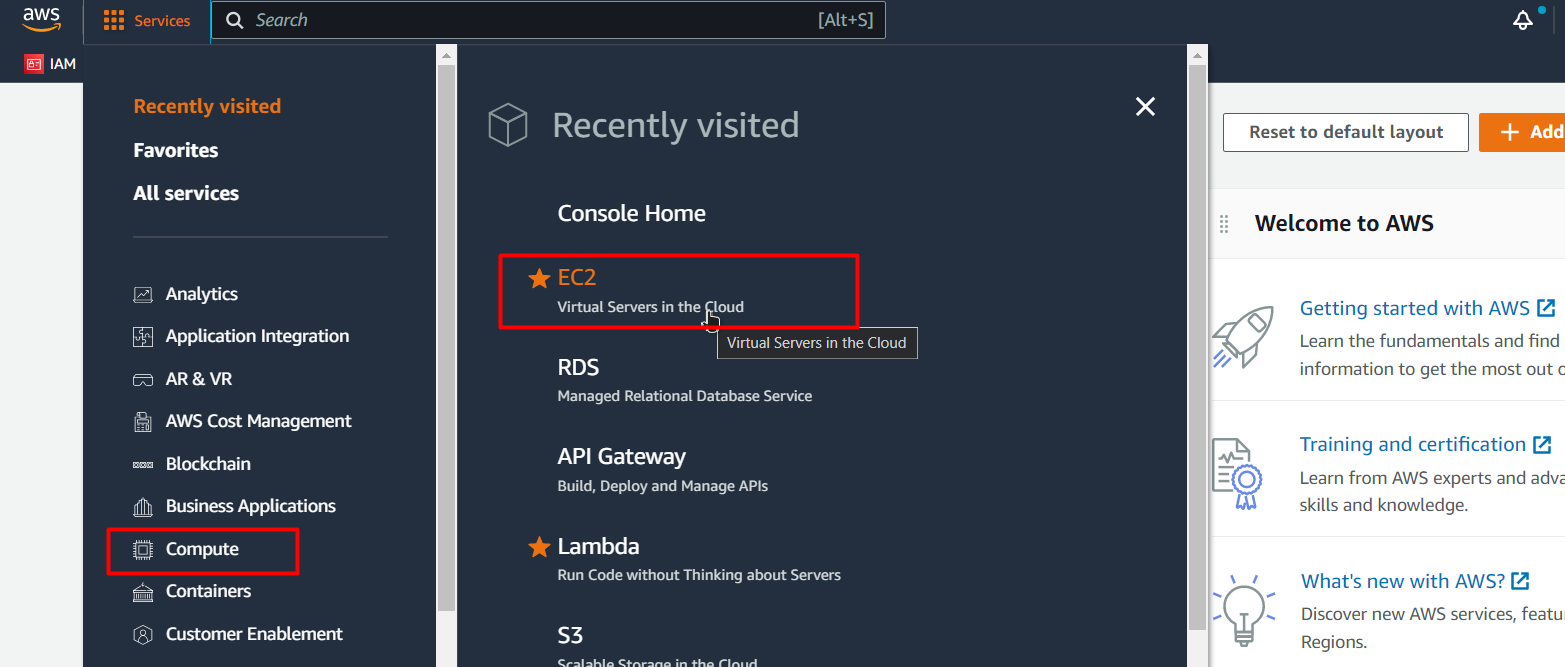
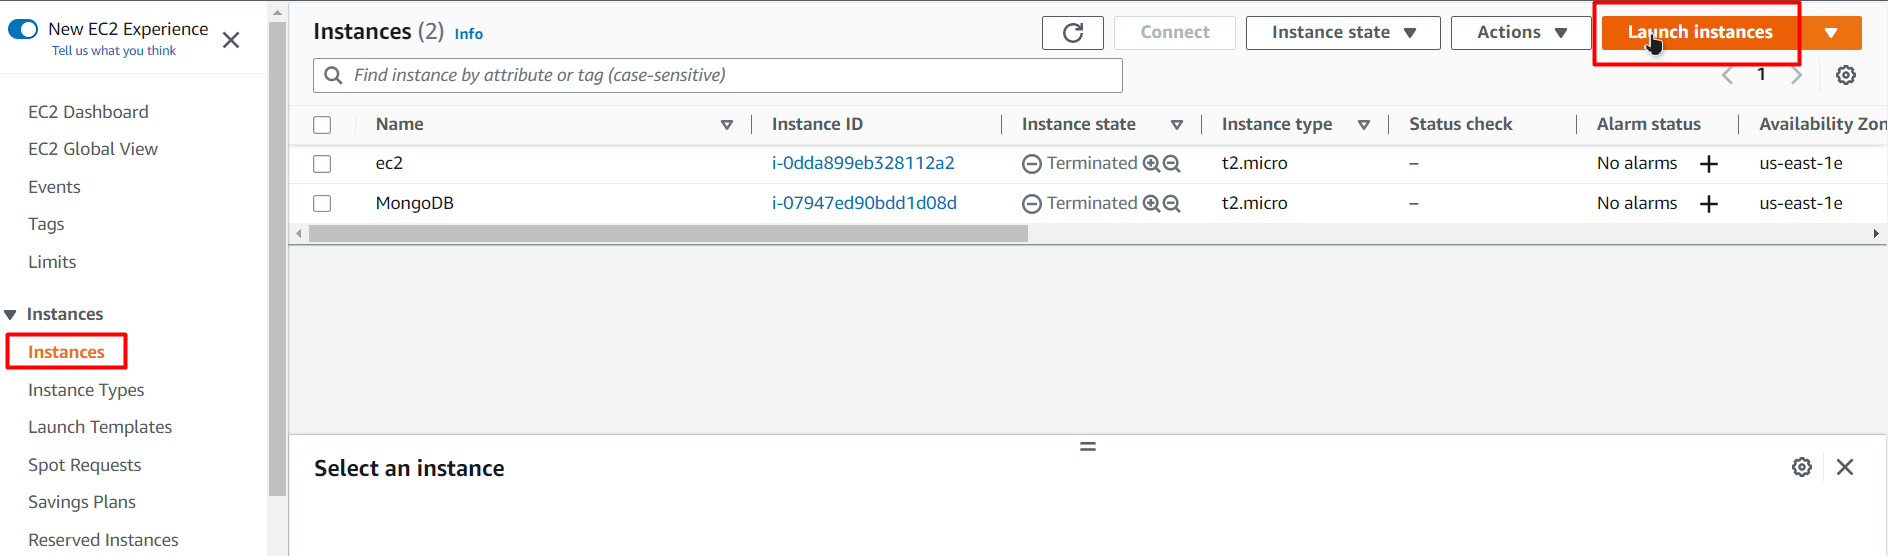
Launch a new instance by clicking the “launch Instance” button from the Instances console:
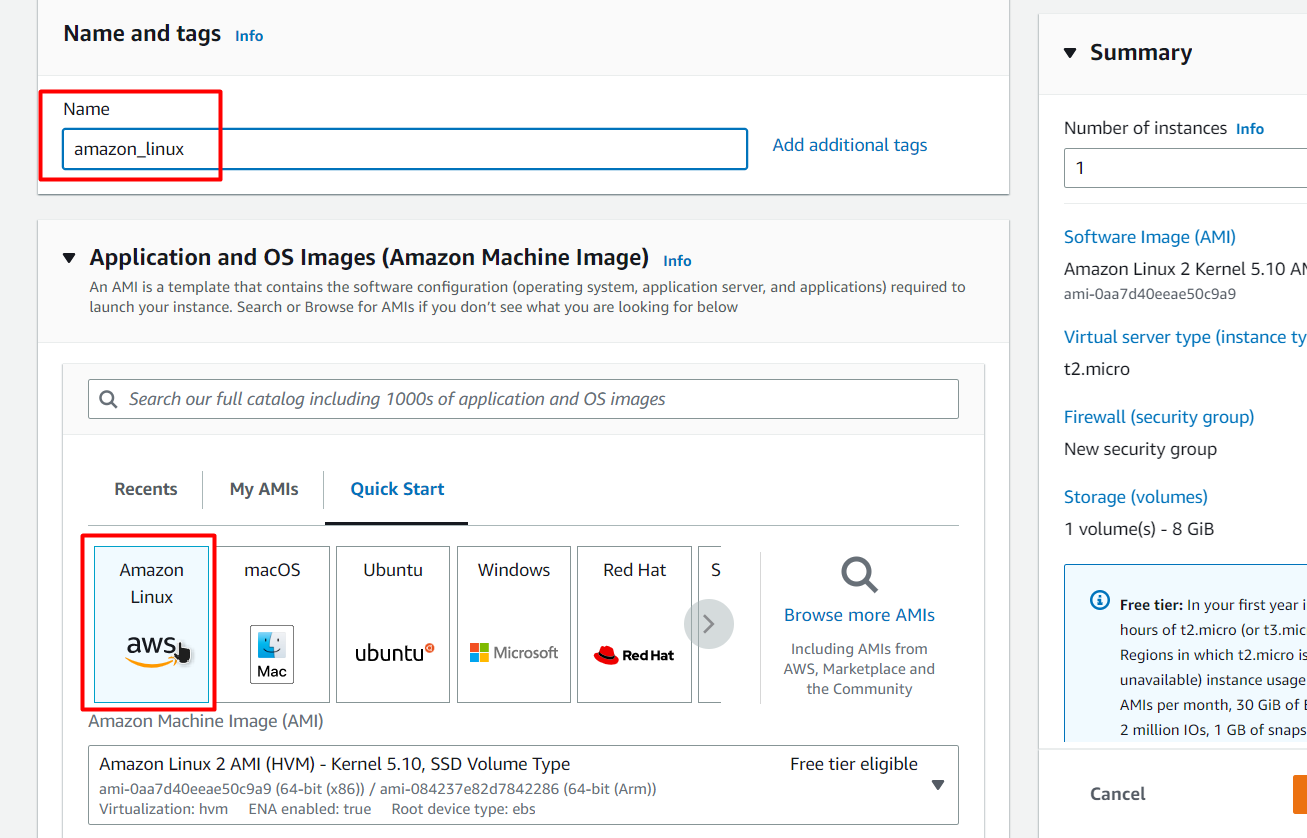
In the launch Wizard, provide a name to your EC2 instance, and then choose the AMI to “Amazon Linux”:
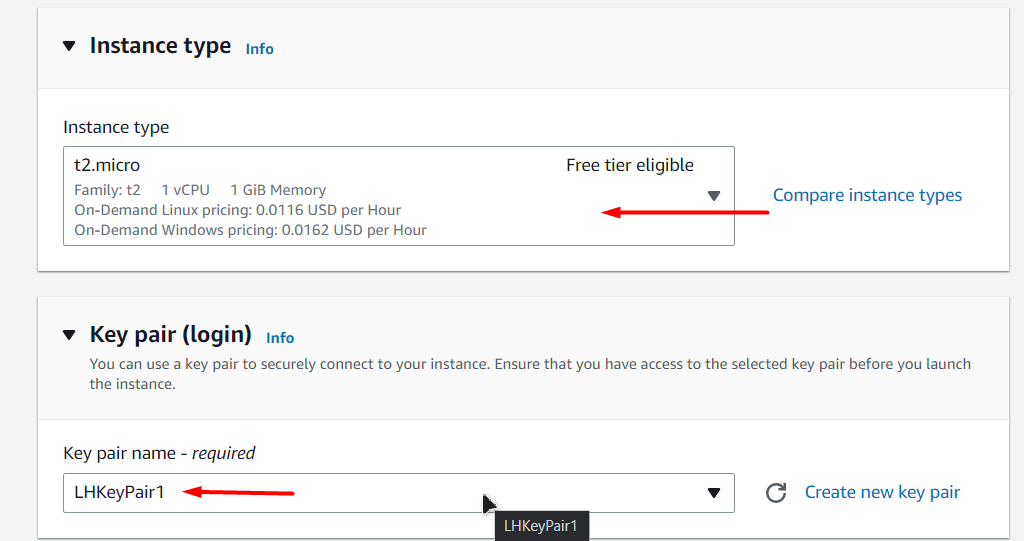
Scroll down and choose the Instance types according to your requirements and also select a key pair by using an already existing one (Make sure it is available on your local pc) or by creating a new one:
After that, click on the “Launch Instance” button at the bottom of the page:
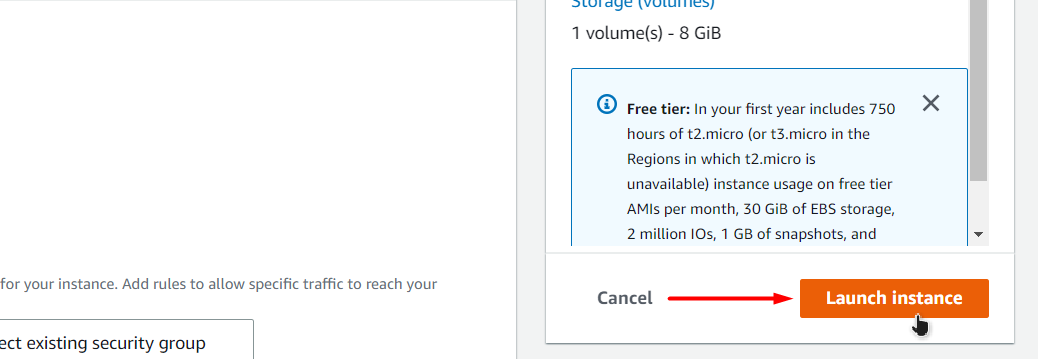
After the launching process is done, you will be able to see the instance in the List of Instances on the EC2 instance dashboard:
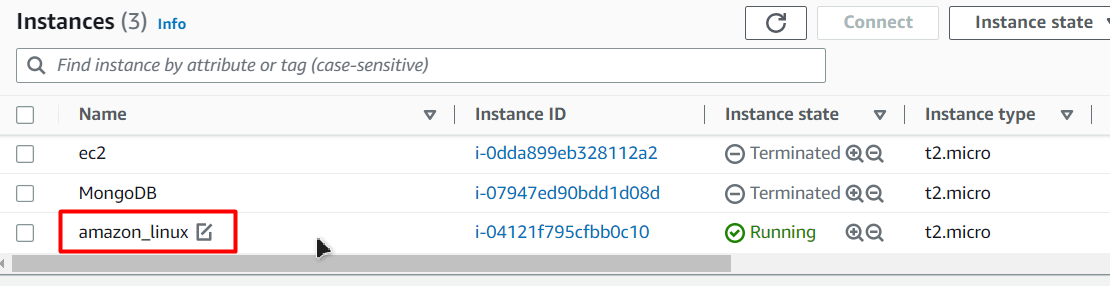
You have created an EC2 instance.
Step 2: Connect to the EC2 Amazon Linux Instance
Click on the name of the EC2 and then click on the connect button:

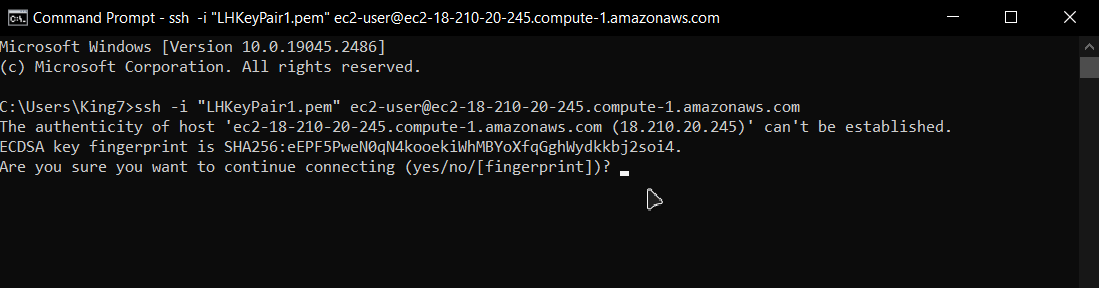
Copy the last command on the SSH client tab:

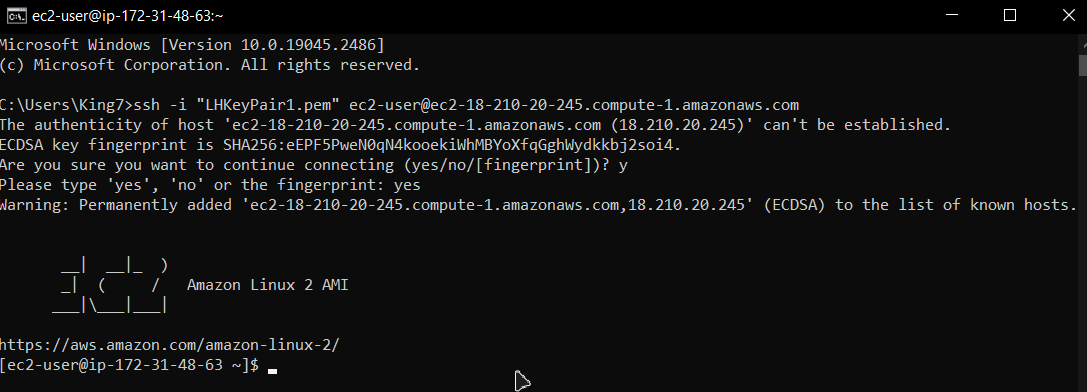
Replace the key pair name (“LHKeyPair1 for this post”) with the complete path of the key pair on your local machine, and then paste the command inside a Command Prompt and press “Enter”. If you are prompted about the connection, simply type “yes” and hit “Enter” again:
Wait for a couple of seconds, and you will be connected to the EC2 instance:
Step 3: Install JDK on Amazon Linux
To install the OpenJDK version 11 on your Linux Virtual Machine, use the following command in the SSH terminal:
This command will install the JDK from the Amazon Linux Extras package:

When prompted about the download, type “y” and press the “Enter” key:
After that wait for the download and installation process to fully complete and once it is done, you can check the version of the Installed JDK using the following command:
The output will look like this:

You have successfully installed JDK 11 on Amazon Linux.
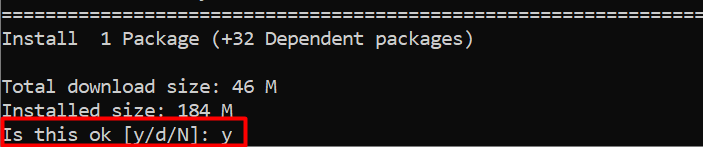
Optional: Installing Complete JDK 8 on Amazon Linux
The JDK installed from Amazon’s extra package doesn’t contain the libraries and all the packages. In case you want to work with something that requires all packages, or if running an application causes JDK errors, you need to install the complete package.
To install complete JDK 8 on Amazon Linux, use the following command inside the SSH terminal:
Executing this command will initiate the downloading process, and when you are prompted about the remaining downloads, type “y” and press the “Enter” key:

After the downloading and the installation process is done, you will get the following output on the terminal:
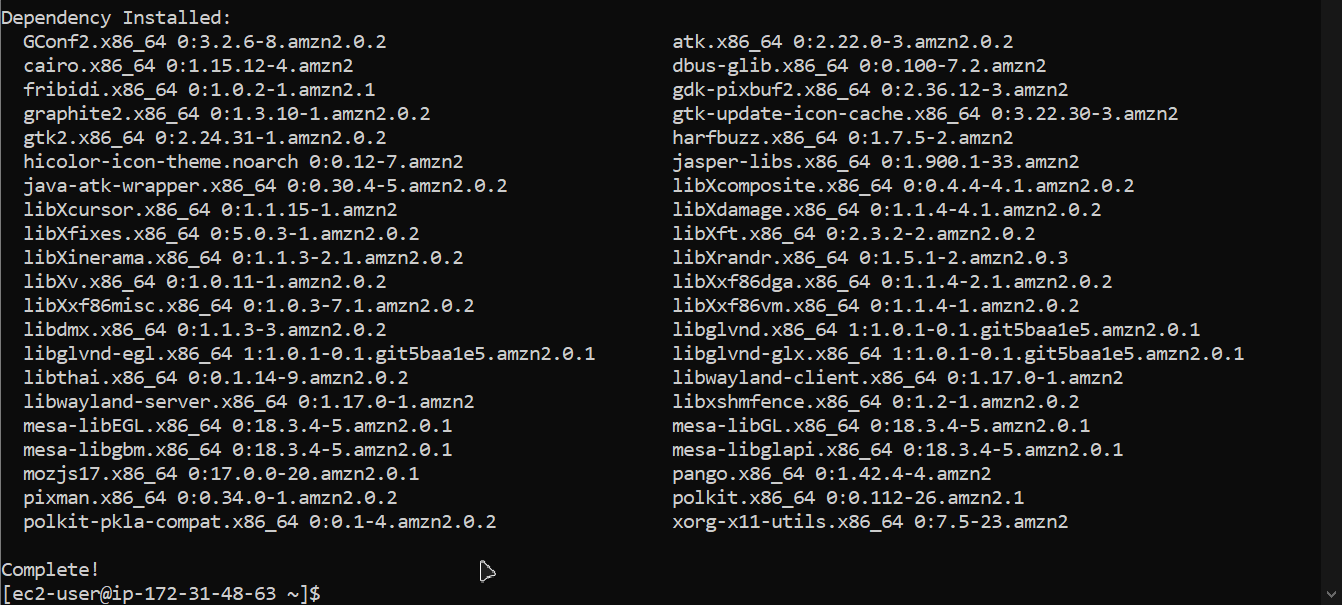
This shows all of the dependencies that are now installed in your Amazon Linux. To verify the JDK installation use the command:
You will get the following output on the SSH terminal:
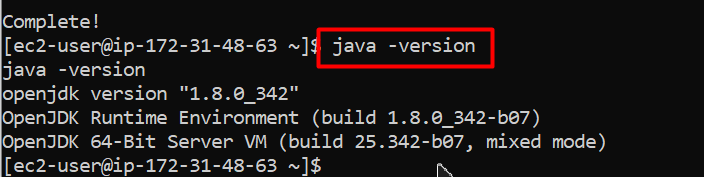
You have successfully installed Java 8 on your Amazon Linux EC2 VM.
Optional: Choosing the JDK version to Use
If Amazon Linux Contains different versions of JDK installed, then you can choose which version is supposed to be used by the OS. For that, simply use the following command:
Executing this command will show the List of installed JDK on the SSH terminal, and the user will be asked about which version to use:

Provide the number of the selection that you to make:
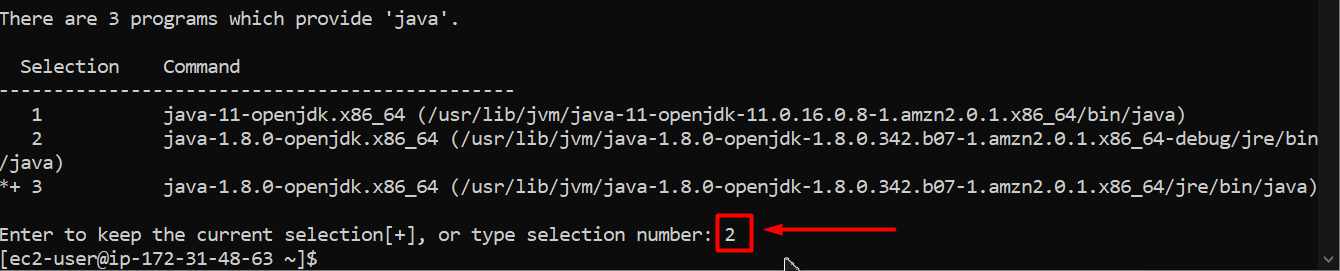
You have configured the alternative or the version of the JDK to be used in the Amazon Linux.
Conclusion
The JDK can easily be downloaded and installed inside the Amazon Linux EC2 instance by either using Amazon Linux’s extra package or from the yum package manager. This post has shown both methods in detail and the way to select the JDK version to be used in case of multiple installations of JDK in Amazon Linux.
About the author
Abdul Mannan
I am curious about technology and writing and exploring it is my passion. I am interested in learning new skills and improving my knowledge and I hold a bachelor’s degree in computer science.
How to Install Java 11/8 on Amazon Linux
This tutorial will help you to install Java 11 or Java 8 on the Amazon Linux system. As of now, Oracle has restricted these Java versions for registered users only, we will use OpenJDK for this installation.
Step 1 – Install Java on Amazon Linux
The OpenJDK 8 is available under default yum repositories and OpenJDK 11 is available under Amazon Linux 2 extras repositories. You can simply install Java 11 or Java 8 on the Amazon Linux system using the following commands.
- Run below commands to install Java 11 on Amazon Linux:
sudo amazon-linux-extras install java-openjdk11
sudo yum install java-1.8.0-openjdk
Step 2 – Check Active Java Version
After successfully installing Java on Amazon Linux using the above steps, Let’s verify the installed version using the following command.
java -version openjdk version "1.8.0_222" OpenJDK Runtime Environment (build 1.8.0_222-8u222-b10-1ubuntu1~18.04.1-b10) OpenJDK 64-Bit Server VM (build 25.222-b10, mixed mode)
Step 3 – Switch Java Version
Use alternatives command-line utility to switch active Java version on your Amazon Linux system. Run below command from the command line and select the appropriate Java version to make it default.

After switching let’s check again active Java version:
java -version openjdk version "11.0.7" 2020-04-14 LTS OpenJDK Runtime Environment 18.9 (build 11.0.7+10-LTS) OpenJDK 64-Bit Server VM 18.9 (build 11.0.7+10-LTS, mixed mode, sharing)
Conclusion
In this tutorial, you have learned to install Java 11 and Java 8 on Amazon Linux system. You also found instructions to switch between multiple java versions.