- Linux Mint Forums
- Re: Wine and Amlogic’s USB Burning Tool
- Re: Wine and Amlogic’s USB Burning Tool
- Amlogic Burning Tool
- Preparing
- Connecting the device
- Switching on and booting up the device
- Selecting the software image for the firmware
- Image flashing
- Saved searches
- Use saved searches to filter your results more quickly
- Stane1983/aml-linux-usb-burn
- Name already in use
- Sign In Required
- Launching GitHub Desktop
- Launching GitHub Desktop
- Launching Xcode
- Launching Visual Studio Code
- Latest commit
- Git stats
- Files
- README.md
- About
- Amlogic USB Burning Tool
- Requirements
- Installation
- Flashing Firmware
- Troubleshooting
- Change Language
- USB Patch Cable
- Video Tutorial
- Support
Linux Mint Forums
Forum rules
There are no such things as «stupid» questions. However if you think your question is a bit stupid, then this is the right place for you to post it. Please stick to easy to-the-point questions that you feel people can answer fast. For long and complicated questions prefer the other forums within the support section.
Before you post please read how to get help. Topics in this forum are automatically closed 6 months after creation.
Re: Wine and Amlogic’s USB Burning Tool
Post by Hoser Rob » Sun Jul 16, 2017 8:29 am
I just did what I usually suggest for these things, searched «linux wine Amlogic USB Burning Tool»:. Got exactly 4 hits, one of which was this thrtead, none of which linked to the WIne app database. Which is what you’re looking for with Wine.
Why don’t you try the WIne forums? I don’t think you’ll get many answers here.
pbear Level 16
Posts: 6540 Joined: Wed Jun 21, 2017 12:25 pm Location: San Francisco
Re: Wine and Amlogic’s USB Burning Tool
Post by pbear » Mon Jul 17, 2017 1:45 pm
Well, Wine is supported in the sense it’s in the repo, but it’s not part of the default installation.
I’m in the process of learning Wine, have registered at WineHQ and so was able to run a search. The only thing which came up was an old forum thread, at which point (2011) it didn’t work. More discouraging, perhaps, it that there’s not a single user report in the database.
Seems to me you’ll do better trying to solve the problem natively. For example, I notice Amlogic has a Linux page. Or a workaround as described here.
Hope that helps. Good luck.
- Important Notices
- ↳ Rules & Notices
- ↳ Releases & Announcements
- ↳ Main Edition Support
- ↳ Beginner Questions
- ↳ Installation & Boot
- ↳ Software & Applications
- ↳ Hardware Support
- ↳ Graphics Cards & Monitors
- ↳ Printers & Scanners
- ↳ Storage
- ↳ Sound
- ↳ Networking
- ↳ Virtual Machines
- ↳ Desktop & Window Managers
- ↳ Cinnamon
- ↳ MATE
- ↳ Xfce
- ↳ Other topics
- ↳ Non-technical Questions
- ↳ Tutorials
- Debian Edition Support
- ↳ LMDE Forums
- ↳ Beginner Questions
- ↳ Installation & Boot
- ↳ Software & Applications
- ↳ Hardware Support
- ↳ Networking
- ↳ Tutorials
- ↳ Other Topics & Open Discussion
- ↳ LMDE Archive
- Interests
- ↳ Gaming
- ↳ Scripts & Bash
- ↳ Programming & Development
- Customization
- ↳ Themes, Icons & Wallpaper
- ↳ Compiz, Conky, Docks & Widgets
- ↳ Screenshots
- ↳ Your Artwork
- Chat
- ↳ Introduce Yourself
- ↳ Chat about Linux Mint
- ↳ Chat about Linux
- ↳ Open Chat
- ↳ Suggestions & Feedback
- International
- ↳ Translations
- ↳ Deutsch — German
- ↳ Español — Spanish
- ↳ Français — French
- ↳ Italiano — Italian
- ↳ Nederlands — Dutch
- ↳ Português — Portuguese
- ↳ Русский — Russian
- ↳ Suomi — Finnish
- ↳ Other Languages
- ↳ Čeština-Slovenčina — Czech-Slovak
- ↳ Magyar — Hungarian
- ↳ 日本語 — Japanese
- ↳ Polski — Polish
- ↳ Svenska — Swedish
- ↳ Українська — Ukrainian
Powered by phpBB® Forum Software © phpBB Limited
Amlogic Burning Tool
Utility for flashing controllers based on Amlogic processors.
The utility only works on Windows operating systems.
Preparing
To correctly detect the controller during USB flashing, you need to install the driver CP210x USB to UART Bridge.
Download and install Amlogic Burning Tool for your device.
Connecting the device
The device must be connected with a USB cable to the PC for flashing.
The controller is also powered through this USB cable during flashing and it is not necessary to connect the main power supply.
- Some devices have more than one USB port.
- Look in the documentation of your device to see which USB port the device is connected to for flashing.
Switching on and booting up the device
To flash the device, it must be booted into bootloader mode (update mode). This can be done in several ways:
- As a rule, the device has a button for switching the loading mode. The button can be accessed through a hole in the housing. When turning on the device or rebooting it, it is necessary to hold this button pressed for 1-2 seconds from the moment the USB cable (power) is connected.
- There are other ways to switch to bootloader mode (see documentation for your device ).
After the device is successfully connected to the PC and identified in the Burning Tool program, the following message will be displayed in the main program window: Connect success will be displayed in the main program window:
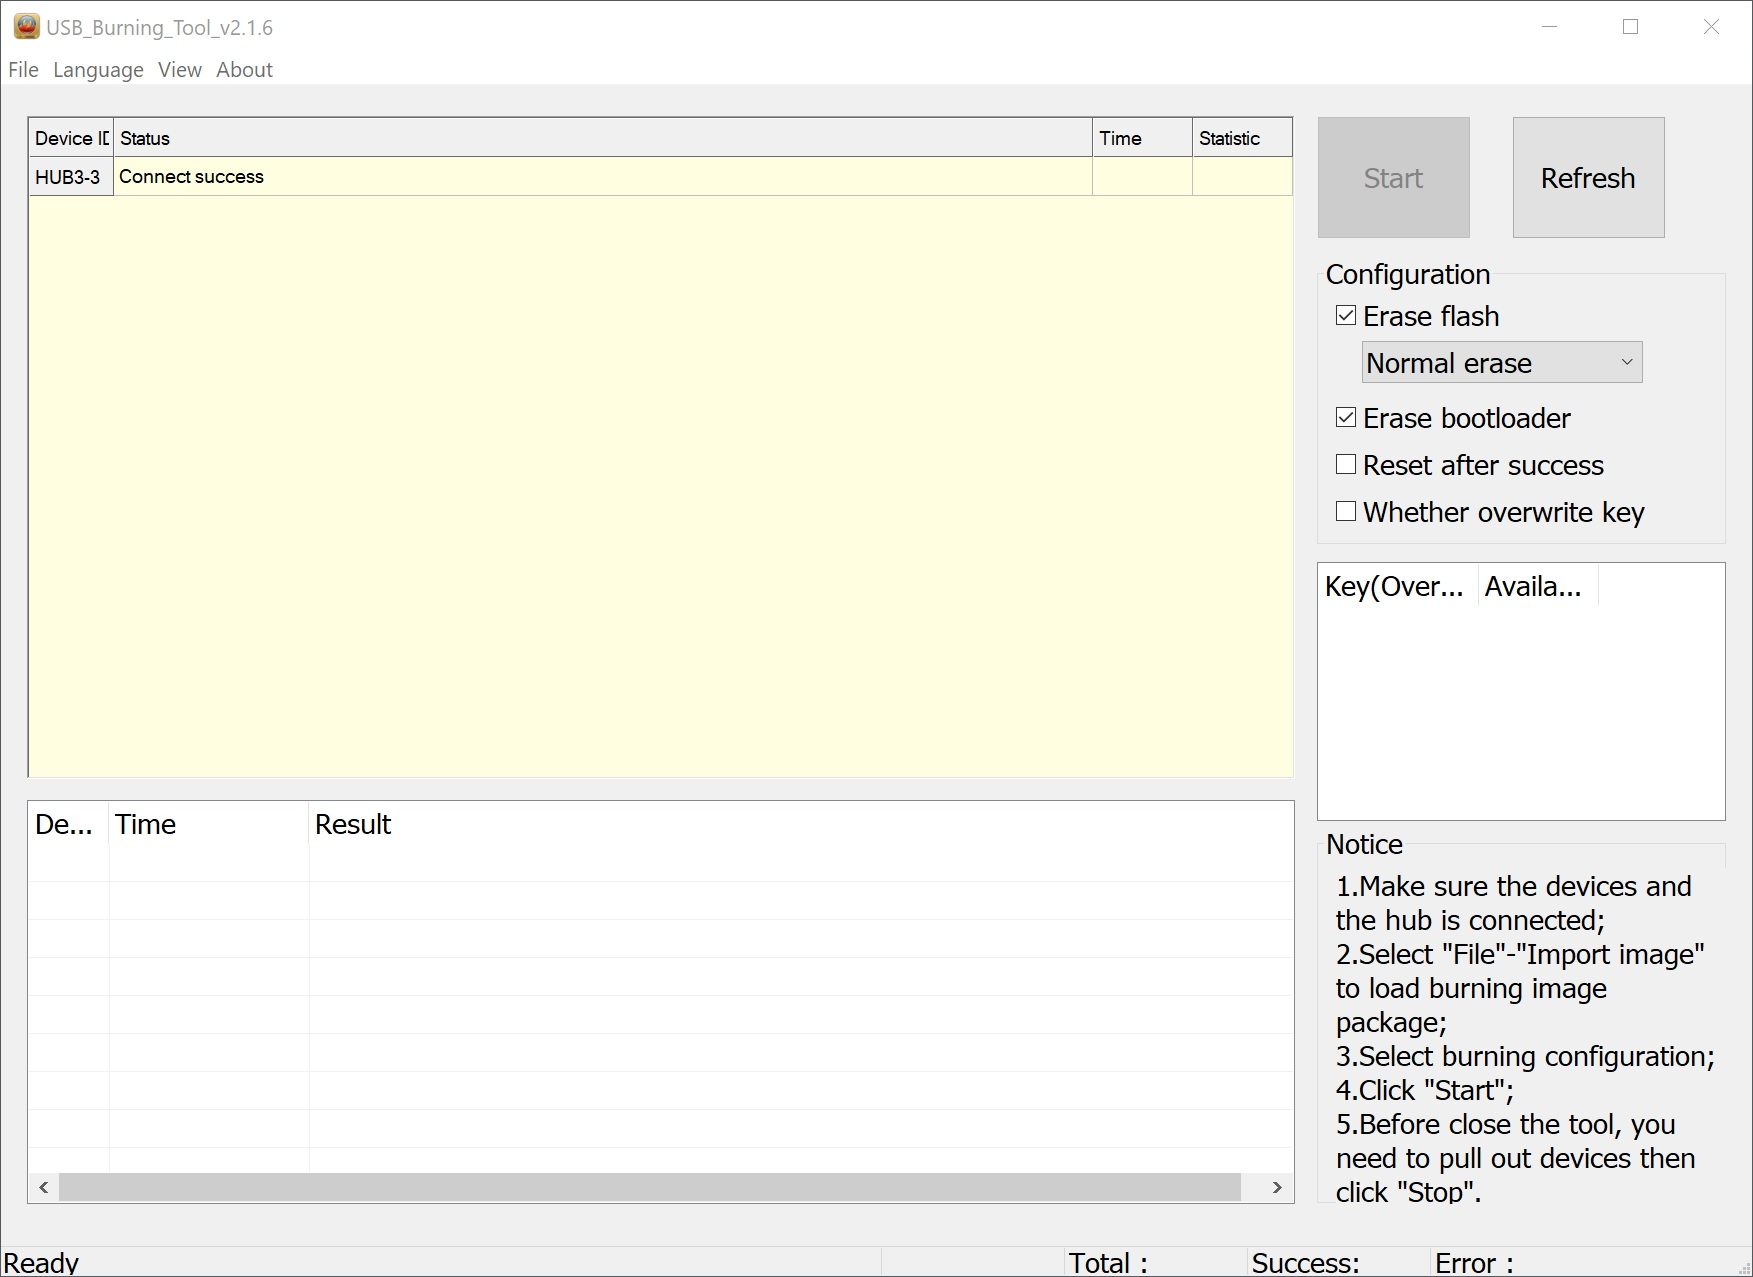
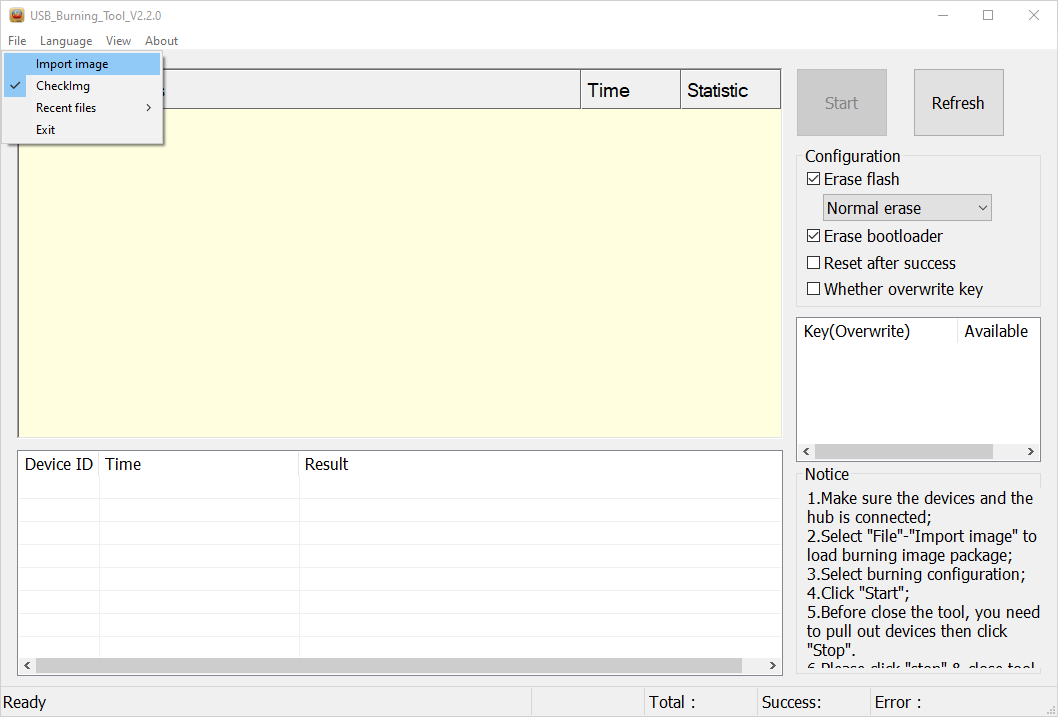
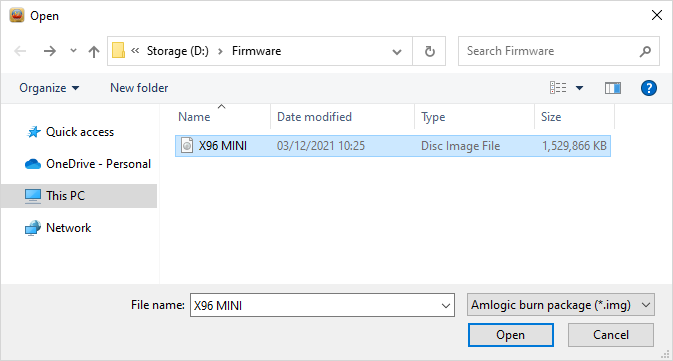
Selecting the software image for the firmware
You can find the current firmware image for your device here: JetHome firmware portal.
Open menu File → Import image and select the image to be flashed on the disk. The image will be checked, this may take a long time:
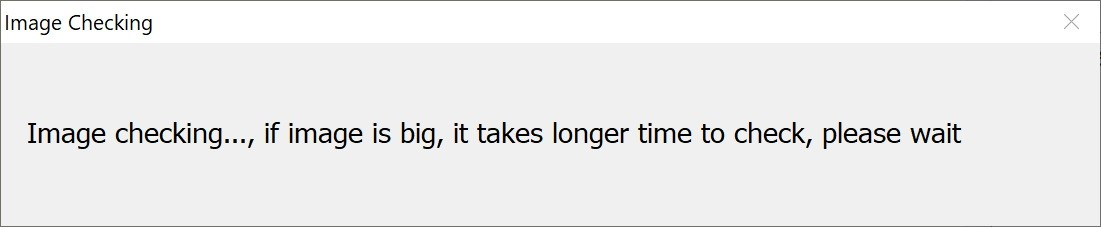
If no errors are found during the check, no message is displayed at the end of the check.
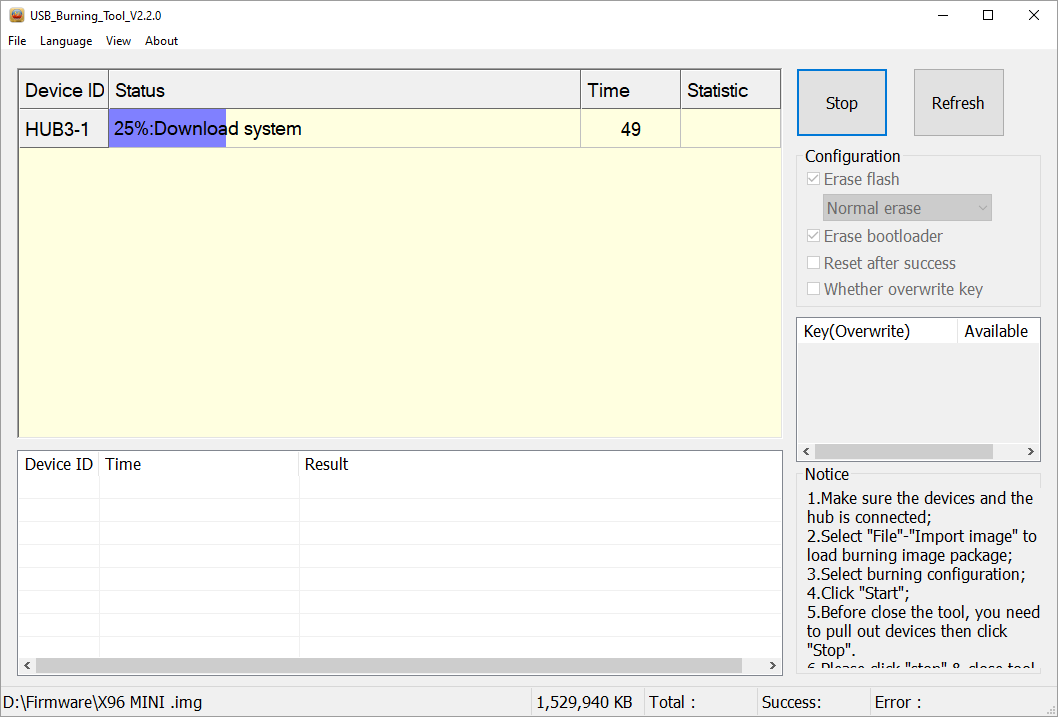
Image flashing
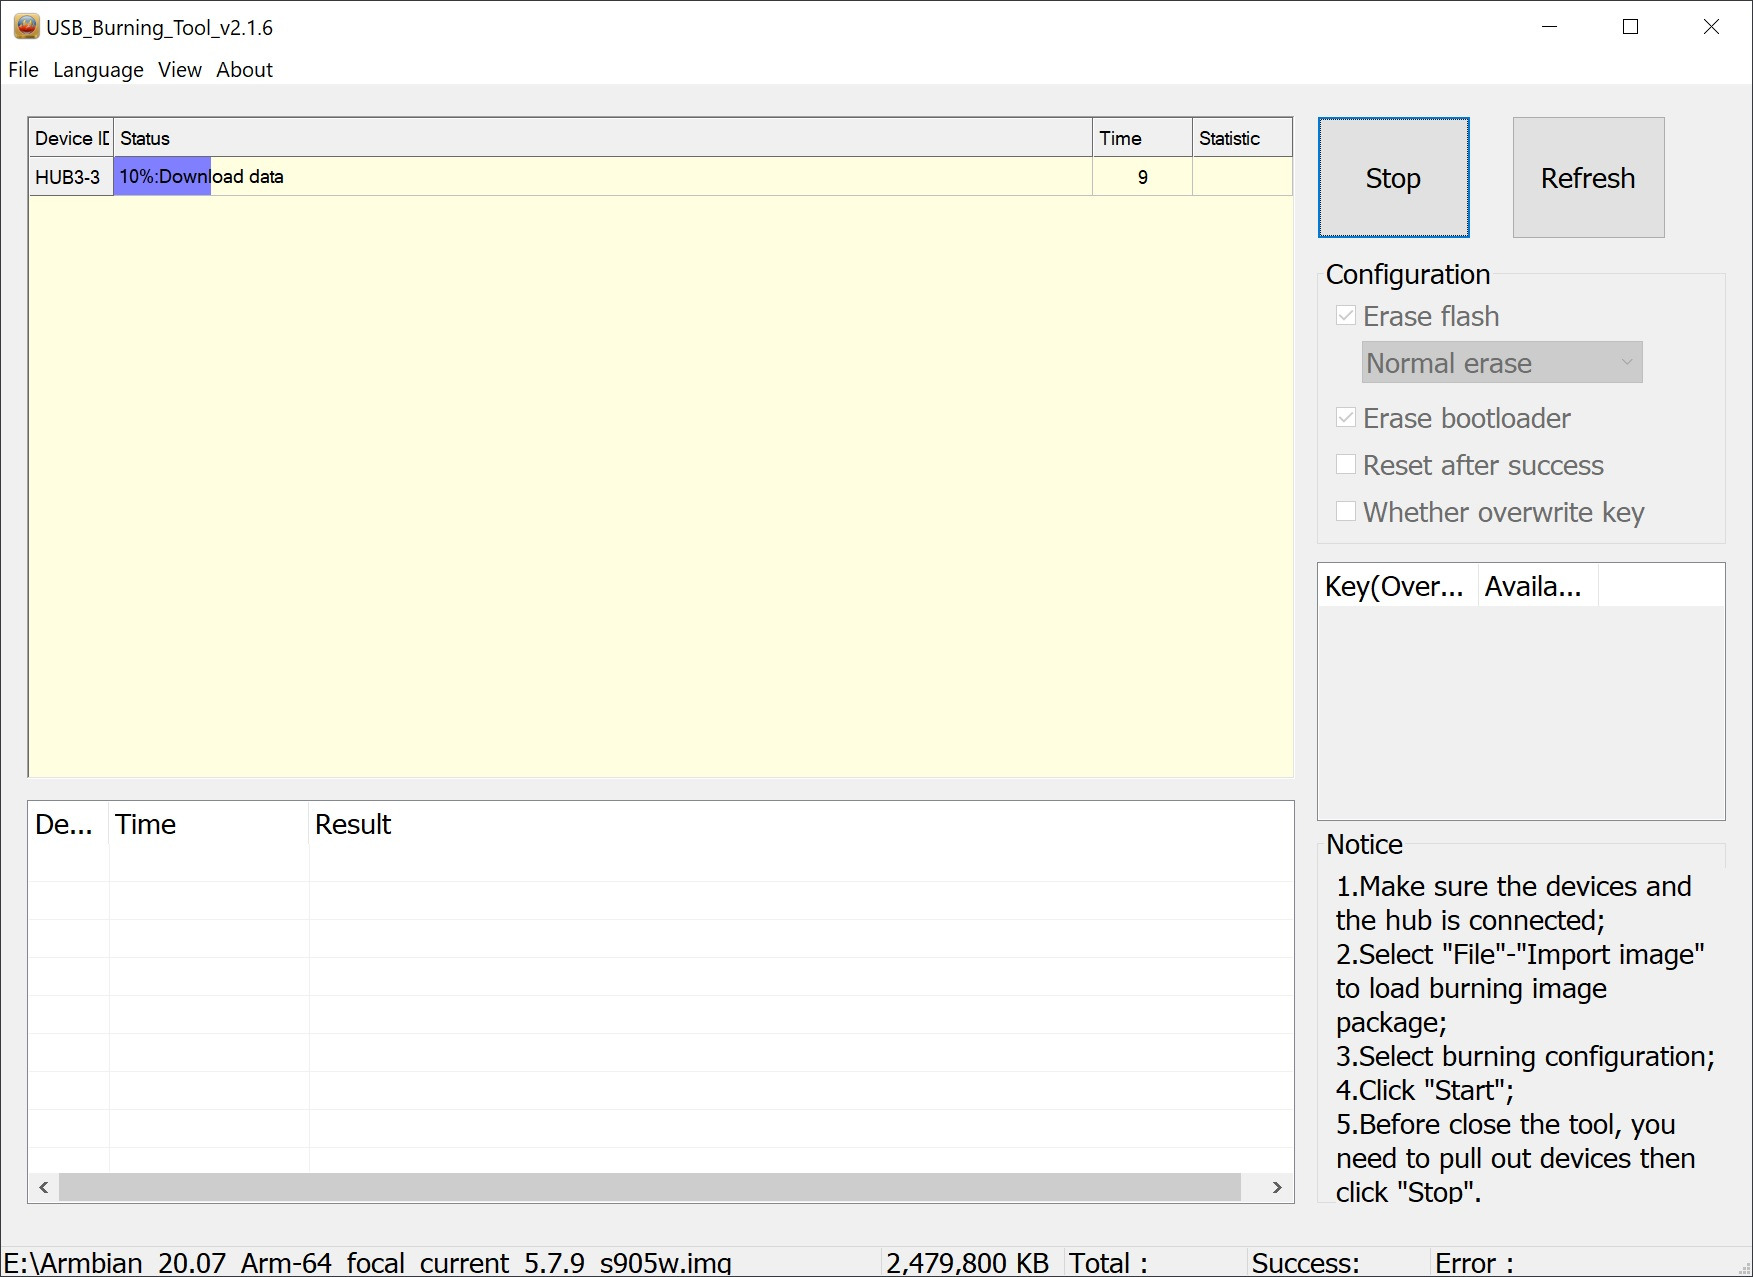
To start flashing the image, press the Start button in the upper right corner of the main program window. The flashing process will start.
If there are errors when flashing the image, it is necessary to uncheck the Erase flash and Erase bootloader checkboxes before starting the flashing process.
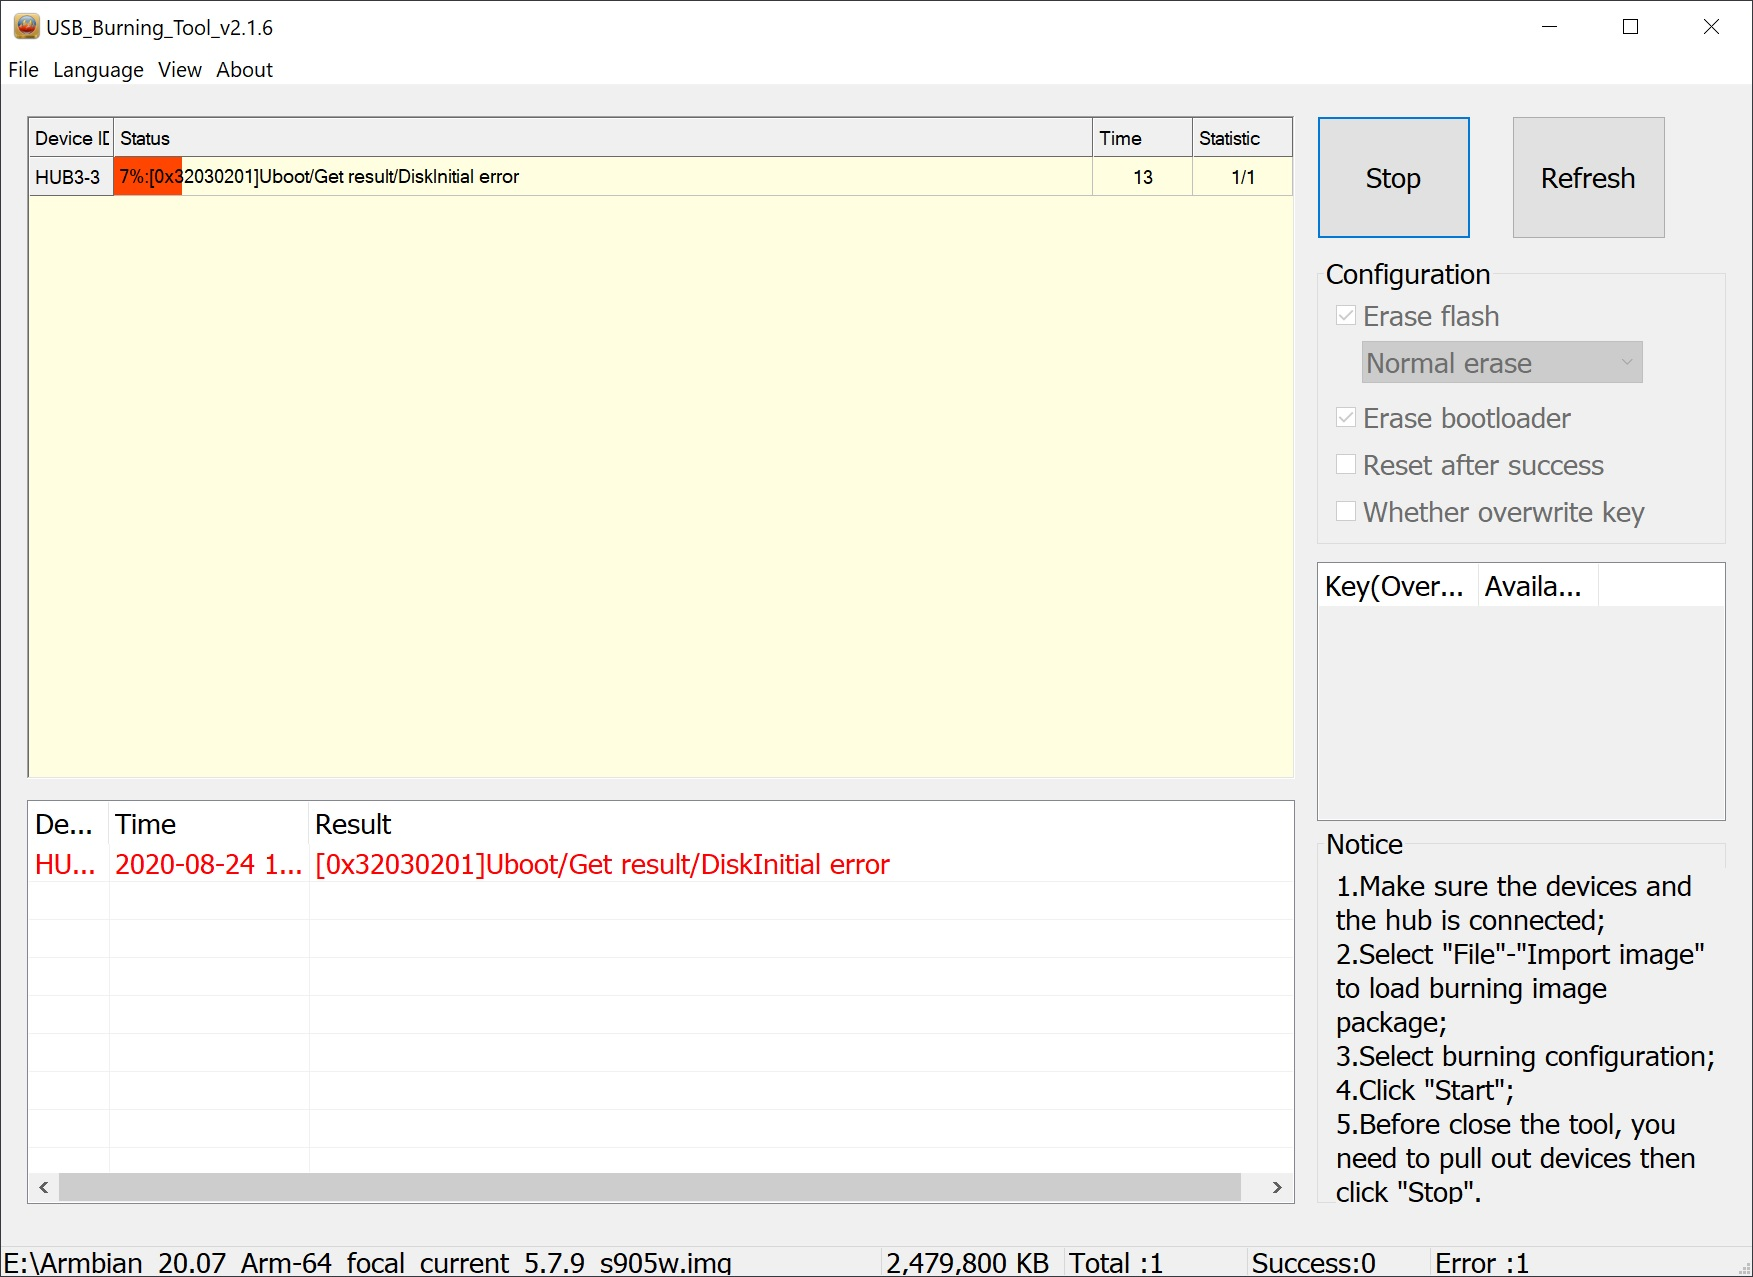
If an error occurs, the process is interrupted and a message describing the error will be displayed at the bottom of the program window:
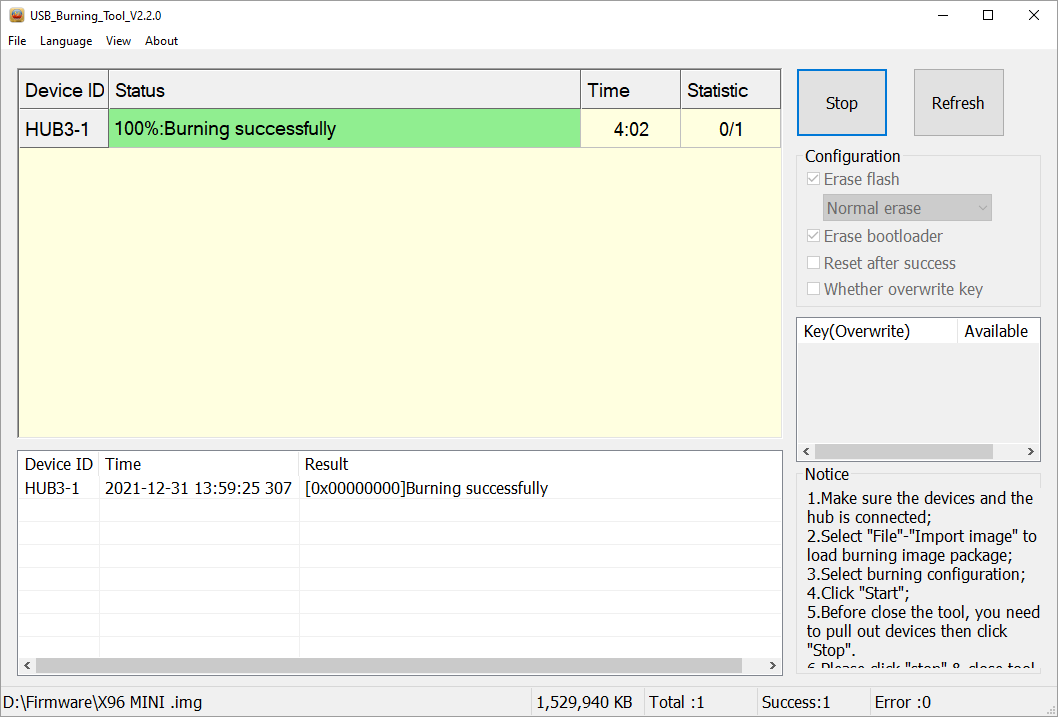
When the flashing process is completed, a message will be displayed: Burning successfull:

After that you can press the button Stop, prohibiting the automatic start of the flashing procedure when you reconnect the device to the PC.
© Copyright 2023, JetHome. Last updated on 26.04.2023 09:26:23 UTC.
Saved searches
Use saved searches to filter your results more quickly
You signed in with another tab or window. Reload to refresh your session. You signed out in another tab or window. Reload to refresh your session. You switched accounts on another tab or window. Reload to refresh your session.
Linux version of Amlogic USB Burn Tool
Stane1983/aml-linux-usb-burn
This commit does not belong to any branch on this repository, and may belong to a fork outside of the repository.
Name already in use
A tag already exists with the provided branch name. Many Git commands accept both tag and branch names, so creating this branch may cause unexpected behavior. Are you sure you want to create this branch?
Sign In Required
Please sign in to use Codespaces.
Launching GitHub Desktop
If nothing happens, download GitHub Desktop and try again.
Launching GitHub Desktop
If nothing happens, download GitHub Desktop and try again.
Launching Xcode
If nothing happens, download Xcode and try again.
Launching Visual Studio Code
Your codespace will open once ready.
There was a problem preparing your codespace, please try again.
Latest commit
Git stats
Files
Failed to load latest commit information.
README.md
Linux version of Amlogic USB Burning Tool
This is just «copy» of files that can be found on Amlogic Openlinux website.
Create new u-dev rule for Amlogic devices (in /etc/udev/rules.d). My file is called 70-persistent-usb-amlogic.rules Content of file is:
SUBSYSTEM=="usb", ENV=="usb_device", ATTR=="1b8e", ATTR=="c003", MODE:="0666", SYMLINK+="worldcup" When you created your rule either reload udev rules or reboot your machine. Make sure that root folder of this repository is in your PATH variable (I simply put it inside my ~/bin folder) so I can call it from anywhere without specifying path.
And this tool depends on libusb and libusb-compat , you must install those tools first.
Connect your device and put it to USB burning mode, open terminal and navigate to folder where your aml_upgrade_package.img is and issue command:
aml-flash --img=aml_upgrade_package.img --soc=gxl --wipe --reset=n --parts=all For more options, just issue aml-flash command. soc paremeter can be gxl (S905, S905X and S912), axg (A113 audio SoC), txlx (TV SoC — T962), m8 (S802, S805 and S812) I tested this tool with sucess on S812, S905, S905X and S912.
This tool is for x64 Linux only. File aml_image_v2_packer is 32bit but update binary (inside tools folder) is 64bit so.
About
Linux version of Amlogic USB Burn Tool
Amlogic USB Burning Tool
For Android Set Top TV Boxes requiring a Firmware Upgrade, a tool called Amlogic USB Burning Tool can be used to manualy download (flash) the Firmware Image to the Device when OTA updates are no longer available.
The Amlogic USB Burning Tool can also replace damaged firmware or repair a corrupted boot loader.
![]()
This tool is exclusively for devices. It is used to upgrade and/or restore Vendor firmware and as an alternative to Amlogic Bootcard Maker. The tool only runs under Microsoft Windows.
Requirements
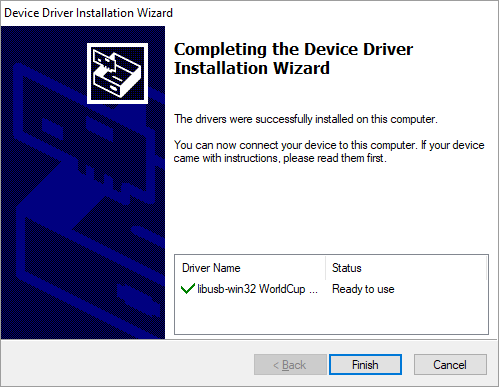
Installation
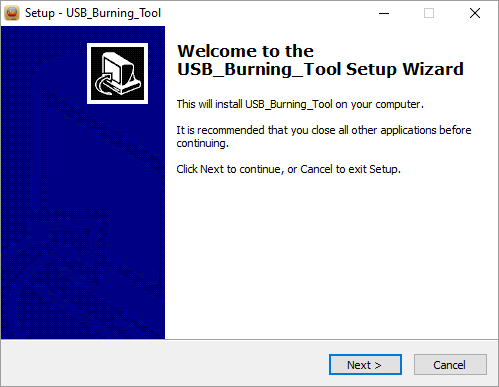
Accept the defaults at the next few screens.
Eventually, the installer will ask to install required Device Drivers:
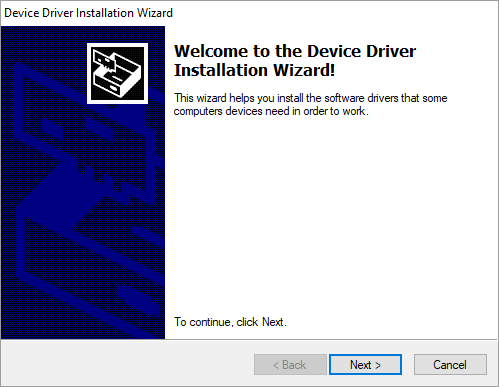
Allow the drivers to be installed.
NOTE: If the drivers are already installed and of the same version, the installer will exit.
Flashing Firmware


The firmware upgrade process should start
Once the firmware upgrade has completed:
Troubleshooting
The device might only accept upgrades over one specific USB port, frequently this is the port closest to the DC power inlet. Try each USB port.
The device might require to be connected by USB Patch Cable prior to starting USB Burning Tool. This is frequently true for older devices.
The device might require to have DC Power Supply and USB Patch Cable inserted simultaneously for the tool to work.
The device might need to be placed in recovery mode prior to connecting the USB Patch Cable:

NOTE: Some devices have the reset button hidden inside the AV slot and a paperclip or toothpick is required.
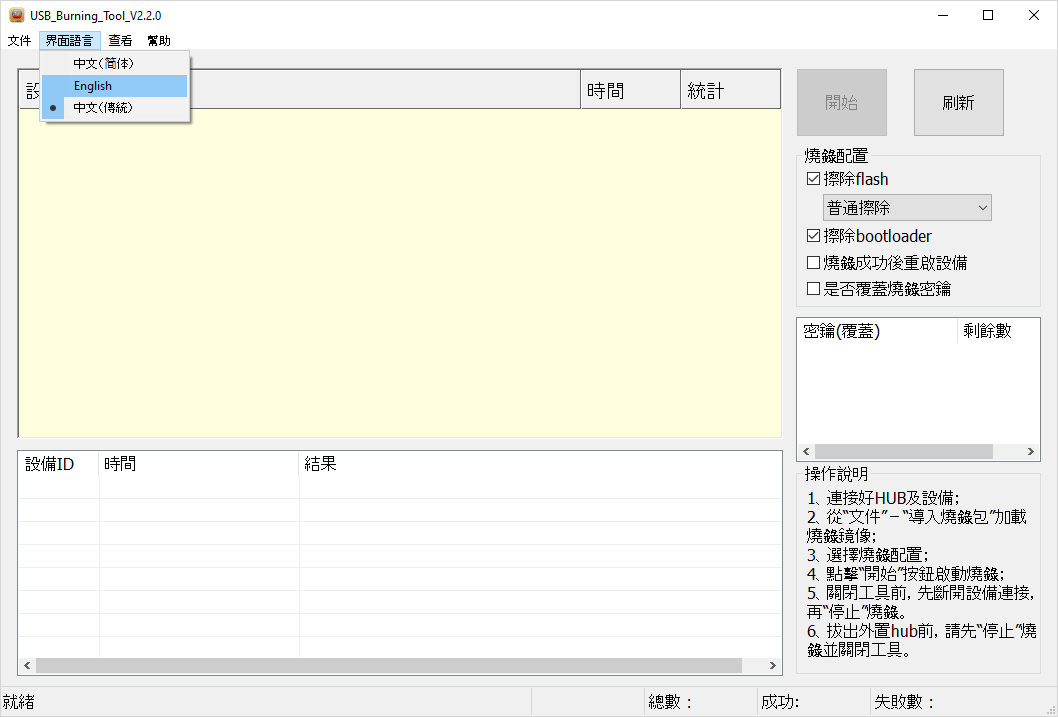
Change Language
USB Patch Cable
Depending the Device Board, the USB Patch Cable can be one of the following types:
| TYPE | GENDER | TYPE | GENDER | |
|---|---|---|---|---|
| USB A | Male | ⇔ | USB A | Male |
| USB A | Male | ⇔ | USB C | Male |
| USB A | Male | ⇔ | USB 2.0 Micro B | Male |
Video Tutorial

Support
Team CoreELEC provides no support for 3rd party applications.