- How To Install Anaconda on Linux Mint 20
- Install Anaconda on Linux Mint 20 Ulyana
- Installing on Linux#
- Prerequisites#
- Installation#
- Problems?#
- What’s next?#
- How to Install Anaconda in Linux Mint 20?
- Installing Anaconda in Linux Mint 20
- Removing Anaconda from Linux Mint 20
- Conclusion
- About the author
- Kamran Sattar Awaisi
- How to Install Anaconda in Linux Mint 20?
- How do I open Anaconda in Linux terminal?
- How do I get pip on Linux?
- How do I install Conda?
- Where does Miniconda install on Linux?
- How do I access Conda in terminal?
- How do I open Anaconda after installing Linux?
- Can I install Anaconda in D drive?
- Should I install anaconda on SSD or HDD?
How To Install Anaconda on Linux Mint 20
In this tutorial, we will show you how to install Anaconda on Linux Mint 20. For those of you who didn’t know, Anaconda is a popular Python/R data science and machine learning platform, used for large-scale data processing, predictive analytics, and scientific computing.
This article assumes you have at least basic knowledge of Linux, know how to use the shell, and most importantly, you host your site on your own VPS. The installation is quite simple and assumes you are running in the root account, if not you may need to add ‘ sudo ‘ to the commands to get root privileges. I will show you through the step-by-step installation of Anaconda python on a Linux Mint 20 (Ulyana).
Prerequisites
- A server running one of the following operating systems: Linux Mint 20 (Ulyana).
- It’s recommended that you use a fresh OS install to prevent any potential issues.
- A non-root sudo user or access to the root user . We recommend acting as a non-root sudo user , however, as you can harm your system if you’re not careful when acting as the root.
Install Anaconda on Linux Mint 20 Ulyana
Step 1. Before running the tutorial below, it’s important to make sure your system is up to date by running the following apt commands in the terminal:
sudo apt update sudo apt install libgl1-mesa-glx libegl1-mesa libxrandr2 libxrandr2 libxss1 libxcursor1 libxcomposite1 libasound2 libxi6 libxtst6
Step 2. Installing Anaconda on Linux Mint 20.
Now we download the latest Anaconda from the official page:
wget https://repo.anaconda.com/archive/Anaconda3-2020.11-Linux-x86_64.sh
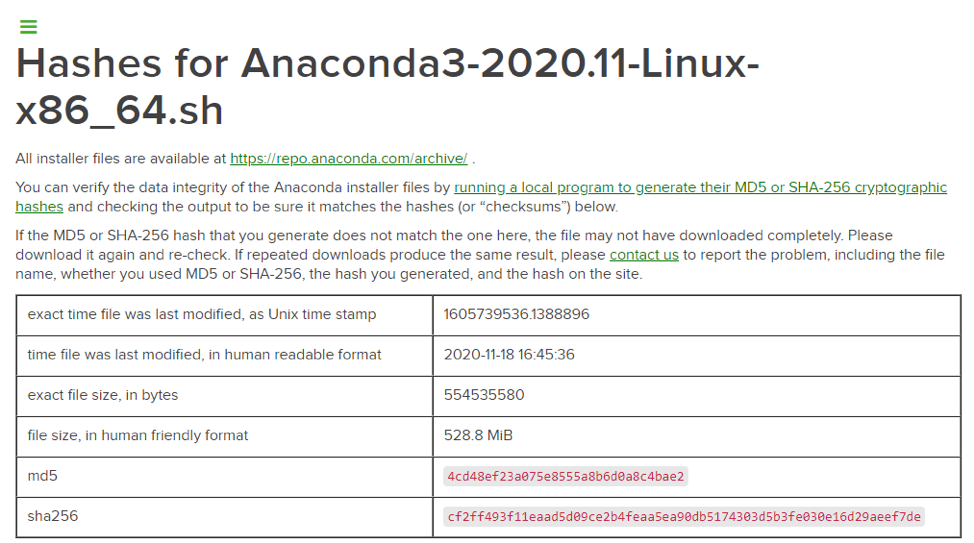
Once done, check the data integrity of the script by running the sha256sum command:
sha256sum Anaconda3-2020.11-Linux-x86_64.sh
Compare it with the official Hashes for Anaconda. If the hash value of the locally downloaded installer file matches the official hash, you’re good to go.
Next, install Anaconda for Python 3.8 using the following command:
bash Anaconda3-2020.11-Linux-x86_64.sh
Now keep pressing enter till it asks:
Do you accept the license terms? [yes|no] Do you wish the installer to initialize Anaconda3 by running conda init? [yes|no]
To activate the Anaconda installation, you can either close and re-open your shell or load the new PATH environment variable into the current shell session by typing:
Step 3. Verify Anaconda installation.
Run the following command from the Terminal to verify Anaconda installation:
Congratulations! You have successfully installed Anaconda. Thanks for using this tutorial for installing the latest version of Anaconda python on the Linux Mint system. For additional help or useful information, we recommend you to check the official Anaconda website.
If you don’t have time to do all of this stuff, or if this is not your area of expertise, we offer a service to do “VPS Manage Service Offer”, starting from $10 (Paypal payment). Please contact us to get the best deal!
Installing on Linux#
Using Anaconda in a commercial setting? You may need to purchase a license to stay compliant with our Terms of Service. This can be accomplished through several of Anaconda’s tiers: Pro , Business (On-prem), Business (Cloud) , or Enterprise. If you have already subscribed to the Pro or Business tiers, see the quickstart guides for Pro or Business to get started!
Visit https://anaconda.cloud/pricing to compare tier capabilities and pricing.
Prerequisites#
To use GUI packages with Linux, you will need to install the following extended dependencies for Qt:
apt-get install libgl1-mesa-glx libegl1-mesa libxrandr2 libxrandr2 libxss1 libxcursor1 libxcomposite1 libasound2 libxi6 libxtst6
yum install libXcomposite libXcursor libXi libXtst libXrandr alsa-lib mesa-libEGL libXdamage mesa-libGL libXScrnSaver
pacman -Sy libxau libxi libxss libxtst libxcursor libxcomposite libxdamage libxfixes libxrandr libxrender mesa-libgl alsa-lib libglvnd
zypper install libXcomposite1 libXi6 libXext6 libXau6 libX11-6 libXrandr2 libXrender1 libXss1 libXtst6 libXdamage1 libXcursor1 libxcb1 libasound2 libX11-xcb1 Mesa-libGL1 Mesa-libEGL1
emerge x11-libs/libXau x11-libs/libxcb x11-libs/libX11 x11-libs/libXext x11-libs/libXfixes x11-libs/libXrender x11-libs/libXi x11-libs/libXcomposite x11-libs/libXrandr x11-libs/libXcursor x11-libs/libXdamage x11-libs/libXScrnSaver x11-libs/libXtst media-libs/alsa-lib media-libs/mesa
Installation#
- In your browser, download the Anaconda installer for Linux.
- Search for “terminal” in your applications and click to open.
- (Recommended) Verify the installer’s data integrity with SHA-256 . For more information on hash verification, see cryptographic hash validation.
- In the terminal, run the following:
shasum -a 256 /PATH/FILENAME # Replace /PATH/FILENAME with your installation's path and filename.
# Include the bash command regardless of whether or not you are using the Bash shell bash ~/Downloads/Anaconda3-2020.05-Linux-x86_64.sh # Replace ~/Downloads with your actual path # Replace the .sh file name with the name of the file you downloaded
# Include the bash command regardless of whether or not you are using the Bash shell bash ~/Downloads/Anaconda2-2019.10-MacOSX-x86_64.sh # Replace ~/Downloads with your actual path # Replace the .sh file name with the name of the file you downloaded
Note Anaconda recommends you accept the default install location. Do not choose the path as /usr for the Anaconda/Miniconda installation.
# Replace with the path to your conda install source /bin/activate conda init
# The base environment is activated by default conda config --set auto_activate_base True # The base environment is not activated by default conda config --set auto_activate_base False # The above commands only work if conda init has been run first # conda init is available in conda versions 4.6.12 and later
Note If you install multiple versions of Anaconda, the system defaults to the most current version, as long as you haven’t altered the default install path.
Problems?#
What’s next?#
Get started programming quickly with Anaconda in the Getting started with Anaconda guide.
Installing on AWS Graviton2 (arm64)
How to Install Anaconda in Linux Mint 20?
![]()
Anaconda is a popular Python platform that is widely used in Machine learning and its associated fields. It contains many open-source data packages, and we can also install more than 7500 data packages using Anaconda repositories.
Anaconda can be installed on Linux Mint 20 from the installer script.
Installing Anaconda in Linux Mint 20
Anaconda is available in four versions i.e., Team, Individual, Enterprise, and Commercial. Except for the Individual version, all other versions are paid. Therefore, we will install Anaconda Individual version.
Complete the below-given steps to install Anaconda on Linux Mint 20:
1. Fire up the terminal and update and upgrade the system with the command:
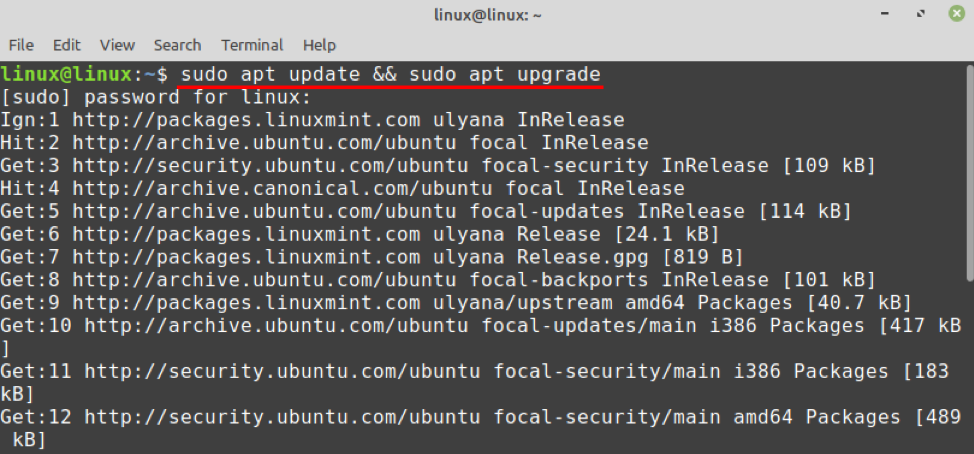
The system will be updated and upgraded successfully.
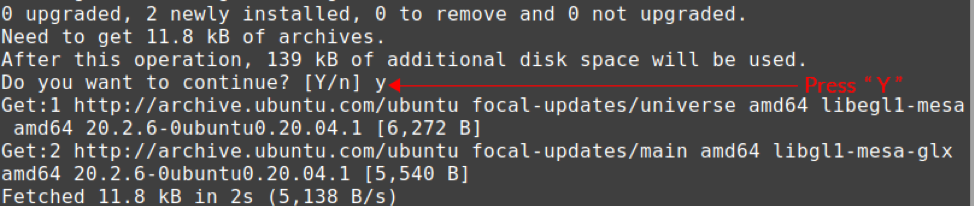
2. Anaconda is dependent on some additional libraries. Next, install the required dependencies:
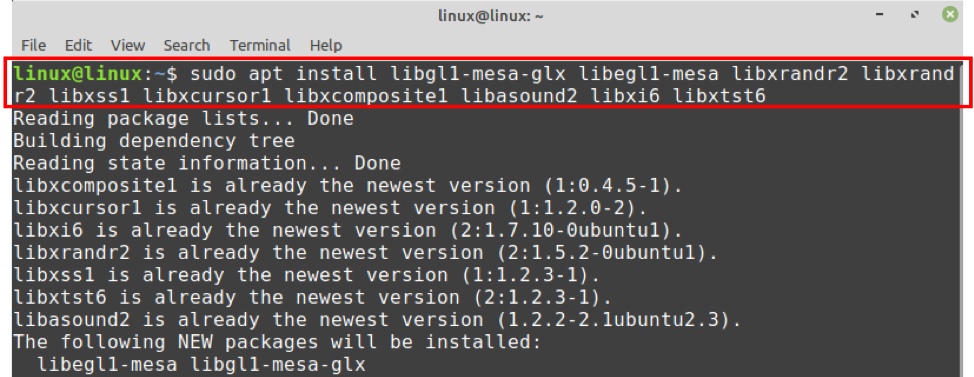
Press ‘y’ to continue installing the dependencies.
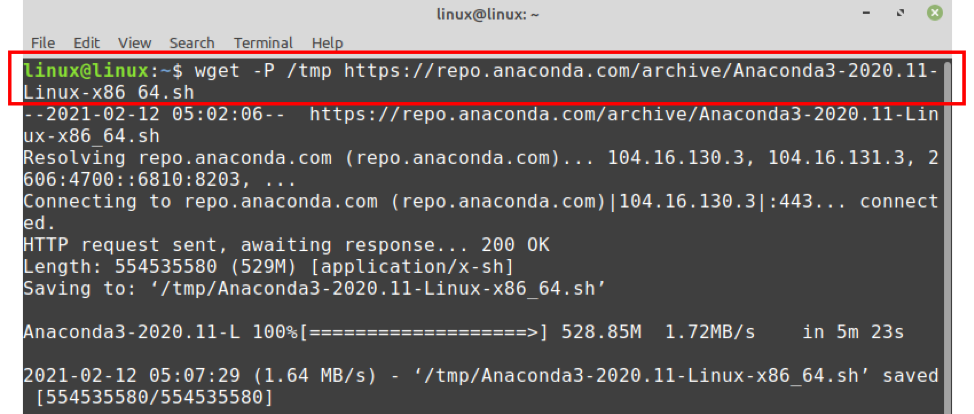
3. As of preparing this post, the latest available version of Anaconda is 2020.11. We will download the installer script in the/tmp directory because the installer script will run once. Next, download the Anaconda installer script by typing the command:
4. When the Anaconda installer script is downloaded successfully, verify the data integrity of the script with the command:

However, this step is optional and you can skip it.
Visit the Anaconda webpage (https://docs.anaconda.com/anaconda/install/hashes/Anaconda3-2020.11-Linux-x86_64.sh-hash/) and make sure that the hash value printed on the command line is equal to the value provided on the official webpage.
5. Now, install the Anaconda on Linux Mint by executing the command:
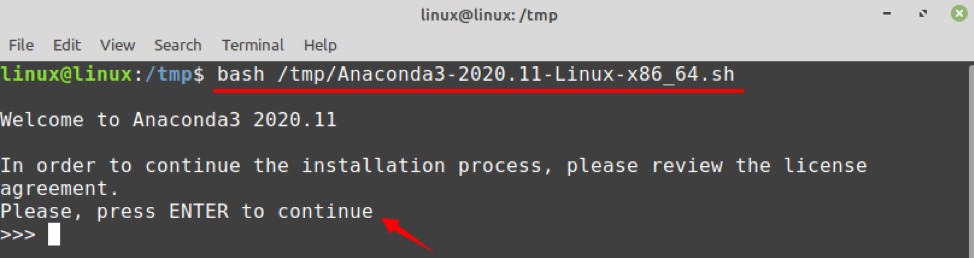
Press ‘Enter’ to continue installing Anaconda.
While installing Anaconda, you will see the License Agreement text. Keep pressing ‘Enter’ to continue reading the License Agreement.
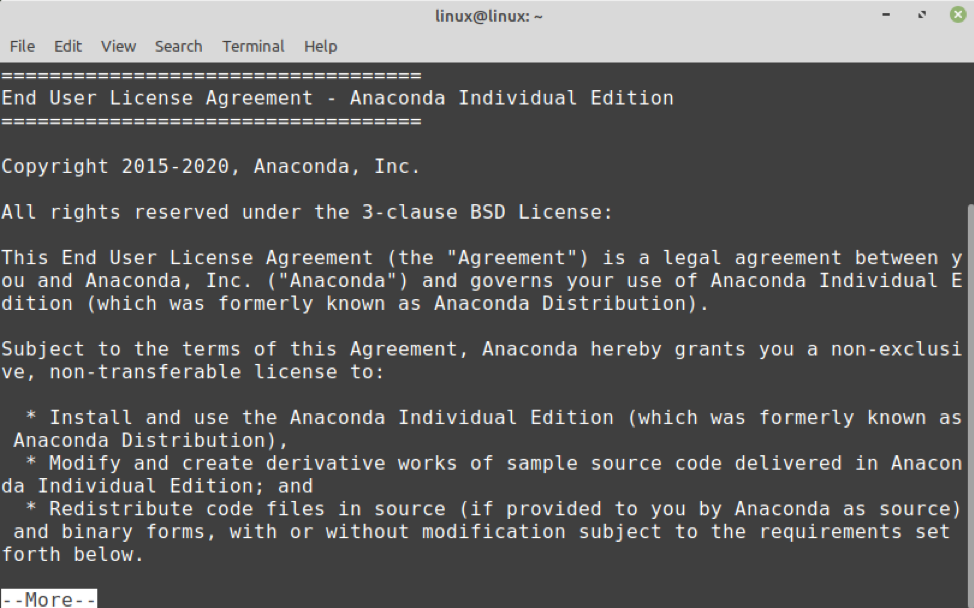
Accept the license terms by typing ‘yes’.

Now, choose the location where Anaconda will be saved and installed.

The Conda init file initializes the Anaconda3 initialization. Type ‘yes’ to start Anaconda initialization.

Once the Anaconda is successfully installed, activate the Anaconda using the command:

Anaconda is activated successfully.
Removing Anaconda from Linux Mint 20
If you wish to remove Anaconda from your Linux Mint 20 system, run the below-given command to do so:

The above-given command will remove the Anaconda directory and all the files from your system.
Conclusion
Anaconda is available in various editions or versions. However, the Individual edition is free and open-source. Anaconda is a Python distribution and is widely used by many popular organizations to perform the data analysis task. In this post, we have learned about Anaconda installation on Linux Mint 20.
About the author
Kamran Sattar Awaisi
I am a software engineer and a research scholar. I like to write article and make tutorial on various IT topics including Python, Cloud Computing, Fog Computing and Deep Learning. I love to use Linux based operating systems.
How to Install Anaconda in Linux Mint 20?
For x86 systems. In your browser, download the Anaconda installer for Linux. RECOMMENDED: Verify data integrity with SHA-256.
How do I open Anaconda in Linux terminal?
- Mac: You’ll find Anaconda Navigator in Launchpad (and also in the Applications folder). .
- Windows: You’ll find Anaconda Navigator in the Start menu.
- Linux: Open a terminal window and run the command anaconda-navigator .
How do I get pip on Linux?
- Start by updating the package list using the following command: sudo apt update.
- Use the following command to install pip for Python 3: sudo apt install python3-pip. .
- Once the installation is complete, verify the installation by checking the pip version: pip3 —version.
How do I install Conda?
- Download the 64-bit Python 3 Miniconda installer to your Home directory.
- Run the installer.
- Delete the installer.
Where does Miniconda install on Linux?
- Create the conda directory in your home folder: mkdir ~/. conda.
- Use the script to install Miniconda.
- Reopen the terminal and check conda was installed conda —version.
How do I access Conda in terminal?
Check conda is installed and in your PATH
Open a terminal client. Enter conda -V into the terminal command line and press enter. If conda is installed you should see somehting like the following.
How do I open Anaconda after installing Linux?
- Windows: Click Start, search, or select Anaconda Prompt from the menu.
- macOS: Cmd+Space to open Spotlight Search and type “Navigator” to open the program.
- Linux–CentOS: Open Applications — System Tools — terminal.
Can I install Anaconda in D drive?
To make Anaconda easily accessible, place it in a directory (where you have write permissions) that is as high up on the drive as possible. For instance, on my system, I have the D: drive reserved for applications, so I use D:\Anaconda3 as my Anaconda install directory.
Should I install anaconda on SSD or HDD?
If this is the case you may want to write to the SSD to take advantage of the faster write speed. So to summarize, in certain circumstances it may be optimal to put anaconda on ssd, . py files on hdd, datasets on hhd, and write new files to ssd. Though most use cases the measurable difference will be negligible.

File
How do I convert M4V to WAV?How do I convert M4V files?How do I make a WAV file?How do I convert m4a to mp3 in Ubuntu?How do I convert an M4A file to .

Restart
Ubuntu / DebianUse the following command to restart the server networking service. # sudo /etc/init.d/networking restart or # sudo /etc/init.d/network.

Background
How to make a transparent background/selection on an image using GIMPOpen your image.Select the area you want to make transparent. . In the Layer wi.
Latest news, practical advice, detailed reviews and guides. We have everything about the Linux operating system