How can I use adb over WiFi? [duplicate]
I am debugging USB devices connected to my Android phone, this means I cannot use ADB over a USB connection. How can I connect to adb over WiFi? Note: Similar question here refers to adb over tcp, however, I’m specifically asking about WiFi.
There is a plugin for Android Studio. github.com/pedrovgs/AndroidWiFiADB Work with it is very easy and has a great explanation on the read-me page. After connecting device to the adb over wi-fi it acts as normal connected device
Yes Android Wifi ADB plugin is there and you can install from android studio refer this link android.jlelse.eu/…
3 Answers 3
- Connect Android phone and host machine to same WiFi network
- Connect Android phone to host machine using USB cable (to start with)
- Run adb tcpip 5555 from a command prompt
- Run adb shell «ip addr show wlan0 | grep -e wlan0$ | cut -d\» \» -f 6 | cut -d/ -f 1″ to obtain the phone’s IP address
- Disconnect USB cable and run adb connect :5555
You can now view logcat output by running adb logcat or by viewing the Android Monitor tab within Android Studio.
Or to get the IP address in a «simpler» (well, faster) way: adb shell «ifconfig | grep -A 1 wlan0 | tail -n 1 | cut -f2 -d: | cut -f1 -d’ ‘»
Using ifconfig on Android Q I get ifconfig: ioctl 8927: Permission denied . I’ve updated my answer to use ip addr show wlan0 instead.
Is there anyway to get around having to make the initial physical connection? Sometimes when I’m debugging its a hassle to go find a cord. could i write an app that makes my phone get into a state that will allow the connection without needing to be plugged in?
Connecting to WiFi using adb shell
I have all the details to connect to a particular access point. I have to use that access point only, so all I require is the command to do it.
I have to automate a few things which only work with wi-fi.I can use monkey and click on settings->etc., but last thing would be how do i choose the network ABC as there may be more than one networks available. so if i could get a command, i can do that using SSID and password right away 🙂
I updated the wpa_supplicant.conf file with new SSID and password, enabled the wifi but this doesn’t seem to work on Nexus 4, Lolipop build. Wifi turns on but goes back to original SSID, that I was using via UI. I also noticed that my updated file was over written with the earlier SSID. I have change chown to system.wifi . Am I doing something incorrect here? I saw some post talking about sqlite3. Do we need to change anything in db?
7 Answers 7
Late to the party, but I came up with a way to accomplish this on a device without root.
It may not be pretty, but it works.
Basically what I propose is to create an app that joins an access point based on EXTRAS given when starting the app. The EXTRAS are then provided using the am command’s -e parameter.
I already build an app which does so and it’s available here: https://github.com/steinwurf/adb-join-wifi
Once the app is installed, a wifi access point can be joined using the following ADB command:
adb shell am start -n com.steinwurf.adbjoinwifi/com.steinwurf.adbjoinwifi.MainActivity -e ssid [SSID] -e password_type [PASSWORD_TYPE] -e password [WIFI PASSWORD] There’s more info in the README on Github.
@Suban Dhyako It should tell you in your router settings what type of password/security it’s using. Also, in the android wifi screen, if you tap on a network it will tell you the security type. Most routers these days will be set up as WPA2 or WPA, and it seems that typing WPA in the adb command will work for either WPA or WPA2. Also, as a note to the author, this worked wonderfully, thank you. But the multi-line command formatting on the github didn’t work for me, while the single line command here did.
@gamingexpert13 thanks, glad to hear it worked for you. The multiline is probably only working on Linux 🙂
hey man I am trying to use your app but when I run the command it says «This application is meant to be used with ADB» what am I doing wrong?
You can add a network entry into the wpa_supplicant.conf yourself (or within your script) Essentially connect manually once, then do:
adb pull /data/misc/wifi/wpa_supplicant.conf and integrate the network entry into your script for automation. Example simple script:
#!/bin/bash # # Get this information by connecting manually once, and do # adb pull /data/misc/wifi/wpa_supplicant.conf ADB_PULL="adb pull /data/misc/wifi/wpa_supplicant.conf" WIRELESS_CTRL_INTERFACE=wlan0 WIRELESS_SSID=Gondolin WIRELESS_KEY_MGMT="WPA-EAP IEEE8021X" WIRELESS_EAP=PEAP WIRELESS_USER=Turgon WIRELESS_PASSWORD=IdrilCelebrindal adb start-server adb wait-for-device echo "adb connection. [CONNECTED]" adb root adb wait-for-device adb remount adb wait-for-device pushd /tmp rm wpa_supplicant.conf 2>/dev/null # Remove any old one adbpull_status=`$ADB_PULL 2>&1` echo -e "\nAttempting: $ADB_PULL" if [ `echo $adbpull_status | grep -wc "does not exist"` -gt 0 ]; then echo " wpa_supplicant.conf does not exist yet on your device yet." echo "This means you have not used your wireless yet." echo "" echo "Taking our best shot at creating this file with default config.." echo "ctrl_interface=$WIRELESS_CTRL_INTERFACE" >> wpa_supplicant.conf echo "update_config=1" >> wpa_supplicant.conf echo "device_type=0-00000000-0" >> wpa_supplicant.conf else echo $adbpull_status echo " wpa_supplicant.conf exists!" fi echo "" echo "Add network entry for wpa_supplicant.conf.." echo "" >> wpa_supplicant.conf echo "network=> wpa_supplicant.conf echo " ssid=\"$WIRELESS_SSID\"" >> wpa_supplicant.conf echo " key_mgmt=$WIRELESS_KEY_MGMT" >> wpa_supplicant.conf echo " eap=$WIRELESS_EAP" >> wpa_supplicant.conf echo " identity=\"$WIRELESS_USER\"" >> wpa_supplicant.conf echo " password=\"$WIRELESS_PASSWORD\"" >> wpa_supplicant.conf echo " priority=1" >> wpa_supplicant.conf echo ">" >> wpa_supplicant.conf echo "Pushing wpa_supplicant.conf.." adb push wpa_supplicant.conf /data/misc/wifi/wpa_supplicant.conf popd #/tmp adb shell chown system.wifi /data/misc/wifi/wpa_supplicant.conf adb shell chmod 660 /data/misc/wifi/wpa_supplicant.conf echo "" echo "Finished!" adb shell am start -a android.intent.action.MAIN -n com.android.settings/.Settings echo "Please toggle wifi off/on now.. (ifconfig not sufficient, monkey this)" Беспроводная отладка Android 11
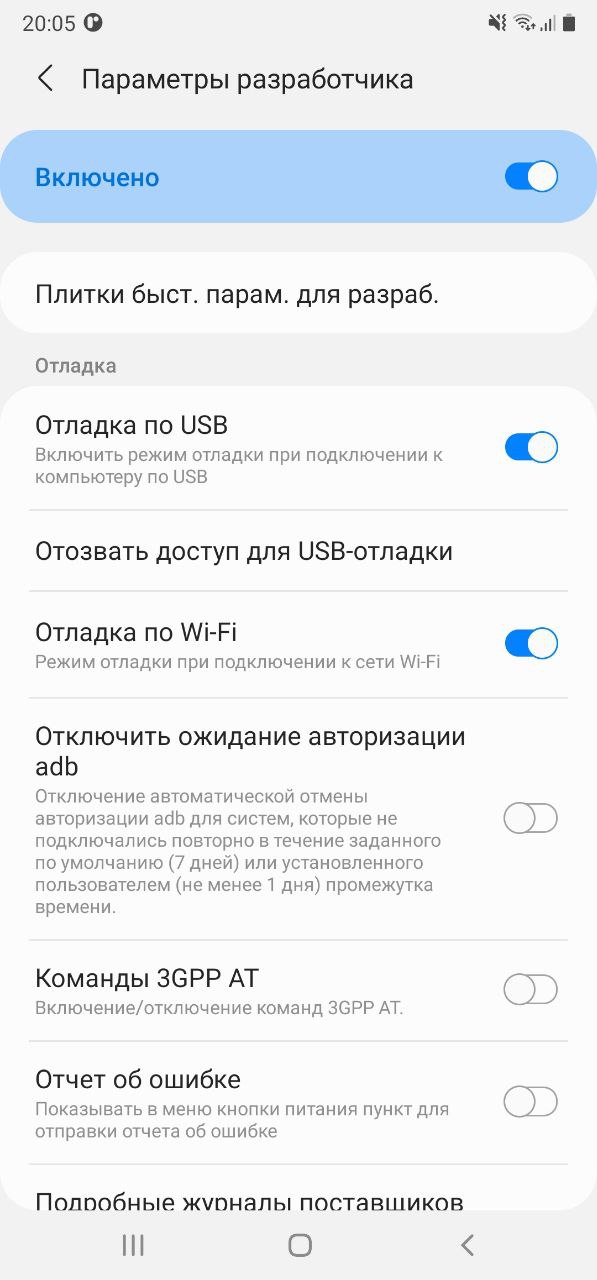
Режим дебага по WiFi теперь доступен, начиная с версии ОС Android 11. Давайте разберемся, как подключить устройство по Wi-Fi и смотреть логи в Logcat.

Нам необходимо убедиться, что у нас имеется все необходимое для соединения, а именно:
- установлен компонент Android SDK Platform-Tools версии не ниже 30.0.0 (April 2020), но естественно необходимо поставить последнюю версию, в которой разработчики пофиксили существующие на данный момент баги;
- включенрежим разработчика на вашем устройстве;
- на устройстве версия ОС Android 11.
Далее необходимо выбрать раздел «Подключить устройство с помощью кода подключения».

В боттомшите отобразится сам код подключения к устройству и IP-адрес и порт.
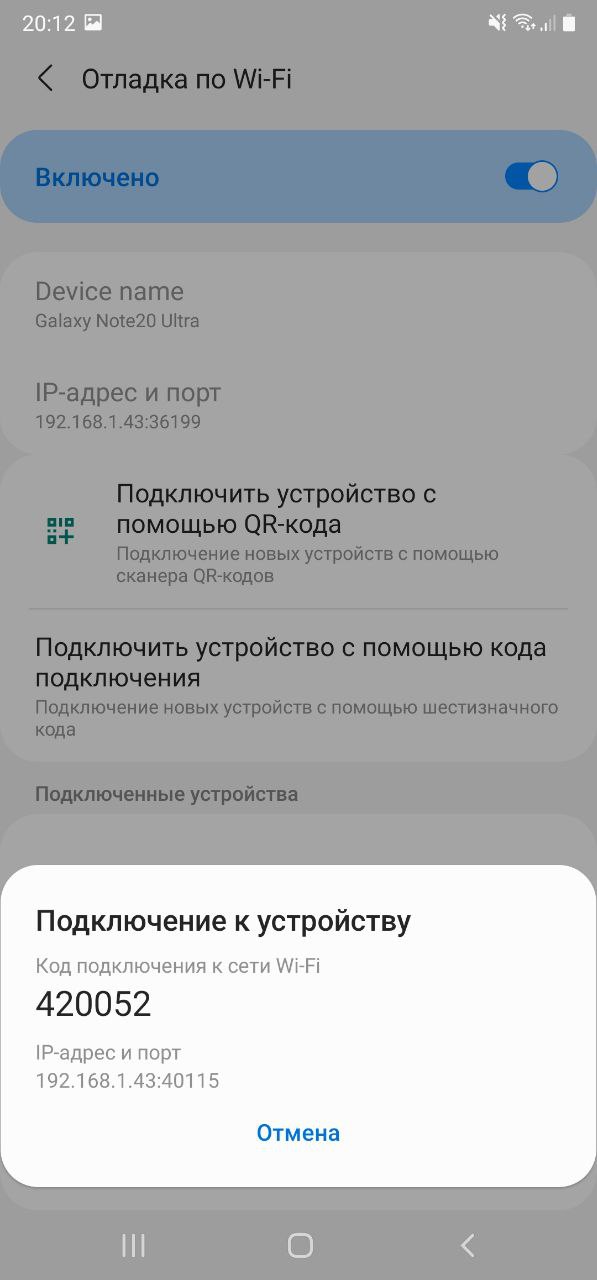
Откроем Android Studio, перейдем во вкладку Terminal, далее введем и выполним команду adb pair ipaddr:port где ipaddr и port — данные из боттомшита «Подключение к устройству». Следующим шагом — вводим код подключения и получим push на устройство об успешном подключении.

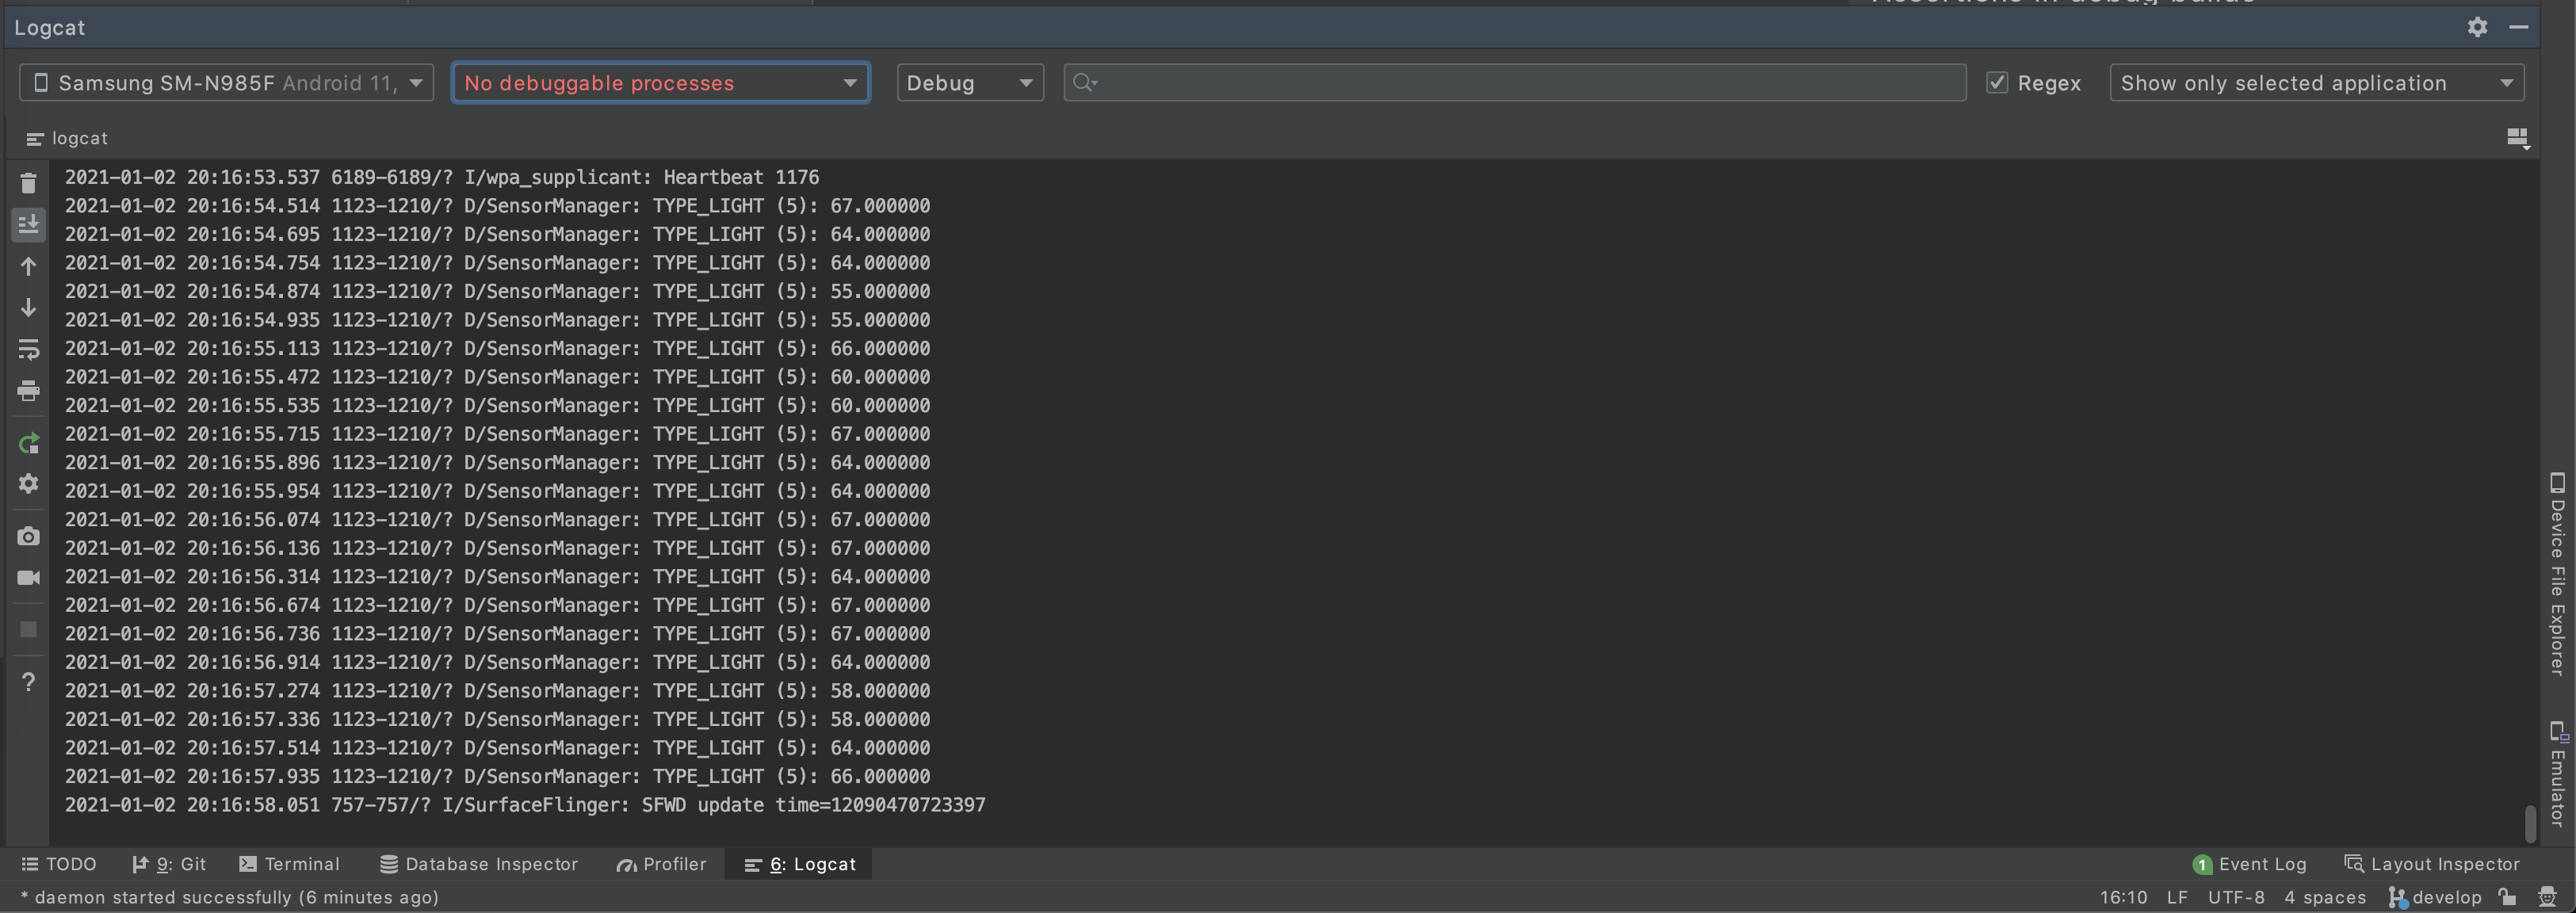
Перейдем на вкладку Logcat и все, что нам осталось — выбрать наше устройстве из списка подключенных устройств, в конкретном примере это Samsung SM-N985F.
Резюме
Следите за обновлениями в новых версиях и не ленитесь читать официальную документацию и узнавать о новых фишках.