- How to install Android SDK on Ubuntu?
- 9 Answers 9
- Пишем и собираем приложения для Android в linux консоли
- Введение
- Железо
- Операционная система
- Установка пакетов
- Настройка adb
- Постановка задачи
- Создание подписи
- Манифест
- Layout
- Исходный код приложения
- Скрипт для сборки
- Сборка и установка
- Заключение
- How to Install Android SDK without Android Studio on Ubuntu
- Prerequisites
- Step 1. Setup Directory for Android SDK
- Step 2. Download Android command-line tools
- Step 3. Let the system know SDK Location
- Step 4. Install Android SDKs from Command Line
- Conclusion
How to install Android SDK on Ubuntu?
For my Ubuntu machine, I downloaded the latest version of Android SDK from this page. After extracting the downloaded .tgz file, I was trying to search for installation instructions and found:
To get started on Linux: Unpack the .zip file you’ve downloaded. The SDK files are download separately to a user-specified directory. Make a note of the name and location of the SDK directory on your system—you will need to refer to the SDK directory later when using the SDK tools from the command line.
there’s an easy install paolorotolo.github.io/android-studio — or check this tutorial on how do it manualy — youtube.com/watch?v=qfinKxwYYZs
@Tasos Any idea about the maintenance and long term support paolorotolo’s Android studio? This looks more of a personal project 🙁
Android Studio itself alerts you when there is a new update/upgrade so you do it from there. I dont think the person modified AS
from my last comment — however you can ask that question directly to the person here — github.com/PaoloRotolo/android-studio/issues
9 Answers 9
sudo apt update && sudo apt install android-sdk The location of Android SDK on Linux can be any of the following:
- /home/AccountName/Android/Sdk
- /usr/lib/android-sdk
- /Library/Android/sdk/
- /Users/[USER]/Library/Android/sdk
- Download the Android Studio.
- Extract downloaded .zip file. The extracted folder name will read somewhat like android-studio
To keep navigation easy, move this folder to Home directory.
- After moving, copy the moved folder by right clicking it. This action will place folder’s location to clipboard.
- Use Ctrl Alt T to open a terminal
- Go to this folder’s directory using cd /home/(USER NAME)/android-studio/bin/
- Type this command to make studio.sh executable: chmod +x studio.sh
- Type ./studio.sh
A pop up will be shown asking for installation settings. In my particular case, it is a fresh install so I’ll go with selecting I do not have a previous version of Studio or I do not want to import my settings.
If you choose to import settings anyway, you may need to close any old project which is opened in order to get a working Android SDK.
From now onwards, setup wizard will guide you.
Android Studio can work with both Open JDK and Oracle’s JDK (recommended). Incase, Open JDK is installed the wizard will recommend installing Oracle Java JDK because some UI and performance issues are reported while using OpenJDK.
The downside with Oracle’s JDK is that it won’t update with the rest of your system like OpenJDK will.
The wizard may also prompt about the input problems with IDEA .
Verify installation settings
An emulator can also be configured as needed.
The wizard will start downloading the necessary SDK tools
The wizard may also show an error about Linux 32 Bit Libraries, which can be solved by using the below command:
sudo apt-get install libc6:i386 libncurses5:i386 libstdc++6:i386 lib32z1
After this, all the required components will be downloaded and installed automatically.
After everything is upto the mark, just click finish
To make a Desktop icon, go to ‘Configure’ and then click ‘Create Desktop Entry’
Пишем и собираем приложения для Android в linux консоли

В данной статье я покажу как можно собрать apk файл в Ubuntu используя лишь
утилиты командной строки.
Обычно для создания приложений для Adroid используется Android Studio. Но для сборки небольших программ можно обойтись командной строкой. Например, когда ресурсы компьютера ограничены и ваше приложение очень простое.
В качестве постоянной среды разработки это, возможно, не очень удобно, но если вам нужно
иногда собирать какие-нибудь мелкие утилиты — это в самый раз.
Введение
Разработка под Android не является основным направлением моей деятельности, я иногда делаю какие-то небольшие приложения для своих нужд.
Раньше я использовал QPython, но он достаточно тяжел и неудобен в работе. Поэтому я перешел к разработке нативных программ. Даже при поверхностном знании Java
это не составляет больших трудностей.
Данное руководство в большой степени базируется на этом документе: Building an Android App
from the Command Line. Кому интересны подробности, обращайтесь к первоисточнику.
Похожая статья: Пишем, собираем и запускаем HelloWorld для Android в блокноте уже встречалась на этом ресурсе, но в ней было рассмотрена разработка в Windows.
Здесь же я рассмотрю, как можно собрать приложение в linux.
Железо
Тестирование проводилось на стареньком нетбуке с процессором Атом, 1Гб ОЗУ
и 8Гб SSD диска.
Операционная система
Я тестировал приложение на Ubuntu 17.04. Начиная с Ubunu 16.04 android-sdk можно установить через пакетный менеджер.
В принципе, тот же SDK можно
скачать с сайта.
Качать файл из раздела ‘Get just the command line tools’
По сути это не сильно меняет процесс, но через пакетный менеджер все гораздо проще.
Разница будет лишь в путях и установке дополнительных пакетов «android-platform».
Установка пакетов
Итак, приступим к установке.
sudo apt install android-sdkБудет установлено большое количество пакетов, включая Java.
Далее, в зависимости от требуемой версии Android, необходимо установить нужную
версию пакетов. Для lolipop 5.1 необходимо ставить:
sudo apt install google-android-platform-22-installer sudo apt install google-android-build-tools-22-installerТак же необходимо установить дополнительный пакет.
sudo apt install apksignerЕсли вы планируете устанавливать apk-пакет через adb, то необходимо немного дополнительных настроек.
Настройка adb
С помощью lsusb найти подключенное устройство
# lsusb . Bus 001 Device 004: ID 1782:75b0 MyDevice . И создать файл с правилом:
sudo vi /etc/udev/rules.d/51-android.rulesВ файл добавить одну строку:
SUBSYSTEM=="usb", ATTR=="1782", MODE="0666", GROUP="plugdev"Здесь «1782» взято из вывода lsusb.
sudo systemctl restart udevПосле подключения через adb, на устройстве необходимо подтвердить соединение.
Теперь все готово к работе.
Постановка задачи
Приложение, которое будем собирать немного сложнее, чем ‘Hello world’.
- Требуется по нажатию кнопки взять строку из буфера обмена.
- Вырезать подстроку
- Записать подстроку обратно в буфер.
- С помощь Toast вывести подстроку или сообщение об ошибке.
Я подготовил пример который возьмем за основу.
Создание подписи
Сначала создадим ключ для подписи файла:
keytool -genkeypair -keystore keystore.jks -alias androidkey \ -validity 10000 -keyalg RSA -keysize 2048 \ -storepass android -keypass androidМанифест
Здесь указываем имя приложения в атрибуте «android:label». Так же приложение будет использоваться свою иконку, она указана в атрибуте «android:icon». Сама иконка лежит в каталоге «res/drawable-mdpi» файл «icon.png». В качестве иконки можно взять любой небольшой png файл.
Layout
Файл с расположением элементов находится в каталоге «/res/layout/».
В него можно добавлять виджеты, если вы захотите расширить функционал.
Исходный код приложения
Исходный код приложения находится здесь «java/ru/kx13/extractvidid»
package ru.kx13.extractvidid; import android.app.Activity; import android.os.Bundle; import android.widget.TextView; import android.widget.Button; import android.widget.Toast; import android.view.View; import android.content.ClipboardManager; import android.content.ClipData; public class MainActivity extends Activity < private static String extract(String s) < int start = s.indexOf("%3D"); int end = s.indexOf("%26"); if(start == -1 || end == -1) < return "error"; >return s.substring(start + 3, end); > @Override protected void onCreate(Bundle savedInstanceState) < super.onCreate(savedInstanceState); setContentView(R.layout.activity_main); TextView text = (TextView)findViewById(R.id.my_text); text.setText("Извлечь youtube video id"); Button button = (Button) findViewById(R.id.button_id); button.setOnClickListener(new View.OnClickListener() < public void onClick(View v) < ClipboardManager myClipboard = (ClipboardManager) getSystemService(CLIPBOARD_SERVICE); ClipData abc = myClipboard.getPrimaryClip(); ClipData.Item item = abc.getItemAt(0); String text = item.getText().toString(); String video_id = MainActivity.extract(text); ClipData myClip = ClipData.newPlainText("text", video_id); myClipboard.setPrimaryClip(myClip); Toast toast = Toast.makeText(getApplicationContext(), video_id, Toast.LENGTH_SHORT); toast.show(); >>); > >Код весьма прост и примитивен, но этот шаблон можно использовать в других приложениях.
Скрипт для сборки
Я не стал использовать утилит сборки типа make или ant, т.к. весь код находится в одном файле и особых преимуществ это не даст. Поэтому это обычный shell скрипт:
#!/bin/sh SOURCE=ru/kx13/extractvidid BASE=/usr/lib SDK="$/android-sdk" BUILD_TOOLS="$/build-tools/22.0.1" PLATFORM="$/platforms/android-22" mkdir -p build/gen build/obj build/apk "$/aapt" package -f -m -J build/gen/ -S res -M AndroidManifest.xml -I "$/android.jar" javac -source 1.7 -target 1.7 -bootclasspath "$/jre/lib/rt.jar" \ -classpath "$/android.jar" -d build/obj \ build/gen/$/R.java java/$/MainActivity.java "$/dx" --dex --output=build/apk/classes.dex build/obj/ "$/aapt" package -f -M AndroidManifest.xml -S res/ -I "$/android.jar" \ -F build/Extractor.unsigned.apk build/apk/ "$/zipalign" -f 4 build/Extractor.unsigned.apk build/Extractor.aligned.apk apksigner sign --ks keystore.jks \ --ks-key-alias androidkey --ks-pass pass:android \ --key-pass pass:android --out build/Extractor.apk \ build/Extractor.aligned.apkНекоторые замечания по поводу путей.
- По умолчанию, переменная BASE указывает на путь, в который пакетный менеджер сохраняет файлы. Если вы ставите SDK вручную, то путь надо будет изменить.
- Если вы используете версию API отличную от 22, то вам надо подправить переменные BUILD_TOOLS и PLATFORM
Сборка и установка
Для сборки просто запустите
Если все настроено правильно никаких сообщений не будет выведено, а в каталоге «build» появится файл «Extractor.apk»
Теперь надо установить наше приложение
adb install -r build/Extractor.apkЕсли все прошло нормально, на устройстве появится новое приложение. Можно запускать и пользоваться.
В общем случае можно перекинуть файл apk на устройство любым удобным способом.
Заключение
Как видно из статьи начать разработку в консоли совсем несложно.
Консольные утилиты позволяют разрабатывать программы при весьма небольших ресурсах.
How to Install Android SDK without Android Studio on Ubuntu
Android SDK consists of a collection of tools that help developers to create Android applications. It comes with tools such as Build Tools, Platform Tools, Emulator, Jetifier, and command line tools.
When you install Android Studio, the Android SDK comes along with it. Some developers may prefer to use their own preferred text editor or IDE and only need SDK tools for their development.
In this tutorial, we learn how to install Android SDK without android studio on a Ubuntu.
Prerequisites
Step 1. Setup Directory for Android SDK
First, create a directory structure to set up SDK Tool. In my case, going to place it in my home directory under ~/android/sdk directory.
For creating the directory, type:
Step 2. Download Android command-line tools
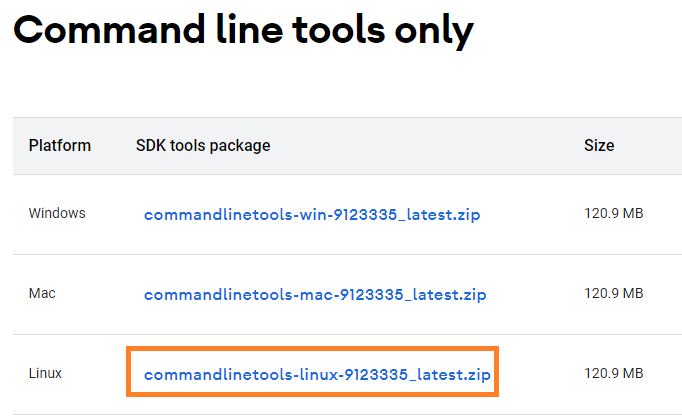
Visit the Android Studio download page and grab the link to download sdk command line tool. This would be at the bottom of the webpage in the section «Command line tools only» and contained in a zip file.
Note: This package is generic for all Linux Distributions. We have tested only on Ubuntu. Should work on other Linux Distros as well.
Change to the sdk directory created before:
Download the zip file using wget command:
sudo wget https://dl.google.com/android/repository/commandlinetools-linux-9123335_latest.zipOnce downloaded, extract the .zip file using the unzip command:
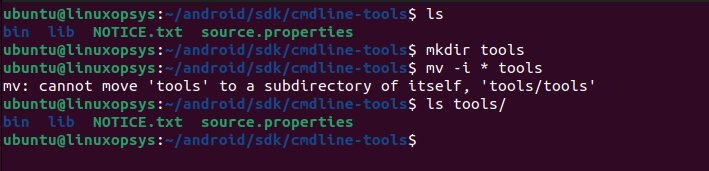
sudo unzip commandlinetools-linux-9123335_latest.zipOnce extraction is completed, you will have a new directory named cmdline-tools. Now change to that directory.
Let’s create a new directory inside cmdline-tools to hold all bin and lib contents.
Now you can move everything inside the cmdline_tools directory to the tools directory.
Step 3. Let the system know SDK Location
For the SDK command line tool to work, we have to set up environment variables properly. For this let us set the ANDROID_HOME environment variable and update the PATH variable.
export ANDROID_HOME=$HOME/android/sdk export PATH=$ANDROID_HOME/cmdline-tools/tools/bin/:$PATH export PATH=$ANDROID_HOME/emulator/:$PATH export PATH=$ANDROID_HOME/platform-tools/:$PATH
To make the changes permanent, you would need to add these commands to your shell profile file (e.g. .bash_profile or .bashrc).
Step 4. Install Android SDKs from Command Line
The Android SDK command line tools package comes with sdkmanager command. This tool is used to manage the packages and components of the Android SDK. Commonly used to list, install and update packages.
To list all installed and available packages, type
sdkmanager --list or sdkmanager --list --channel=channel_id // Channels: 0 (stable), 1 (beta), 2 (dev), or 3 (canary)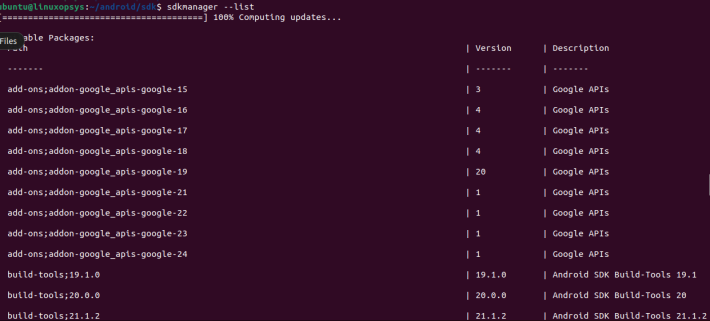
The output is a long list of packages. You can use filter the list using grep — for example sdkmanager —list | grep package-name.
To install packages use the following syntax:
sdkmanager --install packages [options]Some of the useful packages are platform tools, build tools, and emulator. To install those packages using sdkmanager, type:
sdkmanager --install "platform-tools" "build-tools;30.0.1" "emulator" "platforms:android-33"To keep all packages on the latest version update packages use sdkmanager —update command.
Conclusion
In this tutorial, we learned how to install Android SDK without actually installing the full android studio. This is more useful for guys who are more interested to stick on the command line.
Thanks for reading, if you encounter any issues please leave a comment.
If this resource helped you, let us know your care by a Thanks Tweet. Tweet a thanks