Устанавливаем эмулятор Android под Kali Linux
Инструкция писалась и тестировалась для Kali 2017.3 64bit.
1. Обновляем систему.
apt update && apt upgrade -y
2. Устанавливаем Docker.
apt install apt-transport-https ca-certificates curl gnupg2 software-properties-common -y
curl -fsSL https://download.docker.com/linux/debian/gpg | sudo apt-key add —
echo «deb https://download.docker.com/linux/debian stretch stable» >> /etc/apt/sources.list
apt update && apt install docker-ce -y
Следом docker-compose.
curl -L https://github.com/docker/compose/releases/download/1.18.0/docker-compose-`uname -s`-`uname -m` -o /usr/local/bin/docker-compose
chmod +x /usr/local/bin/docker-compose
Включаем сервис.
systemctl enable docker && systemctl start docker
Перезагружаемся.
reboot
3. Подготовим docker-compose.
mkdir ~/docker && nano ~/docker/docker-compose.yml
скопируем в него данную конфигурацию:
version: «2.2»
services:
selenium_hub:
image: selenium/hub:3.4.0
ports:
— 4444:4444
nexus_7.1.1:
image: butomo1989/docker-android-x86-7.1.1
privileged: true
# Increase scale number if needed
scale: 1
ports:
— 6080:6080
— 5554:5554
— 5555:5555
volumes:
— ./video-nexus_7.1.1:/tmp/video
environment:
— DEVICE=Nexus 5
— CONNECT_TO_GRID=True
— APPIUM=true
— SELENIUM_HOST=selenium_hub
— AUTO_RECORD=True

4. Запускаем образ.
cd ~/docker && docker-compose up -d
После того как наш образ загрузится, открываем браузер (Chrome, Firefox), и переходим по адресу: http://IP:6080
и получаем наш Nexus 5, с Android 7.1.1
5. Остановить приложение.
cd ~/docker && docker-compose down
Несколько замечаний:
1. Тестировалось на Kali 2017.3 64, с небольшими изменениями можно запустить на Ubuntu/Debian, на Windows необходимо установить
docker и docker-compose своим способом.
How to Install Genymotion Virtual Android on Kali Linux
Genymotion is a cross-platform Android emulator. Genymotion can run virtual Android devices on our Kali Linux system. By using Genymotion we can use Android as a virtual machine. We can use Genymotion with Android Studio as well to run our application while we develop them.
Genymotion is a great tool for Android developers and testers. It is also an awesome tool if we want to play Android games on our computer. Not only that it will be very beneficial for Android penetration testing. In this way we don’t need to install dangerous malicious Android applications directly on our smartphone or tablet, for testing purpose.

In our this article we are going to discuss how to install Genymotion on our Kali Linux system. We can use any Debian based Linux distribution (like Ubuntu, Linux Mint, ElementaryOS etc). Here we are going to install Genymotion on our latest Kali Linux 2021.1 version. To install Genymotion we need to have VirtualBox on our system.
Installing VirtualBox on Kali Linux
Genymotion uses VirtualBox to run the Android emulator on our computer system. So, you must have hardware virtualization (VT-d/VT-x/AMD-v) enabled on our BIOS and VirtualBox installed in order to use Genymotion.
First of all we need to VirtualBox on our system so before that we update our system by using following command:
Then we need to run following command to install VirtualBox:
sudo apt install virtualbox -y
After applying the above command VirtualBox will be installed on our system.
Downloading Genymotion
Genymotion is not available on Kali Linux repository so basically we need to to install it from the official website of Genymotion. So, first of all we need to visit https://www.genymotion.com/ the page will be like following screenshot:
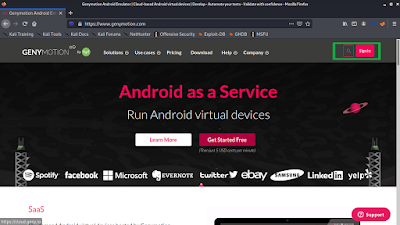
Here we can see the download button for «Sign in». We need to click there.
After that login page will appear in front of us. We need to click on «Create an account» there, the area is highlighted in the following screenshot:

After that we need to fill up some details to register, as shown in the following screenshot:
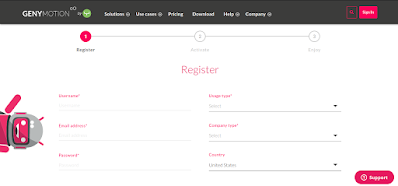
Pro Tip: During fill up the form we can use temporary mail services to verify our mail.
After we successfully verify our account by clicking on the verify mail link we got a page where we can download Genymotion for personal use, as shown in the following screenshot:

Then we need to click on download Genymotion and we reach to the download page of Genymotion, as shown in the following screenshot:
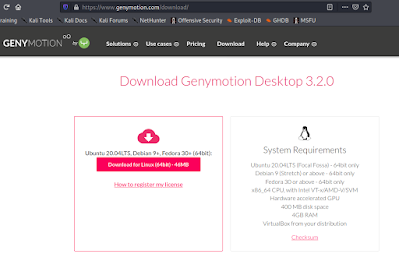
After clicking on download our download will start.

Now the download will start and the download will depend on our internet speed.
After we complete the download the bin file will be stored on our Downloads directory.
Installing Genymotion on Kali
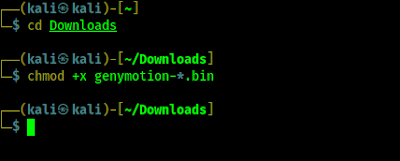
Now we need to open our terminal window and move to our Downloads directory by using following command:
Then we need to give it execute permission by using chmod command:
sudo chmod +x genymotion-*.bin
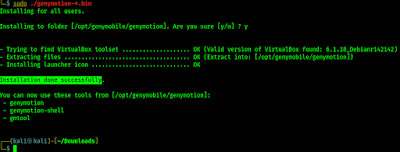
Now we need to type following command to install Genymotion on our system.
After applying the above command Genymotion will ask us question. It will prompt for our installation directory, default one is /opt/genymobile/genymotion. We need to type Y and press Enter ⤶.
Then Genymotion automatically check for VirtualBox toolset then it extract the installation files on the directory. After all configuration done it will show «Installation done successfully» output on our terminal, as we can see in the following screenshot.
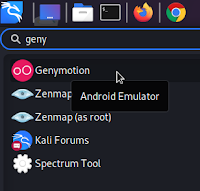
Now we can run Genymotion from our application menu.
After we click on the Genymotion app the app will open and a login screen will appear in front of us, shown on the following screenshot:
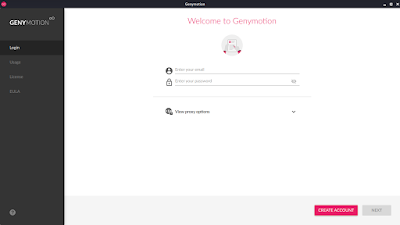
Here we need to fill our login details we have created during downloading Genymotion and click on ‘Next‘.
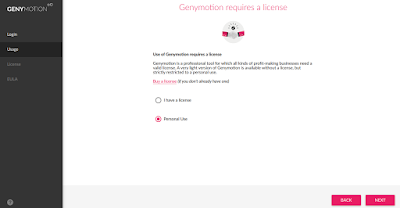
Then it will ask us for license, for commercial use of Genymotion require license but in our case we check on ‘Personal use‘ then click on ‘Next‘.
Then comes Genymotion’s ‘User License Agreement’ page. Where we can read the ‘END USER LICENSE AGREEMENT — GENYMOTION PERSONAL’ and tick ✅ on ‘I have read and accept the end user license agreement‘ and click on ‘Next‘.
After these steps we can see the main screen of Genymotion, as following screenshot:
Genymotion Virtual Android on Kali Linux
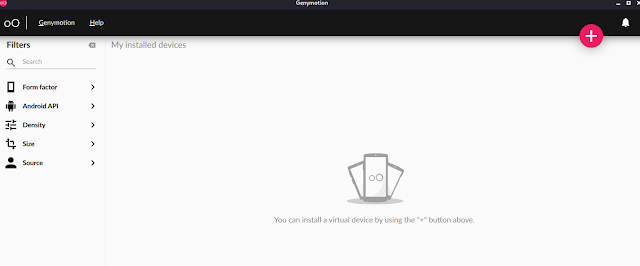
We have installed Genymotion on our Kali Linux now it’s time to add a Genymotion device on it. On the top right corner we can see add sign ➕ we need to click there to add an Android device. Then some Android devices list will come in a pop up window as we can see on the screenshot below:
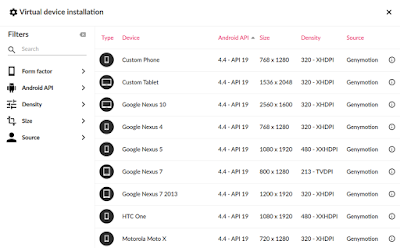
Now from here we can search for devices or use filters to find our required Android device then we need to select the device and click on ‘Next‘. For an example we select «Google Nexus 7».

Then a configuration window will appear, here we can configure the virtual Android device, as we can see in the following screenshot:
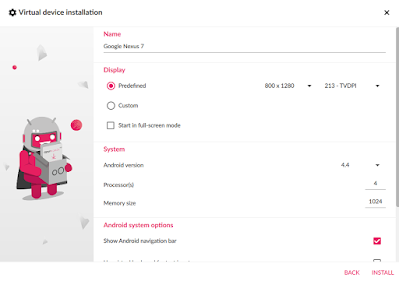
We may keep everything default, but for our penetration testing job and sending payloads on this device we changed the Network mode to Bridge from NAT (we need to select the interface according to our Kali system), we can also edit the configuration later.

Then we click on Install, and our installation process will be started as we can see in the following screenshot:
This require some amount of data (in our case 213MB) and some time depending on our internet speed.
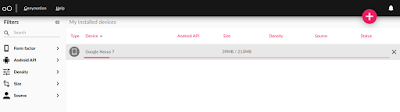
After the download process complete we can see our device on our installed device list.
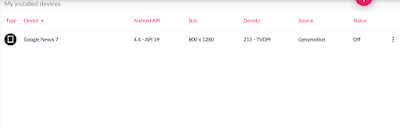
Now we can click on the three dot ፧ on the right side on the device list to get device options, shown in the following screenshot:
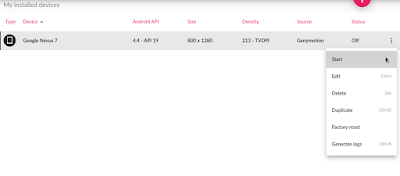
We can run the device from here by clicking on start. Also we are able to do edit, delete, duplicate, factory reset and generate logs from here. Now we just click on ‘Start‘ to run it.
Then the booting process will start, after boot up we can see Google Nexus 7 on our screen.
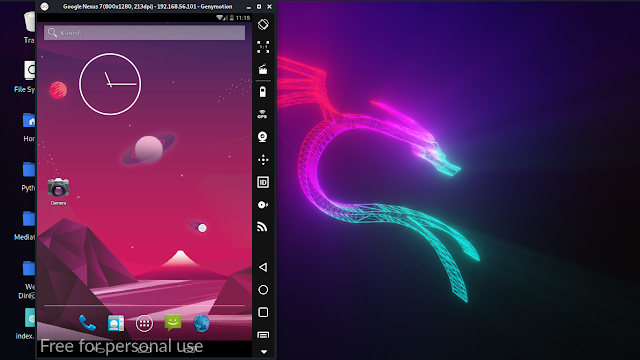
Now we can use this virtual Android device as our own, on our Linux based system by using Genymotion. This is how we can install Genymotion on our Kali Linux system. We can create as many Android virtual devices as we want using Genymotion.
This is very effective way for Android penetration testing, testing bugs on Android and try our payloads on Android system without effecting our own real devices.
Love our articles? Make sure to follow our free email subscription to get all our articles directly on inbox. We are also available on Twitter and GitHub, we post article updates there.
To join our family, join our Telegram Group . We are trying to build a community for Linux and Cybersecurity.
For anything we always happy to help everyone on the comment section . As we know our comment section is always open to everyone. We read each and every comment and we always reply .
how to install android emulator in kali linux
Best Android Emulators for Linux. Genymotion. If you’re searching for the best Android Emulators for Linux, chances are you’ll stumble across the name Genymotion almost everywhere. Andro VM. Anbox. Android-x86. Shashlik. ARChon. Android SDK. Andy OS. how to install android emulator in kali linux

Best Android Emulators for Linux. Genymotion. If you’re searching for the best Android Emulators for Linux, chances are you’ll stumble across the name Genymotion almost everywhere. Andro VM. Anbox. Android-x86. Shashlik. ARChon. Android SDK. Andy OS.
Kali Linux has over 600 preinstalled penetration-testing programs, including Armitage (a graphical cyber attack management tool), Nmap (a port scanner), Wireshark (a packet analyzer), John the Ripper password cracker, Aircrack-ng (a software suite for penetration-testing wireless LANs), Burp suite and OWASP ZAP web application security scanners. Kali Linux can run natively when installed on a computer’s hard disk, can be booted from a live CD or live USB, or it can run within a virtual machine. It is a supported platform of the Metasploit Project’s Metasploit Framework, a tool for developing and executing security exploits. install android emulator in kali linux
It was developed by Mati Aharoni and Devon Kearns of Offensive Security through the rewrite of BackTrack, their previous information security testing Linux distribution based on Knoppix. The third core developer, Raphaël Hertzog, joined them as a Debian expert.how to install android emulator

So today we will tell you through this blog, how you can download and install Android Emulator inside your Kali Linux operating system.
So a few days ago, we had installed the carpet with the help of dual boot in our system and told them how you can install this operating system in your black Linux system and for this we have given you the video and Through this blog, you were told that in which way you can install Kali Linux, so now let us know in which way your Linux operating system In the inside Android emulator can be installed.android emulator
Install Android Emulator
Since it’s sheer technical and requires a handful of computer jargons, installing Android emulator in Kali Linux is a bit intricate task. Therefore, the rest of the content has been designed such that to educate the readers upon the step by step process of setting up Android SDK, an Android emulator by Google and the creation of AVD (Android Virtual Device) so that even the laymen can do it without a hitch. Read on – kali linux
$ sudo apt-get install ia32-libs” or “$ sudo apt-get install libgl1-mesa-dev”, whichever is available.
- Then, install Java on Linux system.
- Use this command “$ wget http://dl.google.com/android/android-sdk_r24.4.1-linux.tgz” to install Android SDK on Linux.
- Extract all the files and move them to a new location.