- Cheesy bits and bobs
- Connecting to WiFi in Android 10
- Suggesting networks
- Connecting to Specific Networks
- How to Connect Your Android Device to Wi-Fi
- In This Article
- Turn On Wi-Fi On Android 9.0 and Up
- Turn on Wi-Fi on Android 8.0
- Connect to a Wi-Fi Network
- What to Consider Before Connecting
- View Details About the Wi-Fi Connection
- Get Notified About Open Wi-Fi Networks
- Choosing the Right Network
Cheesy bits and bobs
A blog about cross-platform mobile app development and other programming related things. Written by Mastodon.


Connecting to WiFi in Android 10
Android 10 was recently released and it introduces a bunch of changes in terms of Privacy. This means that access to /proc/net from the Linux sub-system has been restricted, which requires you to use NetworkStatsManager and ConnectivityManager to get VPN information.
It adds restrictions to who is allowed to enable/disable WiFi. We could previously use WifiManager.SetWifiEnabled() , but not anymore, this method will return false . You will need to show one of the new Settings Panels, which shows a slice of the Android Settings within your App.
What this post will focus on is the restrictions to access to configured networks and connecting to networks. A bunch of the network API has changed, so let us look a bit into what we have available now.
Suggesting networks
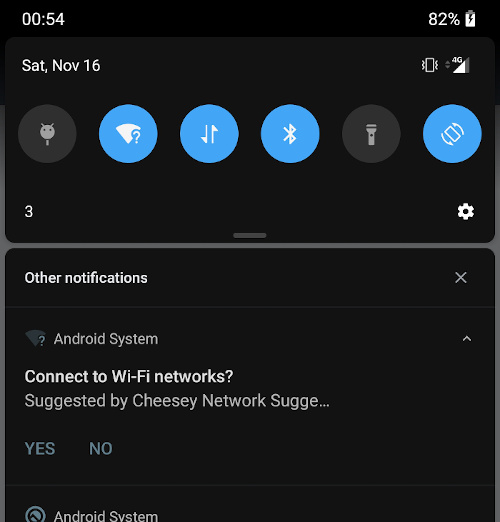
Something new to Android 10 is suggesting networks to connect to. These are just hints to the platform that the networks you provide it, can be connected to and it might decide to chose one of them. When any of these networks are detected nearby, Android will show a notification to the user the first time, which is how they allow connecting to a suggested network.
This could be useful for an Enterprise App, which can allow Access to networks depending on the logged in user or suggest a separate network for guests.
You can suggest networks like so.
var guestUsers = new WifiNetworkSuggestion.Builder() .SetSsid("GuestNetwork") .SetWpa2Passphrase("hunter2") .Build(); var secretEnterpriseNetwork = new WifiNetworkSuggestion.Builder() .SetSsid("Cyberdyne") .SetWpa2Passphrase(":D/-) .Build(); var suggestions = new[] guestUsers, secretEnterpriseNetwork >; var wifiManager = this.GetSystemService(Context.WifiService) as WifiManager; var status = wifiManager.AddNetworkSuggestions(suggestions); if (status == NetworkStatus.SuggestionsSuccess) // We added suggestions! > The suggestions you provide can only be added once. If you try add the same suggestion again, the status from AddNetworkSuggestion will return SuggestionsErrorAddDuplicate . If you need to modify a suggestion, you need to remove it first with RemoveNetworkSuggestion , then add the modified version of it again. Additionally, in order to add these suggestions you will need to add the CHANGE_WIFI_STATE permission to your AndroidManifest.xml.
android:name="android.permission.CHANGE_WIFI_STATE" /> Note: Some of the options on a WifiNetworkSuggestion requires you to request Fine Location permission in order to work. Make sure to consult the Android documentation to be sure.
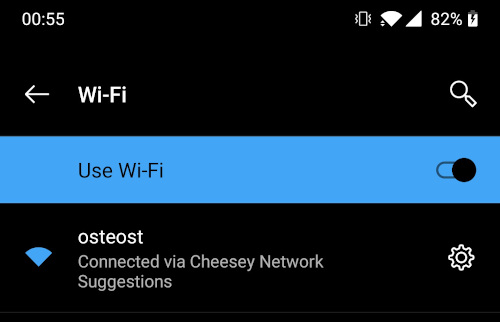
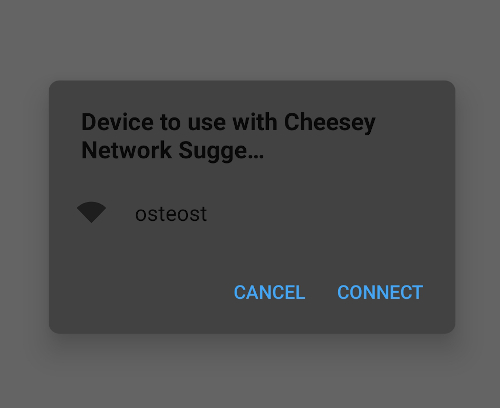
After you run AddNetworkSuggestion don’t expect something to happen immediately. There will eventually be a notification in the notification drawer. Which looks like something in the image below. Choosing “Yes” on the notification, won’t necessarily automatically connect to the network. However, going to Wifi Settings on your device, it should now know how to connect to that network.
Connecting to Specific Networks
Prior to Android 10, we could explicitly tell Android to connect to a specific Network and it would simply do it. This was done using WifiManager.AddNetwork() where you provided a WifiConfiguration . Now this API has been deprecated and replaced with ConnectivityManager.RequestNetwork , where you build a Network Request with a Wifi Specification, similar to the suggestions I showed you above. However, it also allows you to specify, whether the connection requires Internet, cannot be VPN, has to be WiFi and more.
You will also need to provide a ConnectivityManager.NetworkCallback , which will let you know whether connection to the network was successful or not. The idea here is that you are awaiting the requested network to connect and only when that is successful you can continue with your execution.
This is excellent for scenarios, where you need to be on a specific network to do some specific operations. One thing to note is that you will only be able to connect to this network while the App is open. As soon as the App is closed, it disconnects the network.
Note: this connection will not have any Internet connectivity according to the Google docs. See the notes in the Android documentation about WiFi Bootstrapping. For Internet connectivity Google suggests to use the Network Suggestions described above.
var specifier = new WifiNetworkSpecifier.Builder() .SetSsid("cyberdyne") .SetWpa2Passphrase("ill be back") .Build(); var request = new NetworkRequest.Builder() .AddTransportType(TransportType.Wifi) // we want WiFi .RemoveCapability(NetCapability.Internet) // Internet not required .SetNetworkSpecifier(specifier) // we want _our_ network .Build(); var connectivityManager = this.GetSystemService(Context.ConnectivityService) as ConnectivityManager; connectivityManager.RequestNetwork(request, callback); Here is an example of wanting to connect to the network with SSID “cyberdyne” and passphrase “ill be back”. The transport type specifies what kind of network you want to connect to. In this case it is a WiFi network. We do not require any Internet capability on the network. Per default it requests Internet, Not VPN and Trusted capabilities.
The callback looks something like this.
private class NetworkCallback : ConnectivityManager.NetworkCallback public ActionNetwork> NetworkAvailable get; set; > public override void OnAvailable(Network network) base.OnAvailable(network); NetworkAvailable?.Invoke(network); > > var callback = new NetworkCallback NetworkAvailable = network => // we are connected! > >; You can also use OnUnavailable to detect that we could not connect to the network in particular, or the user pressed cancel.
If you connect once to a network request, any subsequent requests will automatically connect if you are in range of the network and the user will not have accept it again. Also, while the App is open and you want to disconnect from the requested network, you simply call ConnectivityManager.UnregisterNetworkCallback() on the callback.
This hopefully gives you an idea about how to connect to WiFi Networks with Android 10.
You can check out the code from my Android 10 WiFi Repository on GitHub and have a go at playing with it yourself.
How to Connect Your Android Device to Wi-Fi
Former Lifewire writer Russell Ware has written hundreds of cell phone and smartphone reviews and guides in dozens of books and magazines.
Chris Selph is a CompTIA-certified technology and vocational IT teacher. He also serves as network & server administrator and performs computer maintenance and repair for numerous clients.
In This Article
This article explains how to connect your Android device to a Wi-Fi network. Instructions apply to devices from any manufacturer with Android 10, 9.0 Pie, or 8.0 Oreo, but the process for other Android versions is similar.
Turn On Wi-Fi On Android 9.0 and Up
Here’s how to make sure that Wi-Fi is turned on:
:max_bytes(150000):strip_icc()/001_connecting-android-device-to-wifi-577618-755697d5bc5649c9aa05c973cc6e76ae-00e87780bf824c61b6872ec93285bdbe.jpg)
Turn on the Wi-Fi toggle switch.
Alternatively, swipe down from the top of the screen and tap the Wi-Fi icon if it’s greyed out. To open the Wi-Fi settings, tap and hold the Wi-Fi icon.
Turn on Wi-Fi on Android 8.0
The process for enabling Wi-Fi and adjusting settings is different for Android 8.0. Here’s how to open the Wi-Fi settings on these devices:
Connect to a Wi-Fi Network
Once Wi-Fi is enabled, go to Settings > Connections > Wi-Fi to see a list of nearby networks to which you can connect.
:max_bytes(150000):strip_icc()/androidwifi-bcada8836c314cc5ad090ff827131320.jpg)
What to Consider Before Connecting
A network with a lock icon is secured and requires a password; it’s preferable to an unsecured one because it’s less vulnerable to intruders. If you must connect to an unsecured Wi-Fi network, use a firewall or antivirus app. Consider using a VPN, as well.
Don’t use an unsecured network for private browsing activities, such as accessing a bank account and logging in to your online user accounts.
Choose the strongest network available. The estimated signal strength displays next to each Wi-Fi network. The darker the icon or the more bars that display, the stronger the network signal is.
View Details About the Wi-Fi Connection
After your Android is connected to Wi-Fi, you can view details about the connection by tapping the network name and then tapping Advanced.
:max_bytes(150000):strip_icc()/wifiadvanced-7e788b2ecc0145178b8f9266e7a7d626.jpg)
This interface varies slightly with Android version.
Get Notified About Open Wi-Fi Networks
You can set up your Android to automatically tell you when a network is available, as long as Wi-Fi is turned on (even if not connected). Here’s how:
:max_bytes(150000):strip_icc()/androidnetworknotif-57e948a0d9464d3fafc675f89dbd7891.jpg)
Turn on the Open network notification or Wi-Fi notifications toggle switch.
Choosing the Right Network
If you’re connecting to your home Wi-Fi network, you can find the default SSID and password on the bottom of your router or in the documents your ISP provided at signup. To connect to a network that isn’t yours, ask the owner for the name and Wi-Fi password.
To find the Wi-Fi password on an Android, open the Google Play Store app and search for and install Solid Explorer File Manager. From the home screen, tap Menu (three lines), go to Storages, and tap Root. In the root filesystem, tap data > Grant > misc > wifi > wpa_supplicant.conf. Choose a text editor; under the network block, find the entry for psk to view the password.
To share a Wi-Fi password from iPhone to Android, find and install a QR code generator app on the iPhone, such as Visual Codes. Launch the app and tap Add Codes > Connect to Wi-Fi. Enter the network’s SSID, Wi-Fi password, and security type (likely WPA). Enter a name in the Label field and tap Create Code. Scan the code with your Android to connect to the network.
To turn on Wi-Fi calling on Android, enable Wi-Fi on the device and connect to a network. Go to Settings > Wireless and Networks > More and tap Wi-Fi Calling to enable the feature. When Wi-Fi calling is enabled, you’ll see a Wi-Fi phone icon in the status bar.