- How to install Android SDK on Ubuntu?
- 9 Answers 9
- How to Setup Android Emulator Without Installing Android Studio in Linux
- Install Command Line Tools
- Install Required Packages
- Find Correct System Image to Use
- Download System Image and Corresponding Packages
- Create a New AVD
- Run Emulator
- Conclusion
- About the author
- Nitesh Kumar
- Установка и запуск Android-приложений на Linux
How to install Android SDK on Ubuntu?
For my Ubuntu machine, I downloaded the latest version of Android SDK from this page. After extracting the downloaded .tgz file, I was trying to search for installation instructions and found:
To get started on Linux: Unpack the .zip file you’ve downloaded. The SDK files are download separately to a user-specified directory. Make a note of the name and location of the SDK directory on your system—you will need to refer to the SDK directory later when using the SDK tools from the command line.
there’s an easy install paolorotolo.github.io/android-studio — or check this tutorial on how do it manualy — youtube.com/watch?v=qfinKxwYYZs
@Tasos Any idea about the maintenance and long term support paolorotolo’s Android studio? This looks more of a personal project 🙁
Android Studio itself alerts you when there is a new update/upgrade so you do it from there. I dont think the person modified AS
from my last comment — however you can ask that question directly to the person here — github.com/PaoloRotolo/android-studio/issues
9 Answers 9
sudo apt update && sudo apt install android-sdk The location of Android SDK on Linux can be any of the following:
- /home/AccountName/Android/Sdk
- /usr/lib/android-sdk
- /Library/Android/sdk/
- /Users/[USER]/Library/Android/sdk
- Download the Android Studio.
- Extract downloaded .zip file. The extracted folder name will read somewhat like android-studio
To keep navigation easy, move this folder to Home directory.
- After moving, copy the moved folder by right clicking it. This action will place folder’s location to clipboard.
- Use Ctrl Alt T to open a terminal
- Go to this folder’s directory using cd /home/(USER NAME)/android-studio/bin/
- Type this command to make studio.sh executable: chmod +x studio.sh
- Type ./studio.sh
A pop up will be shown asking for installation settings. In my particular case, it is a fresh install so I’ll go with selecting I do not have a previous version of Studio or I do not want to import my settings.
If you choose to import settings anyway, you may need to close any old project which is opened in order to get a working Android SDK.
From now onwards, setup wizard will guide you.
Android Studio can work with both Open JDK and Oracle’s JDK (recommended). Incase, Open JDK is installed the wizard will recommend installing Oracle Java JDK because some UI and performance issues are reported while using OpenJDK.
The downside with Oracle’s JDK is that it won’t update with the rest of your system like OpenJDK will.
The wizard may also prompt about the input problems with IDEA .
Verify installation settings
An emulator can also be configured as needed.
The wizard will start downloading the necessary SDK tools
The wizard may also show an error about Linux 32 Bit Libraries, which can be solved by using the below command:
sudo apt-get install libc6:i386 libncurses5:i386 libstdc++6:i386 lib32z1
After this, all the required components will be downloaded and installed automatically.
After everything is upto the mark, just click finish
To make a Desktop icon, go to ‘Configure’ and then click ‘Create Desktop Entry’
How to Setup Android Emulator Without Installing Android Studio in Linux
![]()
This article will explain how to install the official Android emulator as a standalone application in Linux. The official Android emulator comes with the “Android Studio” application development suite. However, if you are not interested in developing Android apps and just want a working emulator without installing Android Studio, this article should help you. All the steps mentioned in the article are tested on Ubuntu 20.04 LTS version.
Install Command Line Tools
Download the latest version of “Android Command Line Tools” from here (scroll down to the command line section).
Extract the downloaded archive and make a new folder named “tools” inside “cmdline-tools” directory. Copy and paste all files from “cmdline-tools” folder to “tools” folder. Your final directory layout should look like this:
Install Required Packages
Go to the “tools/bin” folder, launch a new terminal window and run the following command to update repository details:
Next, run the following command to list available and installed packages:
Install some packages required for the Android emulator to work:
Find Correct System Image to Use
Next you need to make a note of the system image you want to load in the Android emulator. To get a list of downloadable system images, run the command below:
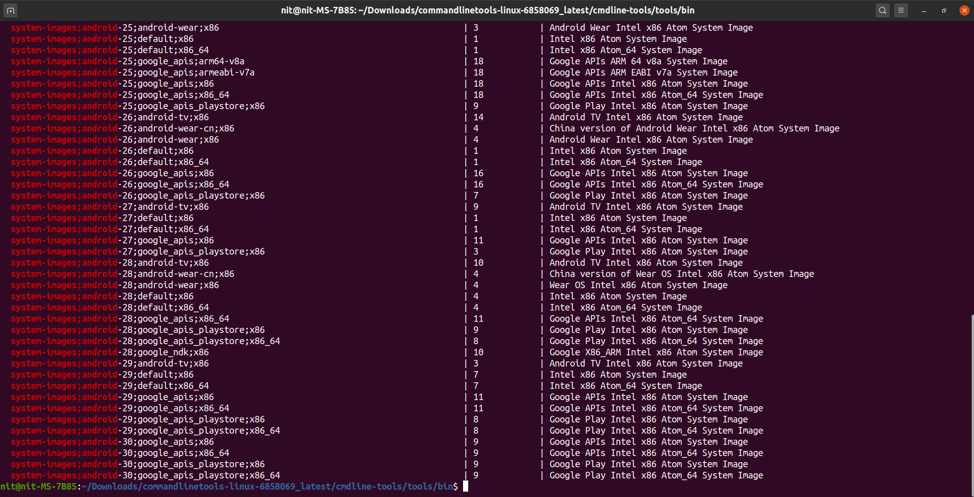
You should get some output similar to this:
You will see some numbers like “27”, “28” etc. in the name of system images. These numbers denote Android API levels. Find the Android version corresponding to the API levels from here and make a note of the appropriate system image you want to use in the emulator and the API level number.
Download System Image and Corresponding Packages
Next, download the following packages using the same API level number you finalized in the step above:
$ . / sdkmanager “platforms;android- 30 ” “system-images;android- 30 ;google_apis_playstore;x86_64” “build-tools;30.0.2”
For instance, if you decided to use “system-images;android-29;default;x86_64” as the system image, the command would change to:
$ . / sdkmanager “platforms;android- 29 ” “system-images;android- 29 ;default;x86_64” “build-tools;29.0.3”
You can always use the “list” switch to find correct command and version numbers:
Create a New AVD
AVD or “Android Virtual Device” is a set of configuration parameters that defines values for a virtual device that will emulate a real Android hardware device.
To create a new AVD, you need to use the system image you downloaded in the step above. Run the following command to create a new AVD:
$ . / avdmanager create avd -n “my_avd_30” -k “system-images;android- 30 ;google_apis_playstore;x86_64”
Replace “my_avd_30” with any name of your choice. You may be prompted to alter some configuration parameters. Follow on-screen instructions and change the values as per your requirements.
Confirm that the AVD has been successfully created using the command below:
You should get some output similar to this:
Available Android Virtual Devices:
Name: my_avd_30
Path: /home/nit/.android/avd/my_avd_30.avd
Target: Google Play (Google Inc.)
Based on: Android 11.0 (R) Tag/ABI: google_apis_playstore/x86_64
Sdcard: 512 MB
Note the path of AVD in the output above. At the same path, you can find a “config.ini” file that can be used to change configuration parameters of the AVD.
Run Emulator
Go to “emulator” folder (up a few directories) and use the following command to launch the emulator:
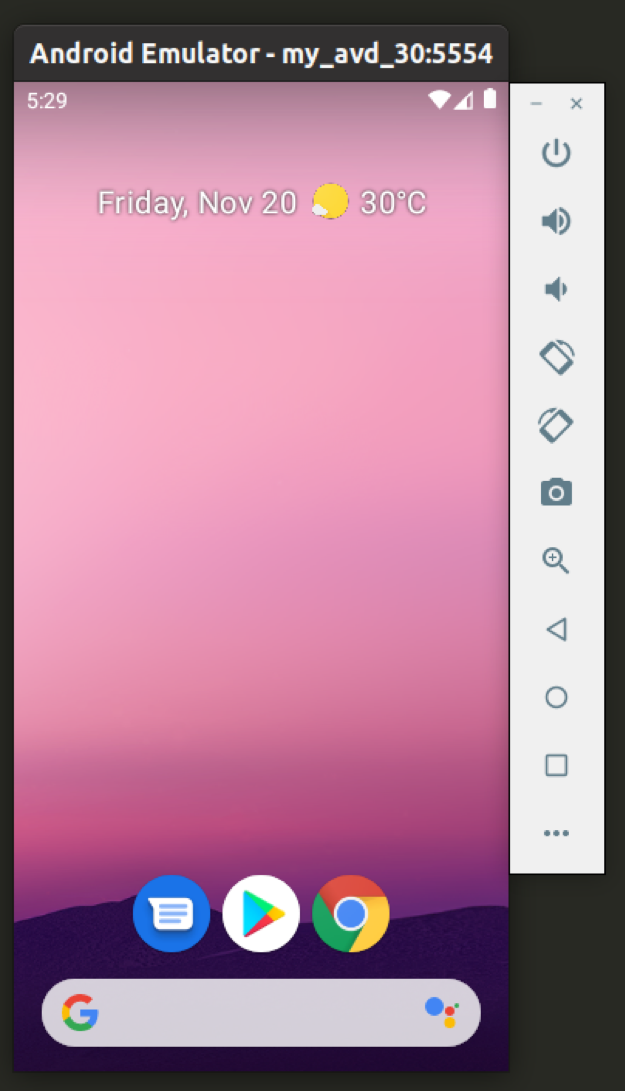
Replace “my_avd_30” with the name of your own AVD you created in the step above. Your Android emulator should be now up and running:
You can create as many as AVDs as you want and each AVD / System Image will be treated separately.
Conclusion
Android emulator provides an excellent way to emulate real life Android devices on your desktop PC. You can use the emulator to test some apps that are yet in development or you can use the emulator to regularly run Android compatible apps and games on a Linux PC. The performance of the emulator will depend on your system’s horsepower, virtualization technologies available on your PC and your system’s compatibility with the KVM kernel module.
About the author
Nitesh Kumar
I am a freelancer software developer and content writer who loves Linux, open source software and the free software community.
Установка и запуск Android-приложений на Linux

Как известно, многие Android-приложения можно нативно запускать на Chrome OS благодаря библиотеке Chrome App Runtime.
С помощью расширений chromeos-apk и ARChon запуск Android APK стал возможен и на других ОС.
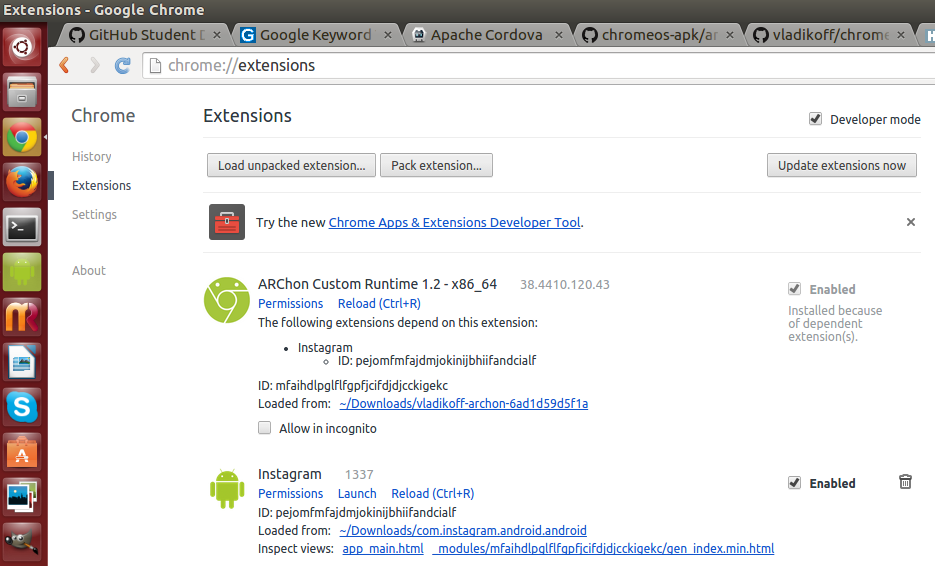
Устанавливаем ARChon Runtime
1) Скачиваем и распаковываем ARChon в произвольную дирректорию;
2) Открываем Chrome и включаем Developer mode в chrome://extensions/;
3) Кликаем «Load unpacked extension» и устанавливаем распакованный ARChon.
Далее необходимо подготовить архив APK для установки.
Устанавливаем chromeos-apk
1) Для Ubuntu прежде всего нужно установить библиотеку lib32stdc++6:
sudo apt-get install lib32stdc++6 2) chromeos-apk можно установить с помощью менеджера пакетов npm (поставляется вместе с node.js).
3) Сейчас можно установить непосредственно chromeos-apk:
npm install chromeos-apk -g Теперь все готово к распаковке APK.
Подготавливаем APK с помощью chromeos-apk
1) Для распаковки APK-архива выполняем:
chromeos-apk path/to/file.apk 2) Теперь у нас есть Chrome-APK расширение, и все что нужно — загрузить (chrome://extensions/) и запустить его.
UPD: полезные ссылки от sequence
ARChon Packager: создает архивы для archon из установленных в телефоне приложений.
twerk: расширение хром, сильно облегчает конвертацию apk.