- Как на Android прописать статический IP для Wi-Fi сети?
- Прописываем IP на Android
- How to change the default hotspot DHCP IP address range on Android?
- 1 Answer 1
- How to Set a Static IP-Address for Wi-Fi on Android 10, 9, 8
- Set a Static IP-Address on Stock Android
- Android 8
- Android 9 and 10
- Manually Configure a Static IP on Samsung Galaxy
- Static IP on Samsung Galaxy S20 with One UI 2.0
- Samsung Experience (Galaxy S7)
- Static IP-address assignment on Android 4.2.2 (Touchwiz)
- How to Switch Back to Automatic IP Address Obtaining
Как на Android прописать статический IP для Wi-Fi сети?
Как правило, в Wi-Fi сетях, IP адреса выдаются в автоматическом режиме и это действительно самый лучший вариант. При каждом новом подключении к сети роутер предоставляет устройству подходящий IP, который не занят. Благодаря этому нет необходимости вручную указывать адрес для каждого нового устройства. Все работает на автомате и проблем обычно не возникает, по крайней мере с компьютерами.
Но с различными мобильными гаджетами иногда возникают трудности и из-за этого они ни в какую не хотят выполнять подключение к Wi-Fi. Чаще всего такие устройства работают под управлением операционной системы Android. В таких случаях может помочь ручная установка статического IP, для конкретной сети.
Это действительно помогает в большинстве случаев и данный способ стоит пробовать в первую очередь, при возникновении подобных проблем. В сегодняшней статье мы рассмотрим, как сменить автоматический IP на статический и изучим небольшие тонкости этой настройки.
Смена адреса на статический как раз помогает при возникновении трех, самых популярных, ошибок: устройство бесконечное количество раз меняет IP, неправильная аутентификация (хотя это может возникнуть и при вводе неверного пароля от сети), и «Сохранено, защита WPA\WPA2».
Прописываем IP на Android
Процесс настройки IP довольно простой. Мы рассмотрим настройку на телефоне (в данном случае HTC) и планшете с ОС Android. Во всех других случаях, с данной операционной системой, настройка происходит приблизительно таким же образом.
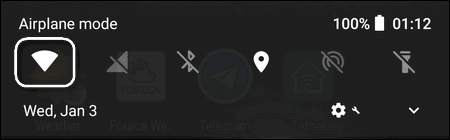
На телефоне, открываем настройки и выбираем раздел Wi-Fi. Теперь нажмите на сеть, с которой у вас возникают проблемы. Иногда настройки могут не открываться, просто нажмите и подержите. После этого, выбираем что-то на подобии пункта «Сменить сеть».
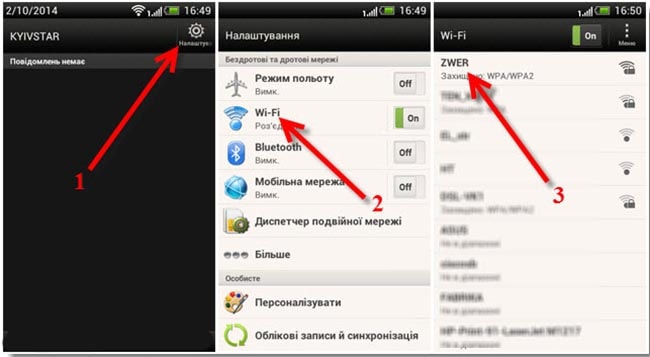
Попав в настройки сети, открываем расширенные параметры. Просто установите флажок напротив соответствующего пункта. Затем, нажмите на DHCP и укажите «Статическая».
Прокручиваем список ниже и в пустых полях необходимо заполнить значения IP адреса, Шлюза и Длины префикса сети. Часто, эти поля могут быть уже заполненными приблизительными значениями, в качестве примера. Но мы должны указать свои.
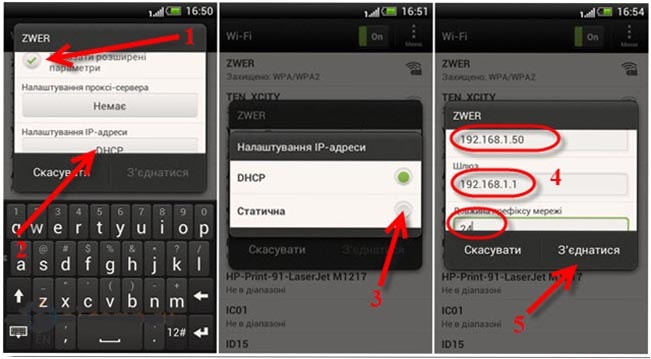
Что же там указывать? Когда в настройки вашего роутера можно попасть, перейдя по такому адресу 192.168.1.1, то в таком случае IP должен выглядеть так: 192.168.1.Х. Вместо Х указываем произвольное число от 1 до 199.
В другом случае, когда адрес, по которому открываются настройки роутера, выглядит так 192.168.0.1, статический IP приобретает подобный вид: 192.168.0.Х. Шлюз выглядит точно так же — 192.168.0.1. Вот и все, что нужно указать в настройках на телефоне. После этого сохраните выполненные изменения.
Теперь давайте взглянем, как это делается на планшете. В целом, настройки на всех современных устройствах, под управлением Android, очень похожи и все делается одинаково, есть только небольшие изменения в интерфейсе.
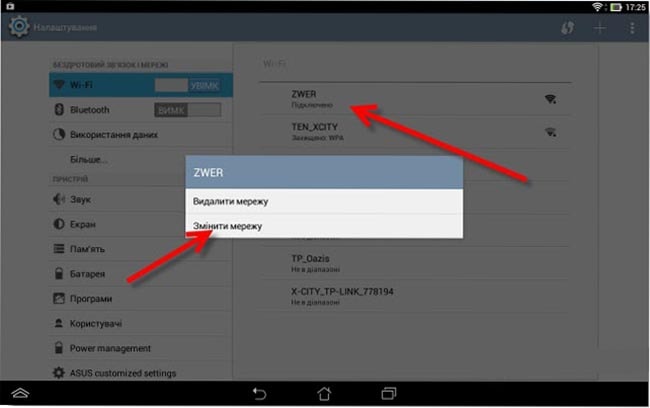
Открываем настройки, открываем раздел Wi-Fi и открываем параметры проблемной сети.
Задаем нужные значения адресов.
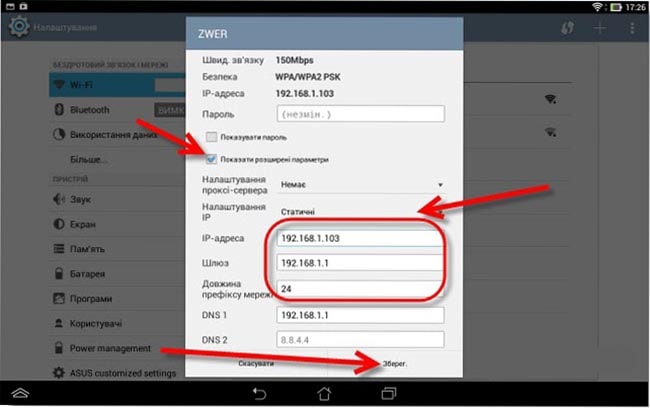
Сохраняем выполненные изменения. Этим способом можно решить самые распространенные проблемы, возникающие при подключении к сети Wi-Fi. По этому этим стоит воспользоваться. Если что-то не получается, или возникли вопросы, можете отписываться в комментариях, с радостью Вам поможем.


Спасибо вам огромное ! Вы меня очень выручили. В двух словах… НАчал замечать странности в смартфоне. Постоянные сбои с Wi-Fi при чём смартфон показывает, что есть соединение (значком сети), но входя в приложение, которое требует подключение Интернета, оно показывает, что подключения нет… Так-же частые вылеты и т.п… Воспользовался вашим советом и прописал 192.168.1.50. Теперь всё работает ! Спасибо ! По-настоящему дельный совет !
How to change the default hotspot DHCP IP address range on Android?
As the title says I look for a way to permanently change the default IP address range form 192.168.43.xxx to 192.168.1.xxx . Reason: On my router some of my devices get a static IP trough DHCP, in the 192.168.1.xxx range. Using the hotspot on the road I would like to have the same setup. I have tried to change the range following this steps, but it did not work out on both of my devices. They are rooted and Lineage OS is installed. The last answer suggest an easy way to do this, but it is not possible in Lineage OS. Also this post from anroidpolice.com suggests that it is possible by an app, I look for a solution to do this with adb . I have no access to Google Play, and do not want it.
1 Answer 1
NOTE: Root is required.
Default DHCP IP address range is hard-coded (1) , you can’t change it without rebuilding ROM with modified source code. Or use a little hack.
When you switch on tethering, what happens (at least):
- hostapd — the daemon which manages access points — is started.
- Network interfaces are set up, IP address is added to Wi-Fi interface (hard-coded before Android Pie (2, 3) , randomized afterwards (4) ), and routing table is added (5) for local network.
- dnsmasq — the DHCP/DNS server (up to Pie) — is started with hard-coded commandline arguments (6) (which can be set through /etc/dnsmasq.conf (7) otherwise).
So we can replace /system/bin/dnsmasq with a custom shell script, taking control of the process in between. Rename the original binary to something else:
~# mv /system/bin/dnsmasq /system/bin/dnsmasq.bin Create script /system/bin/dnsmasq :
#!/system/bin/sh OLD_SUBNET='192.168.43' NEW_SUBNET='192.168.1' WIFI_INTERFACE='wlan0' LOCAL_TABLE=$(awk '$2=="local_network" ' /data/misc/net/rt_tables) export PATH=/system/bin # delete old route, add new ip route del $.0/24 dev $ table $LOCAL_TABLE ip route add $.0/24 dev $ table $LOCAL_TABLE # set new IP address on Wi-Fi interface ip address add $.1/24 dev $WIFI_INTERFACE # inject new subnet in hard-coded arguments received from netd set -- $(printf '%s' "$*" | sed 's/'"$"'/'"$"'/g') unset OLD_SUBNET NEW_SUBNET WIFI_INTERFACE LOCAL_TABLE # execute original binary with new arguments exec dnsmasq.bin $* Confirm the name of your Wi-Fi interface ( wlan0 usually). Check with ip link or ls /sys/class/net/ or iw :
WIFI_INTERFACE=$(iw dev | grep -E 'ssid |Interface ' | grep -B1 ssid | awk '$1=="Interface" ') Also confirm your local_network (8, 9) routing table ( 97 ) is being used for hotspot. Android’s routing is a mess, getting more complex with every new release. So I’m not sure if this has been persistent or not. Also before making any changes, check your routing policies and tables to figure out what you should put in your script:
~# RULES="$(ip rule | grep -vE 'unreachable|local')" ~# echo "$RULES" ~# for t in $(echo "$RULES" | awk '' | uniq); do ip r s table $t; done SELinux rules also need to be defined if (all or some) not already defined and if status is enforcing . Use Magisk’s suploicy or some other similar tool like sepolicy-inject :
# execute binaries from /system/bin allow netd system_file dir < read open getattr search >allow netd system_file file < read gettattr open execute execute_no_trans ># execute /system/bin/sh allow netd shell_exec file < read getattr open execute execute_no_trans ># execute /system/bin/toolbox and its applets allow netd toolbox_exec file < read gettattr open execute execute_no_trans ># configure RPDB rules / routing tables allow netd netd capability
* Rules are not persistent across reboots, use some init.d script or replace /sepolicy in ramdisk
~# chown 0.0 /system/bin/dnsmasq*; chmod 0755 /system/bin/dnsmasq* ~# chcon u:object_r:system_file:s0 /system/bin/dnsmasq ~# chcon u:object_r:dnsmasq_exec:s0 /system/bin/dnsmasq.bin Another options is to modify the value of config_tether_dhcp_range (10) in Android framework as explained in this answer, but I haven’t tested this.
Or you can setup complete tethering from commandline, running your own processes. This answer includes the instructions, though the question is different.
How to Set a Static IP-Address for Wi-Fi on Android 10, 9, 8
If you encounter problems while using DHCP (auto IP obtaining) on Android you might need to manually set a static IP-address.
You may also decide to assign a static address to your Android phone if you want to use a specific IP on a Wi-Fi network but don’t want to set up the IP reservation on your access point or if you simply don’t have access to the router settings.
You can easily revert the network setting to its default state at any time and continue using DHCP.
Here is how to set a static IP-address on a phone or tablet running Android 10 and older versions.
We illustrated the article using screenshots from Samsung Galaxy One UI 2.0 (Galaxy S20, S10), One UI 1.1 (S9), Samsung Experience (S7), old Touchwiz (Ace 3) and stock Android 8 to 10 version (Google Pixel).
Set a Static IP-Address on Stock Android
Android 8
Android 9 and 10
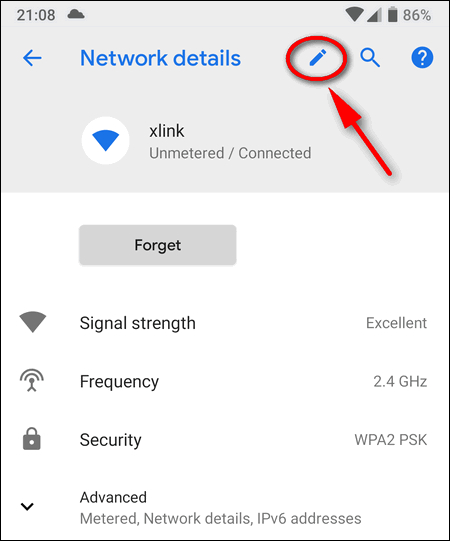
In Android 9 Pie you should tap the network name in the list (no long tap available), then select the pencil icon to modify its profile:
The remaining steps are equal to the steps from Android 8 section.
Manually Configure a Static IP on Samsung Galaxy
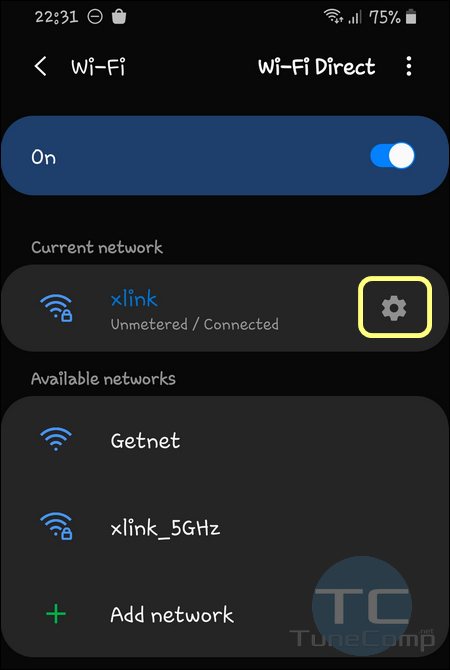
Static IP on Samsung Galaxy S20 with One UI 2.0
- Pull down the notification shade.
- Hold down the Wi-Fi toggle to open Wi-Fi settings.
- Make sure to connect to the right hotspot, where you are going to use a manually configured IP address.
- Tap the gear icon to modify settings of your current network:

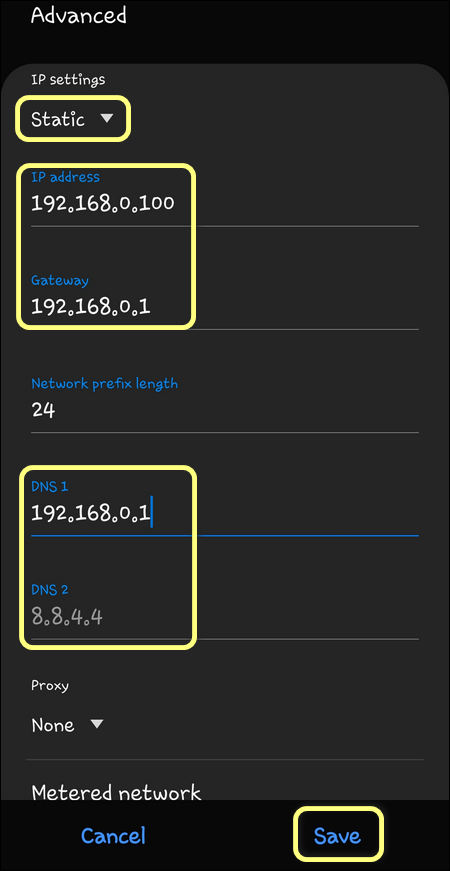
- Tap on Advanced at the very bottom:

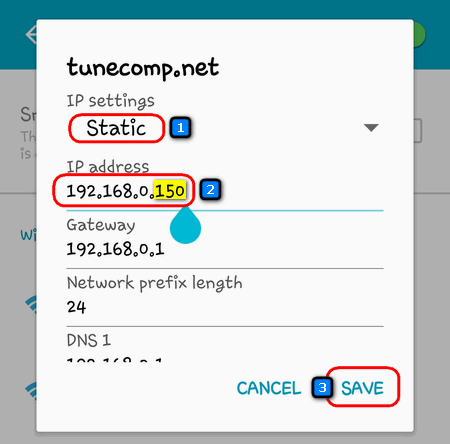
- Switch from DHCP to Static.
- Specify the IP address you want to use on your Galaxy phone.
- Type the Gateway IP and DNS.
- Finally tap Save for changes to take effect:


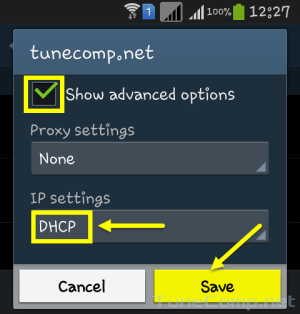
Samsung Experience (Galaxy S7)
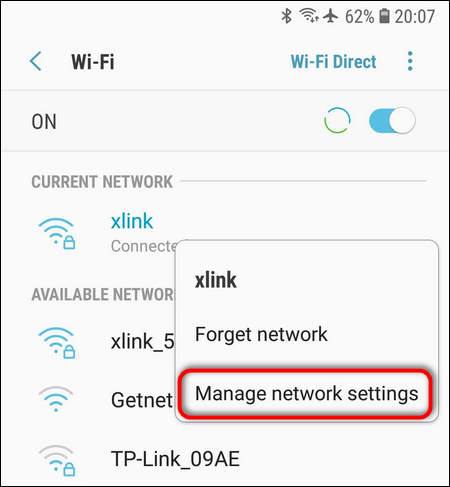
- Hold down the Wi-Fi toggle to dive into network settings.
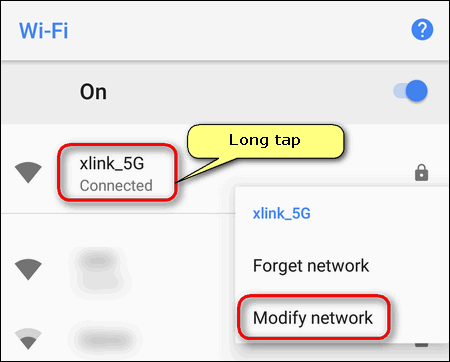
- Long tap on your current wireless network.
- Select Manage Network Settings:
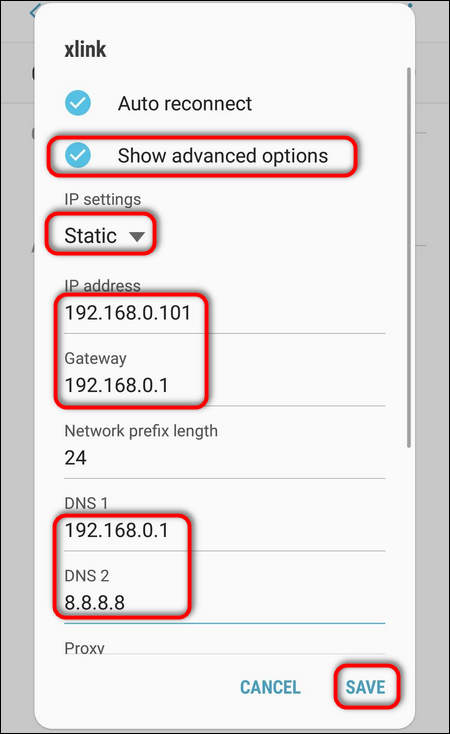
- Set the checkbox Show advanced options.
- In the IP settings switch to the Static option.
- Now manually specify IP address, gateway IP, DNS.
- Don’t forget to tap Save for new static IP address to apply.
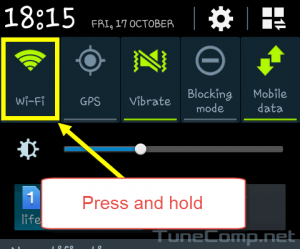
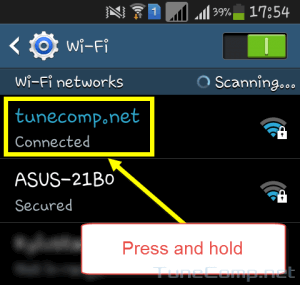
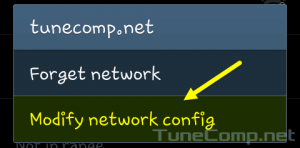
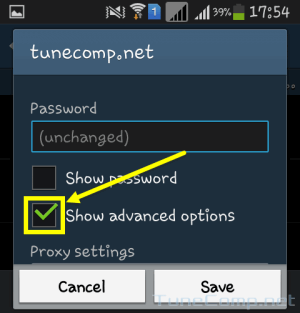
Static IP-address assignment on Android 4.2.2 (Touchwiz)
1. Pull down the status bar.
2. Press and hold the Wi-Fi icon in the quick panel:
3. Perform the long press on your network name:
4. Tap on Modify network config:
5. Set the checkbox Show advanced options:
6. In advanced options area:
- Select Static in IP settings drop-down menu .
- Specify the desired address in IP address field .
- Tap the Save button to apply new settings:
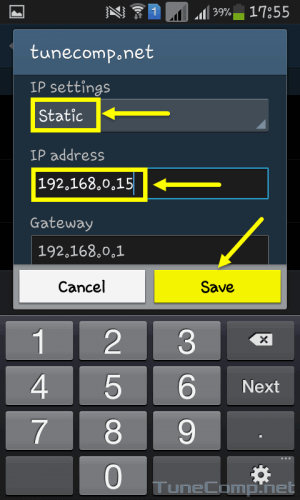
Do not forget to specify the Gateway IP address when using a static IP settings. Otherwise you won’t have the Internet connection on your Android!
How to Switch Back to Automatic IP Address Obtaining
If you wish to obtain an IP-address automatically again perform the following actions:
Go to network config again:
Make sure the checkbox Show advanced options is set.
Select DHCP in IP settings drop down menu.
Press Save:
After that your device will reconnect to the network and obtain the IP from DHCP server.