- Как подключить и настроить Wi-Fi на Android смартфоне: полная инструкция
- Как подключить и включить ВайФай
- Настройка
- How to configure WiFi manually on Android
- Add a new WiFi connection on Android
- Configure connection
- Additional data
- How to Connect Your Android Device to Wi-Fi
- In This Article
- Turn On Wi-Fi On Android 9.0 and Up
- Turn on Wi-Fi on Android 8.0
- Connect to a Wi-Fi Network
- What to Consider Before Connecting
- View Details About the Wi-Fi Connection
- Get Notified About Open Wi-Fi Networks
- Choosing the Right Network
Как подключить и настроить Wi-Fi на Android смартфоне: полная инструкция
![]()
Привет всем! Сегодня мы поговорим – как правильно подключить и настроить вай-фай на смартфоне. Иногда бывает такое, что при подключении к беспроводной локалке появляются ошибки, или мобильник вообще отказывается подключаться. О решении этих проблем мы поговорим чуть позже, а сейчас давайте попробуем просто «приконектиться» к домашней или другой беспроводной сети.
ПОМОЩЬ! Если возникнут трудности, ошибки или непредвиденные ситуации – пишите об этом всём в комментариях, и я постараюсь вам помочь.
Как подключить и включить ВайФай
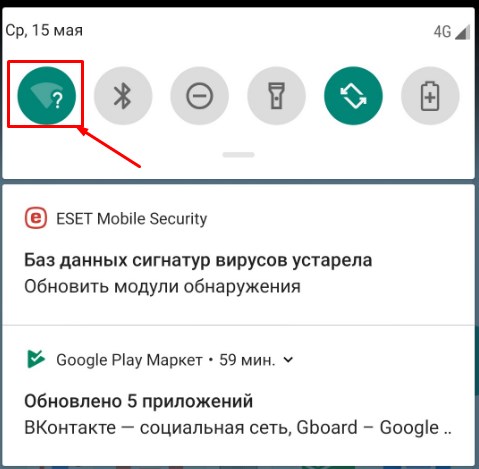
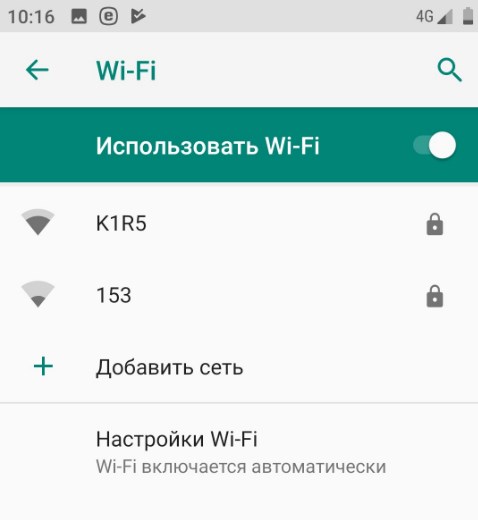
- Для подключения смахните верхнее меню и нажмите на значок Wi-Fi. Если вы находитесь в месте, где есть беспроводная сетка, к которой вы уже подключались, то вы должны к ней автоматически присоединиться, так как телефон хранит пароли всех уже подключенных Wi-Fi.
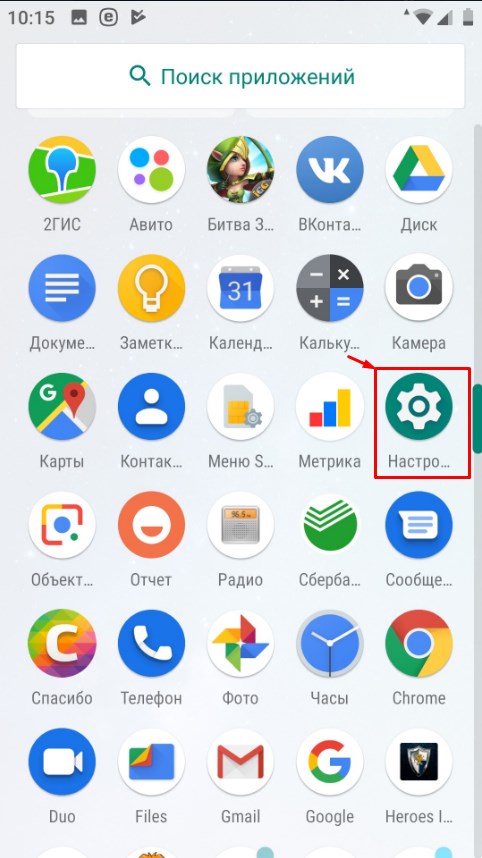
- Если контакта не произошло, то вайфай нужно выбрать вручную, также вы должны знать пароль от этой сети. Заходим в настройки – нажимаем на значок шестеренки.
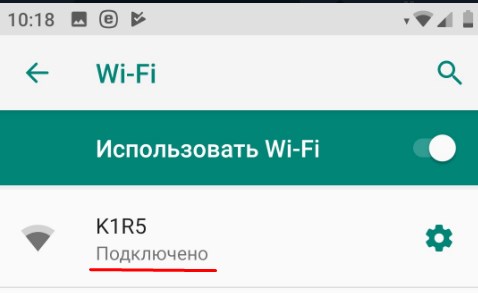
- Теперь если подключение будет установлено, то вы увидите имя вай-фай и надпись «Подключено». Если вы присоединяетесь к неизвестной сети, то нажмите на бегунок Wi-Fi, если он ещё выключен, а после нажмите на надпись беспроводного соединения.
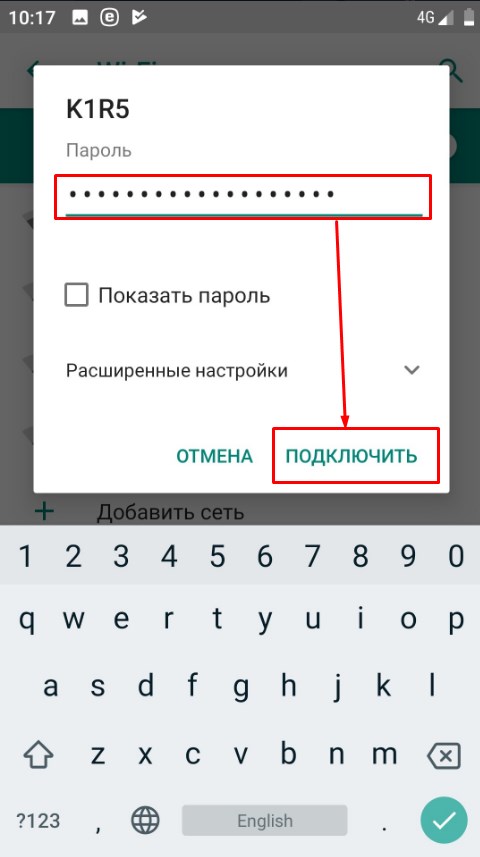
- Теперь вписываем пароль и нажимаем «Подключить». Если вы сомневаетесь в ключе, то можете нажать галочку «Показать пароль», чтобы вы его видели.
ПРИМЕЧАНИЕ! Если устройство не хочет подключаться и пишет, что ключ не подходит, то скорее всего вы вводите неверный пароль. Если вы забыли его, то советую прочесть эту статью.
Настройка
Настройка на Андроиде или iOS выполняется с введением вручную IP адреса устройства, шлюза и DNS адресов. Данные настройки частенько помогают при проблемах с подключением к интернету или к маршрутизатору. Основная настройка интернета и WiFi сети делается на роутере. Для этого на нашем портале есть все подробные инструкции в зависимости от модели и фирмы, которая выпустила ваш интернет-центр. Далее я расскажу, как детально настроить вай-фай на смартфоне с ОС Android.
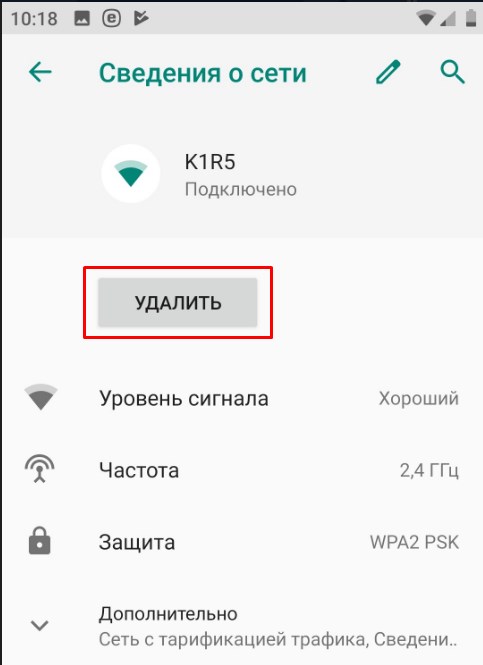
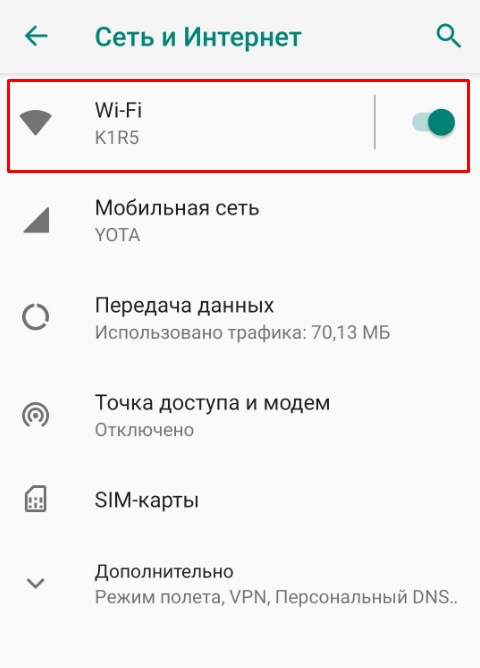
- Если вы уже подключились к сети, то нажмите по подключению и далее «Удалить». Таким образом вы отключитесь от неё.
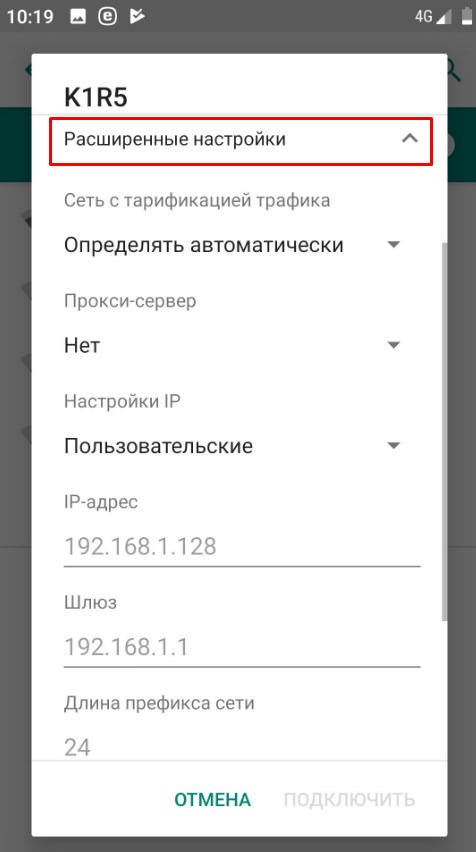
- Аналогично введите пароль при подключении, но пока не нажимайте на кнопку «Подключить». Чуть ниже нажмите «Расширенные настройки». В разделе «Настройки IP» выберите «Пользовательские». Теперь откроется меню, где вы должны будете ввести IP-адрес вашего телефона вручную. Для этого надо узнать IP вашего маршрутизатора. Адрес обычно находится под корпусом на этикетке. Если его там не будет, то зайдите с ноутбука или компьютера, который уже подключен к этому интернет-центру. Откройте командную строку и введите команду «ipconfig». В строке основной шлюз и будет нужная нам информация. Чаще всего это или 192.168.1.1 или 192.168.0.1.
- Теперь в строку IP-адрес нужно ввести первые три цифры как у вашего шлюза, а последнюю можете выбрать любую из диапазона 10 – 254. Я выбрал 128. В строке шлюза как раз и вписываем то самое значение, которое мы нашли на компе.
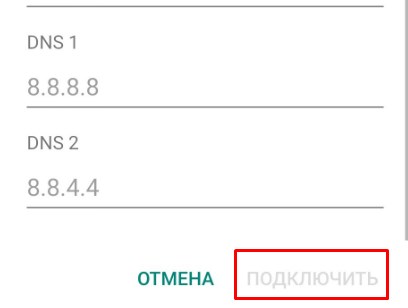
- Теперь пролистываем в самый низ. Нужно вписать DNS адреса. Впишите значения как на картинке выше и нажмите «Подключить». Если кнопка не доступна для нажатия, то скорее всего вы не ввели пароль, пролистайте вверх и проверьте.
После этого какие-то проблемы с подключением должны быть решены. Если и после этого вы не можете подключиться, то проверьте в первую очередь правильность ввода пароля. Если вы его забыли, то стоит зайти в настройки маршрутизатора – посмотреть или поменять ключ на новый.

How to configure WiFi manually on Android

The normal thing is that when we we connect to a WiFi network from our Android phone, the steps we follow are usually the same. We connect the WiFi in the phone and if it is a network that we already know, we connect to it. But in some cases, we can do this in a different way, as we can add a network ourselves. Something that may be necessary in case it is a new network.
Therefore, on Android phones there is the possibility to configure a connection manually. Thus, we add it to the phone and we have everything configured so that this network can be used at all times when we need it. The steps are the same on all OS phones.
Add a new WiFi connection on Android
First of all we will have to go to the WiFi settings on the phone. To go here we have two ways, on the one hand it is possible to use the phone settings and enter the wireless connection section. We can also make use of the quick settings of Android, since if we press and hold on the WiFi icon, the settings of this theme will open on the phone screen. Then we can start.
Depending on the layer, you may directly exit the button to add a new connection. In other telephones, you have to go to the settings menu in that menu, so that you have access to this option. But in all cases, we have to select the option to add or add a new connection. So let’s start then with the steps to add it in our case. Next we will have to enter the details of this connection.

Configure connection

First of all we will have add the basic data of this connection to the phone. On the one hand, we will have to give a name to this WiFi connection that we add on our phone. The name is not something really important, but it should be clear to us, to recognize the network at all times. Although the normal thing is that it is the name of a router or WiFi network, so we have to use the name of that network, respecting upper and lower case letters at all times.
In addition to this, Android asks us to add the type of security of said network. In this sense we have several options, such as WEP, WPA / WPA2 PSK, 802.1x EAP. They tend to always come out, although on other phones there are also some additional security options. It will depend on each phone. Depending on whether or not that network has a password, we will use one or the other. If it’s a passwordless network, then we use none.
But if we have any key in said network, then we have to indicate the type of security of it. We will also have to add the password, which will only be necessary the first time. Since these passwords are then stored on our Android phone. If you have doubts about security, check your router, but the normal thing is that it is usually WPA / wPA2 PSK, which is the most used in that case.

Additional data

The normal thing is that with the data that we have entered, the process has been completed. So this network has already been added to our Android phone and is ready to be used. But it may be the case that it is a specific network that has specific requirements, so that we will have to make use of the advanced options. In this section we find some additional options, which we also have to configure. The sections present are mostly:
- proxy. This option allows you to configure a proxy server to use in this specific connection
- IP settings. This section offers the possibility to choose between the automatic IP mode (DHCP protocol) or to establish a manual IP. If the second is used, certain data is requested, since it will be necessary to enter the IP address, the gateway, the length of the network prefix and the two DNS addresses. Then it is already configured.
- Metered use. It is used to indicate that the Wi-Fi connection is not for unlimited use. This means that for the extra use of data you will have to pay additional money. When these types of networks are activated, Android will limit the use of the network in the compatible applications, to avoid an additional cost.
- Hidden network. In this section it is possible to determine if the connection has its SSID hidden or not.
Once everything has been configured in these sections, in case something had to be done, then you can click on save. So everything is saved and We have configured this WiFi connection directly on our Android phone. The process is not complex, so it is convenient to know how to do it on some occasions.
The content of the article adheres to our principles of editorial ethics. To report an error click here.
Full path to article: Androidsis » Tutorials » Android cheats » How to configure WiFi manually on Android
How to Connect Your Android Device to Wi-Fi
Former Lifewire writer Russell Ware has written hundreds of cell phone and smartphone reviews and guides in dozens of books and magazines.
Chris Selph is a CompTIA-certified technology and vocational IT teacher. He also serves as network & server administrator and performs computer maintenance and repair for numerous clients.
In This Article
This article explains how to connect your Android device to a Wi-Fi network. Instructions apply to devices from any manufacturer with Android 10, 9.0 Pie, or 8.0 Oreo, but the process for other Android versions is similar.
Turn On Wi-Fi On Android 9.0 and Up
Here’s how to make sure that Wi-Fi is turned on:
:max_bytes(150000):strip_icc()/001_connecting-android-device-to-wifi-577618-755697d5bc5649c9aa05c973cc6e76ae-00e87780bf824c61b6872ec93285bdbe.jpg)
Turn on the Wi-Fi toggle switch.
Alternatively, swipe down from the top of the screen and tap the Wi-Fi icon if it’s greyed out. To open the Wi-Fi settings, tap and hold the Wi-Fi icon.
Turn on Wi-Fi on Android 8.0
The process for enabling Wi-Fi and adjusting settings is different for Android 8.0. Here’s how to open the Wi-Fi settings on these devices:
Connect to a Wi-Fi Network
Once Wi-Fi is enabled, go to Settings > Connections > Wi-Fi to see a list of nearby networks to which you can connect.
:max_bytes(150000):strip_icc()/androidwifi-bcada8836c314cc5ad090ff827131320.jpg)
What to Consider Before Connecting
A network with a lock icon is secured and requires a password; it’s preferable to an unsecured one because it’s less vulnerable to intruders. If you must connect to an unsecured Wi-Fi network, use a firewall or antivirus app. Consider using a VPN, as well.
Don’t use an unsecured network for private browsing activities, such as accessing a bank account and logging in to your online user accounts.
Choose the strongest network available. The estimated signal strength displays next to each Wi-Fi network. The darker the icon or the more bars that display, the stronger the network signal is.
View Details About the Wi-Fi Connection
After your Android is connected to Wi-Fi, you can view details about the connection by tapping the network name and then tapping Advanced.
:max_bytes(150000):strip_icc()/wifiadvanced-7e788b2ecc0145178b8f9266e7a7d626.jpg)
This interface varies slightly with Android version.
Get Notified About Open Wi-Fi Networks
You can set up your Android to automatically tell you when a network is available, as long as Wi-Fi is turned on (even if not connected). Here’s how:
:max_bytes(150000):strip_icc()/androidnetworknotif-57e948a0d9464d3fafc675f89dbd7891.jpg)
Turn on the Open network notification or Wi-Fi notifications toggle switch.
Choosing the Right Network
If you’re connecting to your home Wi-Fi network, you can find the default SSID and password on the bottom of your router or in the documents your ISP provided at signup. To connect to a network that isn’t yours, ask the owner for the name and Wi-Fi password.
To find the Wi-Fi password on an Android, open the Google Play Store app and search for and install Solid Explorer File Manager. From the home screen, tap Menu (three lines), go to Storages, and tap Root. In the root filesystem, tap data > Grant > misc > wifi > wpa_supplicant.conf. Choose a text editor; under the network block, find the entry for psk to view the password.
To share a Wi-Fi password from iPhone to Android, find and install a QR code generator app on the iPhone, such as Visual Codes. Launch the app and tap Add Codes > Connect to Wi-Fi. Enter the network’s SSID, Wi-Fi password, and security type (likely WPA). Enter a name in the Label field and tap Create Code. Scan the code with your Android to connect to the network.
To turn on Wi-Fi calling on Android, enable Wi-Fi on the device and connect to a network. Go to Settings > Wireless and Networks > More and tap Wi-Fi Calling to enable the feature. When Wi-Fi calling is enabled, you’ll see a Wi-Fi phone icon in the status bar.