- Save networks and Passpoint configurations
- Code sample
- Как посмотреть пароли от сохраненных WiFi сетей на Android
- Android 10 и выше
- Найдите настройки Wi-Fi
- Android 9 и ниже (требуются рут-права)
- Установить WiFi Password Viewer
- Просмотр сохраненных паролей от Wi-Fi
- Поделиться сохраненными паролями Wi-Fi
- How to know which WiFi networks we have saved on Android
- How to Delete Saved WiFi Networks on Android
- Delete WiFi networks on Android Stock
- Delete WiFi networks on Xiaomi
Save networks and Passpoint configurations
On Android 11 (SDK level 30) and higher, apps can use the android.provider.Settings.ACTION_WIFI_ADD_NETWORKS intent to guide the user through adding one or more new saved networks or Passpoint configurations. The API also works as-is to modify existing saved configurations.
Note: This API is the closest in functionality to the deprecated WifiManager.addNetwork(WifiConfiguration config) API, in that the resulting configuration is added to the user-facing and managed saved network and subscription list.
To save a network or Passpoint configuration, do the following:
- Create an ACTION_WIFI_ADD_NETWORKS intent.
- Create one or more configurations using WifiNetworkSuggestion.Builder . Note that even though you use a WifiNetworkSuggestion , this Intent API is not related to the Suggestion API.
- Create a parcelable array list of the configurations and attach it to the intent with the EXTRA_WIFI_NETWORK_LIST extra.
- Execute Activity.startActivityForResult() , passing in the intent.
- Listen for the result using the Activity.onActivityResult() callback. The resultCode can be one of the following:
- Activity.RESULT_OK : indicating that the user accepted the proposed networks and saved them.
- Activity.RESULT_CANCELED : indicating that the user rejected the proposed networks.
If the resultCode is RESULT_OK , then the data Intent contains the EXTRA_WIFI_NETWORK_RESULT_LIST extra, which contains an array of result codes indicating whether individual configurations were saved successfully. The possible result codes are:
- ADD_WIFI_RESULT_SUCCESS : configuration added or successfully updated.
- ADD_WIFI_RESULT_ADD_OR_UPDATE_FAILED : failure when trying to add configuration, such as due to a badly formed configuration.
- ADD_WIFI_RESULT_ALREADY_EXISTS : the requested configuration already existed so no action was necessary.
Code sample
The following code sample shows how to save a network or Passpoint configuration.
class MainActivity : AppCompatActivity() < override fun onCreate(savedInstanceState: Bundle?) < super.onCreate(savedInstanceState) . >fun startOperation() < val suggestions = ArrayList() // WPA2 configuration suggestions.add( WifiNetworkSuggestion.Builder() .setSsid("test111111") .setWpa2Passphrase("test123456") .build() ) // Open configuration suggestions.add( WifiNetworkSuggestion.Builder() .setSsid("test222222") .build() ) // Passpoint configuration val config = PasspointConfiguration() config.credential = Credential().apply < realm = "realm.example.com" simCredential = Credential.SimCredential().apply < eapType = 18 imsi = "123456*" >> config.homeSp = HomeSp().apply < fqdn = "test1.example.com" friendlyName = "Some Friendly Name" >suggestions.add( WifiNetworkSuggestion.Builder() .setPasspointConfig(config) .build()) // Create intent val bundle = Bundle() bundle.putParcelableArrayList(EXTRA_WIFI_NETWORK_LIST, suggestions) val intent = Intent(ACTION_WIFI_ADD_NETWORKS) intent.putExtras(bundle) // Launch intent startActivityForResult(intent, 0) > override fun onActivityResult(requestCode: Int, resultCode: Int, data: Intent?) < super.onActivityResult(requestCode, resultCode, data) if(resultCode == RESULT_OK) < // user agreed to save configurations: still need to check individual results if (data != null && data.hasExtra(EXTRA_WIFI_NETWORK_RESULT_LIST)) < for (code in data.getIntegerArrayListExtra(EXTRA_WIFI_NETWORK_RESULT_LIST)) < when (code) < ADD_WIFI_RESULT_SUCCESS ->. // Configuration saved or modified ADD_WIFI_RESULT_ADD_OR_UPDATE_FAILED -> . // Something went wrong - invalid configuration ADD_WIFI_RESULT_ALREADY_EXISTS -> . // Configuration existed (as-is) on device, nothing changed else -> . // Other errors > > > > else < // User refused to save configurations >> > Content and code samples on this page are subject to the licenses described in the Content License. Java and OpenJDK are trademarks or registered trademarks of Oracle and/or its affiliates.
Last updated 2023-07-05 UTC.
Как посмотреть пароли от сохраненных WiFi сетей на Android
За время владения устройством Android вы, вероятно, подключались к десяткам сетей Wi-Fi. Школа, дом, работа, спортзал, дома ваших друзей и семьи, кафе — каждый раз, когда вы вводите один из этих паролей от Wi-Fi, ваше устройство Android сохраняет его для безопасного хранения и легкого доступа в будущем.
Проблема возникает, когда вы хотите увидеть пароль для одной из сетей, к которым вы подключены. Возможно, вы хотите подключить другое устройство к сохраненной точке доступа Wi-Fi, или, возможно, вы находитесь с другом, который тоже хочет подключиться к той же точке доступа.
Если у вас Android 10 или выше, вы можете увидеть пароли Wi-Fi прямо из настроек вашего телефона. Однако, если вы используете Android 9.0 Pie или ниже, то вам нужно будет рутироваться.
Android 10 и выше
Этот метод не требует рута или даже дополнительного приложения. Однако, ваш телефон должен работать под управлением Android 10 или выше. Если ваш телефон был обновлен до этой версии, ниже я опишу быстрый и простой способ просмотра сохраненных паролей Wi-Fi.
Найдите настройки Wi-Fi
В настоящее время существует только одна версия Android 10, и это версия «Stock Android» напрямую от Google. Тем не менее, в ближайшем будущем такие производители, как Samsung, всоздадут свою собственную версию Android 10, применив OEM-оболочку, такую как One UI, что означает, что меню настроек на вашем телефоне может немного отличаться.
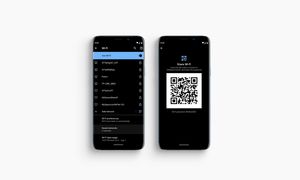
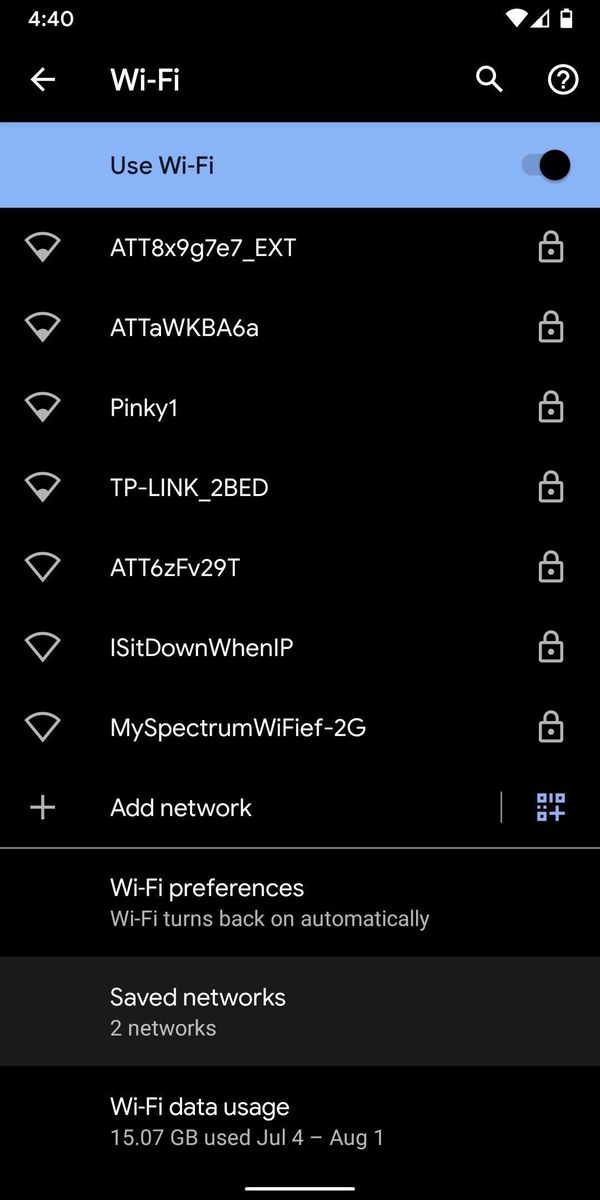
Итак, сначала зайдите в меню «Настройки» и найдите подменю «Wi-Fi». На стоковом Android это находится в Настройки -> Сеть и Интернет. Найдя меню настроек Wi-Fi, выберите его.
На странице настроек Wi-Fi, прокрутите список доступных сетей и выберите опцию «Сохраненные сети». Оттуда вы увидите список всех сетей Wi-Fi, которые сохранены в вашем телефоне.
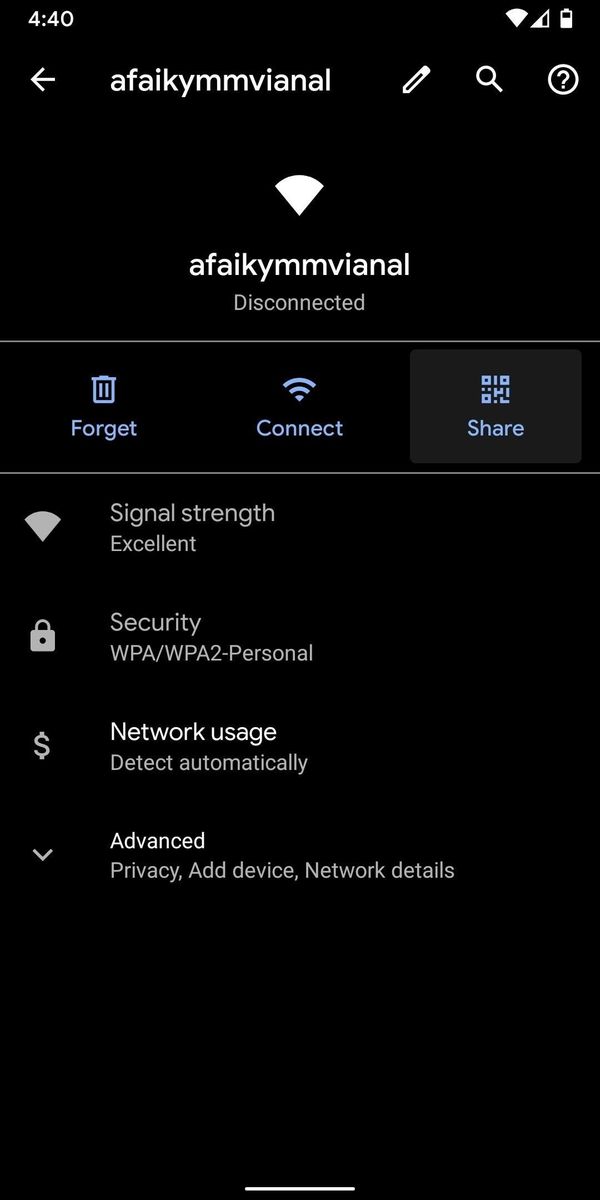
Теперь выберите опцию «Поделиться» в верхней части экрана. Вам будет предложено отсканировать ваш отпечаток пальца или лица или ввести свой PIN-код или пароль. После этого вы увидите QR-код, который представляет собой SSID и пароль сети. Вы можете сканировать это на другом устройстве, используя QR-сканер, если хотите, но пароль также указан в виде простого текста под QR-кодом, так что вы можете скопировать его оттуда.
Android 9 и ниже (требуются рут-права)
Если ваш телефон работает под управлением Android 9.0 Pie или ниже, единственный способ просмотреть сохраненные пароли Wi-Fi — это приложение с правами root.
Установить WiFi Password Viewer
Если у вас уже есть рут права, то зайдите в Play Store и установите WiFi Password Viewer от SimoneDev.
Просмотр сохраненных паролей от Wi-Fi
При первом запуске WiFi Password Viewer приложение запросит доступ к правам суперпользователя. Нажмите «Предоставить» во всплывающем окне, и вы попадете в список, содержащий все сети Wi-Fi, к которым вы когда-либо подключались вместе с паролями к ним.

Если вы подключились ко многим сетям Wi-Fi зв время владения устройством Android, ваш список может быть довольно длинным. Если это так, вы можете искать определенную сеть, используя кнопку поиска в правом верхнем углу.
Поделиться сохраненными паролями Wi-Fi
Если вам нужно поделиться одним из этих паролей с другим устройством, у вас есть несколько вариантов. Нажмите на любую запись в списке, затем появится небольшое меню. Затем нажмите «Копировать пароль», чтобы скопировать пароль этой сети в буфер обмена, что позволит легко вставить его в ваше любимое приложение для отправки текстовых сообщений.
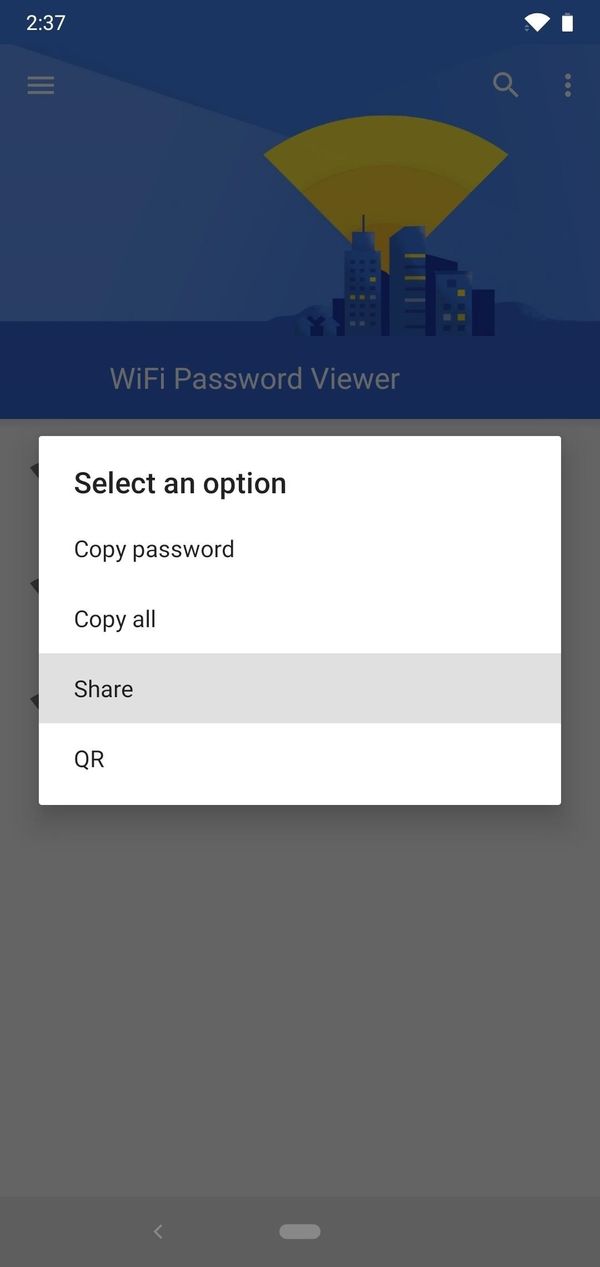
Вы также можете нажать «QR», чтобы приложение сгенерировало QR-код, содержащий информацию о сети. Если другим устройством является Pixel или iPhone, вы можете просто открыть приложение камеры, навести его на QR-код, а затем нажать всплывающее окно, чтобы автоматически подключить его сети Wi-Fi.
Понравилась публикация? Тогда делись с друзьями. А также не забудь подписаться на наш канал в Telegram и аккаунт в Twitter, чтобы всегда быть в курсе актуальных новостей и интересных статей!
How to know which WiFi networks we have saved on Android

When we have been using our Android phone for a while and have been in many places, the most normal thing is that the phone save the WiFi networks of the different places we have been. So when we go to a place, the most likely thing is that the device automatically connects to that WiFi network. Although accessing this password is not always easy.
It also happens that in many cases we do not even know what networks we have saved on the phone. Something that can happen if we use WiFi a lot in many places. Therefore, in these cases the list of saved networks may be quite extensive. Although there is a way to find out.
Throughout time our Android phone has been storing many WiFi networks. Especially those that we have used quite often. Either that of our home, workplace or study center. Something common because users spend a lot of time connected to these networks. Mainly because they help us save on data consumption throughout the month, especially if we have a limited data rate. Although we also find networks to which we have connected only once in our lives. So these lists can be very broad..

This is why many people want to know the complete list of WiFi networks stored on their Android phone. Knowing this is very simple. Since we do not need to install anything on the phone to access this information. We simply have to go to the WiFi section on the phone. There we will have this complete list.
Specifically, we have to go first to the device settings. Once inside, we have to search and enter the Network and Internet section (the name may change depending on the make and model). There we have to click on WiFi and when we are inside we have to go down until we get the option called Saved networks.
The process may be somewhat different on some phones. For example, in mine there is directly a section of WiFi and at the bottom I have a menu option. When I click on this button, I get several options, one of which is the saved networks. So this can vary between phones. But we always find it in the WiFi section on our Android phone. And there will be the option of saved networks. You can even search directly for this option.

In this list we are going to find the names of the WiFi networks that have been saved in our Android phone over time. It can be private or public networks, both are possible. If we click on a specific network, we can see the encryption that that network uses. Although this information is not always available on all networks. In addition to this, we have the option of «forgetting said connection.»
This is something that is recommended to do, since in many cases we have a list of the most extensive networks stored on our Android phone. Therefore, it is advisable to do a small cleaning with some frequency. It is especially recommended to remove public networks from this list, mainly for security reasons. Since they are usually networks whose security is notably worse.
In addition, in these lists there are usually a huge number of networks to which we are not going to connect anymore. Either because they are old or because they are abroad, in a place where we were on vacation. It does not make sense that we have these networks saved on the Android phone. Therefore, the ideal would be to delete them and leave only those networks that we use with certain frequency (home, work, study center . ). Since we are going to use them again soon, in addition to that we know that they are secure WiFi networks for our phone.
The content of the article adheres to our principles of editorial ethics. To report an error click here.
Full path to article: Androidsis » Tutorials » How to know which WiFi networks we have saved on Android
How to Delete Saved WiFi Networks on Android
For various reasons we may need to remove WiFi networks from the mobile among the many that we can have stored in Android, a process that is very similar in most mobiles but has slight differences. For this reason, with this tutorial we want to end all doubts and show you the exact steps you must follow in each of the brands.

Among the possibilities that can make us need to delete a WiFi network from the mobile we find that the connection does not work, sometimes just by reconnecting the problem is solved. The steps are of course the same for all the mobiles of each brand, beyond any small difference that may appear due to a new version of the personalization layer.
Delete WiFi networks on Android Stock
Both in the Google Pixel, as well as in the mobiles of Motorola, Nokia or Android One, the steps will be based on the purest Android experience. Without adding some that modify the options both in Android 9, Android 10 or Android 11 we must follow the following steps that we explain to get rid of any WiFi network that we have stored on our smartphone.

- First of all we access the device settings.
- Then we will enter the network and internet section.
- Now we will click on WiFi.
- And we touch on the settings wheel of the WiFi network that we have saved and want to delete.
- From the new page we just have to click on forget and it will be deleted.
Delete WiFi networks on Xiaomi
It is the turn of Xiaomi mobiles, which offer us the option of deleting a WiFi network in MIUI with a few simple steps. This method is practically identical in MIUI 10, MIUI 11 and MIUI 12 versions. The steps to follow are the following:

- We start by going into the settings.
- Then click on WiFi.
- We select the WiFi network that we want to eliminate.
- This brings us to a new tab where we have to go down to the end.
- Here we will see the option to forget network.