Android x86. Установка в VirtualBox и настройка
Если Вы хотите попробовать новую версию Android, совсем необязательно покупать новый телефон или планшет, вполне достаточно скачать последнюю версию Android-x86 и запустить ее в эмуляторе Oracle VM VirtualBox на компьютере.
Также Вы можете создать загрузочную флешку с Android-x86 и запустить напрямую на компьютере.
Чтобы испытать Android-x86, понадобится три вещи:
- Компьютер с поддержкой аппаратной виртуализации (обычно все новые компьютеры имеют такую возможность).
- Виртуальная машина Oracle VM VirtualBox (доступна для Windows, Linux и MacOS).
- Дистрибутив Android-x86 (последняя и предыдущие версии доступны на сайте проекта).
Поддержка аппаратной виртуализации
Убедитесь, что Ваш компьютер поддерживает аппаратную виртуализацию, а также что она включена в настройках BIOS/UEFI. Обычно в BIOS/UEFI она находится в подменю настроек процессора (Advanced CPU Configuration) и называется «Intel Virtualization Technology» (для процессоров Intel, для AMD-процессоров смотрите по ссылке выше).
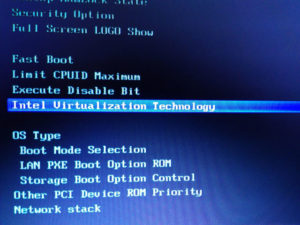
Если процессор в Вашем компьютере не поддерживает технологию аппаратной виртуализации, Вы не сможете установить 64-битные версии Android. И, скорее всего, последние даже 32-битные версии Android (5.x, 6.x, 7.x) на Вашем компьютере тоже не запустятся.
Подготовка VirtualBox
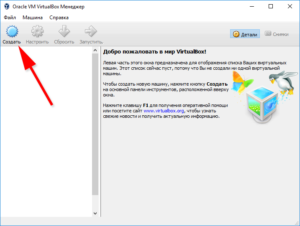
Скачайте и установите программное обеспечение Oracle VM VirtualBox на компьютер, как Вы обычно устанавливаете другие приложения. Запустите приложение и нажмите на кнопку «Создать», чтобы запустить мастер добавления новой виртуальный машины.
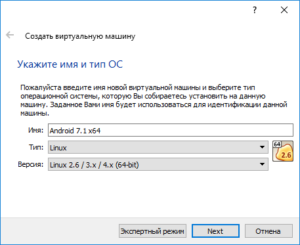
В поле «Имя» введите желаемое имя будущей виртуальной машины на Android. В списке «Тип» выберите «Linux», в списке «Версия» – «Linux 2.6 / 3.x / 4.x (64-bit)», если Ваш компьютер поддерживает аппаратную виртуализацию. В противном случае выберите пункт «Linux 2.6 / 3.x / 4.x (32-bit)», но помните, что тогда не гарантируется работа последних версий Android-x86 в VirtualBox. Нажмите кнопку «Далее» для продолжения.
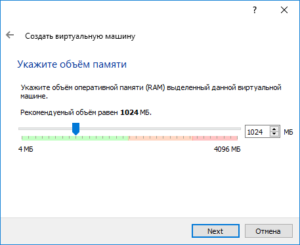
В следующем окне укажите размер оперативной памяти, выделяемый под Android, но рекомендуется не больше половины памяти компьютера. 1 Гб вполне хватит для запуска Android 7.1 Nougat, который мы будем запускать в нашем примере.
В следующем окне выберите пункт «Создать новый виртуальный жёсткий диск».
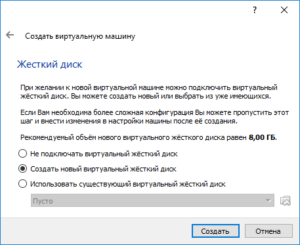
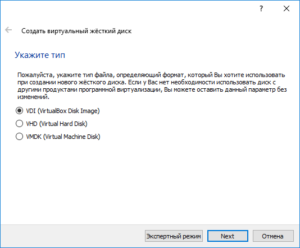
В списке «Укажите тип» выберите «VDI (VirtualBox Disk Image)».
В списке «Укажите формат хранения» выберите пункт «Динамический виртуальный жёсткий диск».

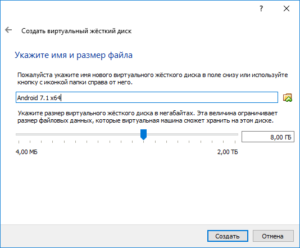
В следующем окне установите желаемый размер внутренней памяти для Android. 8 Гб достаточно для ознакомления с рассматриваемой в нашем примере системой Android 7.1 Nougat.
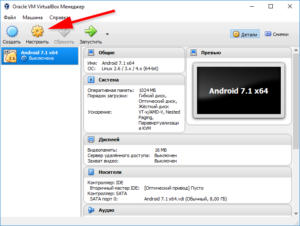
Нажмите «Создать», чтобы завершить настройку создаваемой виртуальной машины. После этого она появится в списке виртуальных машин VirtualBox. Нажмите кнопку «Настроить», чтобы произвести дополнительную настройку виртуальной машины.
В окне настроек, в списке слева выберите пункт «Система», затем на вкладке «Процессор» установите значение на 2 ЦП, если позволяет процессор Вашего компьютера. Также поставьте галочку «Включить PAE/NX».
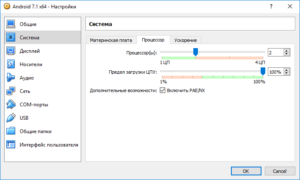
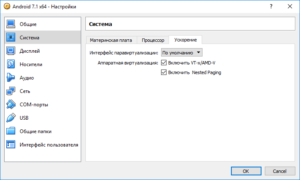
На вкладке «Ускорение» убедитесь, что выставлены галочки виртуализации (если процессор Вашего компьютера поддерживает аппаратную виртуализацию).
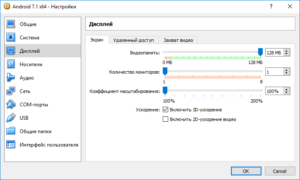
В разделе «Дисплей», на вкладке «Экран» установите размер видеопамяти – 128 Мб и поставьте галочку «Включить 3D ускорение». Нажмите «ОК», чтобы сохранить настройки.
Все! Виртуальная машина готова к установке Android. Продолжение читайте на следующей странице.
Оцените статью: /rating_on.png)
/rating_half.png) 4,50 из 5 (голосов: 2)
4,50 из 5 (голосов: 2)
Android-x86


The following are instructions on how to run Android-x86 inside VirtualBox.
Note: For optimal performance, make sure you have enabled either VT-x or AMD-V in your host operating system’s BIOS.
Android-x86 versions tested against Virtualbox versions.
| Date Tested | Virtualbox | Host OS | Android-x86 | Result |
|---|---|---|---|---|
| ?? | 2.2.4 | Windows XP | ?? | Good |
| ?? | 3.0.2 | Fedora 11 | ?? | Good |
| Nov. 2 2017 | 5.2.0 | Windows 10 | 6.0-r3 32/64 bit | Good |
Downloading
Download an ISO of Android-x86 from here.
Caution
If you are using Android-x86 for debugging purposes, some binaries (gdb for example) are built for 32-bit architectures and will not support debugging 64-bit binaries such as the Android app host. Download a 32-bit distribution instead.
Create a new VM
- Click the «New» button, and name your new virtual machine however you like. Set Type to Linux, and Version to Linux 2.6 / 3.x / 4.x. Note that you should choose the appropriate bit type for the version of Android-x86 that you downloaded.
- Specify how much RAM will be allocated to your virtual machine when you run it. Android doesn’t specify a bare-minimum requirement for memory, just keep in mind what apps you plan on running. 2GB (2048MB) is a good place to start, and you can change this later if you need to.
- Create a new Hard disk image which will act as your machine’s storage. The recommended starting size of 8GB is enough. Click through the rest of the options for creating your Hard disk.
Settings
Tested on VirtualBox 64-bit for Windows, version 5.2.0. Android-x86 version 6.0-r3, both 32-bit and 64-bit.
- [System] Recommended: Processor(s) should be set above 1 if you have more than one virtual processor in your host system. Failure to do so means every single app (like Google Chrome) might crush if you try to use it.
- [Display] :
- Optional: Video Memory may be increased beyond the minimum selected automatically. The affects of this are unknown.
- Mandatory: Unless guest additions are installed [1] , change the default VMSVGA to VBoxVGA .
- Optional: Enable 3D Acceleration may be checked. The Linux Guest Additions must (VirtualBox v6.1+) / may (VirtualBox v6.0 and below) need to be installed [2][1] to get any benefit from this. Failure to do so means you won’t even be able to launch Android-X86 in the first place. [3]
- [Storage] Find the first «Empty» item (this should have an icon of a CD). In the Attributes, click on the CD icon with a small down arrow, and pick «Choose Optical Virtual Disk File. «. Specify the Android-x86 ISO that you downloaded.
- [Audio] Intel HD Audio seems to be natively supported in Android-x86.
- [Network] By default, your installation of Android-x86 will be able to automatically connect to the internet. If not, you can try to enable WiFi in Settings/Network & Internet, and connect to showing VirtWifi. If you do not want to connect to the internet in VirtualBox, uncheck Enable Network Adapter under the Adapter 1 tab.
Install
- If you don’t want to install Android-x86 yet and just want to test it, pick one of the Live CD options (except for Debug mode).
- Pick the Installation option if you want your system to be installed to the virtual hard drive.
Partition
- If you upgrade Android-x86 from a previous version, just select the existing partition. Agree to overwrite it when prompted.
- If this is a new VM, choose to Create/Modify partitions. Use Bootable but not GPT! This will cause the GRUB installation to fail later.
Continue through the installation. You should install GRUB when it prompts you to. You may also leave /system as read and write when prompted.
Once the installation is complete, force close/shut down the virtual machine and remove the ISO from the virtual CD drive.
Finaly, start Android-x86. If it’s a new machine, once loaded you can perform the Android setup to begin using your machine.
Advanced
Custom partitions, SDCard
When booting Android-x86, you may specify which partitions represent the data and sdcard. On the boot menu, select an entry you would like to boot from, press TAB, then add the following as it suits your needs:
DATA=sda1 SDCARD=sda2 Press Enter to boot. These options specify user data (your setting, your uploaded applications, . ) go into /dev/sda1, and data saved in sdcard go into /dev/sda2.
If you build the ISO from source, you can add these options to bootable/newinstaller/boot/isolinux/isolinux.cfg.
- Create a new virtual machine with a hard disk.
- Launch the Live ISO in Debug mode (I used android-x86-2.2-generic.iso) to get the command prompt.
- «fdisk /dev/sda», then type:
- «n» (new partition)
- «p» (primary partition)
- «1» (1st partition)
- «1» (first cylinder)
- «xx» (choose the last cylinder, leaving room for a 2nd partition)
- «w» (write the partition)
Also remember the partition type has to be fat32 (b or c). By using vfat, the step 10 is not needed.
DevTools application has a MediaScanner which (re)indexes your SD card for cases where you manually copied media over. This ensures that you see new images and/or music in the apps without having to reboot.
If you downloaded it from within android, the application asks the relevant service to index new files.
Playing music
This section describes two ways to upload music files into Android running on a vbox so you can play them by the Music app. Of course, you can save the files to the virtual disk mounted at /sdcard, as described above.
Upload files by adb
Adb is Android Debug Bridge, a tool to debug Android system. If you compile from source, it is located in out/host/linux-x86/bin/adb. Otherwise you can get it from Android SDK. Suppose the network of your vbox is OK, you can upload a file from your host by
You need to know the ip of your vbox. You can get it by Alt-F1 and netcfg. You may also need to reboot Android to see the uploaded files. Of course in this way you have to mount /sdcard to a virtual disk partion.
For complex network settings of the VirtualBox VM, you should refer to Debug How To on how to connect adb to the VM.
Upload files by wget
You can also upload files by wget in the debug mode. In the debug mode shell, before entering Android,
Debug with adb
This section describes the way to debug Android with adb via network. If we want to debug with adb via network, we should ensure the ip of vbox can be accessed by host machine. So we should change the Network Adapter type of vbox to Bridged Adapter. After starting the android-x86, we should follow the above Settings/[Network] section to ensure the network of android-x86 is enabled, and enable USB debugging in Settings/System/Developer Options. Then we can get the device ip from Settings/System/About tablet/IP address. For example, if we see the ip address is 192.168.0.116, then we can use following command to connect android-x86 in vbox from host machine.
References