DIY E-Mail Anti-Spam System – Part 1
Anyone that has an e-mail address is likely to suffer from unwanted spam to one degree or another. If you have multiple e-mail addresses, then you are immediately multiplying your chances of receiving increased amounts of spam. This is exactly the situation that I inadvertently found myself in by running a number of different websites, each with a different e-mail address.
Every morning (or more realistically at the crack of noon) I would log on and download my e-mails. However, as a few of my e-mail accounts received all the mail addressed to the e-mail’s domain, I was beginning drown in a sea of spam from e-mails sent to random addresses at one or two of my key domains.
This was driving me to distraction. I wasted a significant amount of time every day scanning through my junk mail folder in Microsoft Outlook, checking to see if any legitimate e-mails had ended up there (as they often do). Not to mention the astronomical e-mail onslaught that I was faced with if I dared to go away for a few days. Things had to change!
The Existing System
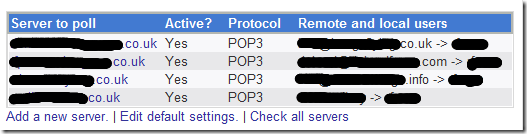
I used Microsoft Outlook as my e-mail client to download mail from four separate POP3 accounts at my internet service provider (ISP). Outlook was set to check and download the e-mail from these accounts every five minutes.
Three of the accounts were for single e-mail addresses, which attracted a little spam, but not excessively so. My big problem was with the fourth account (my main account), which received any e-mail sent to the domain. This meant that if a spammer tried sending an e-mail to a random mail address at my domain, I would receive it. E.g.
A simple solution would be to just have a single e-mail address on the domain, but I rather liked the flexibility of being able to receive e-mails to different addresses at the domain if required. I just didn’t want all of the spam flooding in at the same time. Necessity is the mother of invention as they say, so I set about trying to find a practical and flexible solution to my problem. Enter my Linux server…
Linux to the Rescue
About a year ago, a good friend of mine gave me a retired retired Dell PowerEdge 2850 rack server, ex of Zen Internet. My intended usage for it being a development web server running Ubuntu, following a complete upgrade of my home networking infrastructure.
However, having this server running 24/7, plus being a Linux server (Linux servers are often used as mail servers on the Internet) it seemed like an ideal opportunity to make use of its facilities and spare capacity to fix my spam problem.
With a little research I soon formed a plan of action based on a variety of software packages that were readily available for the Linux environment. My plan was to use the Linux server to automatically download and filter my e-mails from the ISP’s servers at regular intervals and then use Outlook on my PC to connect to the Linux server to download the pre-filtered e-mails.
Configuring the Server
The Linux packages that I required for my automatic mail retrieval and anti-spam system were:
- Fetchmail – Mail Retrieval
- Postfix – Mail Server
- Dovecot – IMAP/POP3 Mail Server
- Procmail – Configurable Mail Filter
- Spam Assassin – Spam Mail Filter
Automated Remote Mail Retrieval
The first job required of the server was to automatically download my e-mails from the POP3 accounts on the remote mail servers. Fortunately, this was remarkably straightforward using fetchmail, a remote-mail retrieval and forwarding utility.
I tend to use Webmin (a web-based interface for Unix system administration) for the majority of the administration tasks on my Linux server, which makes most administrative tasks a doddle.
Fetchmail required my four e-mail account details (remote mail-server name, username and password) together with an e-mail address on the local system’s Mail Transfer Agent (MTA), Postfix in my case, where I wanted the e-mails delivered. I then had to ensure that fetchmail was configured to run as a system service daemon, checking my e-mail accounts at regular, predetermined intervals:
To configure the finer details of the fetchmail setup Webmin wasn’t sufficient, so I had to edit fetchmail’s configuration file, which was located at:
The key configuration change that I made was to set the intervals at which fetchmail checked for new mail. I set the default to check every 60 seconds. However, as some of my accounts were not heavily used, I set the mail check interval on these to every 10 minutes:
1: set bouncemail # direct error mail to the sender 2: set no spambounce # do not bounce spam mail 3: set daemon 60 # poll every 60 seconds 6: proto pop3 # default protocol pop3 9: poll myaccount.isp.co.uk # remote mail server address 10: proto pop3 # pop3 protocol 11: interval 10 # poll server once every 10 cycles (10 minutes, 600s) 12: user "username" # remote account username 13: pass "password" # remote account password 14: is myemail # deliver downloaded mail to local email account "myemail" 15: nokeep # delete messages from server 16: fetchall # fetch all messages 17: no ssl # not SSL encrypted 18: antispam 501 # if MTA refuses mail with error 501, discard mail as spam Fetchmail was now configured to check my e-mail accounts automatically and download all mail from these accounts to a single e-mail account on the local server.
Integrating with Microsoft Outlook
Configuring the Mail Server
Progress was being made as I now had an automated system for downloading my e-mails, but unfortunately they were all now stuck in a single e-mail account on Postfix on my Linux server. I now needed Microsoft Outlook on my Windows PC to be able to connect to the Linux server and download the collected e-mails. This I accomplished using Dovecot (an IMAP/POP3 mail server) on the Linux server.
Dovecot was fairly straightforward to set-up. Essentially I had to tell it what mail transfer protocols to use ( POP3 in my case), what authentication systems to accept (Plain-text) and where to find the downloaded mail files ( /var/mail ). All other settings seemed to work fine in their default states. The Dovecot server was also configured to start automatically on system boot-up.
Configuring Microsoft Outlook
The next piece in the jigsaw was to configure my Microsoft Outlook e-mail client to check for e-mails from my now local mail server via Dovecot, instead of the ISP’s remote mail servers.
This was just like setting up any normal e-mail account in Microsoft Outlook. I set the account details to POP3, entered the IP address of my local server for the incoming e-mail, but left the outgoing e-mail server as that of my existing ISP ’s e-mail server. The final details required were the username and password for the Linux e-mail account where all the downloaded mail was being deposited.
Bingo! It worked, although with all this effort I was still not really any further forward with my original plan to reduce the amount of spam e-mails that I was getting. However, everything was now in place for the next link in the chain, which would hopefully accomplish what I was after.
Spam Filtering
Part 2 of this post details how I configured my Linux server to filter out the Spam in a two stage process to only allow through the e-mails that I actually wanted, leaving my inbox fresh and clean.
Posted on 06 June 2011 Tagged: email, server
Antispam linux mail server

Для защиты Вашего корпоративного почтового сервера мы рекомендуем использовать продукт от компании Kaspersky — Linux Mail Server. Скачать его можно с официального сайта. Данный продукт является платным и у него есть официальная инструкция по установке и настройке. Данное руководство содержит некоторые нюансы и моменты, которые позволят быстро установить данный продукт и ввести в эксплуатацию.
1. Заполните Ваши данные на официальном сайте для получения ознакомительной версии по ссылке.
2. Скачаем Kaspersky Security for Linux Mail Server для Debian. Так как версия для Debian предназначена для x32, а в нашем случае сервер работает на операционной системе x64, установим необходимые пакеты для совместимости.
apt install lib32ncurses5-dev lib32z1
dpkg --add-architecture i386
apt update
apt upgrade
apt-get install libc6-i386
apt install libcrypt1:i386
3. Далее выполните установку согласно официальной инструкции. Если Вы используете нашу готовую сборку почтового сервера, во избежинии неполадок с одновременной работой kdim и kaspersky mail security server мы использовали интеграцию по 3 варианту скрипта установки (after-queue).
/opt/kaspersky/klms/bin/klms-setup.pl4. После завершения установки закомментируйте в файле конфигурации postfix настройки связанные со spamassasin
/etc/postfix/master.cf

smtp inet n - y - - smtpd

#-o content_filter=spamassassin
#spamassassin unix - n n - - pipe
#user=spamd argv=/usr/bin/spamc -f -e
#/usr/sbin/sendmail -oi -f $ $
5. Проверим корректность конфигурации и перезапустим службу postfix
postconf
service postfix restart
6. Проверьте отправку и получение письма на свой ящик и запустите следующий скрипт, чтобы увидеть, что все письма проходят через kaspersky mail security.
/opt/kaspersky/klms/bin/klms-control --dashboard7. Теперь нам необходимо сделать так, чтобы все спам письма и рассылки попадали в папку спам. Внесем настройки в файл сортировки писем sieve.
/etc/dovecot/dovecot.sieve

require "fileinto";
if header :contains "SPAM" "YES" fileinto "Junk";
>
if header :contains "X-Spam-Flag" "YES" fileinto "Junk";
>
if header :contains "X-KLMS-AntiSpam-Status" "mass_mail" fileinto "Junk";
>
if header :contains "X-KLMS-AntiSpam-Status" "spam" fileinto "Junk";
>
if allof (header :contains "subject" "[MASSMAIL]") fileinto "Junk";
>
if allof (header :contains "subject" "[Spam]") fileinto "Junk";
>
8. Перезапустим службу Dovecot
9. Если нужно изменить существующие учетные записи, Вы можете добавить данные правила в файл настроек сортировки каждого пользователя.
cp /etc/dovecot/dovecot.sieve /home/mail//sieve/dovecot.sieveГотово, теперь все нежелательные письма, отмеченные продуктом kaspersky, будут перемещаться в папку спам.
Antispam linux mail server
Настройка службы антиспама spamassassin на почтовом сервер Ubuntu\Debian для службы Postfix и перемещение писем в папку Спам. Данная конфигурация позволяет сделать работу с почтой комфортной за счет обучения фильтра и автоматического перемещение писем.
В данном руководстве предполагается, что сам почтовый сервер у Вас уже настроен и необходимо произвести настройку спам фильтра. Подробнее про настройку почтового сервера можно посмотреть тут:
Вы также можете заказать VPS с уже преднастроенной операционной системой и получить готовый корпоративный почтовый сервер по цене VPS сервера.
1. Установим службу spamassassin
apt-get install spamassassin spamc
adduser spamd --disabled-login
2. Настроим службу
vi /etc/default/spamassassin
OPTIONS="--create-prefs --max-children 5 --helper-home-dir"
OPTIONS="--create-prefs --max-children 5 --username spamd --helper-home-dir /home/spamd/ -s /home/spamd/spamd.log"
В самом конце файла включим крон:
3. Настройка фильтра:
mv /etc/spamassassin/local.cf /etc/spamassassin/local.cf.bk
vi /etc/spamassassin/local.cf

rewrite_header Subject ***** SPAM _SCORE_ *****
report_safe 0
required_score 5.0
use_bayes 1
use_bayes_rules 1
bayes_auto_learn 1
skip_rbl_checks 0
use_razor2 0
use_pyzor 0
ifplugin Mail::SpamAssassin::Plugin::Shortcircuit
endif
4. Настройка службы Postfix
Найдите строку smtp и добавьте конфигурацию ниже:
vi /etc/postfix/master.cf
smtp inet n — y — — smtpd -o content_filter=spamassassin
spamassassin unix — n n — — pipe
user=spamd argv=/usr/bin/spamc -f -e
/usr/sbin/sendmail -oi -f $ $
Сохраним файл и перезапустим службы
systemctl restart postfix.service
systemctl enable spamassassin.service
systemctl start spamassassin.service
Проверим работу службы отправив на почтовый ящик письмо содержащее данный текст:
XJS*C4JDBQADN1.NSBN3*2IDNEN*GTUBE-STANDARD-ANTI-UBE-TEST-EMAIL*C.34X
5. Настроим перемещение спам писем в папку Спам.
Установим и настроим службу Sieve
apt-get install dovecot-sieve dovecot-managesievedvi /etc/dovecot/conf.d/90-sieve.conf
sieve = /etc/dovecot/dovecot.sievevi /etc/dovecot/dovecot.sieve
require "fileinto";
if header :contains "SPAM" "YES" fileinto "Junk";
>
if header :contains "X-Spam-Flag" "YES" fileinto "Junk";
>
Добавим в конец файла конфигурацию:
vi /etc/dovecot/dovecot.conf

service stats unix_listener stats-reader user = vmail
group = vmail
mode = 0660
>

unix_listener stats-writer
user = vmail
group = vmail
mode = 0660
>
>
Добавим конфигурацию в файл, чтобы строка выглядела так:
vi /etc/dovecot/conf.d/15-lda.conf

protocol lda mail_plugins = $mail_plugins sieve
>
Добавим конфигурацию в файл, чтобы строка выглядела так:
vi /etc/dovecot/conf.d/10-director.conf

protocol lmtp mail_plugins = $mail_plugins sieve
>
systemctl start spamassassin.service
systemctl restart postfix.service
Теперь все письма помеченные как спам будут появляться в папке Спам.