- Anycubic photon mono x wifi settings
- Anycubic Photon Mono X и Mono SE — инструкция по применению WiFi
- Подпишитесь на автора
- Getting Started with Your Anycubic Photon Mono X 6Ks: Mastering the Setup and Printing Parameters
- Recommended Parameters For Anycubic Photon Mono X 6Ks
- How to Set Up Anycubic Photon Mono X 6Ks
- Unboxing Guide| A video takes you to go through all the details of Anycubic Photon Mono X 6Ks
Anycubic photon mono x wifi settings
Hi, I’ve got an 6K printer for Christmas. I lost almost 3 Bottles of resin before my prints finally worked.
So I want to share what I changed and since then haven’t had a single failure print.
- I switched to LycheeSlicer. Don’t waste your time using the photon workshop.
- The room temperature. This is so much more important than I thought. Since I printed in the basement and turn on my heater the first small prints started to work from time to time.
- Leveling: I used the «Flint Reed» leveling method. You use the resin vat instead of the paper. Then you select 0,1 mm and raise the plate three times.
- Now my settings. I did the exposure time tests. But it turns out that I can print every color I’ve tested (black, white, grey, translucent) with the same settings.
I don’t change the name and color anymore. My latest prints were with the Anycubic Plant Based Resin + and worked great. The prints take some time but look particularly good in small and larger and articulated forms.
This model is from Fotis Mint Fotis Mint | Printables.com . Most of the models are pre supported. But for my own Models i use these settings: I’ve updated my insane support settings for Chitubox. A quick video walkthru of my new settings! — YouTube
I use a flexi plate from amazon. I know some of the purist guys dont like it but fr me it was a game changer. No more broken parts. You just have to extend your z-axis stopper.I tweaked two nuts over the spacer and replaced the bolts with longer ones.Similar to this: https://www.printables.com/de/model/212752-anycubic-photon-mono-x-z-axis-stop-spacer
I just want to share my settings because it’s ridiculously hard at the beginning and u see so many settings. None of them worked for me. If somebody has improvements that I can test please feel free to post them.
Edit: I am now at 2.9 seconds exposure time with uv power set to 80%.
Anycubic Photon Mono X и Mono SE — инструкция по применению WiFi
Подпишитесь на автора, если вам нравятся его публикации. Тогда вы будете получать уведомления о его новых статьях.
Отписаться от уведомлений вы всегда сможете в профиле автора.
Статья относится к принтерам:

Модели 3D принтеров Anycubic Photon Mono X и Anycubic Photon Mono SE уже на складе интернет-магазина 3DSN с бесплатной доставкой и по самой лучшей цене у российских продавцов (с гарантийным обслуживанием в локальных сервис-центрах).
Обзоров на новые 3D принтеры от Anycubic за последнее время написано не мало, но большенство из них, это транслирование технической информации, опубликованной производителем. Однако, производитель не ответил ни в презентациях, ни в своей инструкции на некоторые вопросы. Например, не каждому пользователю однозначно понятно, как же подружить принтеры Anycubic Photon Mono X и Mono SE с заявленной функцией работы из приложения на телефоне через сеть WiFi. Мы столкнулись с запросами пояснить, как же управлять этими моделями через заявленный производителем интерфейс. Какой IP адрес вводить? Как его задать? Поясняем:
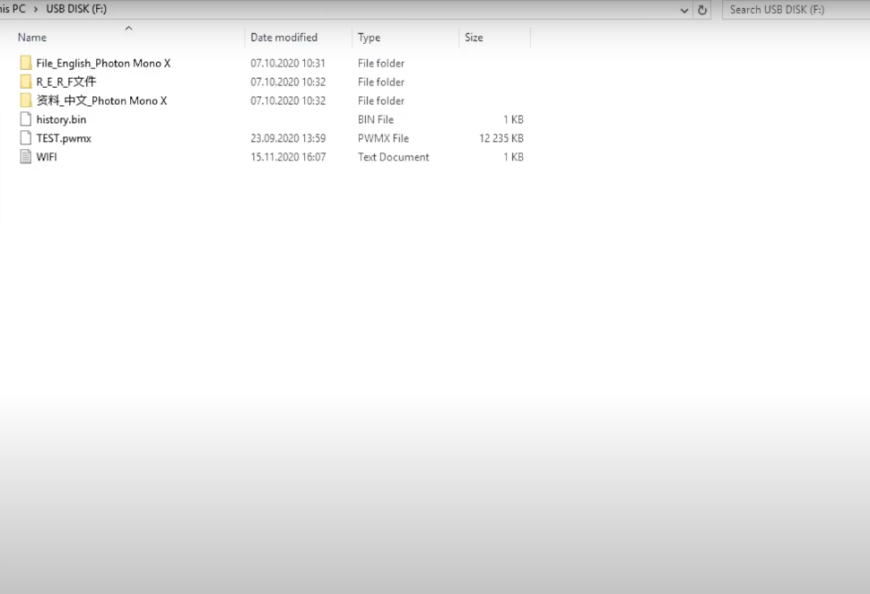
В комплектации принтеров есть USB флешка, а на этой флешке есть файлы. Некоторых пользователей смущают непонятные заморские буквы и так необходимые для настройки файлы просто летят в корзину. Вот так выглядит флешка 3D принтера Anycubic Photon Mono X:
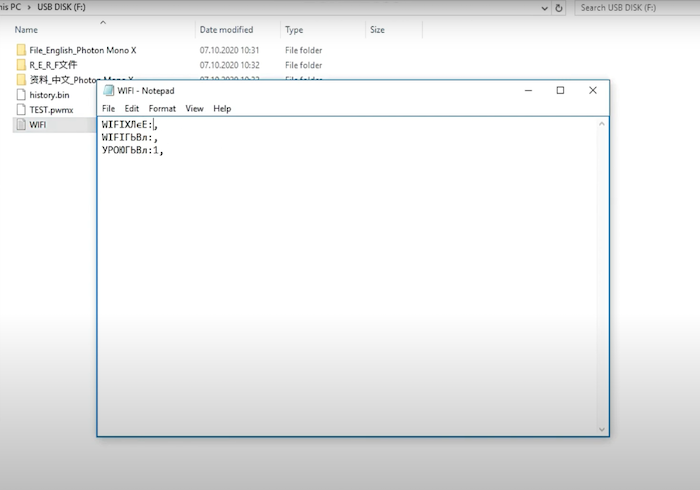
Находим на ней текстовый файл WIFI и открываем в блокноте. Файл содержит три строчки. В первую сточку, между двоеточием и запятой, вводим название своей локальной сети, во вторую строчку пароль от своей WiFi сетки. Третью строчку не трогаем. Если у вашей сети нет пароля, в поле для пароля записываете слово NONE.
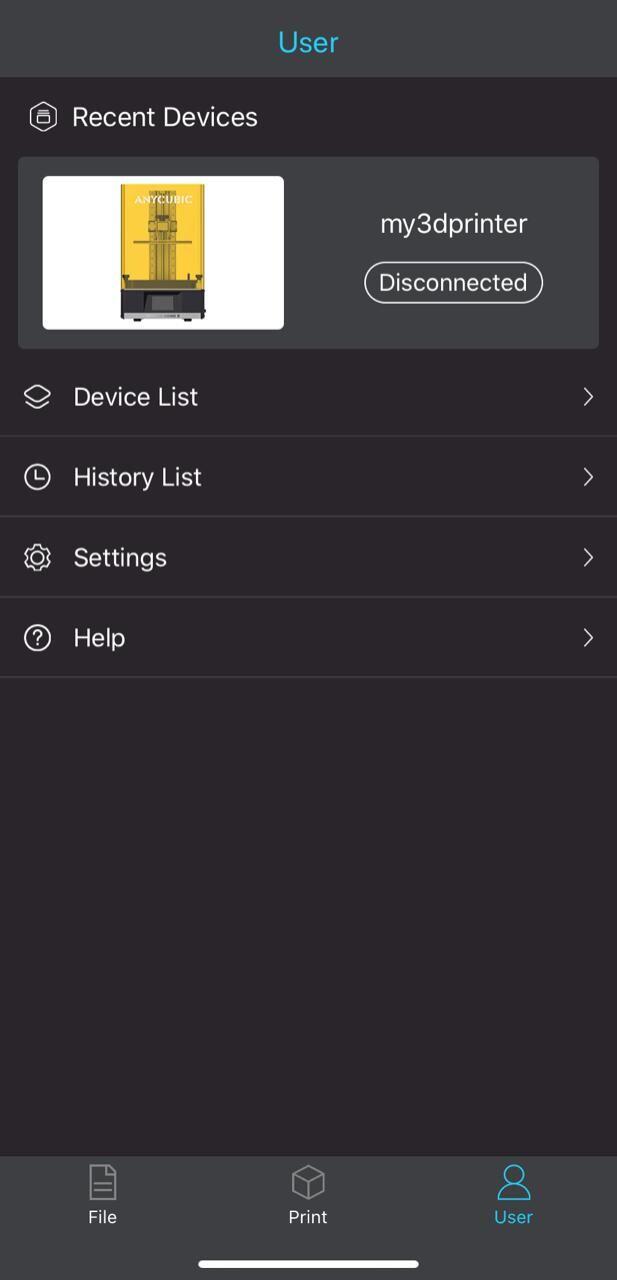
Сохраняем файл, безопасно извлекаем флешку из компьютера и вставляем ее в принтер. Учитывая, что принтер в отличии от компьютера безопасного извлечения не имеет, рекомендуем вставлять и вынимать флешку при выключеном устройстве. Вставили флешку, включили принтер, заходим в меню info и видим такую картину.
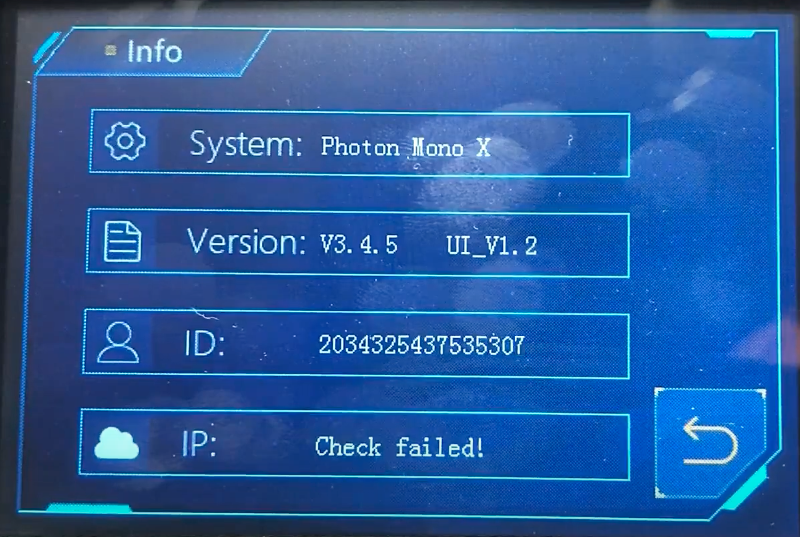
Принтер нам пишет Check failed! Что на нашем скрепном обозначает, что проверка не удалась. Не паникуем, так и должно быть, ибо мы еще не сконфигурировали принтер, не подключили его в локальную сеть. Чтобы это сделать, идем в меню в котором видим файл для печати и наш текстовый WiFi.txt
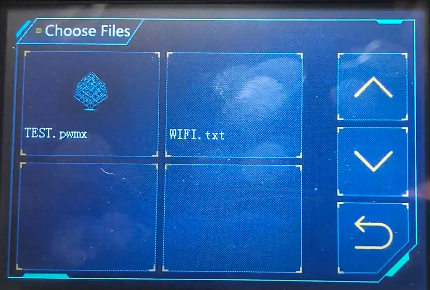
Нажимаем на него и запускаем печать! Естественно, никакой печати 3D объекта не будет, но принтер получит сведения о нашей WiFi сети. После этого заходим снова в меню info:
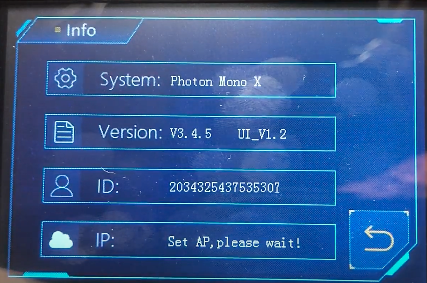
Терпеливо ждем несколько десятков секунд (обычно 30-120 секунд достаточно), и видим примерно вот такую картинку:

IP адрес ваша сеть присвоит принтеру свой, отличный от адреса на скриншоте. Его нужно будет запомнить, он нам понадобится когда скачаем на телефон приложение и будем его настраивать.
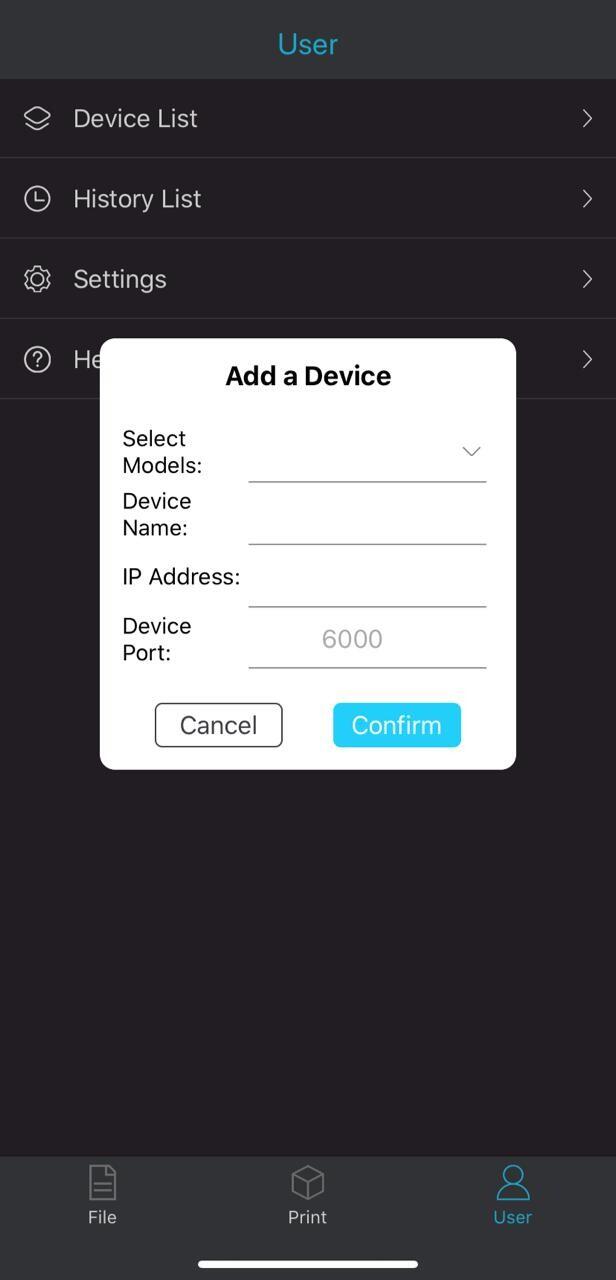
Захотим в настройки приложения и во всплывающем окне заполняем данные по нашему принтеру. Выбираем Mono SE или Mono X, даем название нашему принтеру и вводим IP адрес на который мы его сконфигурировали ранее.
Однако, не сразу у нас это получается, так как разработчики приложения в клавиатуре почему-то оставили запятую, а для ввода IP адреса нам нужна точка. Если введем с запятой, естественно, приложение поругается на нас и не сохранит наши настройки.
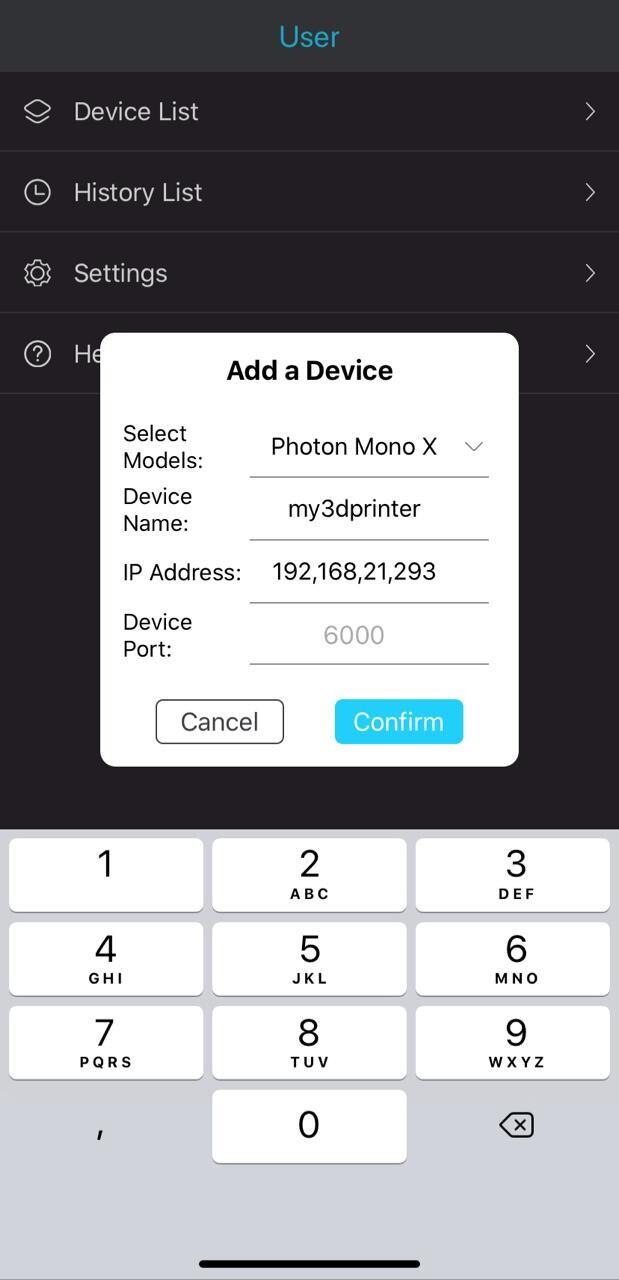
Выход из этой ситуации не сложный, идем в приложение блокнот или любой текстовый редактор на вашем телефоне, пишем там IP адрес с точками, копируем и вставляем в приложение Anycubic.
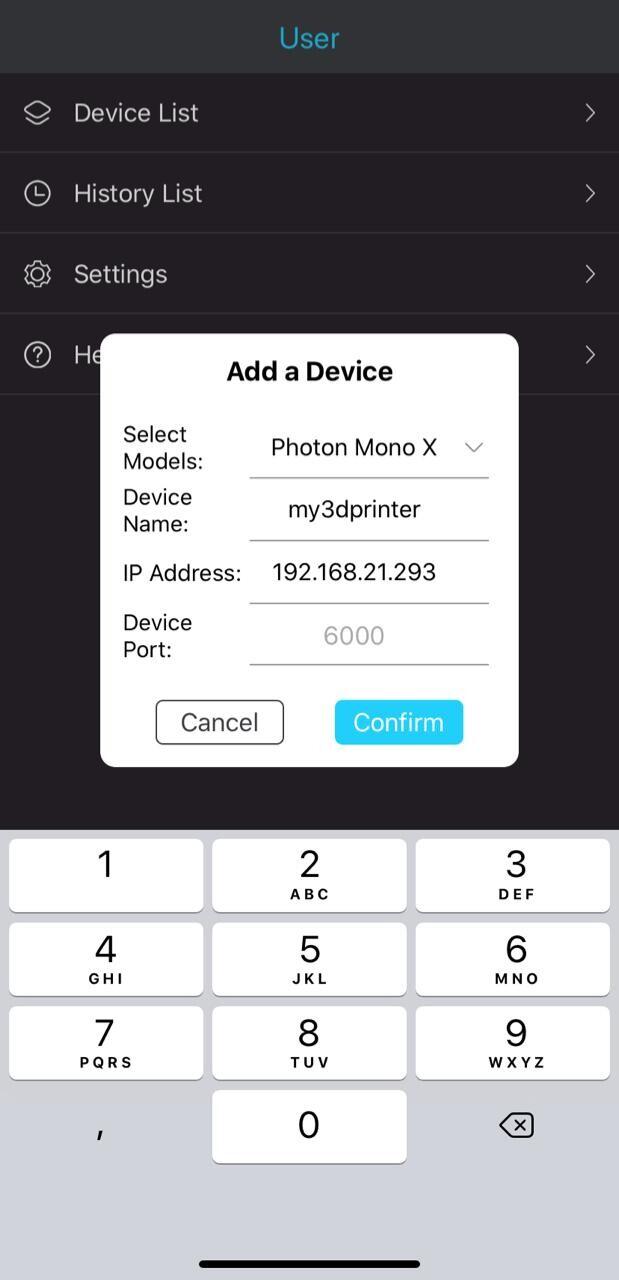
Нажимаем Confirm и все, наш телефон может отправлять файлы на печать в 3D принтер!
Традиционно напоминаем, что в нашем интернет магазине всегда можно купить 3D принтеры самых популярных брендов:
Подпишитесь на автора
Подпишитесь на автора, если вам нравятся его публикации. Тогда вы будете получать уведомления о его новых статьях.
Отписаться от уведомлений вы всегда сможете в профиле автора.
Getting Started with Your Anycubic Photon Mono X 6Ks: Mastering the Setup and Printing Parameters
With its powerful features and user-friendly design, Anycubic Photon Mono X 6Ks becomes very popular among entry-level resin printer users. In this guide, we will guide you through the basic steps of setting up Anycubic Photon Mono X 6Ks, provide printing parameters suitable for different resins, help users have a smoother printing experience, and release your creativity easily.

Recommended Parameters For Anycubic Photon Mono X 6Ks
Printing parameters are crucial for using resin printers, helping us to get the best printing results on different models of printers. Layer height, exposure time, off time, especially these key parameters will directly affect the quality and accuracy of the print. Mastering and setting the correct printing parameters can help users successfully complete printing on Anycubic Photon Mono X 6Ks, and also support users to fine-tune the printing settings according to the needs of different projects and materials.
Basic Resin-Gray
Anycubic Photon Mono X 6Ks
In resin printing, thinner layer thicknesses produce finer details and smoother surfaces. Thinner layers allow for faster light penetration and curing, and require relatively shorter exposure times. Conversely, a larger layer thickness requires an appropriate increase in exposure time. The following is the exposure time corresponding to different layer thicknesses on Anycubic Photon Mono X 6Ks, which can be used as a reference for users to test and adjust according to the desired print quality.
How to Set Up Anycubic Photon Mono X 6Ks
Setup and calibration, are necessary steps to properly start using a resin printer. Leveling the build platform, setting the correct z-axis height, performing exposure, etc. Taking some time to complete the following steps can help users properly calibrate their Anycubic Photon Mono X 6Ks and avoid some possible printing problems.
Step 1: Connect the power and run the printer. Click: Tools — Move Z axis — 10mm, click 5 times, raise the z axis by 50mm.
Step 2: Install the build platform. Tear off the factory protective film and loosen the four screws on the platform. Install the build platform and tighten the knobs.
Step 3: Level the resin printer. Place the leveling paper delivered with the machine on the screen and click «HOME». Press the top of the platform by hand and tighten the four screws.
Step 4: Set the zero point and perform exposure detection. In the printer settings, find the moving Z axis and click «Z=0» to set the zero position for the printer. After the printer stops lifting, select the exposure image, and perform exposure detection.
Step 5: Install the resin tank. Tighten the knobs on both sides of the resin tank to complete the installation.
Unboxing Guide| A video takes you to go through all the details of Anycubic Photon Mono X 6Ks
