- How To Install AnyDesk on Kali Linux
- How install AnyDesk step by step?
- How do I connect to AnyDesk without accepting?
- Why is AnyDesk not working?
- How do I connect to AnyDesk?
- How do I find the Linux version?
- How do I get to root in Ubuntu?
- How use any desk in Linux?
- How do I connect AnyDesk to PC?
- How do I start AnyDesk on Ubuntu?
- Anydesk kali linux установка
- Learn Latest Tutorials
- Preparation
- Trending Technologies
- B.Tech / MCA
- Javatpoint Services
- Training For College Campus
- Как установить AnyDesk на Kali Linux
- Установите AnyDesk в Kali Linux
- Шаг 1. Обновите систему Debian
- Шаг 2: Добавьте репозиторий AnyDesk Kali Linux
- Шаг 3. Установите AnyDesk в Kali Linux
- Шаг 4: Использование AnyDesk в Kali Linux
- Рекомендуемый контент
- Privacy Overview
How To Install AnyDesk on Kali Linux
AnyDesk provides powerful Linux-based connectivity for smooth and seamless remote access to any computer. . Ideal for Ubuntu users, AnyDesk’s solution for Linux remote access is built for stable operation and allows you to access remote desktops in Linux from Windows, Mac, and other Linux based systems.
How install AnyDesk step by step?
- 1 Download AnyDesk. Download AnyDesk at www.anydesk.com.
- 2 Install AnyDesk on your Device. AnyDesk can be easily installed with just 1 click.
- 3 Enable Unattended Access & Security Settings. .
- 4 Apply the license key. .
- 5 Start working.
How do I connect to AnyDesk without accepting?
Connect to the Remote Device
Just connect and wait for the password dialog to appear. Check “Log in automatically from now on” and enter the correct password. You will not be asked for the password anymore for future connections to the same machine. This feature does not save the password itself.
Why is AnyDesk not working?
If not properly addressed, open Android settings — Apps — Choose AnyDesk — grant permissions. If this doesn’t fix the issue, a headless display adapter will help, this will force your system to render the image. Check permissions. AnyDesk might have to be installed on the remote side.
How do I connect to AnyDesk?
- Double-click the downloaded AnyDesk file and AnyDesk will start immediately.
- Enter the ID or Alias of the remote device into the field under «Remote Desk».
- Click the green «Connect»-Button and enjoy our fast and simple remote software solution.
How do I find the Linux version?
- Open the terminal application (bash shell)
- For remote server login using the ssh: ssh [email protected].
- Type any one of the following command to find os name and version in Linux: cat /etc/os-release. lsb_release -a. hostnamectl.
- Type the following command to find Linux kernel version: uname -r.
How do I get to root in Ubuntu?
- Open a terminal Window. Press Ctrl + Alt + T to open the terminal on Ubuntu.
- To become root user type: sudo -i. sudo -s.
- When promoted provide your password.
- After successful login, the $ prompt would change to # to indicate that you logged in as root user on Ubuntu.
How use any desk in Linux?
- Download Anydesk (.deb) After downloading the file install it using this command. .
- Download Anydesk (.rpm) After downloading the . .
- Install Anydesk from repository.
How do I connect AnyDesk to PC?
- Double-click the downloaded AnyDesk file and AnyDesk will start immediately.
- Enter the ID or Alias of the remote device into the field under «Remote Desk».
- Click the green «Connect»-Button and enjoy our fast and simple remote software solution.
How do I start AnyDesk on Ubuntu?
- Step 1: Update Ubuntu System. Start by ensuring your system is updated. .
- Step 2: Add AnyDesk repository. Import AnyDesk GPG key for signing APT packages. .
- Step 3: Install AnyDesk on Ubuntu 20.04/18.04 LTS. .
- Step 4: Launch AnyDesk on Ubuntu 20.04/18.04.

Command
The ssh command provides a secure encrypted connection between two hosts over an insecure network. This connection can also be used for terminal acces.

File
In order to write to a file in PHP you need to go through the following steps:Open the file.Write to the file.Close the file $select = «data what we t.

Step
How To Install KVM on RHEL 8 / CentOS 8 LinuxStep 1: Ensure host CPU has Intel VT or AMD-V Virtualization extensions. . Step 2: Install KVM / QEMU o.
Latest news, practical advice, detailed reviews and guides. We have everything about the Linux operating system
Anydesk kali linux установка
Learn Latest Tutorials


Preparation


Trending Technologies


B.Tech / MCA


Javatpoint Services
JavaTpoint offers too many high quality services. Mail us on h[email protected], to get more information about given services.
- Website Designing
- Website Development
- Java Development
- PHP Development
- WordPress
- Graphic Designing
- Logo
- Digital Marketing
- On Page and Off Page SEO
- PPC
- Content Development
- Corporate Training
- Classroom and Online Training
- Data Entry
Training For College Campus
JavaTpoint offers college campus training on Core Java, Advance Java, .Net, Android, Hadoop, PHP, Web Technology and Python. Please mail your requirement at [email protected].
Duration: 1 week to 2 week
Like/Subscribe us for latest updates or newsletter 


Как установить AnyDesk на Kali Linux

AnyDesk — это инструмент удаленного управления сервером, который позволяет вам подключаться к удаленной системе и управлять ею плавно и беспрепятственно, как если бы вы непосредственно вошли в эту систему. Он работает в Windows, Linux и macOS. Из этого туториала Вы узнаете, как установить AnyDesk в системе Kali Linux Desktop
AnyDesk доступен как бесплатное предложение для личного использования и как платное программное обеспечение для любого коммерческого использования — небольшими командами и крупными организациями, занимающимися удаленной поддержкой. Посетите страницу с ценами AnyDesk, чтобы получить больше информации.
Установите AnyDesk в Kali Linux
Пакеты AnyDesk для Kali Linux доступны в репозитории APT. Добавьте исходный репозиторий APT AnyDesk в Kali Linux, а затем установите AnyDesk из репозитория.
Шаг 1. Обновите систему Debian
Обновите пакеты APT, установленные в Kali Linux:
sudo apt update sudo apt install -y gnupg2Шаг 2: Добавьте репозиторий AnyDesk Kali Linux
Добавьте репозиторий AnyDesk в Kali Linux:
sudo sh -c 'echo "deb http://deb.anydesk.com/ all main" > /etc/apt/sources.list.d/anydesk.list'Импортируйте GPG-ключ AnyDesk для подписи пакетов APT.
wget -qO - https://keys.anydesk.com/repos/DEB-GPG-KEY | sudo apt-key add -Шаг 3. Установите AnyDesk в Kali Linux
Установите AnyDesk в Kali Linux с помощью диспетчера пакетов apt .
sudo apt -y update && sudo apt -y install anydeskПодтвердите установку пакета.
$ apt policy anydesk anydesk: Installed: 5.5.4 Candidate: 5.5.4 Version table: *** 5.5.4 500 500 http://deb.anydesk.com all/main amd64 Packages 100 /var/lib/dpkg/status
Из вывода мы можем получить версию AnyDesk, установленную в Kali Linux.
Шаг 4: Использование AnyDesk в Kali Linux
Теперь вы можете запустить AnyDesk в Kali Linux и начать управлять домашними устройствами из офиса или наоборот.
Из интерфейса командной строки:
Адрес AnyDesk для удаленного компьютера требуется при подключении из локального приложения AnyDesk.
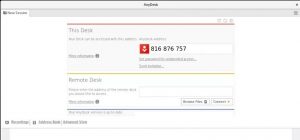
Этот идентификатор генерируется уникальным образом при каждом запуске приложения.
Рекомендуемый контент
Мы используем файлы cookie на нашем веб-сайте, чтобы предоставить вам наиболее релевантный опыт, запоминая ваши предпочтения и повторные посещения. Нажимая «Принять все», вы соглашаетесь на использование ВСЕХ файлов cookie. Однако вы можете посетить «Настройки файлов cookie», чтобы предоставить контролируемое согласие.
Privacy Overview
Этот веб-сайт использует файлы cookie, чтобы улучшить вашу работу во время навигации по веб-сайту. Из них файлы cookie, которые классифицируются как необходимые, хранятся в вашем браузере, поскольку они необходимы для работы основных функций веб-сайта. Мы также используем сторонние файлы cookie, которые помогают нам анализировать и понимать, как вы используете этот веб-сайт. Эти файлы cookie будут храниться в вашем браузере только с вашего согласия. У вас также есть возможность отказаться от этих файлов cookie. Но отказ от некоторых из этих файлов cookie может повлиять на ваш опыт просмотра.
Necessary cookies are absolutely essential for the website to function properly. These cookies ensure basic functionalities and security features of the website, anonymously.
| Cookie | Duration | Description |
|---|---|---|
| cookielawinfo-checkbox-analytics | 11 months | This cookie is set by GDPR Cookie Consent plugin. The cookie is used to store the user consent for the cookies in the category «Analytics». |
| cookielawinfo-checkbox-functional | 11 months | The cookie is set by GDPR cookie consent to record the user consent for the cookies in the category «Functional». |
| cookielawinfo-checkbox-necessary | 11 months | This cookie is set by GDPR Cookie Consent plugin. The cookies is used to store the user consent for the cookies in the category «Necessary». |
| cookielawinfo-checkbox-others | 11 months | This cookie is set by GDPR Cookie Consent plugin. The cookie is used to store the user consent for the cookies in the category «Other. |
| cookielawinfo-checkbox-performance | 11 months | This cookie is set by GDPR Cookie Consent plugin. The cookie is used to store the user consent for the cookies in the category «Performance». |
| viewed_cookie_policy | 11 months | Этот файл cookie устанавливается подключаемым модулем GDPR Cookie Consent. Файлы cookie используются для хранения согласия пользователя на файлы cookie в категории «Необходимые». |
Functional cookies help to perform certain functionalities like sharing the content of the website on social media platforms, collect feedbacks, and other third-party features.
Performance cookies are used to understand and analyze the key performance indexes of the website which helps in delivering a better user experience for the visitors.
Analytical cookies are used to understand how visitors interact with the website. These cookies help provide information on metrics the number of visitors, bounce rate, traffic source, etc.
Advertisement cookies are used to provide visitors with relevant ads and marketing campaigns. These cookies track visitors across websites and collect information to provide customized ads.
Other uncategorized cookies are those that are being analyzed and have not been classified into a category as yet.