- imami / anydesk-enable-remote-access.md
- Use-cases for the Command-Line Interface
- Automatic Deployment
- Removing AnyDesk
- Connecting through the Command-Line Interface
- Modifying AnyDesk shortcuts
- Install AnyDesk on Ubuntu Linux [GUI and Terminal Methods]
- Method 1: Install AnyDesk on Ubuntu using terminal
- Method 2: Install AnyDesk on Ubuntu graphically
- Troubleshooting tip
imami / anydesk-enable-remote-access.md
###AnyDesk — How Enable Remote Access from ubuntu/debian terminal.
Here are the commands might be usefull in this purpose:
- anydesk —get-status : To get current status of anydesk, which might be offlien,online or nothing.
- anydesk —get-id : To get the ID that your system can be accessed by.
- anydesk —service : To start anydesk service if not already running (for Linux).
- anydesk —restart-service : To restart anydesk service
- anydesk —stop-service : To stop anydesk service
- sudo echo qazwsxedc | anydesk —set-password : to set password on anydesk (required to access from a remote system).
In case that your target machine is a kind of a Ubuntu or a Debian based one:
- echo -e «ad.security.allow_logon_token=true\nad.features.unattended=true» >> ~/.anydesk/user.conf
- sudo echo [your-custom-password] | anydesk —set-password
- sudo sed -i » -e ‘s/# AutomaticLogin/AutomaticLogin/g’ -e ‘s/#WaylandEnable/WaylandEnable/g’ /etc/gdm3/custom.conf
- sudo reboot
- Drink your coffee, and wait until your system becomes up and accessible via ssh or terminal.
- Run anydesk —get-status , if its not online then run anydesk —service .
- Run anydesk —get-id && echo to get your desk id.
- Use your desk id in your Anydesk client, to access the remote system.
When running the sudo echo [your-custom-password] | anydesk —set-password command, it should present the message:
Setting the password requires administrator privileges and an installed service. 1 / 1000 To resolve the above issue, it should change into the following command:
sudo echo openstack | sudo anydesk --set-password I have server ubuntu without gui, can use anydesk to connect ?
@amatteo78, it’s possible to install the anydesk without GUI in Ubuntu. Please consider using the following installation steps:
root@ubuntu-s-4vcpu-8gb-amd-sgp1-01:~# lsb_release -a No LSB modules are available. Distributor ID: Ubuntu Description: Ubuntu 18.04.6 LTS Release: 18.04 Codename: bionic root@ubuntu-s-4vcpu-8gb-amd-sgp1-01:~# apt-get update Get:1 http://mirrors.digitalocean.com/ubuntu bionic InRelease [242 kB] Hit:2 https://repos-droplet.digitalocean.com/apt/droplet-agent main InRelease Get:3 http://mirrors.digitalocean.com/ubuntu bionic-updates InRelease [88.7 kB] Get:4 http://mirrors.digitalocean.com/ubuntu bionic-backports InRelease [74.6 kB] Get:5 http://security.ubuntu.com/ubuntu bionic-security InRelease [88.7 kB] Get:6 http://mirrors.digitalocean.com/ubuntu bionic-updates/main amd64 Packages [2730 kB] Get:7 https://packages.clickhouse.com/deb stable InRelease [5536 B] Get:8 https://packages.clickhouse.com/deb stable/main amd64 Packages [18.4 kB] Fetched 3248 kB in 1s (3231 kB/s) Reading package lists. Done root@ubuntu-s-4vcpu-8gb-amd-sgp1-01:~# curl -fsSL https://keys.anydesk.com/repos/DEB-GPG-KEY|sudo gpg --dearmor -o /etc/apt/trusted.gpg.d/anydesk.gpg root@ubuntu-s-4vcpu-8gb-amd-sgp1-01:~# echo "deb http://deb.anydesk.com/ all main" | sudo tee /etc/apt/sources.list.d/anydesk-stable.list deb http://deb.anydesk.com/ all main root@ubuntu-s-4vcpu-8gb-amd-sgp1-01:~# apt-get update Get:1 http://mirrors.digitalocean.com/ubuntu bionic InRelease [242 kB] Hit:2 https://repos-droplet.digitalocean.com/apt/droplet-agent main InRelease Hit:3 http://mirrors.digitalocean.com/ubuntu bionic-updates InRelease Hit:4 http://mirrors.digitalocean.com/ubuntu bionic-backports InRelease Hit:5 http://security.ubuntu.com/ubuntu bionic-security InRelease Get:6 http://deb.anydesk.com all InRelease [5588 B] Hit:7 https://packages.clickhouse.com/deb stable InRelease Get:8 http://deb.anydesk.com all/main amd64 Packages [644 B] Fetched 248 kB in 1s (335 kB/s) Reading package lists. Done root@ubuntu-s-4vcpu-8gb-amd-sgp1-01:~# apt-get install anydesk Reading package lists. Done Building dependency tree Reading state information. Done The following additional packages will be installed: libfile-desktopentry-perl libfile-mimeinfo-perl libgail-common libgail18 libgtk2.0-0 libgtk2.0-bin libgtk2.0-common libgtkglext1 libnet-dbus-perl libpangox-1.0-0 libtie-ixhash-perl libx11-protocol-perl libxml-twig-perl libxml-xpathengine-perl xdg-utils Suggested packages: libunicode-map8-perl libunicode-string-perl xml-twig-tools The following NEW packages will be installed: anydesk libfile-desktopentry-perl libfile-mimeinfo-perl libgail-common libgail18 libgtk2.0-0 libgtk2.0-bin libgtk2.0-common libgtkglext1 libnet-dbus-perl libpangox-1.0-0 libtie-ixhash-perl libx11-protocol-perl libxml-twig-perl libxml-xpathengine-perl xdg-utils 0 upgraded, 16 newly installed, 0 to remove and 3 not upgraded. Need to get 8989 kB of archives. After this operation, 25.1 MB of additional disk space will be used. Do you want to continue? [Y/n] Y Processing triggers for desktop-file-utils (0.23-1ubuntu3.18.04.2) . Processing triggers for libc-bin (2.27-3ubuntu1.6) . Processing triggers for man-db (2.8.3-2ubuntu0.1) . Processing triggers for hicolor-icon-theme (0.17-2) . Processing triggers for mime-support (3.60ubuntu1) . root@ubuntu-s-4vcpu-8gb-amd-sgp1-01:~ root@ubuntu-s-4vcpu-8gb-amd-sgp1-01:~# anydesk --get-status online root@ubuntu-s-4vcpu-8gb-amd-sgp1-01:~# echo "password" | anydesk --set-password .
After running above commands, please follow this section to complete the Anydesk setting in the targeted machine.
Use-cases for the Command-Line Interface
The command-line interface offers ways to help automate many processes involved with AnyDesk. Here, you can find some examples of how to use it with AnyDesk.
Automatic Deployment
The command-line features can be used in combination with software management/deployment tools to deploy and set up AnyDesk on a larger number of devices without the need for manual intervention on each device.
For this case, we would recommend providing a custom MSI installation package as well as preconfigured Customer/Service-Module versions of our .exe files that can easily be distributed this way.
These can be customized further through the custom client generator on my.anydesk.com.
| Standard Module Types | Description |
| Default EXE | EXE version of the standard client from anydesk.com that can both initiate and receive connections. |
| Customer Module EXE | EXE version of a standard client that can only receive connections. |
| Service Module EXE | EXE version of a standard client that can only initiate connections. |
These can then be deployed automatically through a script using the commands described in the Installation Commands or through other deployment tools.
An example batch script, that will install AnyDesk, register the license key, and set a password, could look like this:
@echo off
AnyDesk.exe --install "C:\Install\AnyDesk\Here" --start-with-win --silent --create-shortcuts --create-desktop-icon
echo licence_keyABC | "C:\Install\AnyDesk\Here\AnyDesk.exe" --register-licence
echo password123 | "C:\Install\AnyDesk\Here\AnyDesk.exe" --set-password
Removing AnyDesk
In case AnyDesk is no longer needed on certain machines, it can be uninstalled through the in-built operating system uninstaller or alternatively, the command-line interface.
This can be done using either the —remove or —uninstall command as mentioned in Installation Commands.
—uninstall will start the uninstallation process for the AnyDesk client. Using this command, a GUI prompt will appear which will guide the user through the uninstallation process.

In case the removal of AnyDesk is supposed to happen purely via a script or through management software, —remove is the right parameter to use.
Furthermore, if a completely silent removal is intended, appending —silent will prevent error messages that might occur during the removal process from showing up.
An example for a silent removal without additional user input would be:
—remove will only uninstall the AnyDesk application from the Windows operating system but cannot remove any remnant files. Files such as those found in the below default directories must be manually deleted or deleted through a script.
C:\Program Files (x86)\AnyDesk
%appdata%\AnyDesk
%programdata%\AnyDesk
Connecting through the Command-Line Interface
If AnyDesk is intended to be implemented into already existing software, connecting through the command-line interface using the commands and parameters as described in Connection Commands can be a good tool to achieve that.
Modifying AnyDesk shortcuts
Parameters found in Connection Commands can be used to modify shortcuts that have been dropped to the desktop through AnyDesk.

This is done by appending a parameter to the «Target» field in «Properties» of the desktop shortcut. For example:
"C:\Program Files (x86)\AnyDesk\AnyDesk.exe" 123456789 --plain
Install AnyDesk on Ubuntu Linux [GUI and Terminal Methods]
This beginner’s tutorial discusses both GUI and terminal methods of installing AnyDesk on Ubuntu-based Linux distributions.
AnyDesk is a popular remote desktop software for Linux, Windows, BSD, macOS, and mobile platforms. With this tool, you can remotely access other computers using AnyDesk or let someone else remotely access your system. Not everyone can access it just because two devices use AnyDesk. You have to accept the incoming connection and provide a password for a secure connection. This helps provide tech support to friends, family, colleagues, or even to customers. In this tutorial, I’ll show graphical and command-line ways of installing AnyDesk on Ubuntu. You can use either method based on your preference. Both methods will install the same AnyDesk version on your Ubuntu system. The same method should apply to Debian and other Debian and Ubuntu-based distributions such as Linux Mint, Linux Lite, etc.
Non-FOSS Warning! AnyDesk is not open source software. It is covered here because it is available on Linux and the article focuses on Linux.
Method 1: Install AnyDesk on Ubuntu using terminal
Open the terminal application on your system. You’ll need a tool like wget to download files in the terminal. For that, use the following command:
sudo apt update sudo apt install wgetThe next step is to download the GPG key of the AnyDesk repository and add it to your system’s trusted keys. This way, your system will trust the software from this external repository.
wget -qO - https://keys.anydesk.com/repos/DEB-GPG-KEY | sudo apt-key add -You may ignore the deprecated warning about the apt-key command for now. The next step is to add the AnyDesk repository to your system’s repository sources:
echo "deb http://deb.anydesk.com/ all main" | sudo tee /etc/apt/sources.list.d/anydesk-stable.listUpdate the package cache so your system learns about the availability of new applications through the newly added repository.
You can enjoy AnyDesk now.
Method 2: Install AnyDesk on Ubuntu graphically
If you are not comfortable with the command line, no worries. You can also install AnyDesk without going into the terminal. You can download AnyDesk for Ubuntu from the official AnyDesk website:
You’ll see a Download Now button. Click on it. 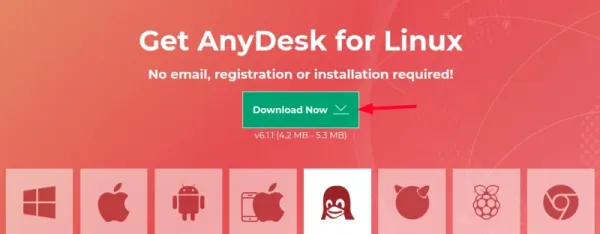 When you click on the download button, it gives you options for various Linux distributions. Select the one for Ubuntu:
 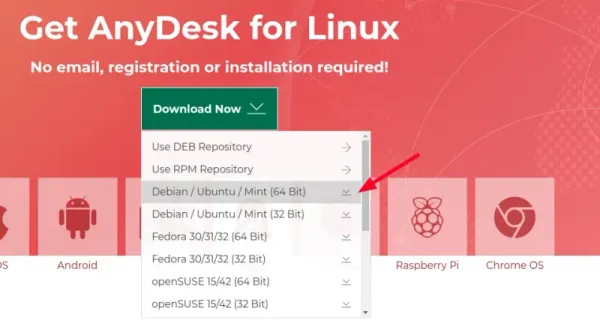 It will download the DEB file of the AnyDesk application. Installing deb file is easy. Either double-click on it or right-click and open it with Software Install.
 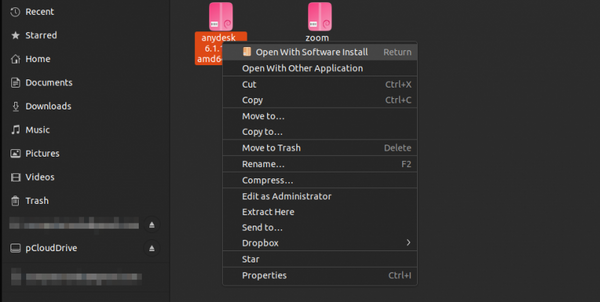 Software Center application will be opened and you can install it from there.
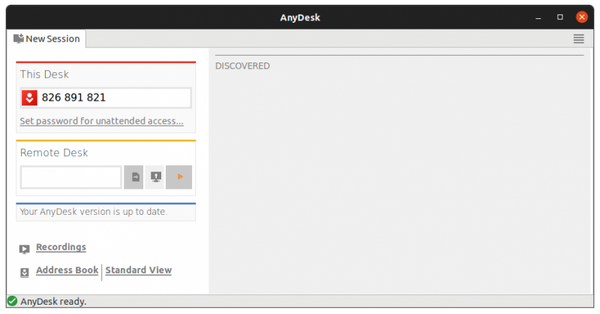
 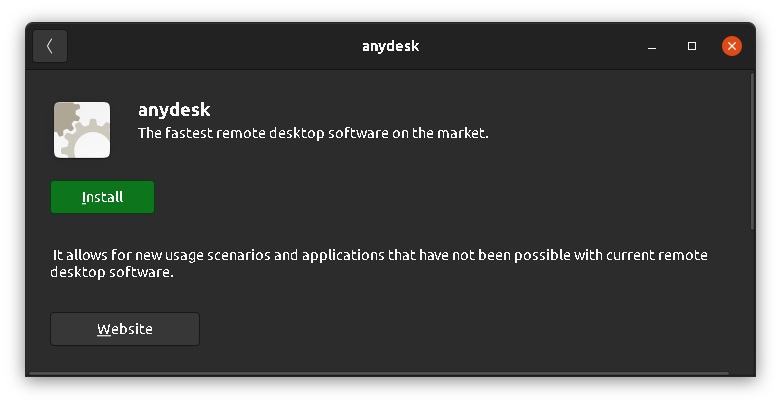 Once installed, search for it in the system menu and start from there.
  That’s it. Not too hard, is it? I am not going to show the steps for using AnyDesk. I think you already have some idea about that. If not, refer to this article, please.
Troubleshooting tip
When I tried to run AnyDesk from the system menu, it didn’t start. So, I started it from the terminal and it showed me this error:
[email protected]:~$ anydesk anydesk: error while loading shared libraries: libpangox-1.0.so.0: cannot open shared object file: No such file or directoryIf you see the error while loading shared libraries message, you install the package it is complaining about. Here’s what I did in my case:
sudo apt install libpangox-1.0-0That solved the issue for me and I hope it works for you also. Please let me know in the comment section if you have any questions about this topic.