- How to Connect iPhone to Arch Linux
- Mount iPhone in Arch Linux
- Worked for you?
- Apple iphone on linux
- Installation
- Connecting to a device
- Usbmux daemon
- Pairing
- Transferring data
- Using a graphical file manager
- Manual mounting
- Importing videos and pictures
- HTML5 videos
- Troubleshooting
- ifuse fails to mount application directories
- Device cannot be redirected to a virtual machine
- See also
- Linux и Android
How to Connect iPhone to Arch Linux
Troubles with iPhone and Arch Linux? iPhone and Linux never really go along very well. In this tutorial, I am going to show you how can you use iPhone in Antergos Linux. Since Antergos is based on Arch Linux, the same steps should be applicable to other Arch based Linux distros such as Manjaro Linux.
So, when I bought an iPhone 6S and when I connected it to Antergos Linux to copy some pictures, it was not detected at all. I could see that iPhone was being charged and I had allowed iPhone to ‘trust the computer’ but there was nothing at all detected. I tried to run dmseg but there was no trace of iPhone or Apple there. What is funny that libimobiledevice was installed as well, which always fixes iPhone mount issue in Ubuntu.
I am going to show you how I am using iPhone 6S, running on iOS 9 in Antergos. It goes more in command line way, but I presume since you are in Arch Linux zone, you are not scared of terminal (and you should not be as well).
Mount iPhone in Arch Linux

Step 1: Unplug your iPhone, if it is already plugged in.
Step 2: Now, open a terminal and use the following command to install some necessary packages. Don’t worry if they are already installed.
sudo pacman -Sy ifuse usbmuxd libplist libimobiledeviceStep 3: Once these programs and libraries are installed, reboot your system.
Step 4: Make a directory where you want the iPhone to be mounted. I would suggest making a directory named iPhone in your home directory.
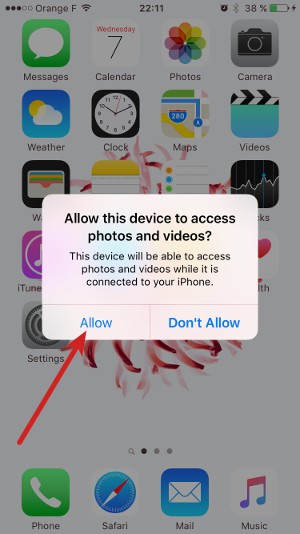
Step 5: Unlock your phone and plug it in. If asked to trust the computer, allow it.
Step 6: Verify that iPhone is recognized by the system this time.
This should show you some result with iPhone and Apple in it. Something like this:
[ 31.003392] ipheth 2-1:4.2: Apple iPhone USB Ethernet device attached
[ 40.950883] ipheth 2-1:4.2: Apple iPhone USB Ethernet now disconnected
[ 47.471897] ipheth 2-1:4.2: Apple iPhone USB Ethernet device attached
[ 82.967116] ipheth 2-1:4.2: Apple iPhone USB Ethernet now disconnected
[ 106.735932] ipheth 2-1:4.2: Apple iPhone USB Ethernet device attached
This means that iPhone has been successfully recognized by Antergos/Arch Linux.
Step 7: When everything is set, it’s time to mount the iPhone. Use the command below:
Since we created the mount directory in home, it won’t need root access and you should also be able to see it easily in your home directory. If the command is successful, you won’t see any output.
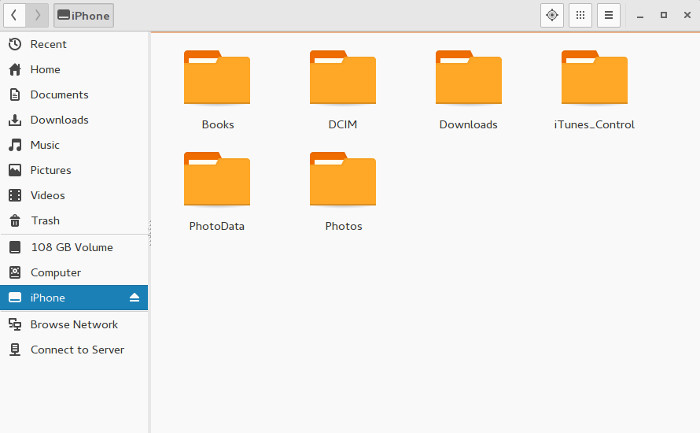
Go back to Files and see if the iPhone is recognized or not. For me, it looks like this in Antergos:

You can access the files in this directory. Copy files from it or to it.
Step 8: When you want to unmount it, you should use this command:
Worked for you?
I know that it is not very convenient and ideally, iPhone should be recognized as any other USB storage device but things don’t always behave as they are expected to. Good thing is that a little DIY hack can always fix the issue and it gives a sense of achievement (at least to me). That being said, I must say Antergos should work to fix this issue so that iPhone can be mounted by default.
Did this trick work for you? If you have questions or suggestions, feel free to drop a comment.
Apple iphone on linux
iOS is an operating system created by Apple Inc. for use in the iPhone series of smartphones. Although connecting iOS devices to Linux is not supported by Apple, the libimobiledevice project provides libraries and tools to connect and transfer data between iOS devices and Linux machines.
Installation
Connecting to a device
Usbmux daemon
The libimobiledevice package depends on usbmuxd , which is responsible for performing the low-level connection to iOS devices. The usbmuxd package also includes an udev rule that automatically starts and stops the daemon whenever a device is connected or disconnected.
Connect the iOS device and verify that usbmuxd.service is automatically started.
$ systemctl status usbmuxd.service
. Active: active (running) since Sun 2020-01-19 19:23:18 UTC; 22s ago .
Pairing
After connecting your iOS device and unlocking the screen, you should be presented with a «Trust This Computer?» popup on the device. Tap «Trust», then enter your device passcode to complete the pairing process.
If you do not see the popup, you can start the pairing process manually. Connect the device, unlock the screen and run:
SUCCESS: Paired with device d8e8fca2dc0f896fd7cb4cb0031ba249
If you have multiple iOS devices connected —udid ios_udid parameter can be passed to target specific device.
You can verify the pairing has succeeded by running:
SUCCESS: Validated pairing with device 00008030-001D3562367A402E
Transferring data
After pairing, iOS exposes two different filesystems to the computer. One is the media filesystem, containing the device’s photos, videos and music. The second filesystem is used for sharing files directly to certain apps. This is sometimes called «iTunes document sharing». [1] [2]
Using a graphical file manager
File managers which use GVFS can interact with iOS devices. To access the media filesystem, install gvfs-gphoto2 . To access the app document filesystem, install gvfs-afc .
Note: When accessing the media filesystem, GVFS will only expose the device’s photos and videos, not music.
Dolphin support for iOS devices is included in the kio-extras package, which is already a dependency for Dolphin. [3]
Manual mounting
Install the ifuse package. You can then run the following command to mount your iPhone’s media filesystem:
You can use this to access the device’s photos inside mountpoint/DCIM .
Note: The device’s music database will also be accessible in mountpoint/iTunes_Control . You cannot add new songs to the device this way, but you can copy songs from the device to your computer.
Warning: Manually editing the databases inside iTunes_Control will result in their corruption, and turn your synced songs into stale data that can only be removed with a system restore.
To access an app’s document filesystem, first you need to identify the app:
"CFBundleIdentifier","CFBundleVersion","CFBundleDisplayName" "org.videolan.vlc-ios","432","VLC" "org.wikimedia.wikipedia","1932","Wikipedia" "org.kde.kdeconnect","2","KDE Connect" [. ]
You can then mount an application’s files using:
$ ifuse --documents APPID mountpoint
Where APPID is the bundle identifier of the desired application, such as org.videolan.vlc-ios .
After you’re done, unmount the filesystem:
$ fusermount -u mountpoint
Importing videos and pictures
Both videos and photos can be found in typically in /DCIM/100APPLE .
HTML5 videos
Typically you want to convert MOV files to a HTML5 video format like OGV using ffmpeg2theora . Note that the creation date metadata is not in the converted video, so you need to use a script like:
#!/usr/bin/sh find -name "*.MOV" | while read mov do d=$(gst-discoverer-1.0 -v $mov | awk '/datetime:/' | tr -d \") base=$ if test -f $base.ogv then touch -d$ $base.ogv ls -l $base.ogv else echo $base.ogv missing fi done
And use cp -a or rsync -t in order to preserve the file’s date & time.
Troubleshooting
ifuse fails to mount application directories
When using ifuse to mount application directories, you may run into the following error when trying to list the contents of the mountpoint:
".": Input/output error (os error 5)
This is a known issue that has been fixed in the current development version of libimobiledevice, but has not been released in a stable version yet. A workaround is to install libimobiledevice-git AUR .
Device cannot be redirected to a virtual machine
If you use a Windows virtual machine to sync your device via USB, trying to redirect it may fail with a «device is in use by another application» message. This is due to usbmuxd.service starting automatically when the device is connected. This can be solved by either stopping or masking usbmuxd.service .
See also
Linux и Android

Раньше было сложно использовать iPhone в качестве внешнего диска Ubuntu. Поддержка Linux для устройств iOS, таких как iPhone, iPad и iPod, была довольно слабой, но теперь ситуация изменилась.
Вот как вы можете смонтировать iPhone в Ubuntu и других дистрибутивах Linux с помощью библиотеки libimobiledevice.
Чтобы iPhone и другие устройства iOS распознавались в Ubuntu, вам необходимо сначала установить библиотеку libimobiledevice. Она позволяет Ubuntu и другим операционным системам Linux взаимодействовать с этими устройствами Apple.
Это важно, особенно из-за мер безопасности Apple. Libimobiledevice позволяет получить доступ к системной информации для вашего устройства, а также к внутренней памяти. На веб-сайте libimobiledevice есть список функций, включенных в настоящее время, а также функций, запланированных на будущее.
Если вы хотите использовать iPhone в качестве внешнего диска, вам сначала необходимо установить libimobildevice.

Вам не нужно добавлять какие-либо дополнительные репозитории пакетов для установки libimobiledevice, поэтому откройте окно терминала и введите:
sudo apt install libimobiledevice6 libimobiledevice-utils
После установки libimobiledevice попробуйте подключить свой iPhone. Если файловая система iPhone не подключается автоматически, возможно, потребуется выполнить сопряжение iPhone. Откройте терминал и введите:
Если после выполнения всех этих команд вы по-прежнему не можете подключиться к своему iPhone, вам необходимо установить и использовать второй пакет под названием iFuse для ручного подключения iPhone.
Пакет iFuse позволяет монтировать и получать доступ к файловой системе на устройствах iOS. Вероятно, iFuse установится вместе с libimobiledevice, но если этого не произошло, вам придется установить его вручную.

Эта команда установит iFuse и любые дополнительные пакеты, которые могут потребоваться в вашей установке Ubuntu.
Если у вас Ubuntu со средой рабочего стола GNOME, файловая система iPhone должна подключиться автоматически после подключения устройства. Перезагрузите компьютер, если ваше устройство не подключается автоматически. Вам также следует разблокировать экран устройства iPhone. Если вы этого не сделаете, у вас не будет доступа к внутренней памяти.
Если это не помогло, возможно, вам придется смонтировать iPhone вручную. Вам также может потребоваться это сделать, если вы не используете стандартную установку Ubuntu с GNOME.
После выполнения этой команды вы должны увидеть сообщение об успешном выполнении, или idevicepair сообщит вам, что не может найти ваше устройство iOS.

В этом случае перезапустите и попробуйте еще раз. Как только ваше устройство будет сопряжено, введите следующие команды, чтобы смонтировать iPhone:
sudo mkdir /media/iphone ifuse /media/iphone
Замените каталог «/media/iphone» другим каталогом по вашему выбору. Здесь на вашем устройстве будут отображаться файлы и папки вашего iPhone.
После монтирования вы сможете увидеть файловую систему iPhone в выбранном файловом менеджере. Затем вы можете удалять или копировать файлы на устройство, как на свой внешний диск.
Если вы подключили свое устройство вручную и хотите безопасно его отключить, снова откройте терминал и введите:
Эта команда безопасно отключит ваше хранилище iPhone. После этого вы можете отключить его от ПК или ноутбука с Ubuntu.