A minimal Arch Linux installation with Gnome. My notes.
Arch Linux is extremely well documented so I highly recommend to read the Arch installation guide. This guide installs the Gnome desktop environment, but one can easily swap Gnome for i3 or another desktop environment, or leave it all together. This is the procedure I used for installing Arch on a Thinkpad t460s, t490s and a Dell Precision 5550.
Partitioning
Checkout the current partition scheme and the name of the harddrive(s)
Determine how you want to partition the disk. I do not use anything fancy (yet).
Let’s go ahead and delete the existing partitions and create new partitions.
1fdisk /dev/nvme01 2fdisk d # delete until no partitions are left 3fdisk n # boot partition, type +512M for size 4fdisk n # for root partition, remainder of disk 5fdisk t L 1 # set to EFI 6fdisk p # check 7fdisk w # write Optional: if you need a swap partition just create an extra partition and prepare it as follows:
1mkswap /dev/nvme0n1p3 2swapon /dev/nvme0n1p3 Encrypt and mount
To encrypt the root partion with Luks:
1cryptsetup -y -v luksFormat /dev/nvme0n1p2 2cryptsetup open /dev/nvme0n1p2 cryptroot Set filesystem to ext4 and mount it:
1mkfs.ext4 /dev/mapper/cryptroot 2mount /dev/mapper/cryptroot /mnt Make filesystem for boot and mount
1mkfs.fat -F32 /dev/vme0n1p1 2mkdir /mnt/boot 3mount /dev/vme0n1p1 /mnt/boot Bootstrap
1pacstrap /mnt vim sudo grub efibootmgr linux linux-lts base base-devel dhcpcd linux-firmware 1genfstab -U /mnt >> /mnt/etc/fstab Now chroot into the newly mounted root:
1ln -sf /usr/share/zoneinfo/Europe/Amsterdam /etc/localtime 2hwclock --systohc 3 Edit /etc/locale.gen and uncomment en_US.UTF-8 UTF-8 and other needed locales.
Generate the locales by running:
Create the locale.conf(5) file, and set the LANG variable accordingly:
1/etc/locale.conf 2LANG=en_US.UTF-8 1/etc/hostname 2myhostname 3 4/etc/hosts 5127.0.0.1 localhost 6::1 localhost 7127.0.1.1 myhostname.localdomain myhostname Grub
This step is the most exciting. We need to create a ramdisk to configure early userspace. See here: https://en.wikipedia.org/wiki/Initial_ramdisk
- We need to make sure to add an encrypt hook before the filesystem is loaded
- We need to add the video driver so it starts before GDM (only for Gnome users)
Leave the rest of the file in tact.
1vim /etc/mkinitcpio.conf 2# only change this: 3MODULES=(i915) 4HOOKS=(base udev autodetect keyboard keymap consolefont modconf block encrypt filesystems fsck) Next generate the ramdisk:
1grub-install --target=x86_64-efi --efi-directory=/boot --bootloader-id=GRUB 2# if you didn't configure encryption, you should mount the EFI partition in /boot/efi and also set --efi-directory=/boot/efi Edit the grub conf to point to the encrypted root.
1vim /etc/default/grub # --> cryptdevice=/dev/nvme0n1p2:cryptroot 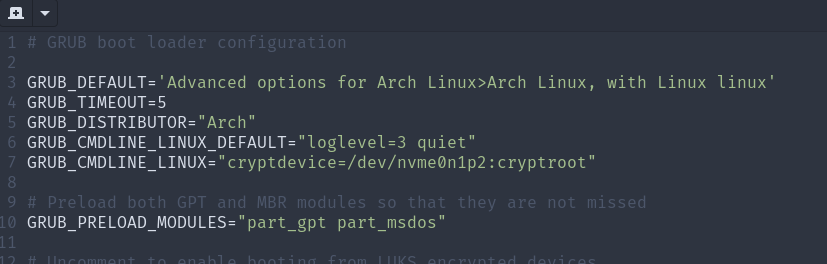
Here is a screenshot from my grub config. I also changed the order as you can see.
1grub-mkconfig -o /boot/grub/grub.cfg Add user and desktop environment
1passwd 2useradd -mg users -G wheel,storage,power -s /bin/bash jacqueline 3passwd jacqueline 4pacman -S xorg xorg-server gnome zsh cmake git neofetch jq ansible 5systemctl enable gdm.service 6systemctl enable NetworkManager.service 7systemctl enable dhcpcd Summary
Add an extra encryption key
If you regret your disk encryption key, you can easily set another one:
1sudo cryptsetup luksDump /dev/nvme0n1p2 2sudo cryptsetup luksAddKey --key-slot 1 /dev/nvme0n1p2 History
1ln -sd /usr/share/zoneinfo/Europe/Amsterdam /etc/localtime 2hwclock --systohc 3vim /etc/locale.gen 4locale-gen 5vim /etc/locale.conf 6vim /etc/hostname 7vim /etc/hosts 8vim /etc/mkinitcpio.conf 9mkinitcpio -P 10grub-install --target=x86_64-efi --efi-directory=/boot --bootloader-id=GRUB 11vim /etc/default/grub 12grub-mkconfig -o /boot/grub/grub.cfg 13passwd 14useradd -mg users -G wheel,storage,power -s /bin/bash jacqueline 15passwd jacqueline 16pacman -S xorg xorg-server gnome zsh cmake git neofetch jq ansible 17systemctl enable gdm.service 18systemctl enable NetworkManager.service 19systemctl enable dhcpcd Jacqueline’s misc notes
Featured Posts
Recent Posts
WebReflection / gnome.md
This is a personal reminder about few things I need to remember wheneve I install the most basic Gnome on ArchLinux.
bash <(curl -s https://archibold.io/install/gnome) This will install automatically pamac-aur , Firefox , and many other common software so that the rest of this document could be ignore.
Pamac, Pakku, Yay, or Yaourt
# GUI only bash <(curl -s https://archibold.io/install/pamac) # or bash <(curl -s https://archibold.io/install/pakku) # or bash <(curl -s https://archibold.io/install/yay) # or bash <(curl -s https://archibold.io/install/yaourt)
Actually way better than chromium, specially when it comes to video playing.
Stil instal chrome-gnome-shell to have gnome shell integrated in Firefox.
If you struggle with sites having weird CSS that mess up forms, so that you cannot read input, you have two options:
Add an about:config string (recommended)
Go to about:config , and right click on the table to add new widget.content.gtk-theme-override string, with the value Adwaita:light , then restart the browser.
If you cannot find your Firefox shortcut anymore, simply re-install it and everything should be fine.
sudo vi /usr/share/applications/firefox.desktop
Find all occurrences of Exec= and add Exec=env GTK_THEME=Adwaita to force bright theme instead.
This can be disturbing though, I wish people knew better how to style form tags.
Install both chromium and chromium-widevine , but also chrome-gnome-shell .
The latter will allow you to control shell extensions right away via Chrome. It works, it’s handy.
If Chromium keeps telling you there were issues in restoring the previous session, go to settings, advanced, and disable the «Continue running background apps when Chromium is closed» option.
If you like to write emoji here or there, install through Gnome Extensions the Emoji Selector.
If you like to change background via unsplash or other sites check Random Wallpaper out.
My favorite collection so far, from unsplash, is 1065376 , or 1339090 for 4K.
Settings, Devices, Mouse and Touchpad, set Tap to Click to ON if you don’t want to go insane.
Settings, Privacy, Location Services ON if you’d like to use Maps (online or the actual Gnome Map) which won’t be installed by default.
Settings, Details, Date & Time, set Automatic Date & Time ON if you’d like to have the right time on screen.
Open Gnome Tweaks to setup few things.
- in Appearance, set Themes to use Adwaita-dark, it’s literally exremely good looking
- go to Extensions and turn it on, if not already. Then enable User themes (or anything else you like)
- switch ON Maximize and Minimize under Windows
- code (or visual-studio-code-bin if you want the non open source version)
- telegram-desktop
- spotify via bash <(curl -s https://archibold.io/install/spotify) if you have HiDPi device
- ricoh-sp150-ppd (for the Ricoh SP 150 printer)
- inkscape
- gimp
- vlc
- transmission-gtk
The simple-scan should just work. If it doesn’t, reboot, attach your scanner back again and try again.
If it still doesn’t work I’ll publish an AUR package to force-boot these bloody lazy scanners that won’t show up right away.
I’ve instlaled both cups and system-config-printer .
The printer didn’t work until I’ve provided the previously mentioned ricoh-sp150-ppd . with that, it goes up like a charm.
Once drivers, cups, and system-config-printer are up, even the Settings, Devices, Printer bit of Gnome works well.
echo ' # for a better bash experience export HISTCONTROL=ignoredups:erasedups # no duplicate entries export HISTSIZE=100000 # many commands in ongoing session memory export HISTFILESIZE=100000 # many lines in .bash_history shopt -s histappend # append to historyinstead of overwriting it alias open=xdg-open # macOS open like function . /etc/profile.d/vte.sh # new terminal tabs in the same folder ' >> ~/.bashrc
On Wayland, try https://extensions.gnome.org/extension/1253/extended-gestures/ extension, and eventually disable the dynamic workspace, reducing the static to 1, if the four fingers get in your way.
To verify if your touchpad recognizes gestures, try sudo libinput debug-events .
Disable Page UP / Down Keys
Specially coming from an MBP, having PgUp and PgDn button beside arrows can be very annoying.
The way I’ve disabled/overwritten those buttons is via this /etc/systemd/system/no-pg-keys.service file:
[Unit] Description=No PgUp / PgDn keys [Service] User=root Type=simple ExecStart=/home/$USER/.no-pg-keys [Install] WantedBy=multi-user.target Replace $USER with your user name and save in /home/$USER/.no-pg-keys the following file:
#!/usr/bin/sh setkeycodes 0xe049 105 setkeycodes 0xe051 106
Make it executable via chmod +X /home/$USER/.no-pg-keys and be sure those keys are correct.
In my case I’ve mapped these to arrows themselves, so I don’t mistake my own intent.
You can systemctl enable no-pg-keys followed by systemctl start no-pg-keys now.
Some extra details about this on the internet.
#!/usr/bin/env bash for pub in $(ls ~/.ssh/*.pub); do pvt="$:0:-4>" if [ -f "$pvt" ]; then sudo chmod 600 "$pvt" sudo chmod 600 "$pub" eval $(ssh-agent -s) ssh-add "$pvt" fi done
Solve Failed to unmount /tmp folder
thacoon / arch-linux-gnome-install
This file contains bidirectional Unicode text that may be interpreted or compiled differently than what appears below. To review, open the file in an editor that reveals hidden Unicode characters. Learn more about bidirectional Unicode characters
| # Install Gnome and some other useful thins |
| # The official installation guide (https://wiki.archlinux.org/index.php/Installation_Guide) contains a more verbose description. |
| # And based on https://wiki.archlinux.de/title/Anleitung_f%C3%BCr_Einsteiger |
| # I have just copied commands from https://wiki.archlinux.de/title/Anleitung_f%C3%BCr_Einsteiger#Weitere_notwendige_Dienste |
| # It’s just to have it with one view after doing a [fresh installation](https://gist.github.com/thacoon/05d5a39606ab554455d6713e8a714b2c) |
| # Some useful services |
| pacman -S acpid ntp dbus cups cronie |
| systemctl enable acpid |
| systemctl enable ntpd |
| systemctl enable org.cups.cupsd.service |
| # nano /etc/ntp.conf # not needed |
| # For german time server de.pool.ntp.org |
| ntpd -gq |
| date # verify correct time |
| hwclock -w |
| # GUI installation |
| pacman -S xorg-server xorg-xinit |
| # Find out your graphics drivers |
| lspci | grep VGA |
| pacman -Ss xf86-video | less # |
| pacman -S YOUR_DRIVER |
| pacman -S xorg-drivers # For all if you do not know |
| # For labtops |
| pacman -S xf86-input-synaptics |
| # Minimal gnome installation |
| pacman -S gnome-shell nautilus gnome-terminal guake gnome-tweak-tool gnome-control-center xdg-user-dirs gdm |
| # The gnome terminal manager needs en_US.UTF-8 uncommented in locale.gen |
| # For guake you have to change the keyboard and format used in the Gnome settings |
| # If guake cannot display chars like: ä,ö,ü then regenerate the locales, like: |
| nano /etc/locale.gen # uncomment the needed lines like: de_DE.UTF-8 or en_US.UTF-8 |
| locale-gen |
| # set the system locale |
| localectl set-locale LANG=en_US.UTF-8 |
| # you need to restart gnome so gnome knows about the change or just reboot |
| # If you do not want a graphical user login |
| cp /etc/skel/.xinitrc /home/MYUSERNAME |
| # If there is no such file use: |
| cp /etc/X11/xinit/xinitrc /home/MYUSERNAME |
| mv ~/xinitrc ~/.xinitrc |
| nano ~/.xinitrc # As a normal user |
| # Add exec gnome-session but only one exec should be used |
| startx # Start Gnome session |
| # If you want to use a graphical user login |
| systemctl start gdm |
| systemctl enable gdm # If everything works fine, to use gdm automatically |
| # Install NetworkManager |
| # Gnome-keyring is needed to store the wifi passwords encrypted |
| sudo pacman -Sy networkmanager gnome-keyring |
| sudo systemctl start NetworkManager |
| sudo systemctl enable NetworkManager |
| # Install Firefox |
| sudo pacman -Sy firefox |
| # Screen sharing in the browsers may not work if you use Wayland. To fix this install: |
| sudo pacman -Sy xdg-desktop-portal xdg-desktop-portal-gnome |
| # Firefox supports this by default, for Chromium you need to enable the flag chrome://flags/#enable-webrtc-pipewire-capturer |
to solve gnome-terminal error:
Error constructing proxy for org.gnome.Terminal:/org/gnome/Terminal/Factory0: Error calling StartServiceByName for org.gnome.Terminal:
#localectl set-locale LANG=»en_US.UTF-8″ # after locale-gen