- ArchPKGs
- Full Tutorial on Installing systemd on Arch Linux/Manjaro/EndeavourOS
- Table of Contents
- systemd (Core) link
- Install link
- Update link
- Remove link
- systemd (Testing) link
- Install link
- Update link
- Remove link
- systemd (core-testing) link
- Install link
- Update link
- Remove link
- More Guides
- Installing feathernotes with Command Line on Arch Linux (Manjaro, Artix)
- Beginner’s Guide on Installing sch-rnd on Arch Linux/Manjaro/Garuda
- Installing perl6-websocket (Full Guide) on Arch Linux/Manjaro/RebornOS
- How to Install kcolorchooser (Complete Tutorial) on Arch Linux, Manjaro and Anarchy
- wlopm-git Install, Update and Uninstall Tutorial on Arch Linux (Manjaro/EndeavourOS)
- How to Install mingw-w64-qt5-script-static (Complete Tutorial) on Arch Linux, Manjaro and Anarchy
- SOLLUS-SOFT
ArchPKGs
Full Tutorial on Installing systemd on Arch Linux/Manjaro/EndeavourOS
There are 3 packages from Core, Testing and core-testing are named systemd . We would recommend going with either the packages from the official repositories or an AUR package tested by the community.
Table of Contents
systemd (Core) link
core/systemd is «system and service manager» according to its description. To install or uninstall this package ( core/systemd ) from Arch official repository (Core) on Arch Linux, Manjaro, EndeavourOS and Anarchy is fairly straightforward. This tutorial will be covering how to install/update/remove the package with either the built-in package manager pacman or an AUR helper like yay .
Install link
There are two typical ways to install core/systemd from Arch official repository (Core). pacman is the choice for you if you’re a seasoned Linux user and understand the concept of how packages are built. If not, yay is an acceptable alternative to install packages without the necessity to review PKGBUILD and build packages with makepkg by yourself.
Install with Pacman (Default) link
sudo pacman -S core/systemd
Install with Yay (AUR Helper) link
yay -S --repo core/systemd
Update link
Since Arch is a rolling-release Linux distro, it is required to do a whole system upgrade before updating an official package due to dependency issues.
Update with Pacman (Default) link
sudo pacman -Syu
Update with Yay (AUR Helper) link
Remove link
Uninstalling packages is the simplest of these three,just choose whether to keep the dependencies that no longer required by other packages and the configuration files generated by the package.
Uninstall with Pacman (Default) link
sudo pacman -R systemd
sudo pacman -Rs systemd
sudo pacman -Rns systemd
Uninstall with Yay (AUR Helper) link
yay -R systemd
yay -Rs systemd
yay -Rns systemd
systemd (Testing) link
Unless you know what you are doing, installing an unstable package ( testing/systemd ) might not be a good practice.
«system and service manager» is the maintainer’s definition of testing/systemd . To get this package ( testing/systemd ) from Arch official testing repository (Testing) on Arch Linux and Arch-based Linux distributions (e.g. Manjaro, EndeavourOS, Garuda, Parabola, ArcoLinux, BlackArch) is fairly simple. This guide will taught you how to install/update/remove the package with either the built-in package manager pacman or an AUR helper (e.g. yay ).
Install link
To enable Testing repository, first you’ll need to uncomment [testing] section of /etc/pacman.conf , then use sudo pacman -Syu to update the packages list and upgrade your system.
There are two well known approaches to install the unstable version of testing/systemd from Arch official repository (Testing). pacman is the choice for you if you’re an experienced Linux user and have the knowledge of how packages are built. Otherwise, yay is an acceptable alternative to install packages without the hassle of reviewing PKGBUILD and build packages with makepkg afterwards.
Install with Pacman (Default) link
sudo pacman -S testing/systemd
Install with Yay (AUR Helper) link
yay -S --repo testing/systemd
Update link
Since Arch is a rolling-release Linux distro, you should definitely not update an official package without doing a whole system upgrade due to dependency issues.
Update with Pacman (Default) link
sudo pacman -Syu
Update with Yay (AUR Helper) link
Remove link
Compared to installing and updating packages, removing is the most uncomplicated of these three,all you need to do is choose whether to purge the dependencies that no longer required by other packages and the configuration files used by the package.
Uninstall with Pacman (Default) link
sudo pacman -R systemd
sudo pacman -Rs systemd
sudo pacman -Rns systemd
Uninstall with Yay (AUR Helper) link
yay -R systemd
yay -Rs systemd
yay -Rns systemd
systemd (core-testing) link
core-testing/systemd is «system and service manager» referring to its description. To get this package ( core-testing/systemd ) from Arch official repository (core-testing) on Arch Linux, Manjaro, EndeavourOS, Parabola and Artix is pretty uncomplicated. This tutorial will taught you how to install/update/uninstall the package with either the built-in package manager pacman or an AUR helper like yay .
Install link
Two well known ways are used to install core-testing/systemd from Arch official repository (core-testing). pacman is the way to go if you’re a seasoned Linux user and have the knowledge of how packages are built. Otherwise, yay is a convenient alternative to install packages without the prerequisite to review PKGBUILD and build packages with makepkg afterwards.
Install with Pacman (Default) link
sudo pacman -S core-testing/systemd
Install with Yay (AUR Helper) link
yay -S --repo core-testing/systemd
Update link
Since Arch is a rolling-release Linux distribution, it is required to do a whole system upgrade before updating an official package due to safety reason.
Update with Pacman (Default) link
sudo pacman -Syu
Update with Yay (AUR Helper) link
Remove link
Compared to installing and updating packages, removing is the simplest of these three,just choose whether to keep the dependencies that no longer required by other packages and the configuration files generated by the package.
Uninstall with Pacman (Default) link
sudo pacman -R systemd
sudo pacman -Rs systemd
sudo pacman -Rns systemd
Uninstall with Yay (AUR Helper) link
yay -R systemd
yay -Rs systemd
yay -Rns systemd
More Guides
Installing feathernotes with Command Line on Arch Linux (Manjaro, Artix)
«Lightweight Qt hierarchical notes-manager» is the developer’s profile of extra/feathernotes. To get this package (extra/feathernotes) from Arch official repository (Extra) on Arch Linux, Manjaro, EndeavourOS, ArcoLinux, Artix, Garuda and Anarchy is relatively easy. This tutorial will show you step-by-step how to install/update/uninstall the package with either the built-in package manager pacman or an AUR helper (e.g. yay).
Beginner’s Guide on Installing sch-rnd on Arch Linux/Manjaro/Garuda
sch-rnd is «simple, modular, scriptable schematics editor» quoting from its description. To get this package (sch-rnd) from AUR (Arch User Repository) on Arch Linux and Arch-based distributions (e.g. Manjaro, EndeavourOS, BlackArch) is fairly simple. This guide will be covering how to install/update/remove the package with either the default package manager pacman or an AUR helper (e.g. yay).
Installing perl6-websocket (Full Guide) on Arch Linux/Manjaro/RebornOS
«WebSocket library for Perl6» is the maintainer’s description of perl6-websocket. To get perl6-websocket from AUR (Arch User Repository) on Arch Linux, Manjaro, EndeavourOS, ArcoLinux, RebornOS and Garuda is quite straightforward. This guide will show you step-by-step how to install, update and uninstall the package with either the built-in package manager pacman or an AUR helper like yay.
How to Install kcolorchooser (Complete Tutorial) on Arch Linux, Manjaro and Anarchy
extra/kcolorchooser is «Color Chooser» according to its profile. To install extra/kcolorchooser from Arch official repository (Extra) on Arch Linux, Manjaro, EndeavourOS, Anarchy, RebornOS, Artix and ArcoLinux is relatively simple. This tutorial will show you step-by-step how to install, update and remove the package with either the default package manager pacman or an AUR helper (e.g. yay).
wlopm-git Install, Update and Uninstall Tutorial on Arch Linux (Manjaro/EndeavourOS)
wlopm-git is «Wayland output power management.» quoting from its own outline. To get wlopm-git from AUR (Arch User Repository) on Arch Linux and Arch-based Linux distros (e.g. Manjaro, EndeavourOS, BlackArch) is comparatively simple. This guide will show you step-by-step how to install/update/uninstall the package with either the default package manager pacman or an AUR helper (e.g. yay).
How to Install mingw-w64-qt5-script-static (Complete Tutorial) on Arch Linux, Manjaro and Anarchy
«Classes for making Qt applications scriptable. Provided for Qt 4.x compatibility (mingw-w64)» is their profile of mingw-w64-qt5-script-static. To install mingw-w64-qt5-script-static from AUR (Arch User Repository) on Arch Linux and Arch-based distributions (e.g. Manjaro, EndeavourOS, Anarchy, Parabola, ArcoLinux, Artix) is fairly straightforward. This guide will show you step-by-step how to install, update and uninstall the package with either the default package manager pacman or an AUR helper like yay.
More guides… copyright 2023 ArchPKGs. All Rights Reserved.
SOLLUS-SOFT
Образ скачан отсюда https://www.archlinux.org/download/ и записан на USB-носитель при помощи приложения Etcher . Ознакомится можно здесь . В Windows настоятельно рекомендую использовать Rufus и не забывать выставить в настройках схему разделов и тип интерфейса. Скачать можно здесь

Посмотрим наши старые загрузочные записи (если есть)

1. Видим, что загрузились через USB UEFI
2. Запись нашего предыдущего загрузчика. Если в свое время устанавливались другие дистрибутивы в раздел EFI, то таких записей может быть несколько. В любом случае визуально все можно понять.
Удаляем не нужные записи командой efibootmgr -b x -B, где x — номер записи в списке по последней цифре. В моем случае это 0.
efibootmgr -b 0 -B
Синхронизация системных часов


При обновлении пакетов видна скорость скачивания с сервера. Если устраивает ,то следующий пункт можно пропустить.

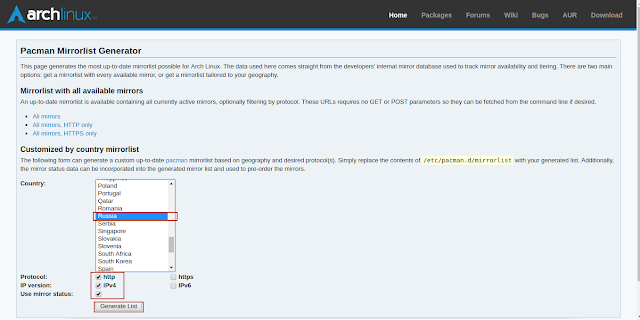
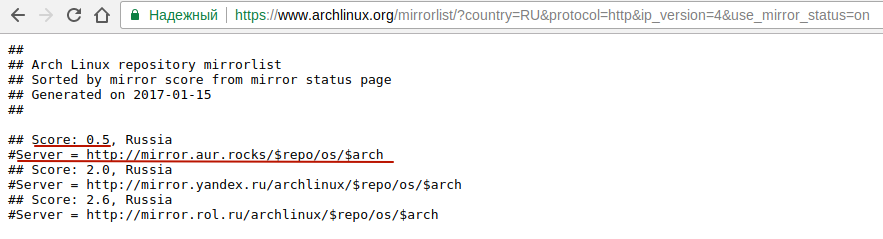
P.S. Для выбора лучшего сервера по скорости и локализации можно воспользоваться ссылкой https://www.archlinux.org/mirrorlist/

Устанавливаем редактор nano
127.0.0.1 localhost
::1 localhost
127.0.1.1 hostname.localdomain hostname

pacman -S efibootmgr iw wpa_supplicant dialog netctl dhcpcd
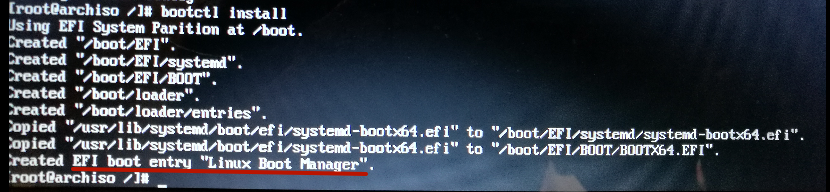
Запускаем менеджер загрузки
bootctl install
Будут созданы необходимые директории и точка входа загрузчика
Настраиваем менеджер загрузки
nano /boot/loader/loader.conf
Закомментируем все строки, добавим свои
default arch
timeout 5
editor 1
Инфа из WIKI


Создаем файлы конфигурации
Для пользователей процессоров Intel нужно установить дополнительный пакет
pacman -S intel-ucode
nano /boot/loader/entries/arch.conf
title Arch Linux
linux /vmlinuz-linux
# initrd /intel-ucode.img # раскомментировать для пользователей Intel
initrd /initramfs-linux.img
options root=/dev/ sda1 rw
Здесь sda1 — это наш примонтированный root раздел
Просмотрим последовательность при запуске системы