- Arduino control LED via Bluetooth
- Hardware Required
- About LED and Bluetooth Module
- Wiring Diagram
- Arduino Code — controls LED via Bluetooth/BLE
- Quick Steps
- Video Tutorial
- ESP32 Serial Communication over Bluetooth Using Arduino IDE
- Introduction to ESP32 Bluetooth Serial Communication Using Arduino IDE
- Initializing ESP32 Bluetooth
- Connecting ESP32 Bluetooth with PC
- Reading Serial Data over Bluetooth Communication
- Conclusion
- About the author
- Kashif
- Arduino — BLE
- Hardware Required
- About HM-10 Bluetooth Module
- Pinout
- About Bluetooth Serial Monitor App
- Wiring Diagram
- How To Program For Bluetooth
- Arduino sends data to Bluetooth App on Smartphone
- Quick Steps
- Bluetooth App Send data To Arduino
- Quick Steps
- Arduino Code — Control LED with smartphone App via BLE
- Arduino Code — Control Servo Motor with smartphone App via BLE
- Video Tutorial
Arduino control LED via Bluetooth
In this tutorial, we are going to learn how program Arduino to control a LED via Bluetooth or BLE.
This tutorial provides the instruction for both modules
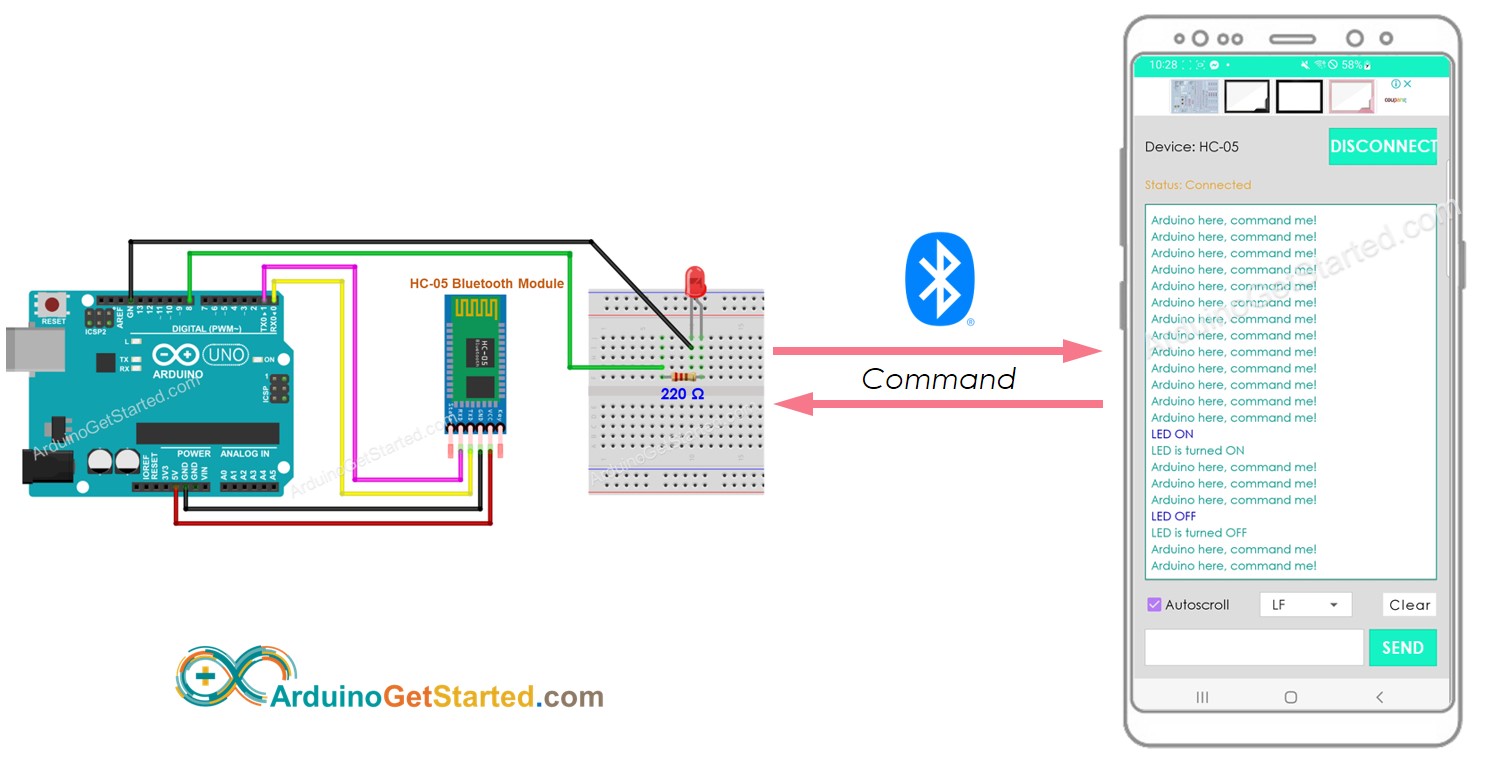
We will use the Bluetooth Serial Monitor App on smartphone to send commands to Arduino. The commands include:
Hardware Required
Or you can buy the following sensor kit:
Please note: These are affiliate links. If you buy the components through these links, We may get a commission at no extra cost to you. We appreciate it.
About LED and Bluetooth Module
If you do not know about LED and Bluetooth Module (pinout, how it works, how to program . ), learn about them in the following tutorials:
Wiring Diagram
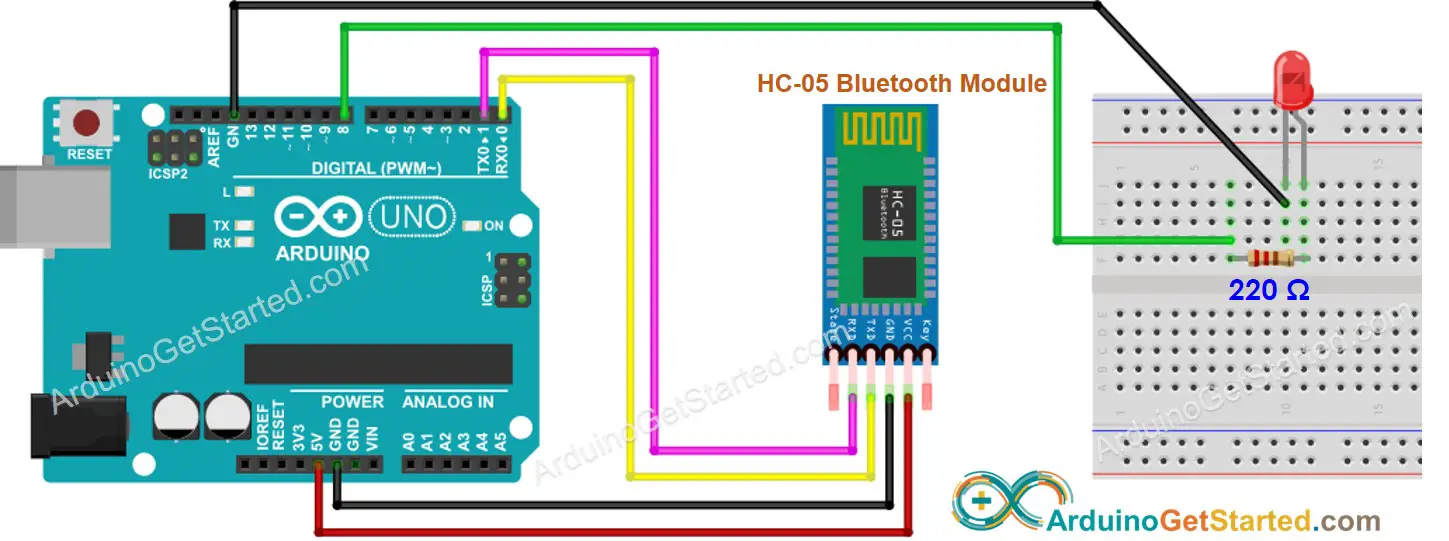
This image is created using Fritzing. Click to enlarge image
This image is created using Fritzing. Click to enlarge image
Arduino Code — controls LED via Bluetooth/BLE
The below code works for both HC-10 Bluetooth module and HM-10 BLE module
Quick Steps
Click Upload button on Arduino IDE to upload code to Arduino. If you are unable to upload code to your Arduino, try disconnecting the TX and RX pins from the Bluetooth module, uploading the code, and then reconnecting the RX/TX pins again.
You may wonder how Arduino can receive a complete command? For example, when we send “OFF” command, how Arduino can know the command is “O” , “OF” or “OFF” ?
⇒ When sending a command, The bluetooth App appends a newline character ( ‘\n’ ) by selecting “newline” option on the App. Arduino will read data until it meets the newline character. The newline character acts as a command delimiter.
If the Bluetooth Serial Monitor app is useful for you, please give it a 5-star rating on Play Store. Thank you!
Video Tutorial
We are considering to make the video tutorials. If you think the video tutorials are essential, please subscribe to our YouTube channel to give us motivation for making the videos.
ESP32 Serial Communication over Bluetooth Using Arduino IDE
![]()
ESP32 is a microcontroller board that has dual support for WiFi and Bluetooth. It comes with dual Bluetooth classic and Bluetooth Low Energy. Using Bluetooth, we can transfer data from different sensors to ESP32 or can create a mesh network of ESP32 Bluetooth inside our project.
This tutorial covers how we can communicate serially using the Bluetooth of ESP32 with a PC. Here we will transmit a string to the Arduino IDE serial monitor while connecting the ESP32 to the PC not serially but using the Bluetooth connection.
Introduction to ESP32 Bluetooth Serial Communication Using Arduino IDE
Serial communication is important when it comes to microcontrollers as it allows devices to exchange data between them. ESP32 comes with UART and multiple other communication protocols that allows it to exchange data with a PC and if required print it on a serial monitor.
ESP32 features Bluetooth support which means we can configure its Bluetooth in such a way that ESP32 communicates serially, and we can print the received data over Bluetooth on the serial monitor.
For this we will be calling the SerialBT() function from the Arduino BluetoothSerial.h library.
Initializing ESP32 Bluetooth
Before we can communicate over Bluetooth, we have to initialize it first for that the steps will be helpful.
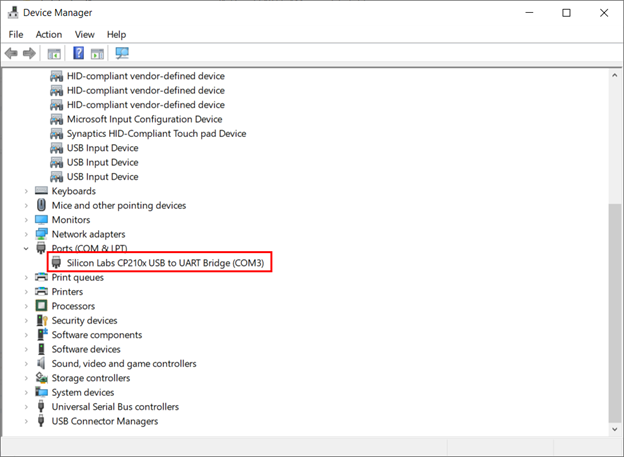
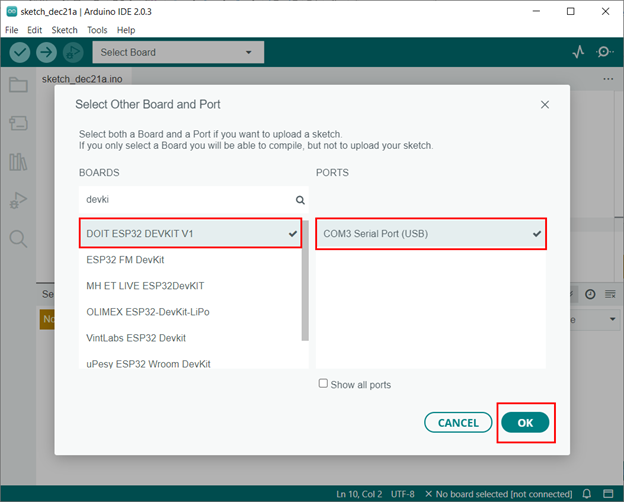
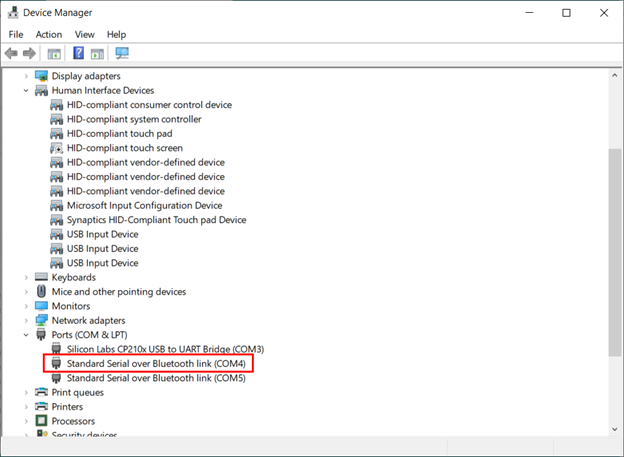
Step 1: Connect ESP32 board with PC using the Micro USB cable. After connecting check, the COM port at which the ESP32 board is connected. Open device manager and here we can see ESP32 is connected at COM3:
Step 2: Now open Arduino IDE and select the ESP32 board along with the same COM port:
Step 3: Now upload the given code to the ESP32 board:
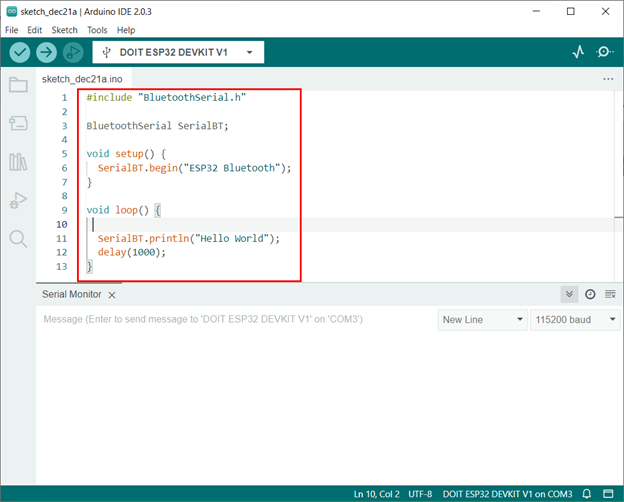
This code started by initializing the Bluetooth Serial library by including the “BluetoothSerial.h”.
After that Bluetooth SSID/Name is initialized using the command SerialBT.begin().
In the end inside the loop part a string Hello World will constantly print over the serial monitor using the ESP32 Bluetooth connection.
#include «BluetoothSerial.h»
BluetoothSerial SerialBT;
void setup ( ) {
SerialBT.begin ( «ESP32 Bluetooth» ) ;
}
void loop ( ) {
SerialBT.println ( «Hello World» ) ;
delay ( 1000 ) ;
}
Now we have successfully configured the ESP32 Bluetooth.
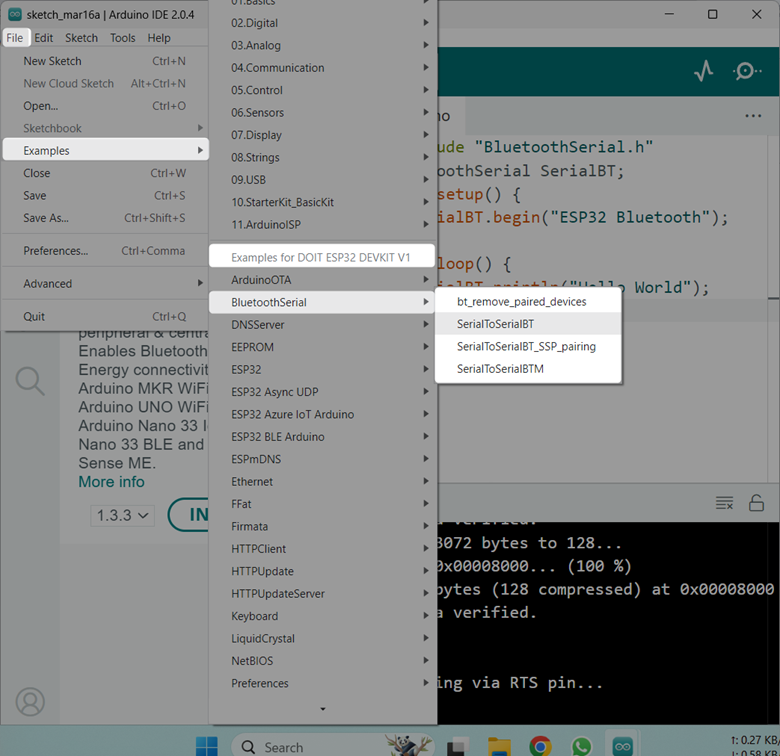
Note: The BluetoothSerial.h is by default installed in Arduino IDE once we add the ESP32 board core. We don’t need to separately install this library. You can also try different examples related to BluetoothSerial.h library by going to: to File>Examples>Bluetooth Serial
Before you can use this Library make sure the ESP32 board is added in Arduino IDE. Read the article Installing the ESP32 Board in Arduino IDE for more information on installation.
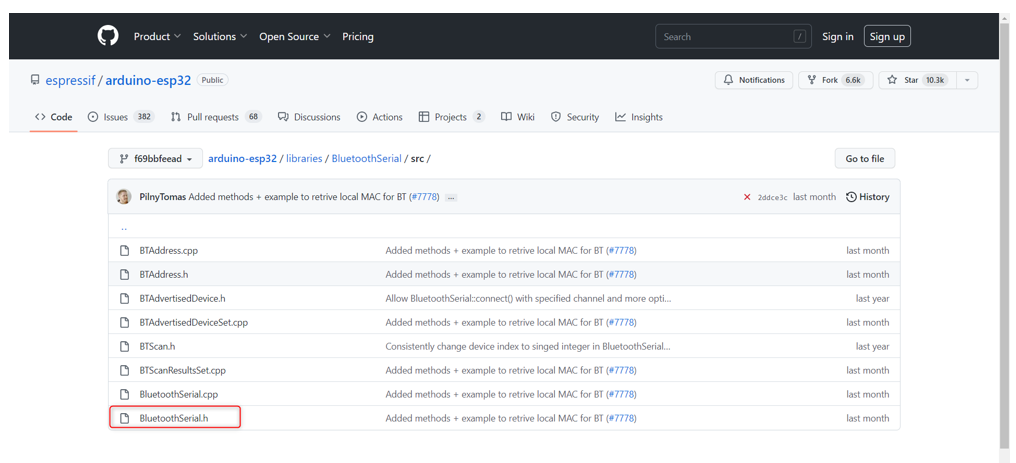
Visit the following Espressif Systems ESP32 GitHub repository to learn more about BluetoothSerial.h library: [GitHub Arduino-ESP32/BluetoothSerial].
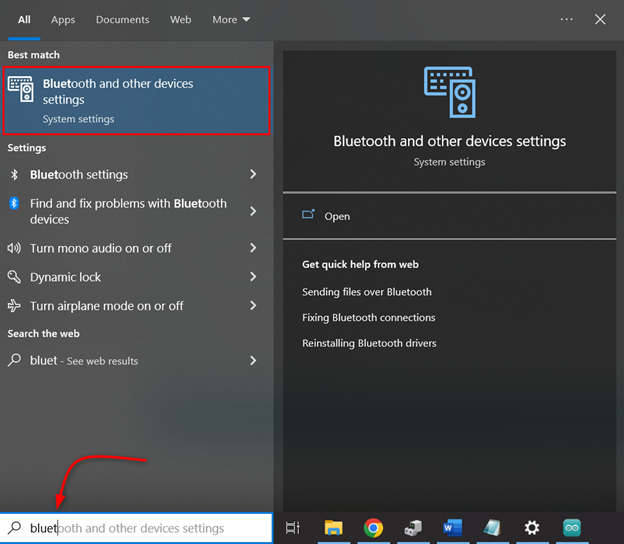
Connecting ESP32 Bluetooth with PC
As ESP32 Bluetooth is configured follow the steps to connect ESP32 Bluetooth with PC.
Step 1: Open Bluetooth settings in Windows:
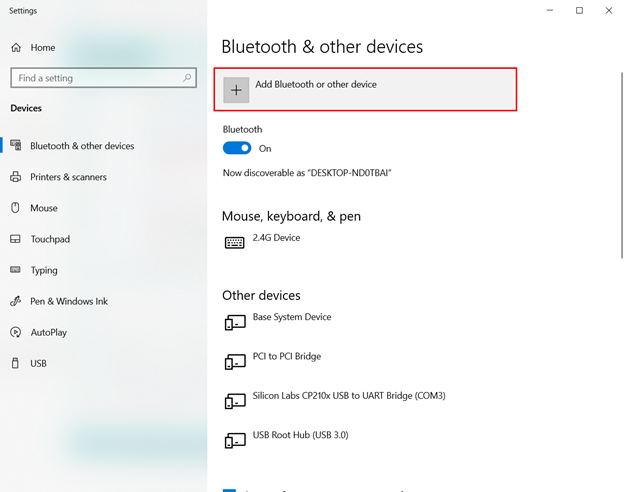
Step 2: Click Add a Bluetooth Device:
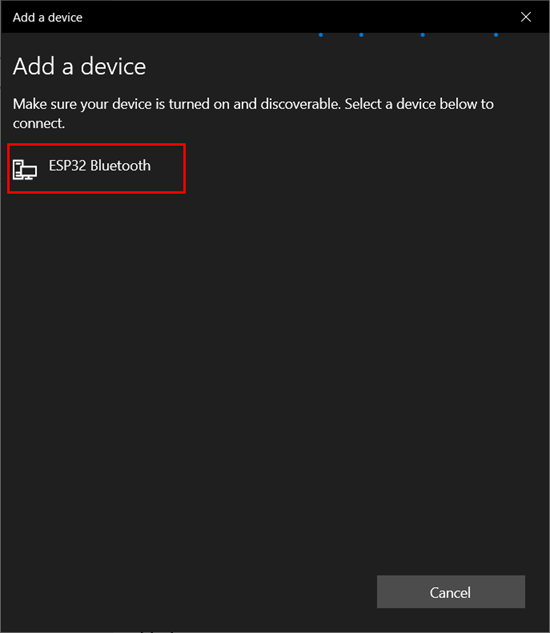
Step 3: Select Bluetooth device:

Step 4: Click ESP32 Bluetooth. Here you will see any name of ESP32 which you defined inside the Arduino code:
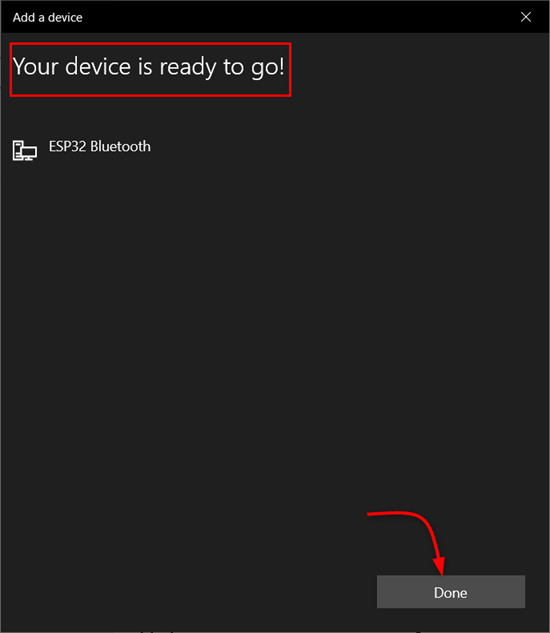
Step 5: Once the ESP32 Bluetooth is successfully connected below a message will appear:
Step 6: In device manager we can see COM port for ESP32 Bluetooth. Knowing this COM port is important as it will help us to receive the data over the serial monitor in the Arduino IDE:
Now we have successfully connected ESP32 with PC over Bluetooth communication.
Reading Serial Data over Bluetooth Communication
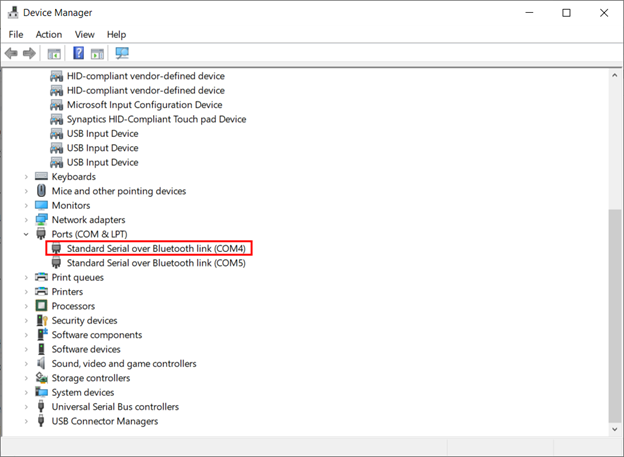
To read serial data over Bluetooth first we have to disconnect the ESP32 from the PC so it will not establish any UART serial communication. After disconnecting we can verify it from the Device Manager.
The image shows ESP32 is disconnected from the PC.
Note: Remember to power ESP32 from any other PC or using the power adapter. This will help to remain ESP32 Bluetooth turned on.
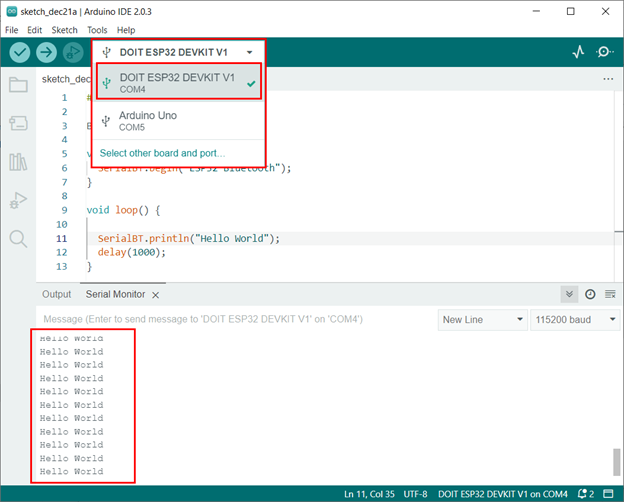
After disconnecting the ESP32 from the PC, open the Arduino IDE and select the COM port at which ESP32 Bluetooth is connected.
After selecting the right port, we can see the ESP32 is continuously transmitting the Hello World string over the serial monitor using Bluetooth communication.
We have successfully received data using the Serial Bluetooth of ESP32.
Conclusion
ESP32 is a versatile programming microcontroller board. It gives users multiple methods for communication like Bluetooth WiFi or using the UART, SPI or any other communication protocol. Here we have covered how ESP32 Bluetooth can be configured for serial communication. For a complete step by step process read the tutorial.
About the author
Kashif
I am an Electrical Engineer. I love to write about electronics. I am passionate about writing and sharing new ideas related to emerging technologies in the field of electronics.
Arduino — BLE
Data exchange between Arduino and a smartphone app through BLE. Communication between two Arduinos via BLE will be covered in another tutorial.
Control of various devices connected to Arduino through the smartphone app, with examples including an LED and servo motor.
It’s worth noting that this tutorial specifically covers Bluetooth Low Energy (BLE, Bluetooth 4.0). If you are looking for information on Classic Bluetooth (Bluetooth 2.0), please refer to a similar tutorial Arduino — Bluetooth.
Hardware Required
Or you can buy the following sensor kit:
Please note: These are affiliate links. If you buy the components through these links, We may get a commission at no extra cost to you. We appreciate it.
About HM-10 Bluetooth Module
The HM-10 is a Serial BLE module that functions as a Serial to Bluetooth Low Energy converter. It performs the following actions:
Receives data from the Serial RX pin and transmits it to a paired device such as a smartphone via BLE
Specifically, when using an Arduino to communicate with a smartphone app (Android/iOS), the following occurs:
Pinout
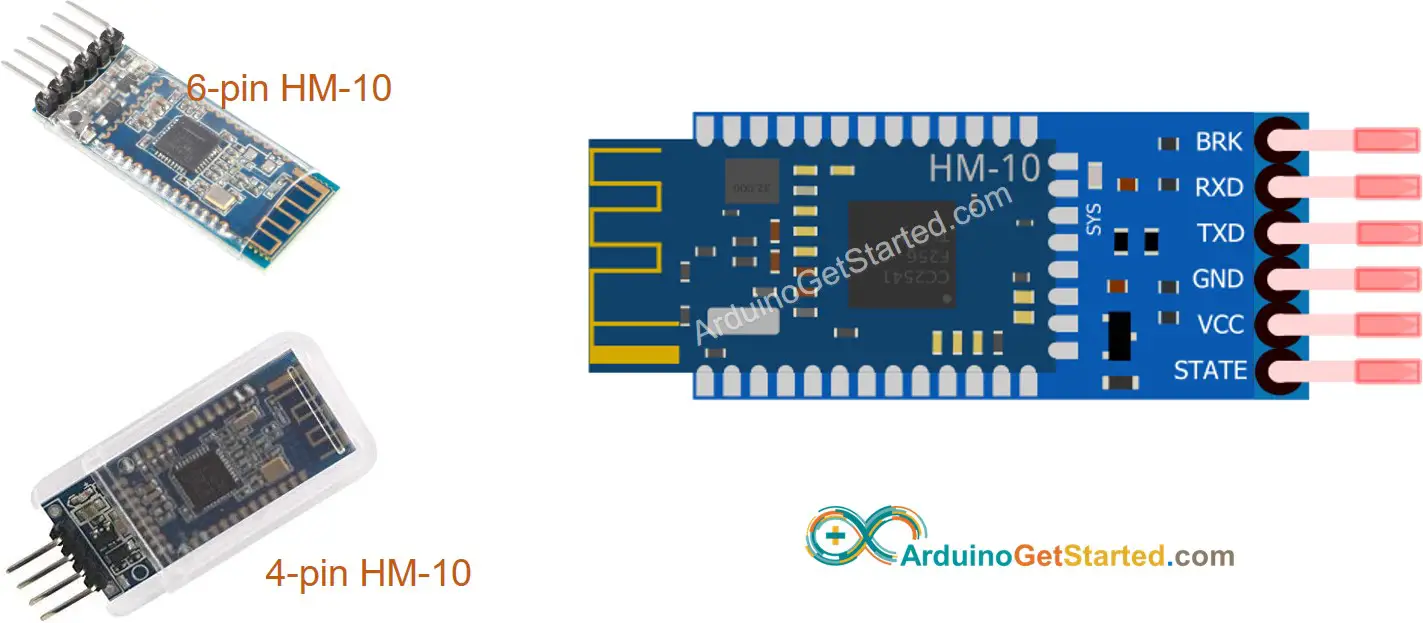
The HM-10 BLE Module has 6 pins:
RX pin: Serial data pin, connect this pin to the TX pin of Arduino. The data received from this pin will be sent to Bluetooth.
TX pin: Serial data pin, connect this pin to the RX pin of Arduino. The data received via BLE will be sent to this pin as serial data.
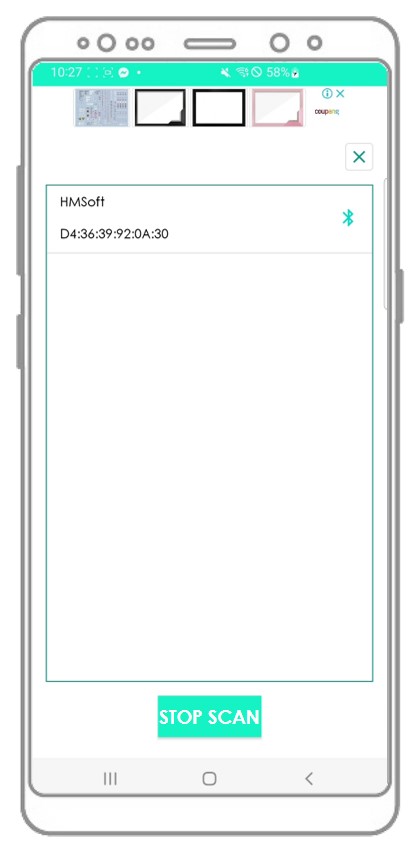
About Bluetooth Serial Monitor App
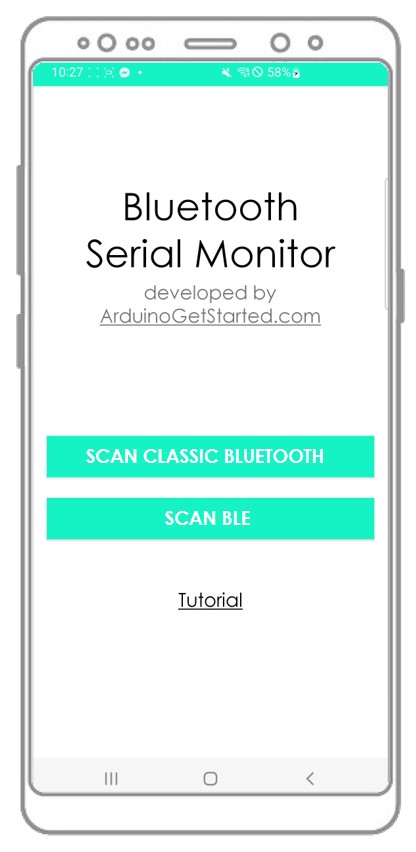
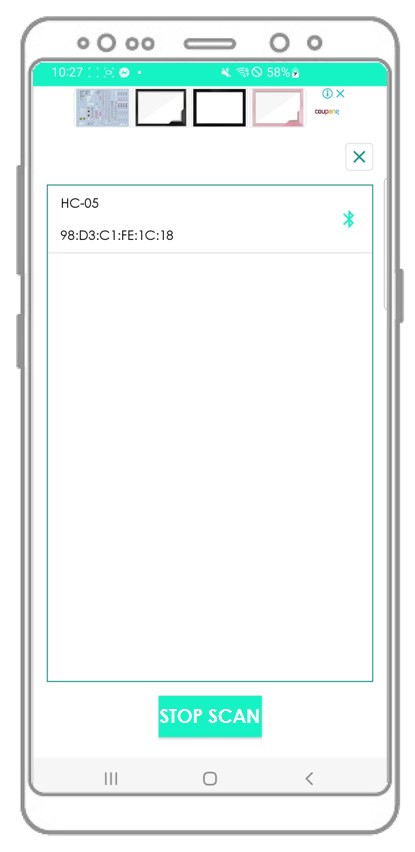
The Bluetooth Serial Monitor App is a mobile application that mimics the appearance of the Serial Monitor in Arduino IDE. It allows communication with an Arduino board through Bluetooth without the need for additional code in the Arduino sketch. To use it, follow these steps:
With these steps completed, you can now send and receive data from the Arduino as if you were using the Serial Monitor in Arduino IDE, without the need to modify your existing Arduino code or add any Bluetooth-specific code.
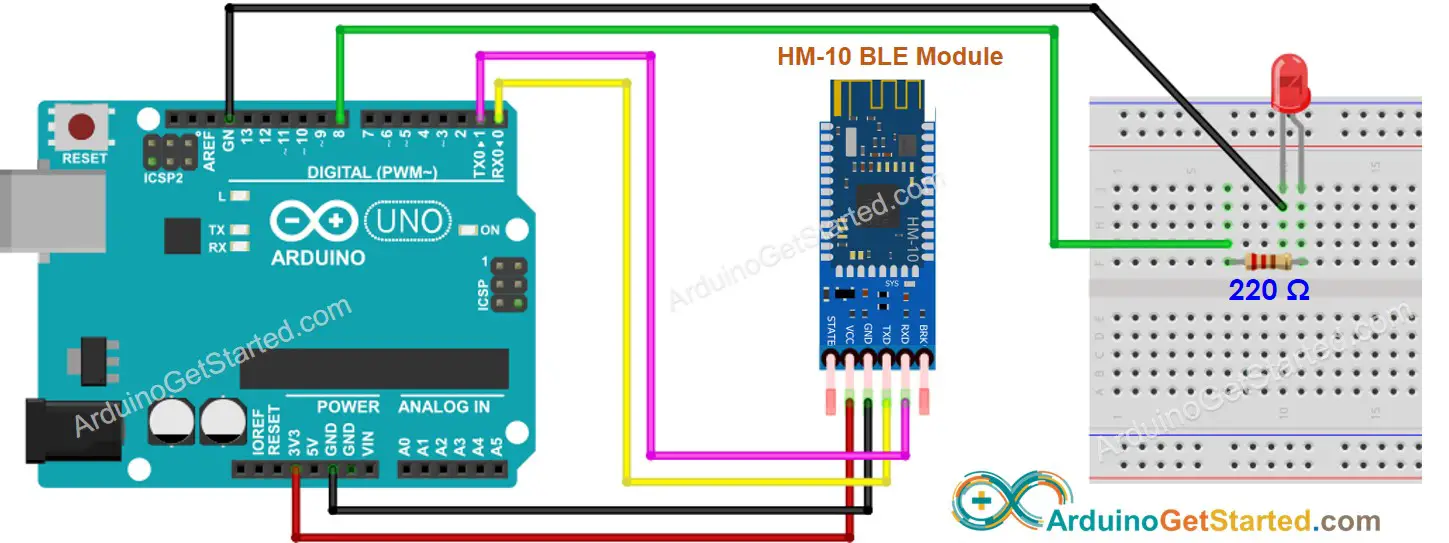
Wiring Diagram
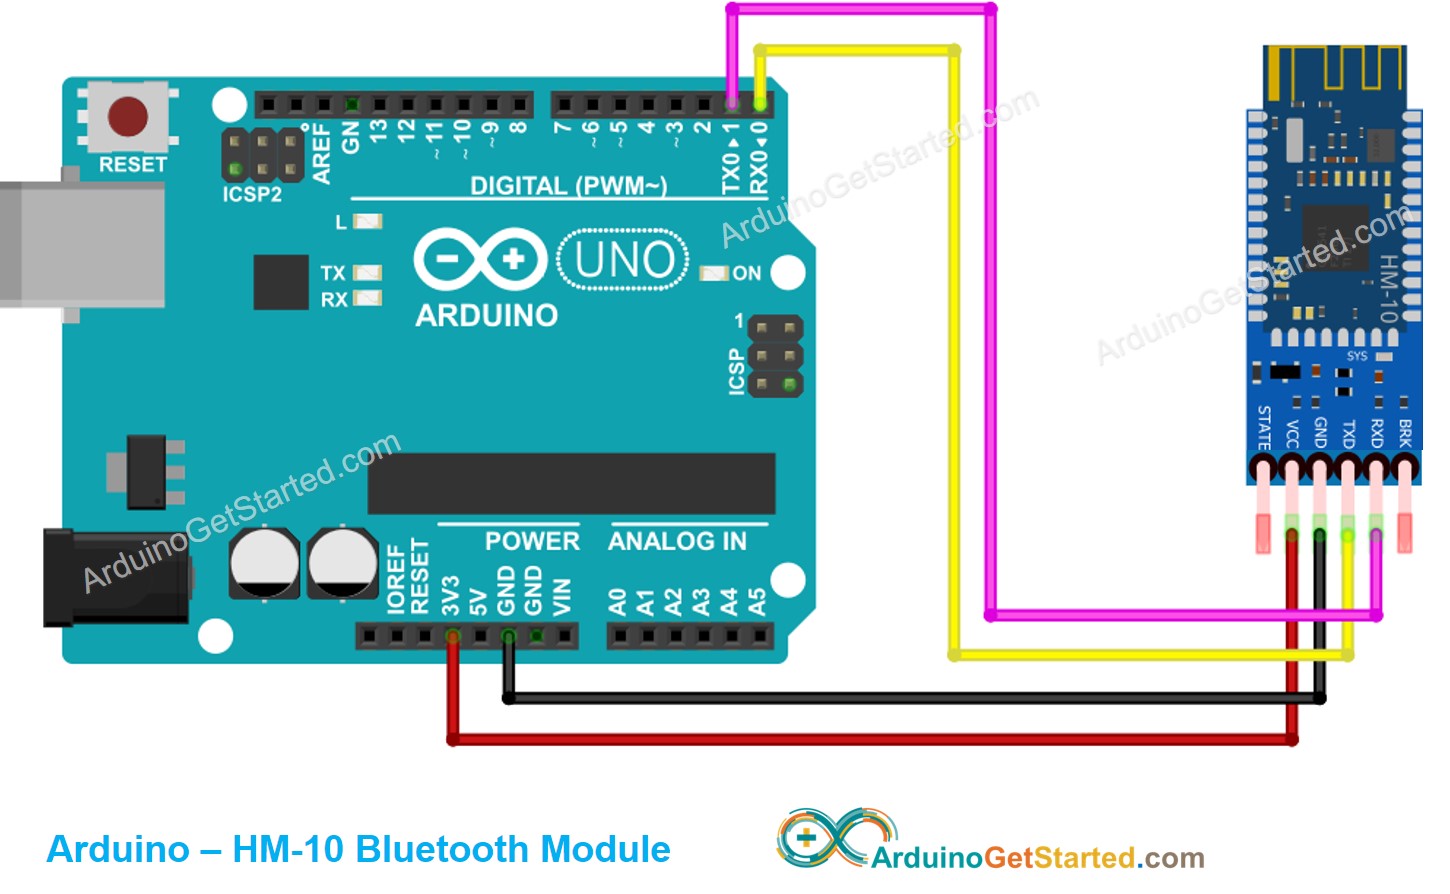
This image is created using Fritzing. Click to enlarge image
| Arduino Pins | HM-10 Bluetooth Pins |
|---|---|
| RX (Pin 0) | TX |
| TX (Pin 1) | RX |
| 5V | VCC |
| GND | GND |
| BKR (NOT connected) | |
| STATE (NOT connected) |
The Arduino code can use other pins by replacing the Serial object with an alternative such as Serial1, Serial2, or SoftwareSerial (if available).
How To Program For Bluetooth
No specialized Bluetooth code is necessary, only Serial code is needed.
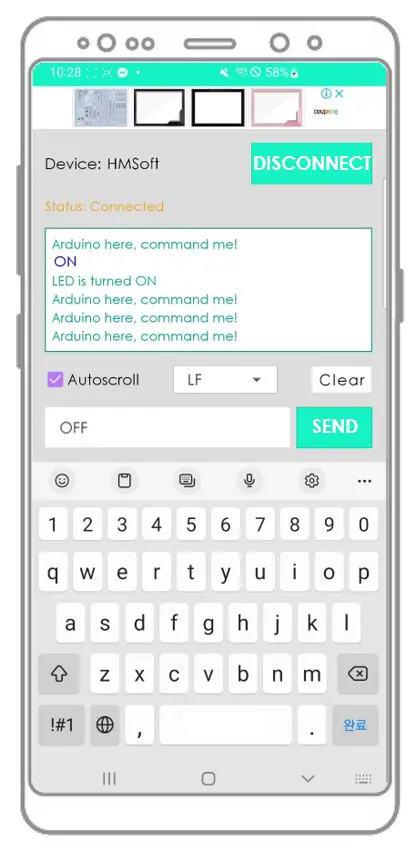
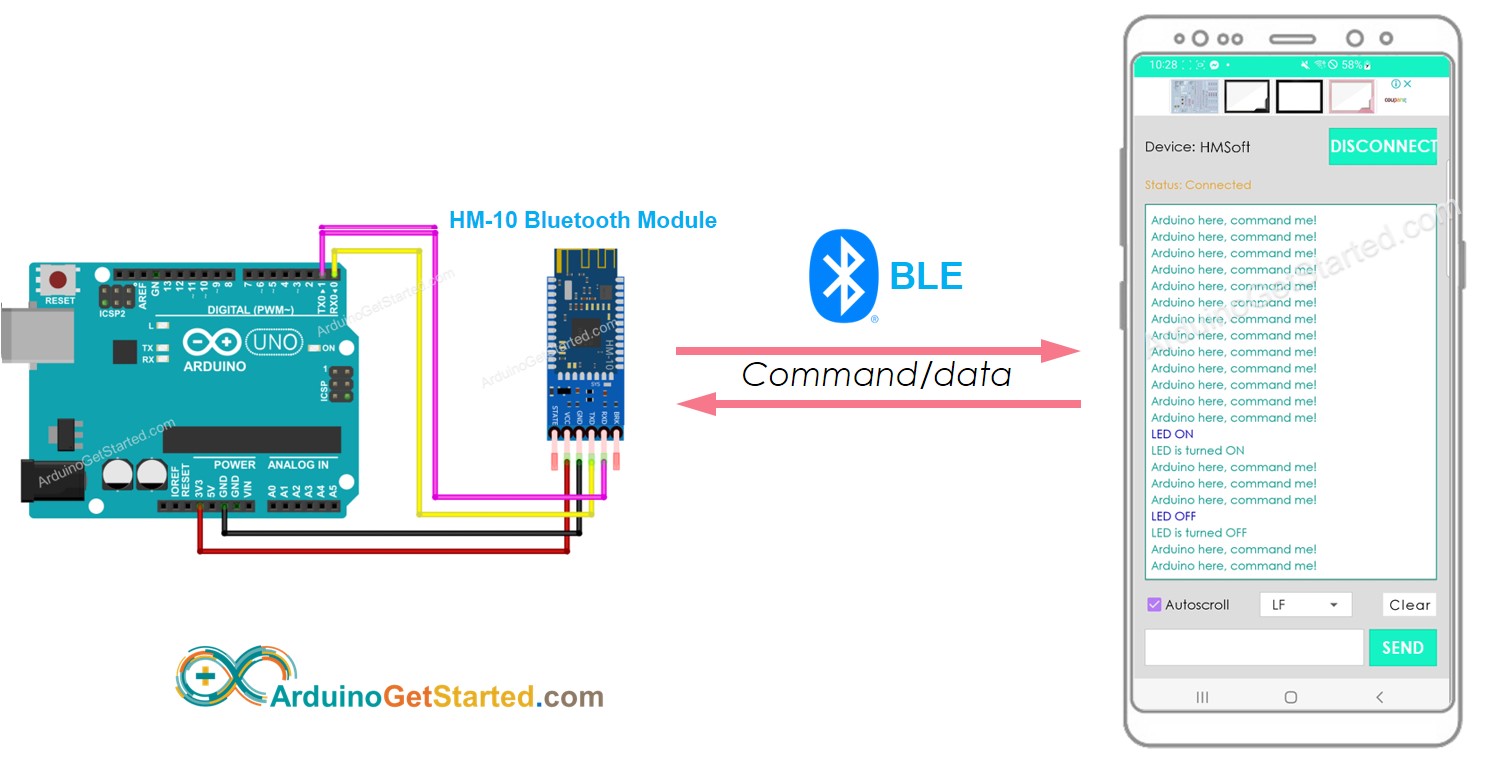
Arduino sends data to Bluetooth App on Smartphone
To transmit data from an Arduino board to a Bluetooth app on a smartphone, the following Arduino code can be used. This example demonstrates sending the message “Arduino here, command me!” from the Arduino to the smartphone app every second
/* * Created by ArduinoGetStarted.com * * This example code is in the public domain * * Tutorial page: https://arduinogetstarted.com/tutorials/arduino-ble */ void setup () < Serial . begin (9600); >void loop () < Serial . println ( "Arduino here, command me!" ); delay (1000); >
Quick Steps
To use the code and connect an Arduino board to a smartphone via BLE, follow these steps:
Open the Arduino IDE, copy the code provided above, and upload it to the Arduino board. If you are unable to upload the code, disconnect the TX and RX pins from the Bluetooth module, upload the code, and then reconnect the RX/TX pins.
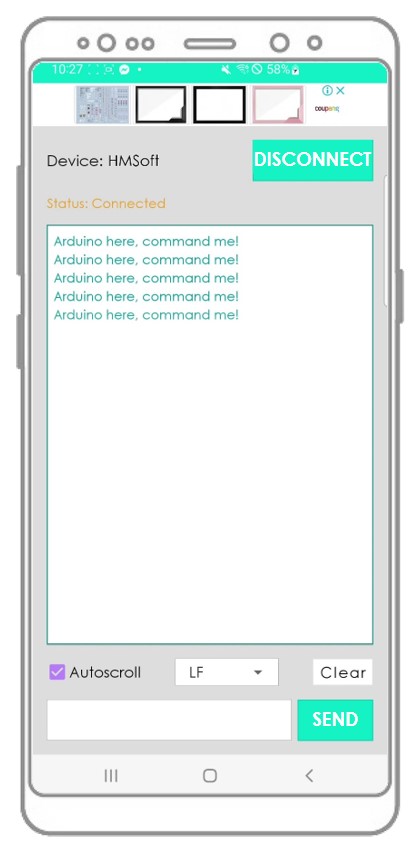
Arduino here, command me! Arduino here, command me! Arduino here, command me! Arduino here, command me! Arduino here, command me!
If you follow the steps and run the code, you will observe that the data displayed on the Serial Monitor of the Arduino IDE and on the Android app will match.
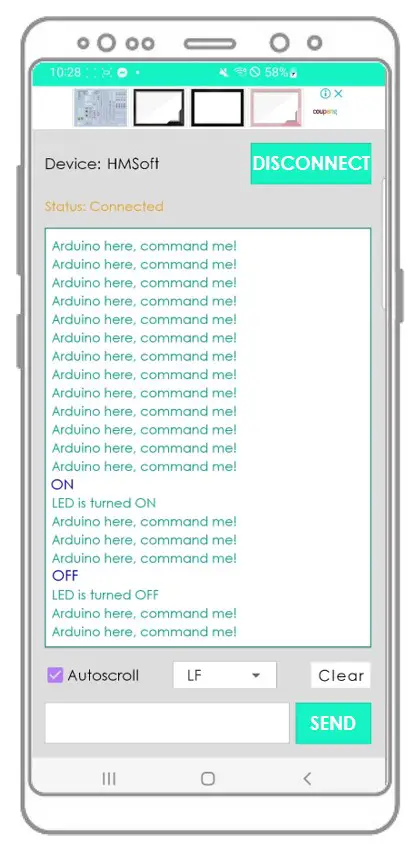
Bluetooth App Send data To Arduino
The code below performs the following actions:
The Arduino board will read the incoming data and then sends a response back to the Bluetooth device.
Quick Steps
Here are the steps to use the code with Arduino and an Android app:
Open Android App and pair it with the HM-10 Bluetooth module using the instructions provided in a previous example.

The Arduino board will receive the data, print a response to the Serial port. This data will be sent to the Bluetooth app.
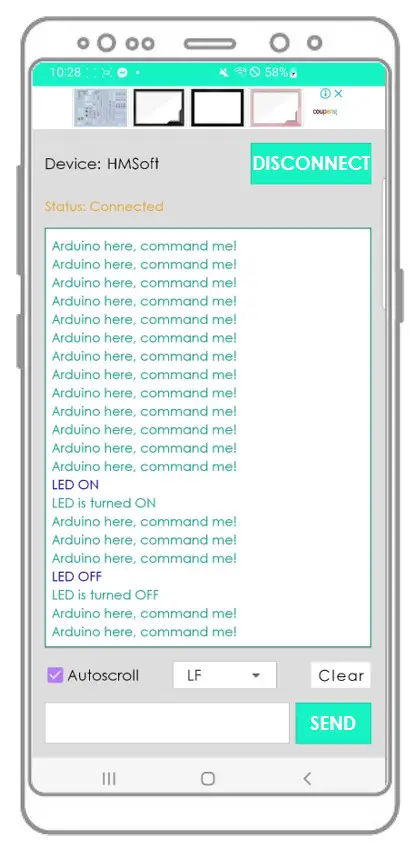
Arduino here, command me! Arduino here, command me! Arduino here, command me! Arduino here, command me! Arduino here, command me! Arduino here, command me! LED ON LED is turned ON Arduino here, command me! Arduino here, command me! Arduino here, command me! LED OFF LED is turned OFF Arduino here, command me! Arduino here, command me!
When you complete the steps above, you will notice that the information displayed on the Serial Monitor of the Arduino IDE and the Android app will be the same
Arduino Code — Control LED with smartphone App via BLE
The following Arduino example code utilizes commands “ON” and “OFF” received through the Bluetooth Serial Monitor App to turn on/off a built-in LED.
You can see the instructions in more detail in Arduino controls LED via Bluetooth/BLE tutorial
Arduino Code — Control Servo Motor with smartphone App via BLE
The following Arduino code receives an angle value from the Bluetooth Serial Monitor App to control the angle of a servo motor.
/* * Created by ArduinoGetStarted.com * * This example code is in the public domain * * Tutorial page: https://arduinogetstarted.com/tutorials/arduino-ble */ // NOTE: change the Serial to other Serial/Software Serial if you connects Bluetooth module to other pins # include < Servo .h>Servo servo; // create servo object to control a servo int pos = 0; // variable to store the servo position void setup () < Serial . begin (9600); servo. attach (11); // attaches the servo on pin 11 to the servo object >void loop () < if ( Serial . available ()) < // if there is data comming int angle = Serial . parseInt (); if (angle >= 0 && angle <= 180) < servo. write (angle); // rotate servo Serial . print ( "Rotated servo to angle: " ); // reports action to smartphone app Serial . println (angle); >else < Serial . print ( "Invalid angle: " ); // reports invalid value to smartphone app Serial . println (angle); >> >
You can see the instructions in more detail in Arduino controls Servo Motor via Bluetooth/BLE tutorial
If the Bluetooth Serial Monitor app is useful for you, please give it a 5-star rating on Play Store. Thank you!
Video Tutorial
We are considering to make the video tutorials. If you think the video tutorials are essential, please subscribe to our YouTube channel to give us motivation for making the videos.