- Saved searches
- Use saved searches to filter your results more quickly
- sparkfun/ESP8266_WiFi_Shield
- Name already in use
- Sign In Required
- Launching GitHub Desktop
- Launching GitHub Desktop
- Launching Xcode
- Launching Visual Studio Code
- Latest commit
- Git stats
- Files
- README.md
- About
- Arduino ESP8266 WiFi Shield
- Using as-is
- Rewiring
- Pixl.js
- Software
- Client
- Access point
- Buying
- Arduino Wi-Fi Shield – плата расширения на базе ESP8266 (ESP-12E)
- Arduino Wi-Fi Shield — плата расширения на базе ESP8266 (ESP-12E) для Arduino UNO / MEGA
- Основные достоинства
Saved searches
Use saved searches to filter your results more quickly
You signed in with another tab or window. Reload to refresh your session. You signed out in another tab or window. Reload to refresh your session. You switched accounts on another tab or window. Reload to refresh your session.
An Arduino WiFi Shield based around the Espressif ESP8266 WiFi SoC.
sparkfun/ESP8266_WiFi_Shield
This commit does not belong to any branch on this repository, and may belong to a fork outside of the repository.
Name already in use
A tag already exists with the provided branch name. Many Git commands accept both tag and branch names, so creating this branch may cause unexpected behavior. Are you sure you want to create this branch?
Sign In Required
Please sign in to use Codespaces.
Launching GitHub Desktop
If nothing happens, download GitHub Desktop and try again.
Launching GitHub Desktop
If nothing happens, download GitHub Desktop and try again.
Launching Xcode
If nothing happens, download Xcode and try again.
Launching Visual Studio Code
Your codespace will open once ready.
There was a problem preparing your codespace, please try again.
Latest commit
Git stats
Files
Failed to load latest commit information.
README.md
SparkFun ESP8266 WiFi Shield
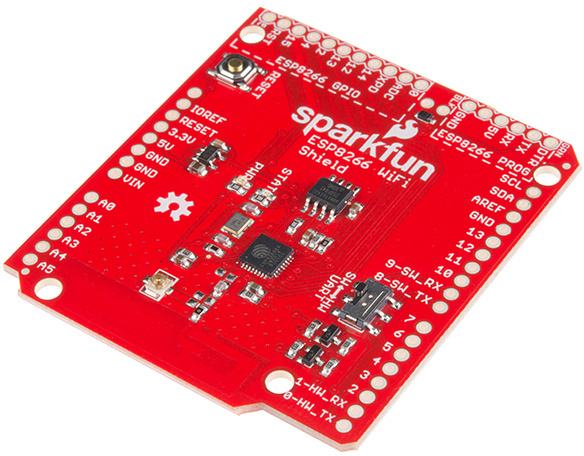
The SparkFun ESP8266 WiFi Shield is essentially an Arduino shield for the ESP8266 WiFi SoC. The ESP8266 ships with a slightly customized version of the Espressif AT command set.
The ESP8266 is controlled by serial AT commands. The shield is equipped with a switch to swap between a software serial port or hardware serial port interface.
- /Firmware — Firmware flashed on the ESP8266 WiFi Shield (requires ESP8266 SDK 1.2.0)
- /Hardware — Eagle design files (.brd, .sch)
- /Production — Production panel files (.brd)
This product is open source!
The hardware is released under Creative Commons ShareAlike 4.0 International.
The code is beerware; if you see me (or any other SparkFun employee) at the local, and you’ve found our code helpful, please buy us a round!
Please use, reuse, and modify these files as you see fit. Please maintain attribution to SparkFun Electronics and release anyWiFi Shield derivative under the same license.
Distributed as-is; no warranty is given.
About
An Arduino WiFi Shield based around the Espressif ESP8266 WiFi SoC.
Arduino ESP8266 WiFi Shield
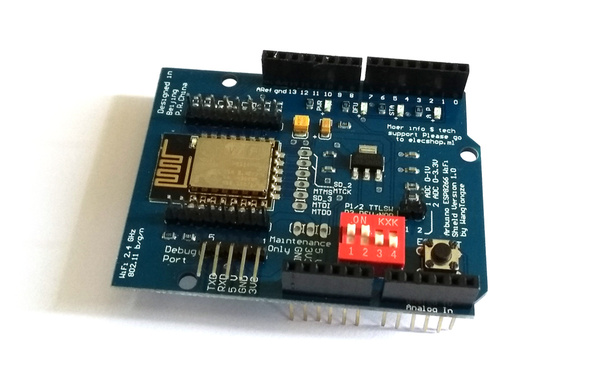
This is a common ESP8266 Arduino shield with the following markings:
Designed in Beijing P.R.China Moer info $ tech support Please go to elecshop.ml Arduino ESP8266 WiFi Shield Version 1.0 by WangTongze The voltage switching circuitry on this shield doesn’t work properly as it arrives, so you’ll have to modify it slightly if you intend it to work as a shield (with SW1 and SW2 set to ON ).
| Switch | Function |
|---|---|
| SW1 | Connect ESP8266 TX to pin D0 |
| SW2 | Connect ESP8266 RX to pin D1 |
| SW3 | Enable bootloader mode |
| SW4 | Use DFU LED to show serial activity (?) |
Power is drawn from the 5v pin (not Vin ) so if connecting to Pixl.js ensure that Vin and 5V are shorted on the solder jumper unless you plan to power the shield separately.
Using as-is
- Ensure SW1 and SW2 are OFF
- Connect a jumper lead from the TXD pin on Debug Port to D0 on the Arduino header
- Connect a jumper lead from the RXD pin on Debug Port to D1 on the Arduino header
Rewiring
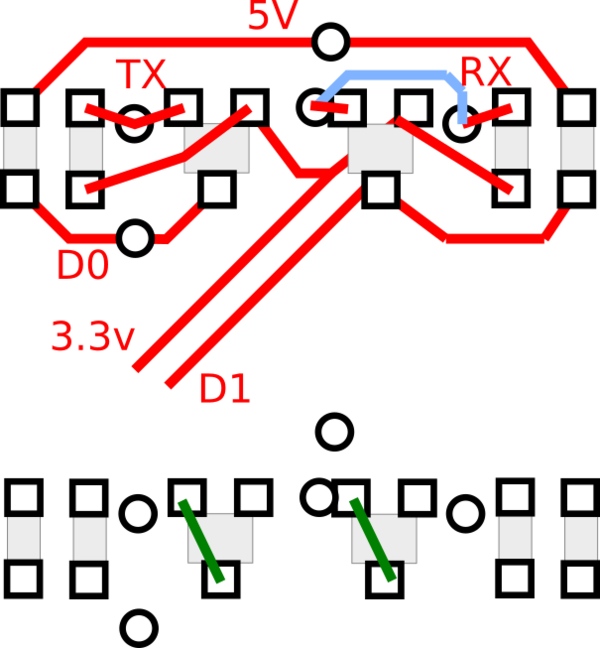
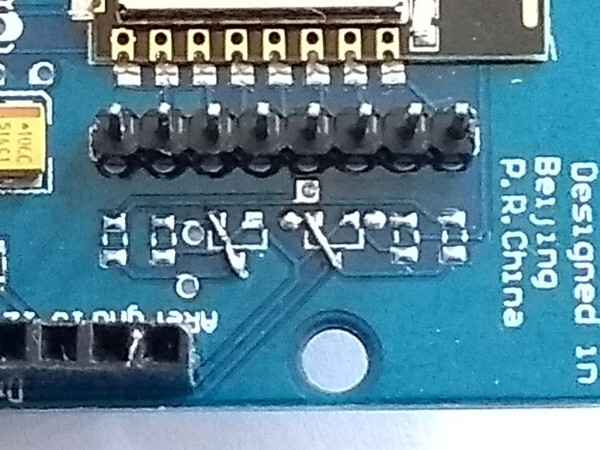
- Unsolder all the surface mount components to the right-hand side of the ESP8266
- Short across the two transistor outlines from the right pad to the bottom-left pad
- Ensure SW1 and SW2 are ON
- TXD and RXD should now be available on D0 and D1 at 3.3v levels
Pixl.js
If connecting to Pixl.js you should be aware that when if Pixl.js detects a connection on D0 at boot, it’ll start using Serial1 as a console device rather than the LCD.
To avoid this you’ll need to explicitly set the console back to the LCD at boot time:
Software
Note: your module may not come with ESP8266 AT firmware installed. To fix this, see the the ESP8266 page. If you’re using Pixl.js you can now update the firmware on the ESP8266 module via the Flasher section of the Web IDE.
Client
To connect to a WiFi access point.
var WIFI_NAME = "WiFi_Name"; var WIFI_PASS = "WPA2_Key"; var wifi; function getPage() < require("http").get("http://www.pur3.co.uk/hello.txt", function(res) < console.log("Response: ",res); res.on('data', function(d) < console.log("--->"+d); >); >); > function go() < Serial1.setup(115200,); wifi = require("ESP8266WiFi_0v25").connect(Serial1, function(err) < if (err) throw err; console.log("Connecting to WiFi"); wifi.connect(WIFI_NAME, WIFI_PASS, function(err) < if (err) throw err; console.log("Connected"); // Now you can do something, like an HTTP request getPage(); >); >); > Access point
To set up as an access point called ESP123 with password HelloWorld that serves up a webpage on address 192.168.4.1 :
var wifi; function pageHandler(req, res) < res.writeHead(200); res.end("Hello World"); >function go() < Serial1.setup(115200,); wifi = require("ESP8266WiFi_0v25").connect(Serial1, function(err) < if (err) throw err; console.log("Connecting to WiFi"); wifi.createAP("ESP123","HelloWorld",5,"wpa2_psk", function(err) < if (err) throw err; console.log("Connected!"); require("http").createServer(pageHandler).listen(80); >); >); > See the ESP8266 page for more information on how to use the ESP8266, and the Internet page for more examples of things you can do on Espruino with an Internet connection.
Buying
This page is auto-generated from GitHub. If you see any mistakes or have suggestions, please let us know.
© 2017 Pur3 Ltd (Printable Version) π
Arduino Wi-Fi Shield – плата расширения на базе ESP8266 (ESP-12E)

С помощью этой платы расширения вы сможете использовать ESP8266 совместно с Arduino UNO/Mega. В ней применяется модуль ESP-12E.
Москва и МО: Самовывоз
Курьерская доставка
Россия и СНГ: СДЭК
Почта РФ / Достависта
Купить Arduino Wi-Fi Shield — плата расширения на базе ESP8266 (ESP-12E) в Москве или с доставкой по России и СНГ очень просто — до покупки осталось всего 3 клика!
- Добавьте товар в корзину
- Оформите заказ, выбрав наиболее удобный способ доставки и оплаты
- Дождитесь подтверждения от менеджеров или позвоните самостоятельно
- Оплатите заказ удобным способом и получите его в ближайшее время
Arduino Wi-Fi Shield — плата расширения на базе ESP8266 (ESP-12E) для Arduino UNO / MEGA
На Arduino Wi-Fi Shield дублированы все выводы Arduino и разведены все выводы ESP8266, так что вы сможете воспользоваться всеми возможностями обоих микроконтроллеров, соединённых через UART. На плату расширения установлен DIP-переключатель и вынесены выводы этого порта, с помощью переключателя устанавливается режим его работы: прошивка ESP8266, прошивка Arduino, соединение между ними.
ESP8266 в составе этой плате может работать и как самостоятельное устройство, обменивающееся данными с Arduino, так и как Wi-Fi модуль, управляемый AT-командами.
Так как микроконтроллеры ESP8266 работают при напряжении 3,3, а большинство Arduino при 5В, на плату установлен преобразователь логических уровней и стабилизатор напряжения на 3,3В. Питание подаётся с основной платы Arduino.
Плата расширения Arduino Wi-Fi Shield оснащена четырьмя светодиодами: индикаторы питания (PWR), обновления прошивки (DFU), работы Wi-Fi в режимах точки доступа (AP) и клиента (STA). Также на ней присутствует кнопка рестарта ESP8266.
Основные достоинства
- Использование всех выводов ESP8266
- Разные режимы работы UART
- Простота работы с ESP8266