- Arduino Libraries
- How to Manually Install Arduino Library
- Manual Installation of Arduino Libraries
- Importing a .zip Library File
- Adding Library in Arduino IDE Directory
- Conclusion
- About the author
- Kashif
- All About Arduino Libraries
- Download the Zip File
- Save the Zip File
- Open the Zip File
- Start the Extraction
- Extract into your Libraries Folder
- Give it a Legal Name
- Re-start the IDE
- Verify that it Compiles
- All About Arduino Libraries
- Open the Preferences Dialog
- Find the Sketchbook Location
- Create a Libraries Folder
- Rename to Libraries
Arduino Libraries
Libraries are files written in C or C++ (.c, .cpp) which provide your sketches with extra functionality (e.g. the ability to control an LED matrix, or read an encoder, etc.). They were introduced in Arduino 0004.
To use an existing library in a sketch simply go to the Sketch menu, choose «Import Library», and pick from the libraries available. This will insert an #include statement at the top of the sketch for each header (.h) file in the library’s folder. These statements make the public functions and constants defined by the library available to your sketch. They also signal the Arduino environment to link that library’s code with your sketch when it is compiled or uploaded.
User-created libraries as of version 0017 go in a subdirectory of your default sketch directory. For example, on OSX, the new directory would be ~/Documents/Arduino/libraries/. On Windows, it would be My Documents\Arduino\libraries . To add your own library, create a new directory in the libraries directory with the name of your library. The folder should contain a C or C++ file with your code and a header file with your function and variable declarations. It will then appear in the Sketch | Import Library menu in the Arduino IDE.
Note: for users of versions previous to 0017, libraries belong in a subdirectory of the Arduino application directory: ARDUINO/lib/targets/libraries. For version 0017, the libraries directory was moved to make them more convenient to install and use.
Because libraries are uploaded to the board with your sketch, they increase the amount of space used by the ATmega8 on the board. See the FAQ for an explanation of various memory limitations and tips on reducing program size. If a sketch no longer needs a library, simply delete its #include statements from the top of your code. This will stop the Arduino IDE from linking the library with your sketch and decrease the amount of space used on the Arduino board.
To get started writing libraries, download this test library. It should provide a basic template for creating a new library. After you’ve made changes to your library, in order to get it to recompile, you will have to delete the .o file generated in the library’s directory.
How to Manually Install Arduino Library
![]()
Libraries in Arduino IDE is a set of functions and code that allows users to interface multiple hardware and make them easy to control. Thousands of Arduino libraries are freely available to make the Arduino development environment more user friendly and easy to use. Every hardware module that we attach with Arduino has its own library that enhances its functionality. Here in this article, we will install Arduino libraries in IDE using a manual installation method.
Manual Installation of Arduino Libraries
Arduino IDE provides multiple ways of installing libraries. Thousands of Arduino libraries can be directly downloaded using Arduino IDE library manager but there is also a manual way of installing libraries in IDE. Manual way for installation comes handy when we need to install any open-source external library for hardware and modules or in case any library is not available inside the library manager.
Following are the two ways to install Arduino library manually:
Importing a .zip Library File
Most of the libraries are distributed as a Zip file or folder. Therefore, Arduino IDE has an option of including a library using a zip file. The name of the library is the same as the library zip folder name. Inside the library folder it contains .cpp, .h format files along with some text files.
Following the mentioned steps to install the Arduino library using the zip file method.
Step 1: Open Arduino IDE.

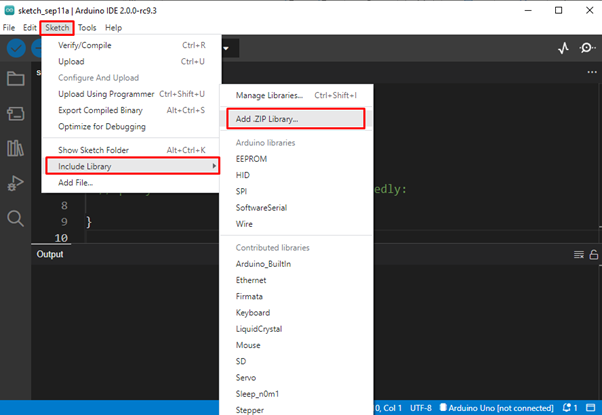
Step 2: To add a library in the IDE. Go to: Sketch>Include Library>Add ZIP Library:
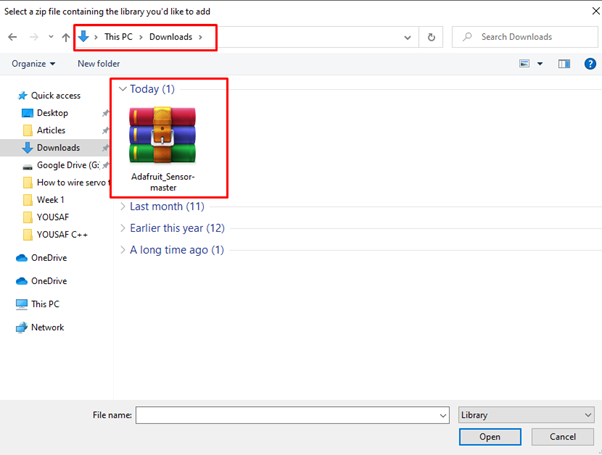
Step 3: We have downloaded an Adafruit Sensor library using GitHub. Once you click Add zip library a new window will open. Now select the folder where the Arduino library is downloaded. Here in our case, we have downloaded a new library in the download folder. Select and click open to add the library zip file in Arduino IDE.
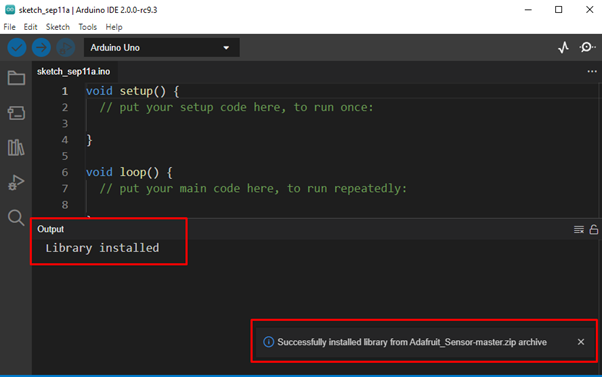
Step 4: After we open a library, respective files of that library will start installing. After successful installation Library installed message will appear in the output window of Arduino IDE.
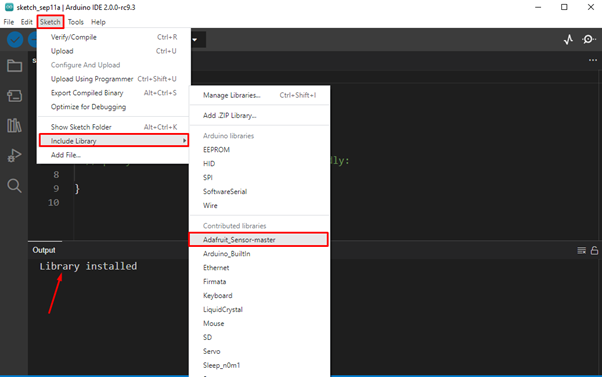
Step 5: Now go to Sketch>Include Library menu. Here a new library file Adafruit_Sensor-master will be available at the drop-down menu with the exact same name as zip file. Now this library is ready to use in Arduino sketch. The zip file we added is expanded in the Arduino libraries directory.
After installation is completed, we can access the library using the example section but some older versions of Arduino need to be restarted before it can be used.
Adding Library in Arduino IDE Directory
To install the Arduino library manually, we need to download the library as a zip file, expand it and save it in the Arduino library directory. Zip folder contains all necessary files including example sketches if the author of that library has provided. To install Arduino library using the Arduino IDE directory, follow the steps explained below:
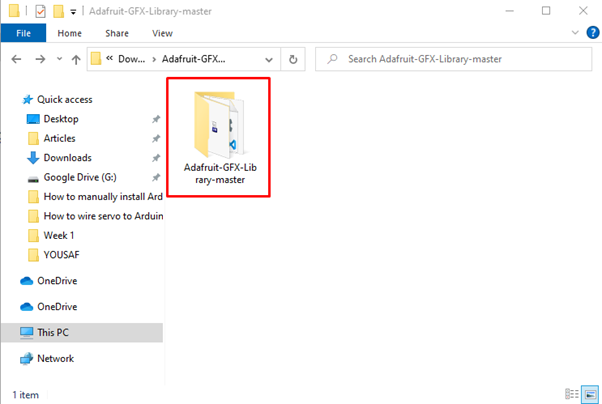
Step 1: First download the zip file of the library which you want to install in IDE or open the folder where the library zip file is stored.

Step 2: Extract the library zip file as a result a new folder will be created with the exact same name. Double click on that folder:

Step 3: This folder will contain all the necessary files for the library, copy this folder to paste it into the Arduino library directory:
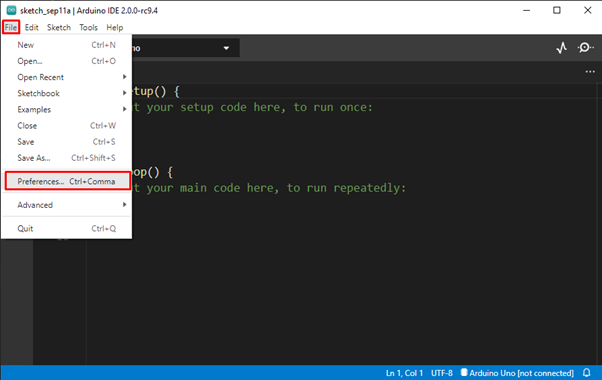
Step 4: To get path to Arduino library directory Go to: File>Preferences or press “Ctrl + comma”:
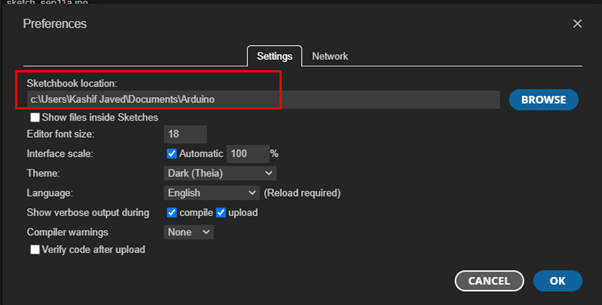
Step 5: Copy the sketchbook location in the settings tab:
Step 6: Paste the copied location in the address bar of File Explorer then press enter. A new directory will open where we can see the Arduino library folder. open the library folder:

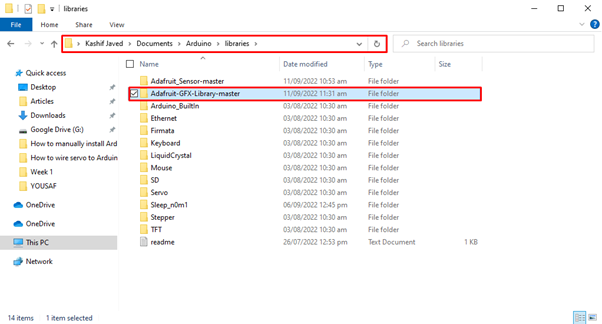
Step 7: Once the library directory is opened paste the extracted zip file of Adafruit-GFX library copied earlier:
Step 8: Open IDE, Go to Sketch>Include Library. Here in the library section, verify the library we just installed:

Conclusion
Libraries contain different codes and examples which can help to make programming experience with Arduino easier and more efficient. Here we discussed two methods through which we can add multiple Arduino libraries in IDE. One by importing the zip file and second by directly copying files in the IDE directory. Using these two methods any library can be easily installed in Arduino IDE.
About the author
Kashif
I am an Electrical Engineer. I love to write about electronics. I am passionate about writing and sharing new ideas related to emerging technologies in the field of electronics.
All About Arduino Libraries

You will be redirected back to this guide once you sign in, and can then subscribe to this guide.
First make sure that all instances of the Arduino IDE are closed. The IDE only scans for libraries at startup. It will not see your new library as long as any instance of the IDE is open!
Download the Zip File
Make sure to select a released version of the library. Some library repositories are still in development, and may contain unreleased or untested code. The «Releases» button takes you to the tested and released versions.
- Click the «Releases» button on the Github repository page to find the released version of the library.
- Then download the zip file.
Save the Zip File
Open the Zip File
Start the Extraction
If you don’t have a Sketchbook/Libraries folder, it may be in ~/Arduino/libraries as has been reported on Ubuntu 16.04 LTS and IDE 1.8.5.
Extract into your Libraries Folder
Give it a Legal Name
The IDE will not recognize folders with dashes in the name. So you must rename the Github Master Folder. Underscores are OK!
Re-start the IDE
Restart the Arduino IDE and verify that the library appears in the File->Examples menu.
Load one of the library examples to test.
Verify that it Compiles
Click the check-mark icon in the upper left and verify that the example sketch compiles without errors.
This guide was first published on Feb 16, 2013. It was last updated on Jan 31, 2013.
This page (Installing a Library on Linux) was last updated on Feb 13, 2013.


Your browser does not support the video tag. This links to the guide Multi-tasking the Arduino — Part 1.

OUT OF STOCK NOTIFICATION
You have been successfully subscribed to the Notification List for this product and will therefore receive an e-mail from us when it is back in stock!
For security reasons, an e-mail has been sent to you acknowledging your subscription. Please remember that this subscription will not result in you receiving any e-mail from us about anything other than the restocking of this item.
If, for any reason, you would like to unsubscribe from the Notification List for this product you will find details of how to do so in the e-mail that has just been sent to you!
All About Arduino Libraries
You will be redirected back to this guide once you sign in, and can then subscribe to this guide.
The Library Manager is the simplest and safest way to install libraries. If possible, that is the method you should use.
If the library you want to use is not available via the library manager, you can get the source code and place it into your machine’s local library folder. The location of the folder is rather specific.
See the file hierarchy below:

It is important to install your libraries in the correct location. Otherwise the compiler will not be able to locate them when you try to compile and upload your sketches.
Your sketchbook folder is the folder where the Arduino IDE stores your sketches. This folder is automatically created by the IDE when you install it.
On Linux machines, the folder is named «Sketchbook» and it is typically located in /home/
On Windows and Macintosh machines, the default name of the folder is «Arduino» and is located in your Documents folder.
This is a common source of confusion on Windows and Mac machines, your sketchbook folder is not named «sketchbook» it is named «Arduino»!
User installed libraries should go in a folder named Libraries, located inside your sketchbook folder. This is where the IDE will look for user installed libraries.
On version 1.0.2 and later of the Arduino IDE, the «Libraries» folder is created automatically. On earlier versions of the IDE, you may need to create it when you install your first library.
Open the Preferences Dialog
Click File -> Preferences in the IDE.
Find the Sketchbook Location
Usually a folder named Arduino in your Documents folder.
Once you know the location, navigate to this folder in Windows Explorer or mac Finder
Create a Libraries Folder
If there is no Libraries folder there, create one.
Right click in Windows Explorer and select New -> Folder.
Rename to Libraries
Right click on the New Folder and select Rename. Then type in Libraries.
This guide was first published on Feb 16, 2013. It was last updated on Jan 31, 2013.
This page (Installing Libraries Manually) was last updated on Jan 31, 2013.


Your browser does not support the video tag. This links to the guide Using NeoPixels and Servos Together.


OUT OF STOCK NOTIFICATION
You have been successfully subscribed to the Notification List for this product and will therefore receive an e-mail from us when it is back in stock!
For security reasons, an e-mail has been sent to you acknowledging your subscription. Please remember that this subscription will not result in you receiving any e-mail from us about anything other than the restocking of this item.
If, for any reason, you would like to unsubscribe from the Notification List for this product you will find details of how to do so in the e-mail that has just been sent to you!