Fixing Linux firmware issues on Arduino Mega 2560
Early adopters of the new Arduino UNO and Arduino Mega 2560 using the Linux operating system seemed to have a number of bizarre issues with the serial port connectivity. Fortunately, the Arduino team just released a new firmware patch for the little ATmega8U2 microcontroller that handles the serial communications. They wrote up some great photos and instructions on how to re-flash your Arduino UNO. but they don’t have any information or photos for the Mega 2560.
Well, tonight I looked at the Mega 2560 schematic and PCB layout files in Eagle, and figured out what I needed to do to properly reset the 8U2 serial port chip to enable the “DFU” programming mode. The general idea is to reset the chip while shorting two pads on the backside of the circuit board. The two pads you need to short are in a different location on the Mega than the UNO, and are highlighted in the image below in green. The other two pads you need to short are highlighted in red.
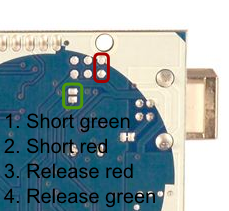
You’re going to want to follow the guide posted for installing the Linux/OSX/Windows DFU programming software, and the rest of the re-programming process. This page shows the procedure for resetting your Arduino Mega 2560 into DFU programming mode. This procedure is as follows:
- Plug your Mega into the computer as normal, using the USB cable.
- Using a piece of wire or a screwdriver tip, short out the pads above circled in green. Keep them shorted out until the end.
- Using another piece of wire or another screwdriver, short out the pads above in red.
- Stop shorting out the red pins.
- Stop shorting out the green pins.
Now, if you check in your Arduino menu, the board’s serial port should no longer show up in the menu. You can now follow the rest of the guide on re-flashing your 8U2 serial port firmware with the latest version.
Thanks for the post. Just tried this on my Mega2560 and all the process went smoothly.
Afterwards I was able to upload a program that uses the serial port to the board and it was running beautifully.
But when I tried to upload a second time, I persistently get the following error: avrdude: stk500_2_ReceiveMessage(): timeout Anybody has any idea what this means? If I press shift when uploading this is the whole output. Thanks. Binary sketch size: 3794 bytes (of a 258048 byte maximum)
/usr/bin/avrdude -C/etc/avrdude/avrdude.conf -v -v -v -v -patmega2560 -cstk500v2 -P/dev/ttyACM0 -b115200 -D -Uflash:w:/tmp/build503225717737270483.tmp/read_apple_serial.cpp.hex:i avrdude: Version 5.10, compiled on Feb 19 2010 at 10:20:42
Copyright (c) 2000-2005 Brian Dean, http://www.bdmicro.com/
Copyright (c) 2007-2009 Joerg Wunsch System wide configuration file is “/etc/avrdude/avrdude.conf”
User configuration file is “/home/jimenez/.avrduderc”
User configuration file does not exist or is not a regular file, skipping Using Port : /dev/ttyACM0
Using Programmer : stk500v2
Overriding Baud Rate : 115200
avrdude: Send: . [1b] . [01] . [00] . [01] . [0e] . [01] . [14]
avrdude: stk500_2_ReceiveMessage(): timeout
avrdude: ser_recv(): programmer is not responding
avrdude: stk500_2_ReceiveMessage(): timeout
avrdude: Send: . [1b] . [01] . [00] . [01] . [0e] . [01] . [14]
avrdude: stk500_2_ReceiveMessage(): timeout
avrdude: stk500_2_ReceiveMessage(): timeout
avrdude: stk500_2_ReceiveMessage(): timeout
avrdude: stk500_2_ReceiveMessage(): timeout
Thanks for this post! The 8U2 firmware bug was really annoying me, but I was a bit nervous to do anything about it without Mega-specific instructions. These worked great.
Thank you, sir! This is exactly what I was looking for after hitting the firmware bug and then noticing that the Arduino.cc instructions were Uno specific. New firmware is uploaded, serial works without issues in Linux now. You rock : )
I have the same issue as Alberto: Worked fine with first sketch after flashing and serial worked fine, however, after the second sketch, I only get the timeout error. Any suggestions? -J
I had another problem, because my Arduino was a MEGA 2560 R2. But I found a solution. You can find it here, but it’s all in spanish:
http://ge-rov.blogspot.com/
Guys, please, there is any simple way to see if my 8u2 is bricked? I did all steps at here and windows is still seeing the same VIP and PID 0000.
Hello.I put my arduino 2560 in dfu mode.After this i update driver from flip directory and it installed an at90usb82.i open flip and i select device at90usb82.When i push communication->usb i received could not open usb.
Please help me.
tao13: I don’t know what you are trying to do. What are you talking about the at90usb82 chip? This chip is not in the arduino mega 2560, so I am confused what you are talking about.
Trackbacks and Pingbacks
Arduino mega 2560 linux
Just recently,we’ve been trough the use of an open-source applications and patronizing its community development ; surprisingly enthusiasts all over the globe are very much overwhelmed in participating the continuous evolutions of an open-source technology.And we are not far from the said expectations , our electronic stores are now tapping-up the distributions of these materials to the cheapest cost that local geeks and enthusiasts are able to afford of.Gone are those days when we are under the verdict of proprietary vendors such as Zilog,PIC,Renessas and other microchip distributors. I want to mention the following e-stores in the city: Alexan ,e-Gizmo and other on-line stores (tipidPC, sulit.com ,ayos dito) are vendors where we can buy the series of MCUs especially Arduino with reasonable price.
Well, our concerns are embedded kits ;yes, the Arduino things and other assorted gadgets ,this rebranded MCU is having the domination in the global e-store.We have noticed that Arduino sheilds’ package is the included Atmel microchips , and became an open hardware and software that completely sets the requirement of starting and advancing the learning curve of an embedded system design.This is the main reason that enticed our local e-hobbyists to avail the Arduino MCUs which had given all their resources completely open and free for modifications i,e: DIY,documents,source code and innovations. Perhaps Arduino unravel the «Mt. everest» of complex embedded system into the level of laymen’s know-how. E-hobbyists are introduced to their limitless creativity and ingenuity-we could be one of them.
So, this techno blog is all about giving you the idea on how to work on Arduinos using pure Linux for its compiler and IDE.And the purpose is to reload and upgrade default firmware to its new release versions that will be published in the Arduino web site( http://arduino.cc/en/Main/Software). This time,I will give you the how-tos of firmware upgrading or bootloading the ACEduino Mega 2560 with USBasp programmer which can be purchased in Alexan and e-Gizmo respectively.So folks please have a try.. 🙂
Requirements:
avrdude
arduino IDE version 1.5X
USBasp http://www.e-gizmo.com/KIT/usbasp.html
Arduino Mega 2560 http://www.alexan.com.ph/index.php/training-modules/227-aceduino-mega-2560
Objectives:
To solve USBasp programmer usb setting in Linux
To use USBasp programmer in Arduino IDE
I) Installations
root@locahost# yum install arduino*
root@localhost# yum install gcc-*
root@localhost# yum install avrdude*
2) Testing avrdude
root@localhost# lsusb
root@localhost# avrdude
3) Bootloading using avrdude
root@localhost# cd /usr/share/arduino/hardware/arduino/bootloaders/stk500v2/
root@localhost# avrdude -c usbasp -p m2560 -u -U flash:w:stk500boot_v2_mega2560.hex
4) Using Arduino IDE
root@localhost# arduino
5) Bootloading using Arduino IDE
5.1) Tools-> Programmer->USBasp
5.2) Tools->Board->Arduino Mega 2560
5.3) Tools->Bootloader
5.4) Note!
Check bootloading process and if see trouble shooting if there are errors
6) New Sketch-> Basic->Digital->Blink
6.1) Compile the program
6.2) Load the program
6.3) Note!
..A LED on pin # 13 must be blinking
1) ACEduino 2560 from Alexan Store
2) USBasp clone from e-gizmo
Using the new Arduino Mega 2560 with Arduino 0019 on Ubuntu
Today I was happy to take delivery of one of the first new arduino megas which utilise the atmega2560 and replace the ftdi chip with a more versatile ATMEGA 8U2. The websocket server I’ve been writing is getting a bit heavy for the arduino duemilanove I used up to now at around 20kb so I decided it was time to upgrade. However I had failed to notice that a version of the arduino IDE (0020) had not been released for Linux at the same time as the hardware. This was a bit of an oversight on my part but I think it was a bit silly of the arduino team to release the hardware without mentioning it.
In this post I intend to briefly outline things I’ve tried that can make it work at least a bit…
Hardware
The main improvement, for me, of this new arduino over the old mega is the double memory capacity which allows me to grow a bit further after the duemilanove. Most noticeable on arrival is the new packaging which is a nice touch and makes the product feel like a commercial product rather than some underground toy.
However it’s not all good, the quality of production of this board seems to have dropped slightly, it having a significant amount of flux on the chip, not a major issue, I just like things to be perfect!
Software
This is where all hell breaks loose. The arduino mega 2560 and arduino uno require the new version 0020 of the IDE to work correctly, this is not yet available on linux due to rxtx problems, when I ordered I stupidly assumed that there would be the same software support that had always been there but sadly not, so I tried a few things to try and make it work, with varying amounts of success:
Run the IDE under Windows XP in a virtual machine
While I could put up with this for a week or two it’s not ideal..and proved far from reliable.
I duly downloaded and installed the windows version of arduino 0020, I already have a virtual machine set up with XP and usb set up, so I piped through the usb port for the arduino, it was detected by windows and appeared to install correctly however when attempting to upload the blink sketch (which compiles fine) I get errors from avrdude:
avrdude: stk500v2_recv(): checksum error avrdude: stk500v2_recv(): checksum error avrdude: verification error, first mismatch at byte 0x0268 0x68 != 0xb1 avrdude: verification error; content mismatch
After retrying sometimes I was able to upload a sketch, but not reliably, sometimes it just hanging on upload. At this point I didn’t really know what to do, so I tried it on a real windows computer and it worked fine…but that is not a workable solution for me so I tried a more radical approach:
Modify the Arduino 0019 IDE to work
I did not have high hopes here as there is obviously a reason if the arduino team are having issues with 0020 on linux. However I had limited success.
I took the hardware/arduino/boards.txt file from the new windows arduino 0020 ide and pasted it into the corresponding place in the 0019 IDE on linux, the arduino mega 2560 (and uno) now appear in the boards menu. All good so far but in removing the ftdi chip the arduino moved its default location moving from /dev/ttyUSB0 to /dev/ttyACM0, to compenste for this I made a symlink between the locations sudo ln -s /dev/ttyACM0 /dev/ttyUSB0 after inserting the arduino usb lead into the computer.
Now when starting the ide there is a delay of several seconds longer than usual with no errors shown, sketches can be opened and compiled for the mega 2560 but everytime the tools menu is accessed there is the same hanging of the program for several seconds while the serial ports are searched. Despite these problems sketches can be uploaded most of the time, others the arduino just hangs…
Edit: Since writing this post I’ve noticed that there were 5 instances of avrdude running left over from my messing about collectively maxing out my quad core processor so there are definitely still issues to be resolved!
That’s as far as I got…hoping for a better solution soon…