- Adding Bluetooth to Your Arduino Projects
- Types of Wireless Connection
- Adding Bluetooth to an Arduino
- Where to Get Your Bluetooth Modules
- Setting up Your Bluetooth Module
- Connecting Your Bluetooth Module to Arduino
- Adding a Software Serial Port
- Arduino — Bluetooth
- Hardware Required
- About HC-05 Bluetooth Module
- Pinout
- How It Works
- HC-05 Default Settings
- About Bluetooth Serial Monitor App
- Wiring Diagram
- How To Program For Bluetooth
- Arduino sends data to Bluetooth App on Smartphone
- Quick Steps
- Bluetooth App Send data To Arduino
- Quick Steps
- Arduino Code — Control LED with smartphone App via Bluetooth
- Arduino Code — Control Servo Motor with smartphone App via Bluetooth
- Video Tutorial
Adding Bluetooth to Your Arduino Projects
Sometimes we want to be able to control and monitor our electronics projects remotely. Maybe our device is somewhere that makes it hard to access it or maybe we just want a nice user-friendly interface on our mobile phone so we can see what’s happening and make changes. Being able to connect wirelessly opens up a whole range of exciting possibilities for your projects.
Types of Wireless Connection
There are a range of wireless technologies that we can use. LoRa (Long Range) technology uses license free radio frequencies to create radio connections between devices. It offers low power consumption with a range of up to 10 km in open space. It is widely used when your project isn’t near a Wi-Fi connection and when you need to make a connection from a distance. Wi-Fi should be very familiar to everyone. This makes use of a Wi-Fi hotspot which is connected to the Internet. We can connect project to the Wi-Fi hotspot and then access our electronics from anywhere in the world. A lot of the time will use this to connect our project to our home Wi-Fi and then control it from our computer. Bluetooth is ideal for short range communication of up to 10 m. We can connect our project to any Bluetooth enabled device and then transfer data to and from it. This is the technology we are going to be using in this project.
Adding Bluetooth to an Arduino
Most Arduino boards don’t have a Bluetooth connection built-in. We need to add one using a Bluetooth module. If you do a search on Amazon or eBay you’ll find a range of devices for under £10. These are usually built around an HC-05, HC-06, or similar module which is usually mounted on a small breakout board that lets you easily plug it into your breadboard. These Bluetooth modules basically allow you to extend a serial port on your Arduino over a Bluetooth connection to another device. As far as our Arduino is concerned we’ll simply be talking to a serial device and a Bluetooth module will then handle the wireless communication. In this project I’ll be using an HC-06 based module which is a slave only device. This means that I can use a phone or similar to connect to my Arduino project, but that my Arduino project will be able to initiate a connection with other Bluetooth devices. If you need one Arduino to monitor and control a second Arduino over Bluetooth you’ll need to use an HC-05 based Bluetooth module.
Where to Get Your Bluetooth Modules
Setting up Your Bluetooth Module
When you first receive your Bluetooth module it will have some default factory settings built into it. The main settings that concern us for the serial port speed and the devices broadcast name. Usually the default port speed is 9600 baud which is fine for short messages. The device broadcast name will vary between manufacturer but will be some generic string of characters. We don’t need to change any of the settings to use the device but if you want a faster baud rate or want your device to broadcast a relevant name (e.g. MY_PROJECT) please have a look at this tutorial which will take you through using a serial port to connect the Bluetooth module to your computer so you can change settings.
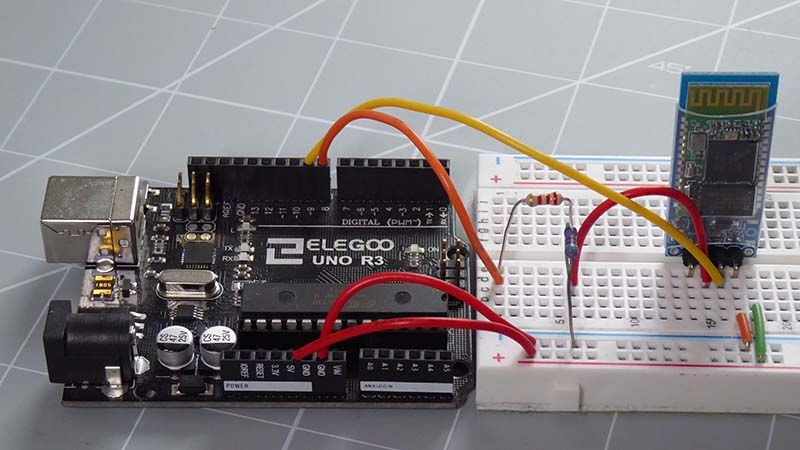
Connecting Your Bluetooth Module to Arduino
The connections are actually very simple. We need to supply power to the Bluetooth module along with two data connections for the Tx and Rx signals. 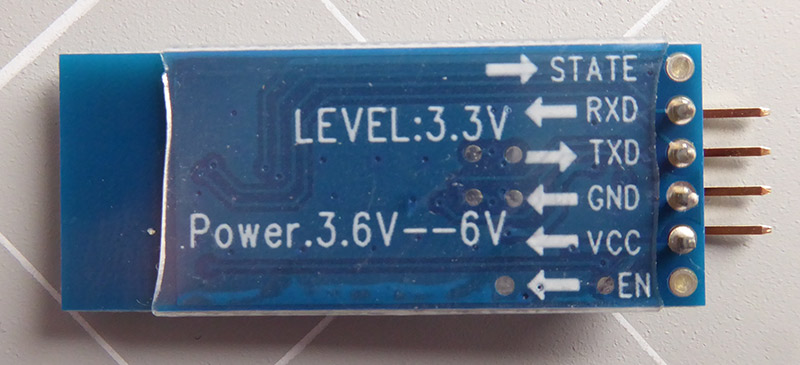 GND should be connected to GND on the Arduino. Vcc can usually connected to 5 V from the Arduino, but please check the specification on your Bluetooth module as internally they usually work at 3.3 V. This is usually the advantage of buying a device mounted on a breakout board as that usually contains a small voltage regulator. The Rx connection on the Bluetooth module is where we will send data from the Arduino to the module. This will be connected to a transmit pin on the Arduino. Most Bluetooth modules work at 3.3 V logic so will need to use a level shifter (or a simple potential divider) to drive the signal. In the circuit below I’ve used a 2K2 and 5K7 resistors for the divider. The Tx connection the Bluetooth module sends data from Bluetooth to the Arduino, so this needs to be connected to receive pin on Arduino. Again this will be a 3.3 V logic signal but this can usually be fed directly into the Arduino and it will work fine. If you do have problems then you might need to use a proper level shifting module to connect the signals. Although the Arduino has a hardware serial port and you’ll see a couple of pins labelled Tx and Rx on the board they are not always the most convenient to use. If you’re using an Arduino Uno or Nano the serial port is also used for communication with your computer. If we connect devices to the hardware serial port it can mean that we have to unplug parts of our circuit before we can reprogram the Arduino. For this reason I tend to use a software serial port which lets me use any two pins as the transmit and receive connections, leaving the hardware Tx and Rx pins free so that I can leave the Arduino connected to my PC as I develop the code. Once the project is up and running we can always move back to the hardware port if we want to.
Adding a Software Serial Port
Adding a software powered serial port is simply achieved by importing a very handy package that comes bundled with the Arduino IDE. At the top of our code listing we simply include the line,
Arduino — Bluetooth
Arduino exchanges data with the smartphone app. The communication between two Arduino via Bluetooth will be presented in another tutorial.
You can use any Android/iOS app. This tutorial will use Bluetooth Serial Monitor App on Android for demonstration.
You can control anything connected to Arduino from the smartphone app. This tutorial will take LED and servo motor as examples.
This tutorial is about using Classic Bluetooth (Bluetooth 2.0). If you are looking for a Bluetooth Low Energy — BLE (Bluetooth 4.0), See this similar tutorial: Arduino — Bluetooth Low Energy
Hardware Required
Or you can buy the following sensor kit:
Please note: These are affiliate links. If you buy the components through these links, We may get a commission at no extra cost to you. We appreciate it.
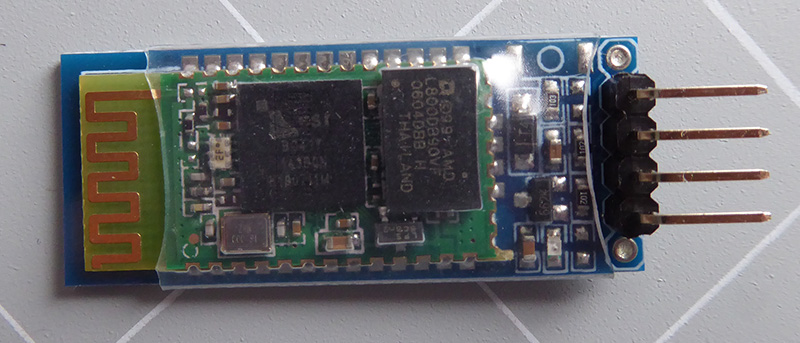
About HC-05 Bluetooth Module
HC-05 is a Serial Bluetooth module. It works as a Serial to Bluetooth Converter. It does:
Receive data from the Serial RX pin and transmit the data to the paired device (such as a smartphone) via Bluetooth
More specifically, In the context of Arduino communicates with smartphone App (Android/iOS):
Pinout
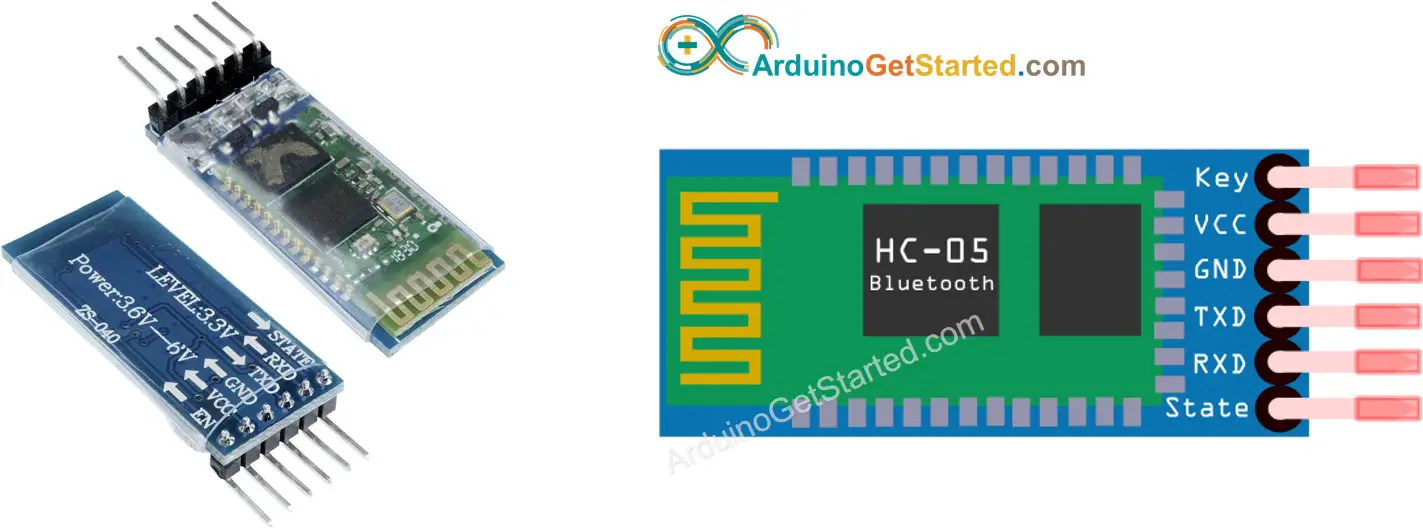
The HC-05 Bluetooth Module has 6 pins:
Enable/Key pin: This pin is used to toggle between Data Mode (set LOW ) and Command mode (set HIGH ). If not connected, it is in Data mode by default
TX pin: Serial data pin, connect this pin to the RX pin of Arduino. The data received via Bluetooth will be sent to this pin as serial data.
RX pin: Serial data pin, connect this pin to the TX pin of Arduino. The data received from this pin will be sent to Bluetooth
State: The state pin is connected to the onboard LED, it can be used as feedback to check if Bluetooth is working properly.
However, for basic functions, we just need to use 4 pins of The HC-05 Bluetooth Module to connect to Arduino.
The HC-05 Bluetooth Module also has two built-in components:
Button: can be used to control the Key/Enable pin to select the operation mode (Data or Command Mode)
How It Works
The HC-05 Bluetooth module has two operation modes:
Fortunately, The HC-05 Bluetooth module can work with Arduino by using the default setting without configuration.
HC-05 Default Settings
| Default Bluetooth Name | “HC-05” |
|---|---|
| Default Password | 1234 or 0000 |
| Default Communication | Slave |
| Default Mode | Data Mode |
| Default Data Mode Baud Rate | 9600, 8, N, 1 |
| Default Command Mode Baud Rate | 38400, 8, N, 1 |
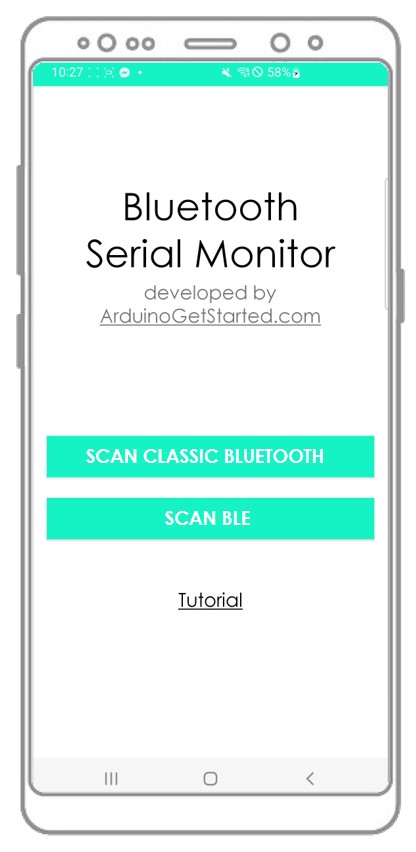
About Bluetooth Serial Monitor App
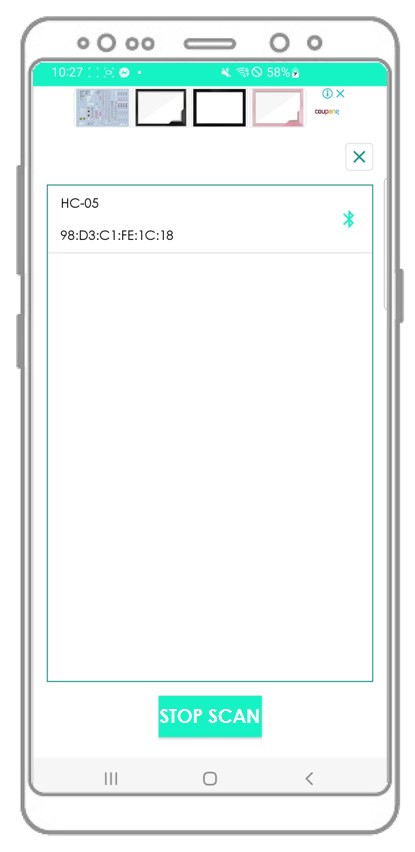
The Bluetooth Serial Monitor App is a mobile app that has the User Interface that looks like the Serial Monitor of Arduino IDE. It communicates with Arduino via Bluetooth. You can interact with Arduino via this app as if Serial Monitor on your PC, without adding any special code for the Bluetooth module in your Arduino code, by doing the following step:
And now you can send/receive data from Arduino just like the Serial Monitor of Arduino IDE. You do not need to modify the existing Arduino code or do not need to add any Bluetooth code to the new Arduino code.
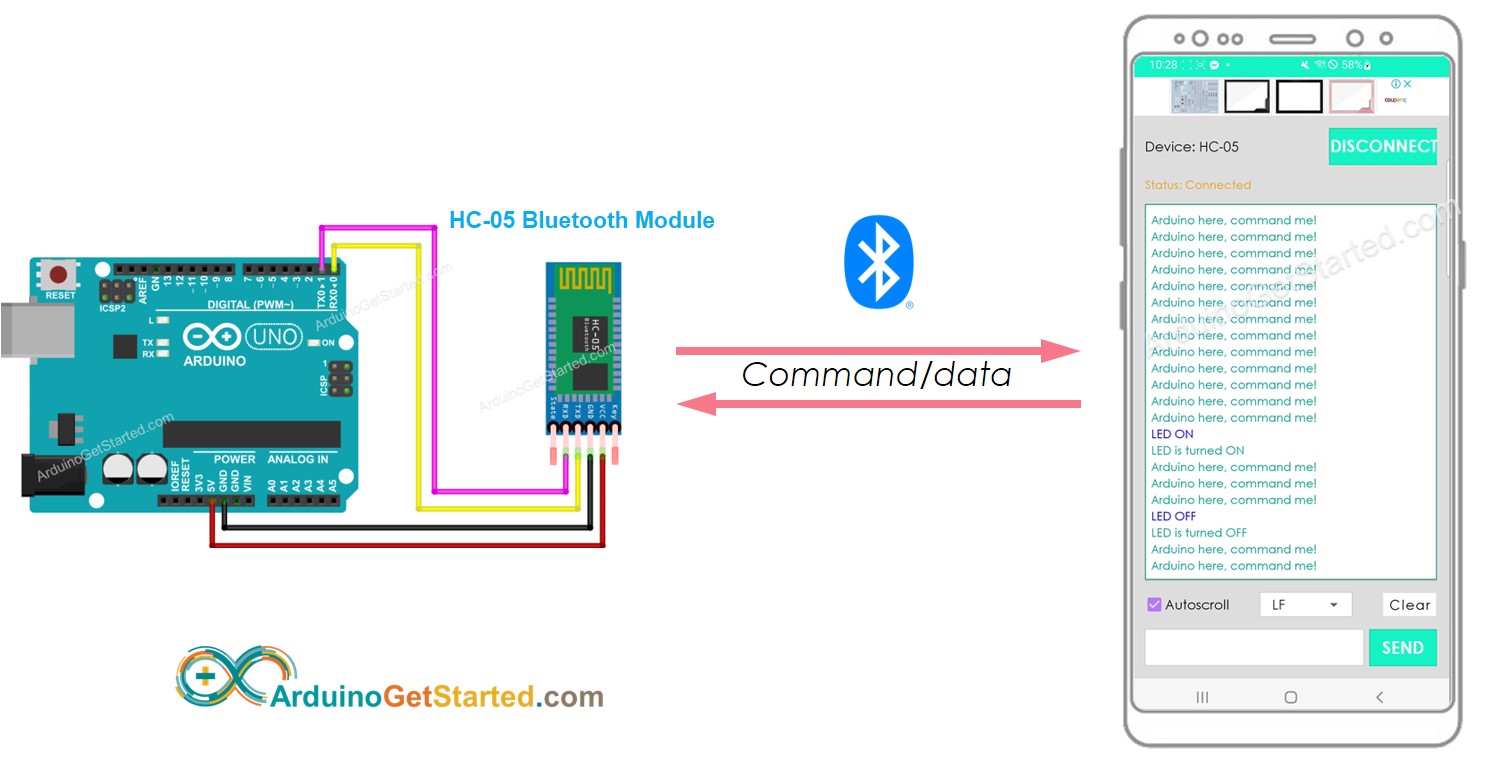
Wiring Diagram
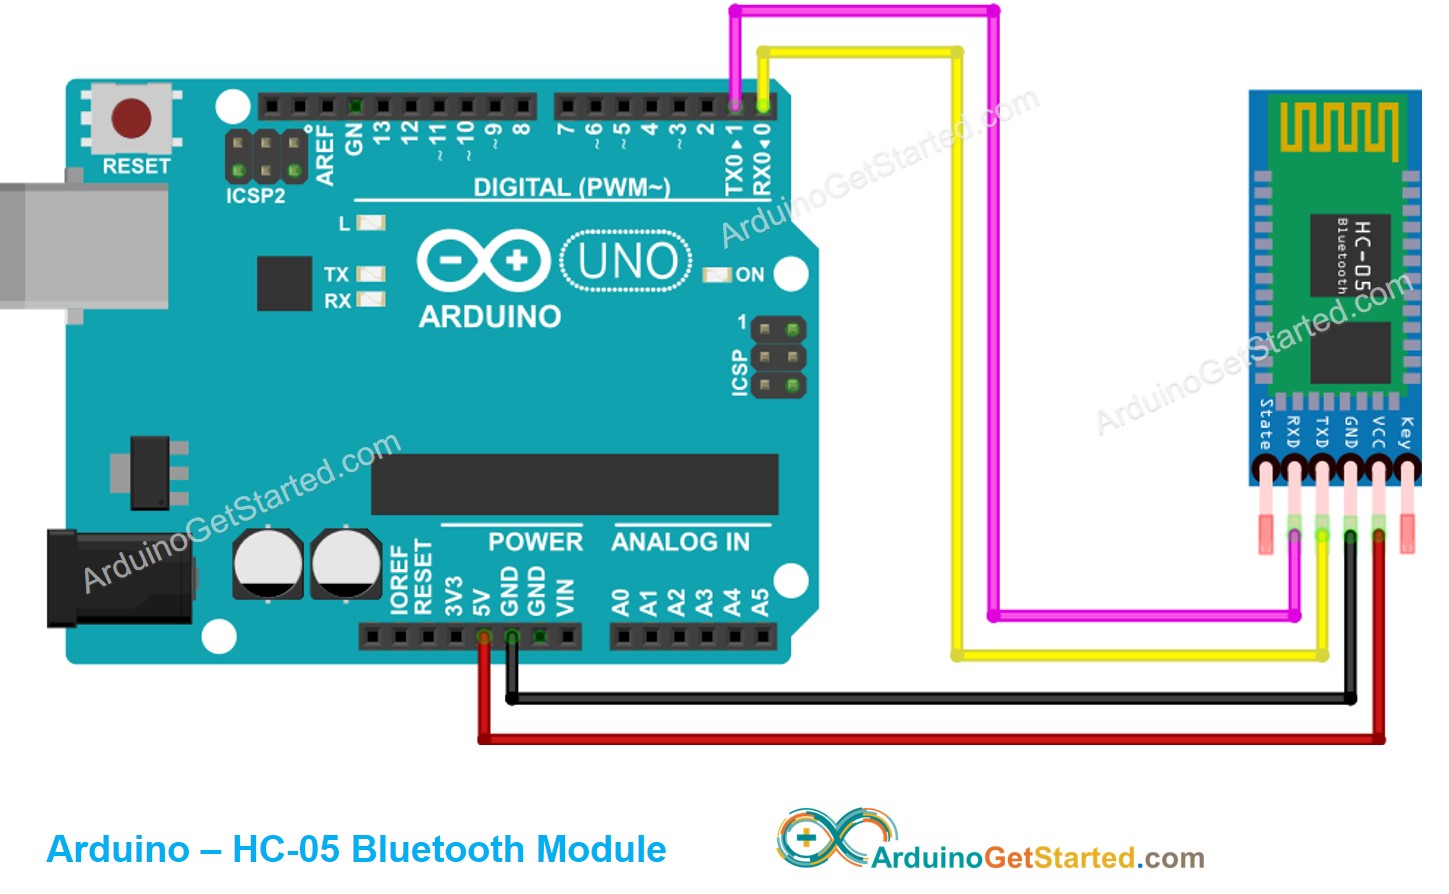
This image is created using Fritzing. Click to enlarge image
| Arduino Pins | HC-05 Bluetooth Pins |
|---|---|
| RX (Pin 0) | TX |
| TX (Pin 1) | RX |
| 5V | VCC |
| GND | GND |
| Enable/Key (NOT connected) | |
| State (NOT connected) |
You can use other Arduino pins by changing the Serial object in the Arduino code to another Serial1, Serial2. or SoftwareSerial if available.
How To Program For Bluetooth
No Bluetooth-dedicated code is required. We just need to use the Serial code.
Arduino sends data to Bluetooth App on Smartphone
To send data from Arduino to Bluetooth App on Smartphone, we need to use the following Arduino code:
In this example, we will send the “Arduino here, command me!” from Arduino to Bluetooth App on Smartphone every second
/* * Created by ArduinoGetStarted.com * * This example code is in the public domain * * Tutorial page: https://arduinogetstarted.com/tutorials/arduino-bluetooth */ void setup () < Serial . begin (9600); >void loop () < Serial . println ( "Arduino here, command me!" ); delay (1000); >
Quick Steps
Click Upload button on Arduino IDE to upload code to Arduino. You may be failed to upload the code to Arduino. If so, disconnect TX and RX pins from Bluetooth module, upload the code, and then reconnect RX/TX pin again.
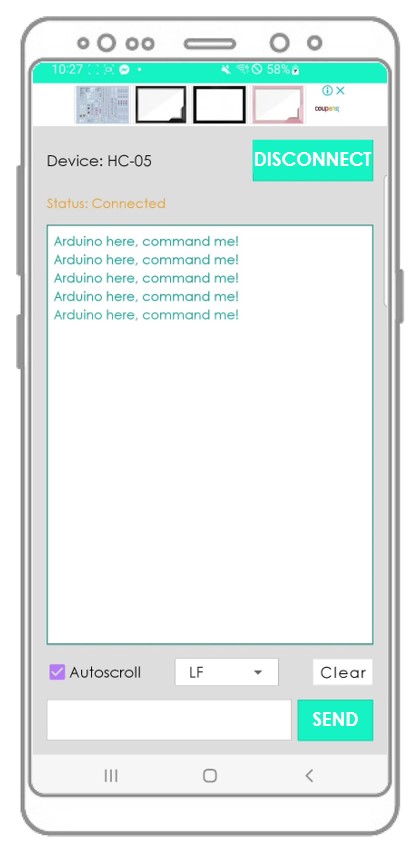
Arduino here, command me! Arduino here, command me! Arduino here, command me! Arduino here, command me! Arduino here, command me!
You will see that the data on the Serial Monitor of Arduino IDE and on the Android App are identical
Bluetooth App Send data To Arduino
Quick Steps
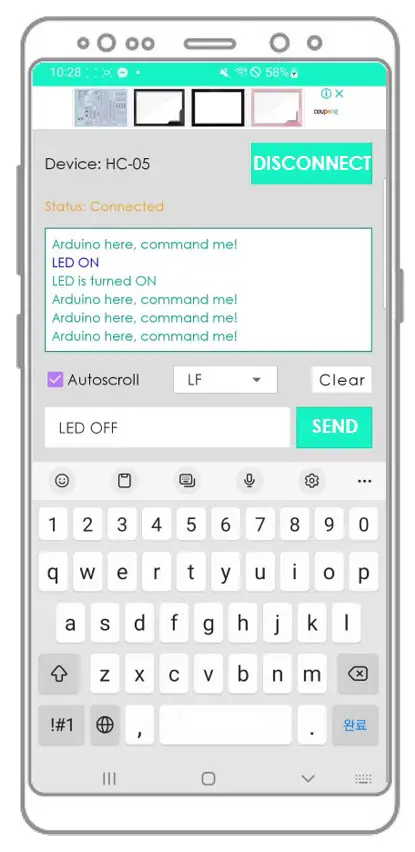
Arduino receives the data and prints the response to the Serial port. This data will be sent to the Bluetooth app
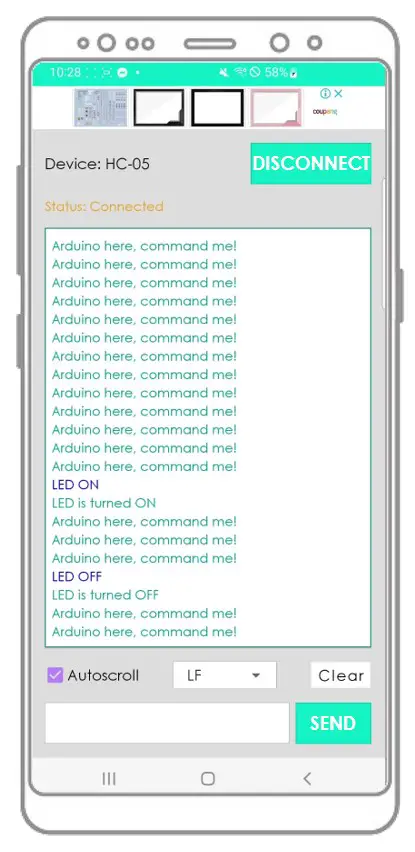
Arduino here, command me! Arduino here, command me! Arduino here, command me! Arduino here, command me! Arduino here, command me! Arduino here, command me! LED ON LED is turned ON Arduino here, command me! Arduino here, command me! Arduino here, command me! LED OFF LED is turned OFF Arduino here, command me! Arduino here, command me!
You will see that the data on the Serial Monitor of Arduino IDE and on the Android App are identical
Arduino Code — Control LED with smartphone App via Bluetooth
The below Arduino example code accepts two commands ( “ON” and “OFF” ) from Bluetooth Serial Monitor App to turn on/off a built-in LED.
You can see the instructions in more detail in Arduino controls LED via Bluetooth/BLE tutorial
Arduino Code — Control Servo Motor with smartphone App via Bluetooth
The below Arduino code received the angle value from Bluetooth Serial Monitor App to control the angle of the servo motor.
/* * Created by ArduinoGetStarted.com * * This example code is in the public domain * * Tutorial page: https://arduinogetstarted.com/tutorials/arduino-bluetooth */ // NOTE: change the Serial to other Serial/Software Serial if you connects Bluetooth module to other pins # include < Servo .h>Servo servo; // create servo object to control a servo int pos = 0; // variable to store the servo position void setup () < Serial . begin (9600); servo. attach (11); // attaches the servo on pin 11 to the servo object >void loop () < if ( Serial . available ()) < // if there is data comming int angle = Serial . parseInt (); if (angle >= 0 && angle <= 180) < servo. write (angle); // rotate servo Serial . print ( "Rotated servo to angle: " ); // reports action to smartphone app Serial . println (angle); >else < Serial . print ( "Invalid angle: " ); // reports invalid value to smartphone app Serial . println (angle); >> >
You can see the instructions in more detail in Arduino controls Servo Motor via Bluetooth/BLE tutorial
If the Bluetooth Serial Monitor app is useful for you, please give it a 5-star rating on Play Store. Thank you!
Video Tutorial
We are considering to make the video tutorials. If you think the video tutorials are essential, please subscribe to our YouTube channel to give us motivation for making the videos.