Sending Data over MQTT
Learn how to use the MQTT (Message Queuing Telemetry Transport) protocol to send data between the Arduino UNO WiFi Rev2 and another device.
Introduction
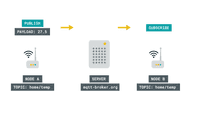
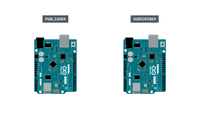
In this tutorial, we will create a setup that allows a Arduino UNO WiFi Rev2 board to send data to another Wi-Fi compatible board, using MQTT (Message Queuing Telemetry Transport). The sender device, simply publishes a message to a broker service, which then can be subscribed to by a receiver device.
The data we will send is simply random readings from the analog inputs on the Arduino UNO WiFi Rev2, but can easily be replaced by any sensor. This tutorial uses the broker test.mosquitto.org, an open-source service, free to use by anyone.
This tutorial uses the ArduinoMqttClient and WiFiNINA libraries.
Goals
The goals of this project are:
- Learn some basics of how MQTT works.
- Learn how to use the ArduinoMqttClient library.
- Create a sketch for a publisher device.
- Create a sketch for a subscriber device.
Hardware & Software Needed
Note: The sketches in this tutorial also works with the MKR WiFi 1010 and Nano 33 IoT boards. You can for example use the Arduino UNO WiFi Rev2 as a publisher, and a Nano 33 IoT as a subscriber.
Message Queuing Telemetry Transport (MQTT)
The MQTT protocol was first introduced in 1999, as a light-weight publish and subscribe system. It is particularly useful for devices with low-bandwidth, where we can send commands, sensor values or messages over the Internet with little effort.
A basic explanation on how it works is that a node, for example and Arduino with a Wi-Fi module, sends a payload to a broker. A broker is a kind of «middle-point» server, that essentially stores payloads sent to it, in something called topics. A topic, is a definition of what type of data it contains, it could for example be «basement humidity» or «living room temperature». Another node can then subscribe to this information, from the broker, and voilà, data has been moved from Node A to Node B over the Internet.
There are several different ways this can be practiced, with many different layers of security depending on what type of broker and setup we use. For example, if we are dealing with non-sensitive data, such as temperature of a specific location, we are not too concerned on who might get access to it. But there’s cases where data needs to be protected, for example in Social Media messaging services.
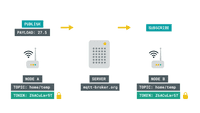
One way to protect the data is for example, by using a token, something that is quite common when working with various IoT services. For instance, if we are publishing something to a broker, anyone that has the URL, e.g. randombroker.org/randomtopic can subscribe to it. But if we add a unique token on both sides, they wouldn’t be able to. These tokens could for example be Z6ACuLwr5T, which is not exactly something easy to guess.
MQTT is quite the interesting topic, and if you wish to read more about it, check out the links below:
- mqtt.org — all you need to know about MQTT.
- Mosquitto.org — an MQTT broker.
- Inductive automation — what is MQTT?
- Randomnerdtutorials — what is MQTT and how it works.
Circuit
This tutorial requires no external circuit. It does however, require two boards with a Wi-Fi module (one publisher and one subscriber).
Step by Step
We will now go through the steps required to setup one board as a publisher, and one as a subscriber. The following steps will be needed:
- Include the necessary libraries.
- Create a header file to store Wi-Fi credentials.
- Configure the publisher device to create three topics and publish them to a broker.
- Configure the subscriber device to subscribe to the three topics.
- First, let’s make sure we have the drivers installed. If we are using the Web Editor, we do not need to install anything. If we are using an offline editor, we need to install it manually. This can be done by navigating to Tools > Board > Board Manager. . Here we need to look for the Arduino avrMEGA Boards and install it.
- Now, we need to install the libraries needed. If we are using the Web Editor, there is no need to install anything. If we are using an offline editor, simply go to Tools > Manage libraries.., and search for ArduinoMqttClient and WiFiNINA and install them both.
- Now let’s take a look at some important functions used in the sketches:
MqttClient mqttClient(wifiClient)mqttClient.connect(broker, port)mqttClient.beginMessage(topic)Programming the Publisher
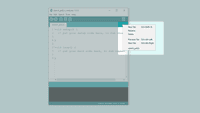
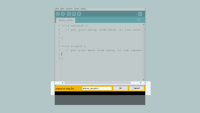
- We will now program the publisher device. Let’s start by opening an empty sketch, and create a header file called
Then, name the file «arduino_secrets.h».
- Inside this new header file, we need to use the below code, where our
1#define SECRET_SSID "" 2 #define SECRET_PASS ""- We can now copy and paste the sender code below into our regular sketch file, and upload it to our board. Make sure we have selected the right port and board before uploading.
created here may be used by someone else. If we change this, we will also need to change the name of the topic we subscribe to in the subscriber sketch.
1#include 2 #include 3 #include "arduino_secrets.h" 4 5 ///////please enter your sensitive data in the Secret tab/arduino_secrets.h 6 char ssid[] = SECRET_SSID; // your network SSID (name) 7 char pass[] = SECRET_PASS; // your network password (use for WPA, or use as key for WEP) 8 9WiFiClient wifiClient; 10MqttClient mqttClient(wifiClient); 11 12 const char broker[] = "test.mosquitto.org"; 13 int port = 1883; 14 const char topic[] = "real_unique_topic"; 15 const char topic2[] = "real_unique_topic_2"; 16 const char topic3[] = "real_unique_topic_3"; 17 18 //set interval for sending messages (milliseconds) 19 const long interval = 8000; 20 unsigned long previousMillis = 0; 21 22 int count = 0; 23 24 void setup() 25 //Initialize serial and wait for port to open: 26 Serial.begin(9600); 27 while (!Serial) 28 ; // wait for serial port to connect. Needed for native USB port only 29 > 30 31 // attempt to connect to Wifi network: 32 Serial.print("Attempting to connect to WPA SSID: "); 33 Serial.println(ssid); 34 while (WiFi.begin(ssid, pass) != WL_CONNECTED) 35 // failed, retry 36 Serial.print("."); 37 delay(5000); 38 > 39 40 Serial.println("You're connected to the network"); 41 Serial.println(); 42 43 Serial.print("Attempting to connect to the MQTT broker: "); 44 Serial.println(broker); 45 46 if (!mqttClient.connect(broker, port)) 47 Serial.print("MQTT connection failed! Error code = "); 48 Serial.println(mqttClient.connectError()); 49 50 while (1); 51 > 52 53 Serial.println("You're connected to the MQTT broker!"); 54 Serial.println(); 55 > 56 57 void loop() 58 // call poll() regularly to allow the library to send MQTT keep alive which 59 // avoids being disconnected by the broker 60 mqttClient.poll(); 61 62 unsigned long currentMillis = millis(); 63 64 if (currentMillis - previousMillis >= interval) 65 // save the last time a message was sent 66 previousMillis = currentMillis; 67 68 //record random value from A0, A1 and A2 69 int Rvalue = analogRead(A0); 70 int Rvalue2 = analogRead(A1); 71 int Rvalue3 = analogRead(A2); 72 73 Serial.print("Sending message to topic: "); 74 Serial.println(topic); 75 Serial.println(Rvalue); 76 77 Serial.print("Sending message to topic: "); 78 Serial.println(topic2); 79 Serial.println(Rvalue2); 80 81 Serial.print("Sending message to topic: "); 82 Serial.println(topic2); 83 Serial.println(Rvalue3); 84 85 // send message, the Print interface can be used to set the message contents 86 mqttClient.beginMessage(topic); 87 mqttClient.print(Rvalue); 88 mqttClient.endMessage(); 89 90 mqttClient.beginMessage(topic2); 91 mqttClient.print(Rvalue2); 92 mqttClient.endMessage(); 93 94 mqttClient.beginMessage(topic3); 95 mqttClient.print(Rvalue3); 96 mqttClient.endMessage(); 97 98 Serial.println(); 99 > 100 >Programming the Subscriber Device
We will now program the subscriber device. For this, we need to create a new sketch, and create another
- We can now copy and paste the receiver code below into our regular sketch file, and upload it to our board. Make sure we have selected the right port and board before uploading.
1#include 2 #include 3 #include "arduino_secrets.h" 4 5 ///////please enter your sensitive data in the Secret tab/arduino_secrets.h 6 char ssid[] = SECRET_SSID; // your network SSID 7 char pass[] = SECRET_PASS; // your network password 8 9WiFiClient wifiClient; 10MqttClient mqttClient(wifiClient); 11 12 const char broker[] = "test.mosquitto.org"; 13 int port = 1883; 14 const char topic[] = "real_unique_topic"; 15 const char topic2[] = "real_unique_topic_2"; 16 const char topic3[] = "real_unique_topic_3"; 17 18 void setup() 19 //Initialize serial and wait for port to open: 20 Serial.begin(9600); 21 while (!Serial) 22 ; // wait for serial port to connect. Needed for native USB port only 23 > 24 // attempt to connect to Wifi network: 25 Serial.print("Attempting to connect to SSID: "); 26 Serial.println(ssid); 27 while (WiFi.begin(ssid, pass) != WL_CONNECTED) 28 // failed, retry 29 Serial.print("."); 30 delay(5000); 31 > 32 33 Serial.println("You're connected to the network"); 34 Serial.println(); 35 36 Serial.print("Attempting to connect to the MQTT broker: "); 37 Serial.println(broker); 38 39 if (!mqttClient.connect(broker, port)) 40 Serial.print("MQTT connection failed! Error code = "); 41 Serial.println(mqttClient.connectError()); 42 43 while (1); 44 > 45 46 Serial.println("You're connected to the MQTT broker!"); 47 Serial.println(); 48 49 // set the message receive callback 50 mqttClient.onMessage(onMqttMessage); 51 52 Serial.print("Subscribing to topic: "); 53 Serial.println(topic); 54 Serial.println(); 55 56 // subscribe to a topic 57 mqttClient.subscribe(topic); 58 mqttClient.subscribe(topic2); 59 mqttClient.subscribe(topic3); 60 61 // topics can be unsubscribed using: 62 // mqttClient.unsubscribe(topic); 63 64 Serial.print("Topic: "); 65 Serial.println(topic); 66 Serial.print("Topic: "); 67 Serial.println(topic2); 68 Serial.print("Topic: "); 69 Serial.println(topic3); 70 71 Serial.println(); 72 > 73 74 void loop() 75 // call poll() regularly to allow the library to receive MQTT messages and 76 // send MQTT keep alive which avoids being disconnected by the broker 77 mqttClient.poll(); 78 > 79 80 void onMqttMessage(int messageSize) 81 // we received a message, print out the topic and contents 82 Serial.println("Received a message with topic '"); 83 Serial.print(mqttClient.messageTopic()); 84 Serial.print("', length "); 85 Serial.print(messageSize); 86 Serial.println(" bytes:"); 87 88 // use the Stream interface to print the contents 89 while (mqttClient.available()) 90 Serial.print((char)mqttClient.read()); 91 > 92 Serial.println(); 93 Serial.println(); 94 >Testing It Out
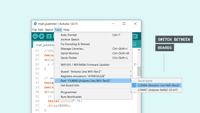
If everything was successful during the upload, we now have a publisher and subscriber device. Next, we need to open the Serial Monitor for each board, one at a time. This will initialize the sketch. Since we can only have one Serial Monitor open at one time, we will need to switch the ports manually. Using only one computer can be a bit tedious, as we can never view the Serial Monitor of both devices at the same time.
In this tutorial, a Arduino UNO WiFi Rev2 and a Nano 33 IoT board was used. When switching between the ports, we can see them listed as COM12 and COM3.
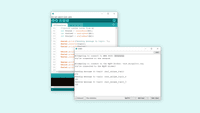
When both devices have been initialized, they start connecting to the network. Now, let’s open the Serial Monitor and keep it open for the publisher device.
We can now see that we are sending messages every 8 seconds (this interval can be changed at the top of the code). Each interval sends three messages, for each topic. Each topic contains the latest reading from an analog pin.
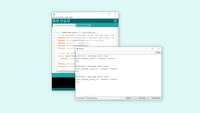
Now, let’s open the subscriber device’s Serial Monitor, and keep it open. If everything is successful, we can now see the analog values. This means, that we have successfully published three topics on one device, and subscribed to them using another device.
Troubleshoot
If the code is not working, there are some common issues we can troubleshoot:
- Check that the host is right: this tutorial uses test.mosquitto.org.
- Check that our credentials are correct in the
Conclusion
In this tutorial, we have created a very basic MQTT application, which allows data to flow from a publisher device, via a broker, to a subscriber device. This type of setup is commonly used in many Internet of Things (IoT) applications, and we encourage you to continue exploring the ArduinoMqttClient library. In this tutorial, in order to create a minimal working project we did not use any form of encryption. This is OK to use for just basic, non-private data, but if you are intending to use it for e.g. home automation, security systems and so on, it is strongly recommended to use more security layers.
The broker used in this tutorial, test.mosquitto.org provides some explanation on different forms of encryption, and what ports to use etc.
