- Getting started with the Arduino Uno WiFi Rev2
- Use your Arduino Uno WiFi Rev2 on the Arduino Web IDE
- Use your Arduino Uno WiFi Rev2 on the Arduino Desktop IDE
- Installing Drivers for the Uno WiFi
- Open your first sketch
- Select your board type and port
- Upload the program
- Tutorials
- Please Read.
- Serial ports
- SPI
- I2C
- Analog
- RGB LED
- Integrated IMU
- Interrupts
- Arduino Uno Wi-Fi Rev2, Программируемый контроллер на базе ATmega4809 с поддержкой Wi-Fi
- Технические параметры
Getting started with the Arduino Uno WiFi Rev2
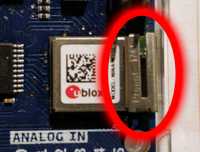
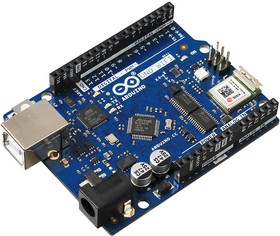
The Arduino Uno WiFi Rev2 is an Arduino Uno with an integrated WiFi module. The board is based on the Microchip MEGA4809 with an ESP32 u-blox NINA-W13 WiFi Module integrated. The NINA-W13 Module is a self contained SoC with integrated TCP/IP protocol stack that can give access to your WiFi network (or the device can act as an access point).
The Arduino Uno WiFi Rev2 is programmed using the Arduino Software (IDE), our Integrated Development Environment common to all our boards and running both online and offline. For more information on how to get started with the Arduino Software visit the Getting Started page.
Use your Arduino Uno WiFi Rev2 on the Arduino Web IDE
All Arduino boards, including this one, work out-of-the-box on the Arduino Web Editor, you only need to install Arduino Create Agent to get started.
The Arduino Web Editor is hosted online, therefore it will always be up-to-date with the latest features and support for all boards. Follow this simple guide to start coding on the browser and upload your sketches onto your board.
Use your Arduino Uno WiFi Rev2 on the Arduino Desktop IDE
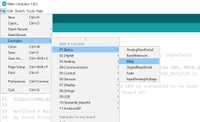
If you want to program your Arduino Uno WiFi Rev2 while offline you need to install the Arduino Desktop IDE. Full instructions on how to install it can be found in our Getting Started page.
You will need to add the Arduino megaAVR Core to the Arduino IDE. This simple procedure is done selecting Tools menu, then Boards and last Boards Manager, as documented in the Arduino Boards Manager page.
Installing Drivers for the Uno WiFi
macOS No drivers are needed for the Arduino UNO WiFi Rev2 on macOS.
Windows (tested on XP, 7, Vista and 10) At this point of this Getting Started guide you already have installed the drivers together with the Arduino Software (IDE) and the board will be recognized automatically.
Linux There is no need to install drivers for Ubuntu 10.0.4 and later, but make sure port 5353 is not being blocked by a firewall. Users with Linux need to run this code in the terminal: ~/.arduino15/packages/arduino/hardware/megaavr/1.8.1/scripts/create_dfu_udev_rule
You need to be admin on the computer to do so.
Open your first sketch
Open the LED blink example sketch: File > Examples >01.Basics > Blink.
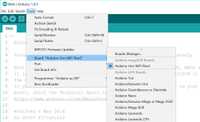
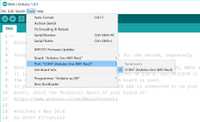
Select your board type and port
You’ll need to select the entry in the Tools > Board menu that corresponds to your Arduino Uno WiFi Rev2 board.
Select the serial device of the board from the Tools | Serial Port menu. This is likely to be COM3 or higher (COM1 and COM2 are usually reserved for hardware serial ports). To find out, you can disconnect your board and re-open the menu; the entry that disappears should be the Arduino Uno WiFi Rev2 board. Reconnect the board and select that serial port.
Upload the program
Now, simply click the «Upload» button in the environment.
Wait a few seconds — you should see the green progress bar on the right of the status bar. If the upload is successful, the message «Done uploading.» will appear on the left in the status bar.
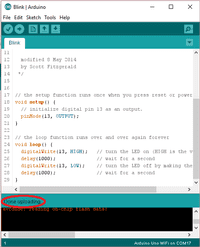
A few seconds after the upload finishes, you should see the on-board LED start to blink. If it does, congratulations! You’ve gotten your Uno WiFi board up-and-running for the USB programming. If you have problems, please see the troubleshooting suggestions.
Tutorials
Now that you have set up and programmed your Uno WiFi board, you may find inspiration in our Project Hub tutorial platform, or have a look to the tutorial pages that explain how to use the various features of your board. We suggest that you visit the WiFi Nina Library page that explains the network functions of this board.
Please Read.
This board uses the new Microchip MEGA4809 microcontroller that has a different memory layout compared to the usual ATmega 328P. You now have 48K of Flash memory, 6K of RAM and 256 bytes of EEPROM, therefore you have more Flash and more memory than the Arduino UNO (16K Flash and 2K RAM). The programming of the MEGA4809 happens through an ATmega 32U4 programmed with the mDBG code and creates a virtual COM port when connected to a PC.
Serial ports
The Arduino Uno WiFi Rev. 2 has 3 hardware serial ports. Serial is connected to the USB interface, Serial1 is connected to Pin 0 (RX) and 1 (TX), Serial 2 is connected to the u-blox NINA-W13 module. This allows the usage of pins 0 and 1 without issues: on the original Arduino UNO, the usage of Pins 0 and 1 disrupts the sketch upload.
SPI
The SPI interface is available on the ICSP connector with the usual layout for MISO, MOSI, SCK and CS. The IMU and the WiFi module are connected to the SPI bus and have individuale and dedicated pins for Chip Select (CS)
I2C
The I2C interface is available on the SDA and SCL pins. Unlike the classic Arduino Uno, these pins are not alternatives to pins A4 and A5. This means you are still free to use the Uno WiFi Rev2’s A4 and A5 for anything you like when an I2C device is connected to SDA and SCL.
Analog
The new core has 5 PWM pins and the pin 11 doesn’t support PWM. The resolution of the 6 A/D pins is the usual, with 10 bits and values from 0 to 1023.
RGB LED
Close to the Nina module and the ICSP connector there is a square RGB SMD LED. This LED is directly connected to the NINA-W13 WiFi module and it is driven by the module itself. It will be used for future applications and developments.
Integrated IMU
On the SPI bus, with a dedicated CS connection (pin D30 or SPIIMU_SS) and a dedicated interrupt pin (SPIIMU_INT), the Arduino UNO WiFi Rev.2 has a LSM6DS IMU with 3-axis accelerometer and 3-axis gyroscope. This chip, made by ST Microelectronics, is a standard component that you can use with our own library Arduino_LSM6DS3. To get the library, you can use our Library Manager available in the Arduino Software (IDE) .
The library contains two examples to show you how to read acceleration and rotational speed.
Interrupts
The new MEGA4809 microcontroller allows you to attach any digital pin to an interrupt, therefore you may have as many Interrupt Service Routines (ISR) as the available digital pins. You still define the interrupts with the usual function attachInterrupt(digitalPinToInterrupt(pin), ISR, mode); . Please refer to the attachInterrupt() page for further details.
Note: the WiFi antenna built in in the U-blox NINA-W13 module is made for embedded products and should NOT be touched. Applying pressure or force on it could cause damage. Be very careful when you detach shields on this board because you may pull the WiFi antenna.
The text of the Arduino getting started guide is licensed under a Creative Commons Attribution-ShareAlike 3.0 License. Code samples in the guide are released into the public domain.
Arduino Uno Wi-Fi Rev2, Программируемый контроллер на базе ATmega4809 с поддержкой Wi-Fi
Плата Arduino Uno Wi-Fi Rev2 позволит создать собственного робота или взять на себя управление умным домом с веб-интерфейсом и сетью беспроводных датчиков.
Arduino Uno Wi-Fi Rev2 — улучшенная версия Arduino Uno R3 с 8-битным микроконтроллером Microchip ATmega4809 из семейства megaAVR. В отличие от предшественника, плата обзавелась беспроводным модулем U-blox NINA-W102 и инерциальным датчиком LSM6DS3 от STMicroelectronics. Теперь беспроводные технологии Wi-Fi, Bluetooth и данные c 3-осевого акселерометра / гироскопа доступны без подключения дополнительных модулей, а все периферийные вводы-выводы платформы остаются свободными для других расширений и сенсоров.
Для программирования Arduino Uno Wi-Fi Rev2 используется среда Arduino IDE, визуальная среда XOD IDE или произвольный C/C++ инструментарий. Для прошивки понадобится USB-кабель.
Для питания Arduino Uno Wi-Fi Rev2 используется USB-подключение или внешний разъём — источник определяется автоматически. Рекомендуемое напряжение внешнего питания составляет от 7 до 12 В.
Характеристики
Чипы: ATmega4809, NINA-W102 и LSM6DS3
Пины ввода-вывода: 20
Напряжение логических уровней: 5 В
Максимальный ток с пина или на пин: 40 мА
Максимальный выходной ток пина 5V: 1,2 A
Максимальный выходной ток пина 3V3: 1 A
Входное напряжение через пин Vin: 7–12 В
Габариты платы: 69×53 мм
Габариты платы c учётом разъёмов: 75×53 мм
Микроконтроллер Microchip ATmega4809
Ядро: 8-битный megaAVR
Тактовая частота: 16 МГц
Flash-память: 48 КБ
SRAM-память: 6 КБ
EEPROM-память: 256 байт
Контактов с АЦП: 6
Разрядность АЦП: 10 бит
Контактов с ШИМ: 5
Разрядность ШИМ: 8 бит
Пинов с прерываниями: 20
Аппаратных интерфейсов SPI: 1
Аппаратных интерфейсов I2C / TWI: 1
Аппаратных интерфейсов UART / Serial: 3
Беспроводной модуль NINA-W102
Тактовая частота: до 240 МГц
Частота беспроводной передачи: 2,4 ГГц
Стандарт Wi-Fi: 802.11b/g/n
Стандарт Bluetooth: BLE v4.2 BR/EDR
Flash-память: 2 МБ
ROM-память: 448 КБ
SRAM-память: 520 КБ
IMU-сенсор STM LSM6DSM
Трёхосевой акселерометр и гироскоп в одном модуле
Выходной интерфейс: SPI
Диапазон измерений ускорения и поворота: ±2/±4/±8/±16g и ±125/±250/±500/±1000/±2000 град./с
Частота обновления акселерометра и гироскопа: 1,6–6664 Гц и 12,5–6664 Гц
Технические параметры
| Микроконтроллер | ATmega4809 | |
| FLASH память, КБ | 48 | |
| EEPROM память, КБ | 256 | |
| SRAM память, КБ | 6 | |
| Цифровые входы/ выходы | 20(5 с шим) | |
| Аналоговые входы | 6 | |
| Прочие интерфейсы | WiFi | |
| Вес, г | 50 | |
| Показать похожие | ||