Web Server Using Access Point with Arduino UNO WiFi Rev2
In this tutorial, we will be creating something called an Access Point. An access point is practically a wireless local area network, which in this tutorial will not be connected to the Internet. This can be a practical setup for projects that have no access to the internet, but we still want to control and monitor our Arduino UNO WiFi Rev2 board wirelessly. We will be using functionalities from the WiFiNINA library, and we will set up a basic configuration that allows us to control an LED (on or off) and do a reading on one of the analog pins.
Hardware & Software Needed
- Arduino IDE (online or offline).
- WiFiNINA library.
- Arduino UNO WiFi Rev2 (link to store).
- Generic LED.
- 220 ohm resistor.
- Breadboard.
- Jumper wires.
You can also use the built-in LED on the Arduino UNO WiFi Rev2.
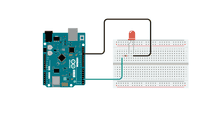
Circuit
Follow the wiring diagram below to connect the LED to the board.
Creating an Access Point
This tutorial barely uses any external hardware: we only need an LED that we will control remotely. But the most interesting aspects lie in the library we are going to use: WiFiNINA. This library can be used for many different connectivity projects, where we can both connect to WiFi, make GET requests and — as we will explore in this tutorial — create an access point (AP) and hosting a web server that we can connect to.
We will go through the following steps in order to create a web server on our Arduino UNO WiFi Rev2:
- First, we need to initialize the WiFiNINA library.
- Then, we need to create the credentials of our access point by entering our SSID (name of network) and PASS (password of network).
- Once the program is running, it will create an access point, start hosting a server, and wait for a client to connect.
- On our phone or laptop, we can now find the access point in the list of available Wi-Fi networks. We can connect using the same password we created in the program.
- Once connected to the Wi-Fi, we can connect to the board’s specific IP address using our regular browser (e.g. Chrome, Firefox).
- As long as we are connected, the program detects it, and enters a
And that is the configuration we will be using in this tutorial. There are a few other functionalities, such as checking if we have the latest firmware and that we are using the right board, and these potential errors will be printed in the Serial Monitor.
Programming the Board
- First, let’s make sure we have the drivers installed. If we are using the Web Editor, we do not need to install anything. If we are using an offline editor, we need to install it manually. This can be done by navigating to Tools > Board > Board Manager. . Here we need to look for the Arduino megaAVR Boards and install it.
- Now, we need to install the library needed. If we are using the Web Editor, there is no need to install anything. If we are using an offline editor, simply go to Tools > Manage libraries.., and search for WiFiNINA and install it.
- We can now take a look at some of the core functions of this sketch:
Upload the code to the board, and make sure the right board and port are selected.
1#include 2 3char ssid[] = "yourNetwork"; // your network SSID (name) 4char pass[] = "yourPassword"; // your network password (use for WPA, or use as key for WEP) 5 int keyIndex = 0; // your network key Index number (needed only for WEP) 6 7 int led = LED_BUILTIN; 8 int status = WL_IDLE_STATUS; 9 WiFiServer server(80); 10 11 void setup() 12 //Initialize serial and wait for port to open: 13 Serial.begin(9600); 14 while (!Serial) 15 ; // wait for serial port to connect. Needed for native USB port only 16 > 17 18 Serial.println("Access Point Web Server"); 19 20 pinMode(led, OUTPUT); // set the LED pin mode 21 22 // check for the WiFi module: 23 if (WiFi.status() == WL_NO_MODULE) 24 Serial.println("Communication with WiFi module failed!"); 25 // don't continue 26 while (true); 27 > 28 29 String fv = WiFi.firmwareVersion(); 30 if (fv WIFI_FIRMWARE_LATEST_VERSION) 31 Serial.println("Please upgrade the firmware"); 32 > 33 34 // print the network name (SSID); 35 Serial.print("Creating access point named: "); 36 Serial.println(ssid); 37 38 // Create open network. Change this line if you want to create an WEP network: 39 status = WiFi.beginAP(ssid, pass); 40 if (status != WL_AP_LISTENING) 41 Serial.println("Creating access point failed"); 42 // don't continue 43 while (true); 44 > 45 46 // wait 10 seconds for connection: 47 delay(10000); 48 49 // start the web server on port 80 50 server.begin(); 51 52 // you're connected now, so print out the status 53 printWiFiStatus(); 54 > 55 56 57 void loop() 58 // compare the previous status to the current status 59 if (status != WiFi.status()) 60 // it has changed update the variable 61 status = WiFi.status(); 62 63 if (status == WL_AP_CONNECTED) 64 // a device has connected to the AP 65 Serial.println("Device connected to AP"); 66 > else 67 // a device has disconnected from the AP, and we are back in listening mode 68 Serial.println("Device disconnected from AP"); 69 > 70 > 71 72 WiFiClient client = server.available(); // listen for incoming clients 73 74 if (client) // if you get a client, 75 Serial.println("new client"); // print a message out the serial port 76 String currentLine = ""; // make a String to hold incoming data from the client 77 while (client.connected()) // loop while the client's connected 78 if (client.available()) // if there's bytes to read from the client, 79 char c = client.read(); // read a byte, then 80 Serial.write(c); // print it out the serial monitor 81 if (c == '\n') // if the byte is a newline character 82 83 // if the current line is blank, you got two newline characters in a row. 84 // that's the end of the client HTTP request, so send a response: 85 if (currentLine.length() == 0) 86 // HTTP headers always start with a response code (e.g. HTTP/1.1 200 OK) 87 // and a content-type so the client knows what's coming, then a blank line: 88 client.println("HTTP/1.1 200 OK"); 89 client.println("Content-type:text/html"); 90 client.println(); 91 92 // the content of the HTTP response follows the header: 93 client.print("Click here turn the LED on
"); 94 client.print("Click here turn the LED off
"); 95 96 int randomReading = analogRead(A1); 97 client.print("Random reading from analog pin: "); 98 client.print(randomReading); 99 100 // The HTTP response ends with another blank line: 101 client.println(); 102 // break out of the while loop: 103 break; 104 > 105 else // if you got a newline, then clear currentLine: 106 currentLine = ""; 107 > 108 > 109 else if (c != '\r') // if you got anything else but a carriage return character, 110 currentLine += c; // add it to the end of the currentLine 111 > 112 113 // Check to see if the client request was "GET /H" or "GET /L": 114 if (currentLine.endsWith("GET /H")) 115 digitalWrite(led, HIGH); // GET /H turns the LED on 116 > 117 if (currentLine.endsWith("GET /L")) 118 digitalWrite(led, LOW); // GET /L turns the LED off 119 > 120 > 121 > 122 // close the connection: 123 client.stop(); 124 Serial.println("client disconnected"); 125 > 126 > 127 128 void printWiFiStatus() 129 // print the SSID of the network you're attached to: 130 Serial.print("SSID: "); 131 Serial.println(WiFi.SSID()); 132 133 // print your WiFi shield's IP address: 134 IPAddress ip = WiFi.localIP(); 135 Serial.print("IP Address: "); 136 Serial.println(ip); 137 138 // print where to go in a browser: 139 Serial.print("To see this page in action, open a browser to http://"); 140 Serial.println(ip); 141 142 >Testing It Out
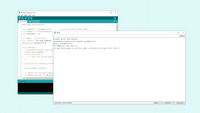
Once we have successfully uploaded the code, open the Serial Monitor and it should look like the following image.
This means that we successfully created an access point. To connect to it, we can either use a laptop or a smartphone that can connect to Wi-Fi. We will need to disconnect from our current Wi-Fi network, so it is easier to use a phone to connect. Go to your phone’s settings, and open the list of Wi-Fi networks. The name of the network we created earlier should show up now, there we need to enter the password we created to connect to it.

Once we are connected to the Wi-Fi, we can enter the URL (IP address of the board) in the browser. This is the one printed in the Serial Monitor. Now, we should see an almost empty page with two links at the top left that say «Click here to turn the LED on» and «Click here to turn the LED off», and a text saying: «Random reading from analog pin: xxx». Depending on if you are using a computer or a phone, they will look like the image below.
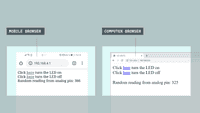
When interacting with the links, you should see the LED, connected to pin 2, turn on and off depending on what you click, and now we have successfully created a way of interacting with our Arduino UNO WiFi Rev2 remotely. Whenever we click on these links, the Serial Monitor will print information regarding the requests, as the image below shows.

Troubleshoot
If the code is not working, there are some common issues we might need to troubleshoot:
- We have not updated the latest firmware for the board.
- We have not installed the core required for the board.
- We have not installed the WiFiNINA library.
- We have not entered the SSID and PASS: remember, it is case sensitive.
- We have not selected the right port to upload: depending on what computer we use, sometimes the board is duplicated. By simply restarting the editor, this issue can be solved.
Conclusion
In this tutorial, we learned how to create an access point, and how to host a web server that we can connect to. We learned how to control an LED remotely, as well as how to display the value of an analog pin in the browser. This method can be very useful when creating a wireless system of sensors and actuators. If you have more than one Wi-Fi compatible board, we can also connect these to the same access point.