- Arduino — Ethernet
- Arduino Ethernet Shield 2 vs PHPoC WiFi/Ethernet Shield
- Arduino — Webserver
- Communication between two Arduino
- Communication between two Arduino — Overview
- Communication between two Arduino via Ethernet/WiFi
- Example Application
- Self-defined Protocol
- Wiring Diagram
- Arduino Code for Arduino #1
- Arduino Code for Arduino #2
- Quick Steps
- Video Tutorial
- How to connect two Arduino via Internet
- Arduino wifi with ethernet
- Arduino Yún — Wi-Fi и Ethernet при нём
- Межпроцессорное взаимодействие
- Сетевые возможности
- Питание
- Linux
- USB Host
- Цена
- Небольшая презентация
- Заключение
- Ссылки
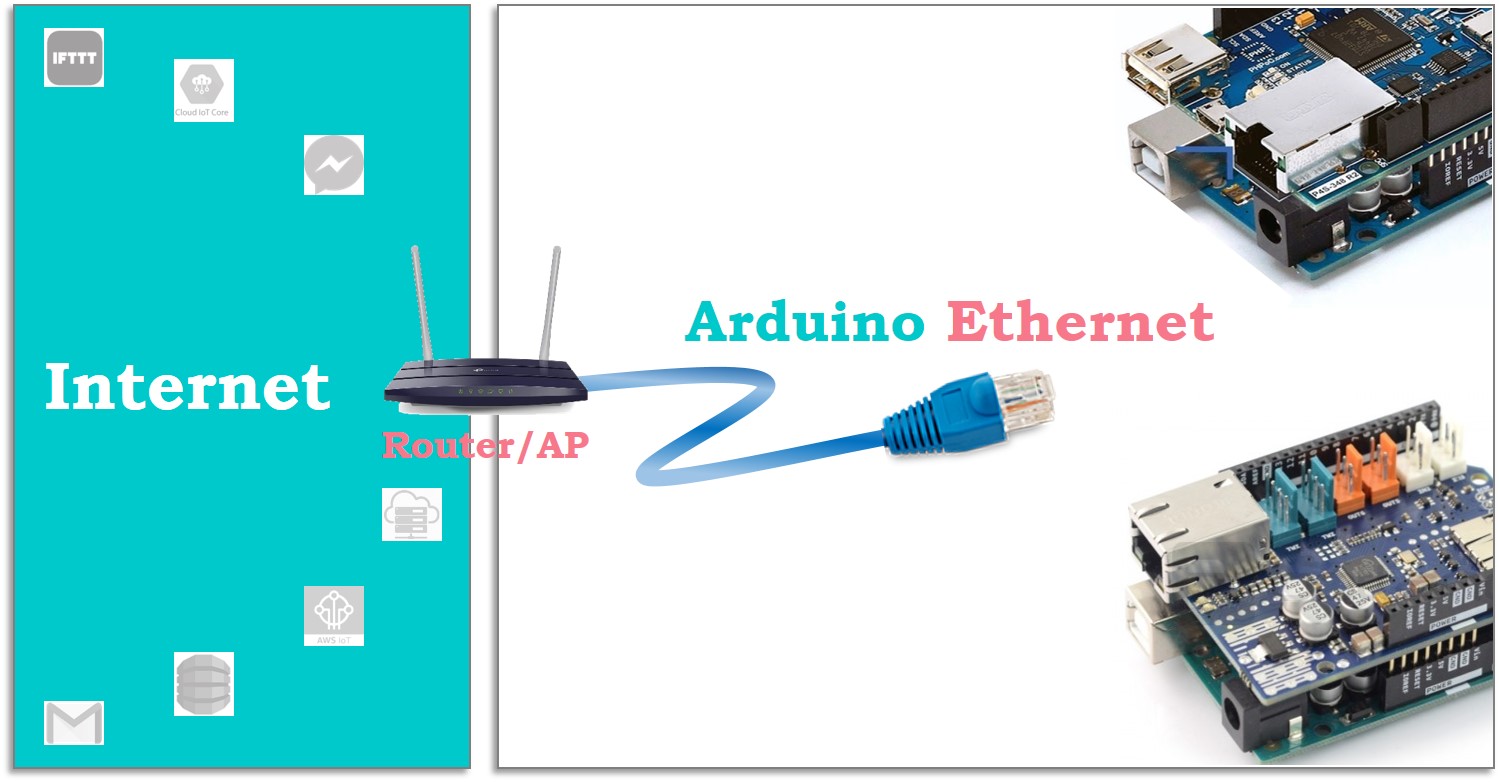
Arduino — Ethernet
Ethernet is the easiest way to connect Arduino to Internet. There are many ways to connect Arduino to the Internet via Ethernet. Among them, we introduce two ways for Arduino Uno:
Please note: These are affiliate links. If you buy the components through these links, We may get a commission at no extra cost to you. We appreciate it.
Arduino Ethernet Shield 2 vs PHPoC WiFi/Ethernet Shield
PHPoC WiFi/Ethernet Shield is also called PHPoC Shield.
Both Arduino Ethernet Shield 2 and PHPoC WiFi/Ethernet Shield communicates with Arduino via the SPI interface. The followings are deferences between them:
| Arduino Ethernet Shield 2 | PHPoC WiFi/Ethernet Shield | |
|---|---|---|
| Price | normal | expensive |
| Usage | easy | easy |
| Library | built-in | need to Install |
| MAC Address | need to declare in code | built-in on Shield, no need to declare in code |
| IPv4 Address | set in Arduino code | set via web |
| IPv6 | no | yes |
| SSL/TLS | no | yes |
| Dedicated web server | no | yes |
| Websocket | no | yes |
| Sending Gmail | no | yes |
| Built-in web app | no | yes |
| WiFi | no | yes |
Arduino — Webserver
We can make Arduino become a webserver with both shield. Howerver:
Arduino Ethernet Shield 2: we have to mix Arduino code and web code (HTML, css, javascript) in to Arduino sketch. It is dificult to use image.
It has a dedicated web server on Shield, Arduino code will be in Arduino sketch. Web code (HTML, css, javascript) and image is stored on the shield. We can upload HTLML, css, javascript and image file to this shield (max is 512 KB of sie in total). The uploading process is very simple. Just drag and drop.
Moreover, This shield supports websocket, which allows to exchange data between web browser ann Arudino in real time and two direction.
It has some built-in webapp, which let beginners program and control Arduino via web browser WITHOUT writing web code (HTML, css, javascript).
One more great feature of PHPoC WiFi/Ethernet Shield is ability to switch from Ethernet to WiFi without changing Arduino code. The same Arduino code can works for both Enthernet and WiFi interface.
With more advanced features, Those are reason why PHPoC WiFi/Ethernet Shield is more expensive than Arduino Ethernet Shield 2.
Communication between two Arduino
Please note: These are affiliate links. If you buy the components through these links, We may get a commission at no extra cost to you. We appreciate it.
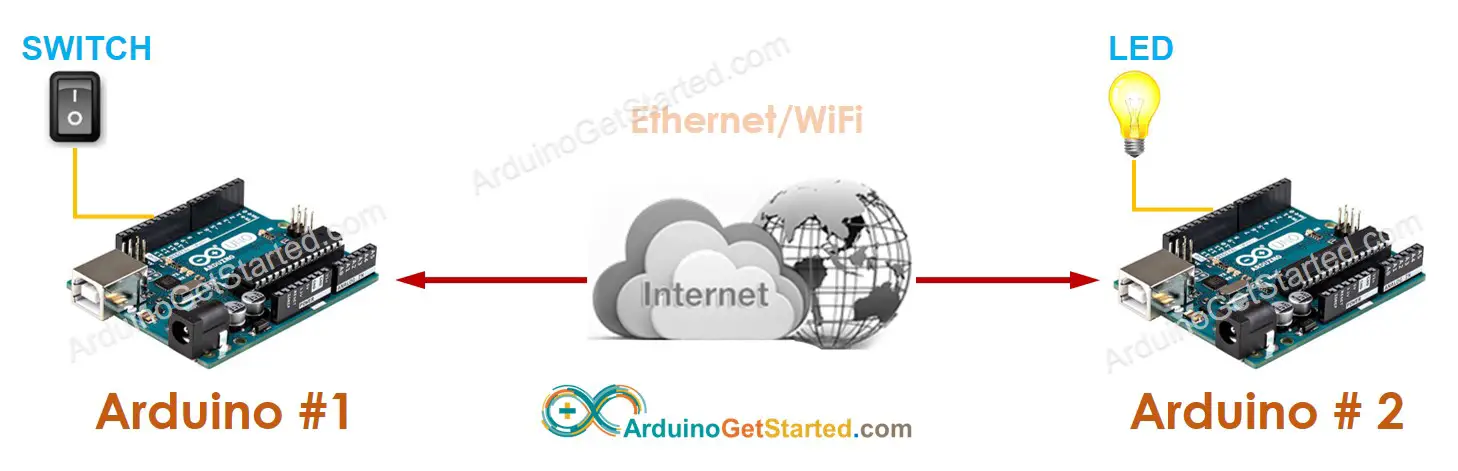
Communication between two Arduino — Overview
Let’s consider a specific case: Arduino #1 communicates with Arduino #2. There are many methods to enable communication between two Arduino. We can choose one of them depending on the communication range. The below table shows some methods and their communication range.
| Methods | Range |
|---|---|
| I2C | very short |
| SPI | very short |
| UART (TTL) | very short |
| UART (RS-232/485/422) | short |
| Bluetooth | short |
| LoRa | long |
| Ethernet/WiFi | unlimited (*) |
If two Arduino are not connected to the Internet, but they are connected in the same LAN network, they can still communicate with each other. The communication range is limited within the LAN network.
Among the above methods, this tutorial uses Ethernet/WiFi to enable communication between two Arduino because it allows two Arduino to communicate over the unlimited distance.
Communication between two Arduino via Ethernet/WiFi
Two Arduino can communicate with each other via Ethernet/WiFi if:
No matter two Arduino connects with each other within a local LAN network or via the Internet, there are two types of communication:
In the case of communicating directly, in most cases, one Arduino plays the role of TCP client, the other plays the role of TCP server.
In the case of communicating through a centralized server, in most cases, both Arduino play the role of TCP client.
Depending on the application, We need to choose an application protocol for communicating between two Arduino. Below are some of the application protocols we can use:
UDP protocol is beyond the scope of this tutorial.
Example Application
Let’s realize the following application: A button/switch connected to Arduino #1 controls an LED connected to Arduino #2 via Ethernet/WiFi.
This tutorial uses two Arduino Ethernet Shield 2. You can use another WiFi Shield or Ethernet Shield instead. If you use another shield it just needs to modify the code a little bit.
As mentioned above, there are some application protocols we can use. In this example, to make it simple, we will define a protocol by ourself (a self-defined protocol)
Self-defined Protocol
Let’s define a simple protocol:
Wiring Diagram
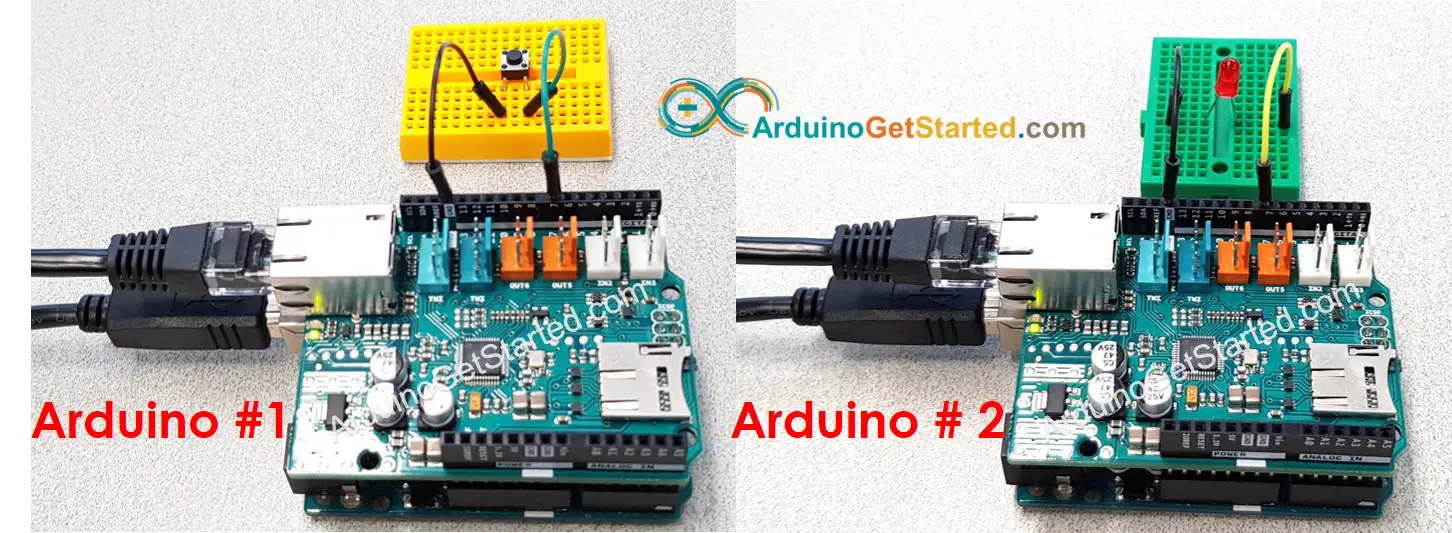
you need to add a resistor for LED if LED does not have a built-in resistor. You can learn more in Arduino — LED and Arduino — Button tutorials
Arduino Code for Arduino #1
Arduino Code for Arduino #2
Quick Steps
Open another Arduino IDE window (called Arduino IDE #2) by clicking on Arduino IDE icon on your PC (important! (**) )
ARDUINO #2: TCP SERVER + AN LED TCP Server IP address: 192.168.0.2 -> Please update the serverAddress in Arduino #1 code
ARDUINO #1: TCP CLIENT + A BUTTON/SWITCH Connected to TCP server — The button is pressed, sent command: 1 — The button is released, sent command: 0 — The button is pressed, sent command: 1 — The button is released, sent command: 0 — The button is pressed, sent command: 1 — The button is released, sent command: 0
ARDUINO #2: TCP SERVER + AN LED TCP Server IP address: 192.168.0.2 -> Please update the serverAddress in Arduino #1 code — Received command: 1 — Received command: 0 — Received command: 1 — Received command: 0 — Received command: 1 — Received command: 0
(**): If you open Arduino IDE #2 window via «File» → «New» or «Open» from Arduino IDE #2 window, you will NOT be able to open two Serial Monitors for two Arduino in the same PC at the same time.
There is an alternative to this self-defined protocol. It is the Modbus TCP. The Modbus protocol is standardized, it has many advantages over the self-defined protocol. See more in Arduino — Modbus tutorial
Video Tutorial
We are considering to make the video tutorials. If you think the video tutorials are essential, please subscribe to our YouTube channel to give us motivation for making the videos.
How to connect two Arduino via Internet
There are two kinds of IP address: private IP address and public IP address. The IP address you are using in the home network is usually a private IP address.
You can easily identify the private IP address. The private IP address has three pattern: 10.x.x.x, 172.16.x.x, 192.168.x.x
It does NOT matter to use the private IP address in the following case:
If two Arduino are in the same LAN network, regardless of communicating directly or via a centralized server, regardless of your LAN network connects to the Internet or not.
If two Arduino are in the different LAN networks and communicating with each other via a centralized server
In the case of two Arduino are in the different LAN networks and communicating with each other directly. The Arduino TCP client can use the private IP address. However, the Arduino TCP server MUST use either:
The process of doing «Port Forwarding» is different from each router/AP. It is out of the scope of this tutorial.
Arduino wifi with ethernet


Rather than buying something, make it.
Browse thousands of projects created by the Arduino community
795016 views • 605 comments • 415 respects

Arduino Based Mini CNC 2D Plotter
165785 views • 40 comments • 214 respects
212914 views • 90 comments • 57 respects

Ultrasonic Security System
163108 views • 142 comments • 188 respects
157350 views • 63 comments • 60 respects
Measure Heart Rate and SpO2 with MAX30102
321960 views • 154 comments • 244 respects

Share and Compete in Project of the Month!
Unlock amazing rewards by submitting your project today.


Create projects fast, with no coding
Import, use and customize ready-made templates for your IoT projects
Dream big, we will take care of the rest
See what you can create with Arduino Cloud
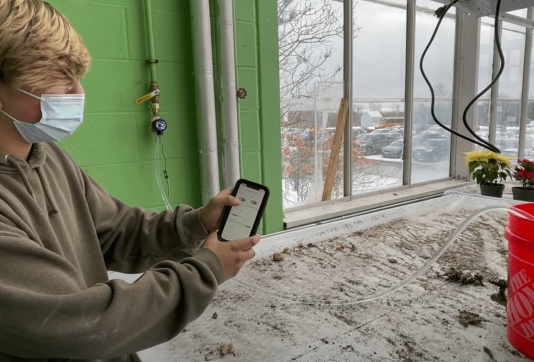
White Mountains Regional High School
Discover how this school is working with remote sensing applications that allow them to do things like automate lighting, regulate temperature, adjust humidity, and check on the greenhouse from their phones.
Smart ovens take a leap into the future
How a strong partnership and the Arduino Portenta Machine Control led historical company Rinaldi Superforni to revolutionize their business


The new Portenta X8 and Max Carrier
Industrial Arduino and Linux combined to get the best of both worlds
Arduino Yún — Wi-Fi и Ethernet при нём

На днях итальянская компания презентовала и запустила продажи новой модели в семействе своих устройств — Arduino Yún. Главной изюминкой стало то, чего многие Arduino-фанаты ждали уже давно — встроенные сетевые возможности. На плату добавили сразу два сетевых интерфейса — Wi-Fi и Ethernet.
Сама плата основана на Arduino Leonardo и управляется комбинацией микроконтроллера ATMega32u4 и SoC Atheros AR9331, работающей под управлением Linino (Yún’s Linux) — кастомизированной версии OpenWRT.
Межпроцессорное взаимодействие

Yún’s Linux и Arduino общаются посредством библиотеки Bridge, позволяющей Arduino скетчам посылать команды в Linux. Сами процессоры соединены последовательным интерфейсом, то есть ATMega32u4 работает с Yún’s Linux через интерфейс командной строки (CLI). Так же есть возможность установить и запустить свое Linux приложение используя Bridge.
Другой интересной особенностью является возможность заливать Arduino скетчи через WiFi интерфейс посредством SoC AR9331. При присутствии Arduino Yún в одной сети с компьютером плата автоматически определиться в Arduino IDE (для этого выпущена новая версия IDE). Скетч будет передан в AR9331 и Yún’s Linux произведет прошивку AVR микроконтроллера через SPI, выступая в роли AVR ISP программатора.
Сетевые возможности

Доступ к сети реализуются двумя отдельными интерфейсами:
- 10/100 Mbit/s Fast Ethernet
- IEEE 802.11 b/g/n 2.4GHz WiFi поддерживающий WEP, WPA и WPA2
WiFi интерфейс также может работать в режиме точки доступа (Access point). В режиме точки доступа другие WiFi устройства могут подключаться напрямую к Arduino Yún, однако, к сожалению, в этом режиме подключение к интернету невозможно, несмотря на наличие еще одного сетевого интерфейса.
Для упрощения работы с популярными интернет сервисами было заключено партнерство с Temboo и добавлением одноименной библиотеки в Arduino SDK. Данный ресурс упрощает доступ к сотням популярных веб сервисов выступая как прокси.
Питание
Linux
В качестве операционной системы на SoC Atheros AR9331 используется OpenWRT дистрибутив Linino. 16МБ flash-памяти содержат Linux образ, полноценный python и менеджер пакетов. 64МБ DDR2 должны позволять выполнять ресурсоёмкие задачи, такие как запуск web-сервера или вещание видео с web камеры. При необходимости встроенные 16МБ памяти могут быть расширены за счет использования SD карты или USB Flash. Для этого надо всего лишь в корне карты или флешки создать папку arduino и она автоматически определится при подключении.
USB Host
Arduino Yún имеет USB порт, подключенный к SoC AR9331. К нему можно подключать различную периферию: web камеры, устройства хранения данных, различный устройства ввода прочие устройства, драйвера к которым присутствуют в Linino. Также есть возможность установки драйверов для специфических устройств. Данный USB порт на прямую не доступен из Arduino скетчей.
Цена
Небольшая презентация
Заключение
Устройство в первую очередь должно понравится поклонникам Arduino. И даже несмотря на довольно серьезных конкурентов (Raspberry Pi, virt2real) думаю Arduino Yún ждет успех.