- How to Install and Use dig and nslookup Commands in Linux for DNS Lookup
- How to Install dig & nslookup in Linux
- Install dig & nslookup in Debian/Ubuntu
- Install dig & nslookup in RHEL/Fedora
- Install dig & nslookup in Arch/Manjaro
- Testing dig & nslookup Commands are Working
- How To Use The dig Command
- dig command syntax
- dig command output decode
- dig command usage
- How to use the nslookup command
- Examples of dig & nslookup commands
- Wrap up
- How to Install and Use dig and nslookup Commands in Linux
- Installing dig & nslookup in CentOS/RHEL
- Installing dig & nslookup on Debian / Ubuntu
- Installing dig & nslookup on ArchLinux
- Using the dig command
- Using the nslookup Command
How to Install and Use dig and nslookup Commands in Linux for DNS Lookup
The dig and nslookup are network administration command-line tools that are used for network troubleshooting and gathering information related to the Domain Name Server (DNS).
The “Domain Information Groper” ( dig ) command is an essential tool for gathering information or interrogating the DNS name servers to troubleshoot DNS issues.
The “Name Server Lookup” ( nslookup ) command is a network administration command-line tool for querying and obtaining crucial mapping information between a domain name and an IP address.
Most of the modern Linux operating systems ship dig and nslookup commands, but older ones might be left out of the responsibility of installation to you.
Still, before installing the package, it’s better you run dig -v. If it shows dig command not found, then you have read the next section to install.
So let’s learn how to install and use the dig and nslookup commands in Linux to troubleshoot DNS issues and obtain DNS information easily.
How to Install dig & nslookup in Linux
The dig and nslookup tools are part of bind-utils, so installing just bind-utils will let you have both of the tools on your system. Pretty simple, right?
Now just follow the below installation steps according to your distribution’s package manager.
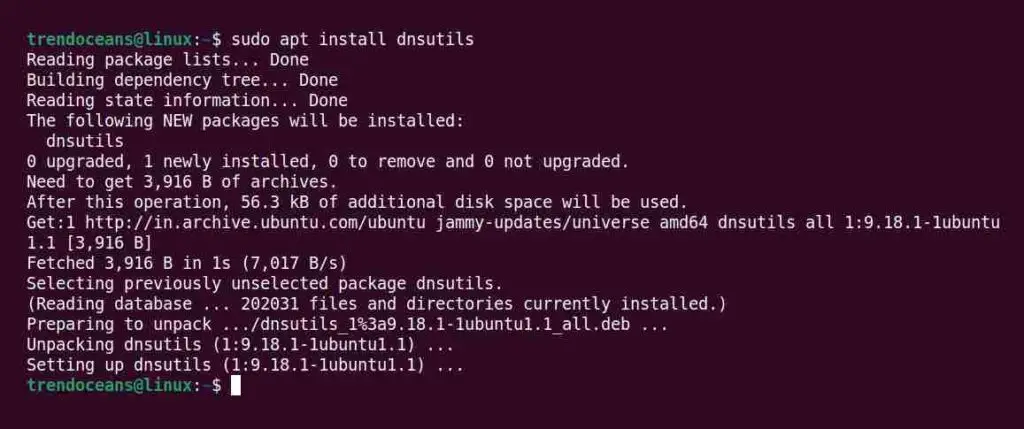
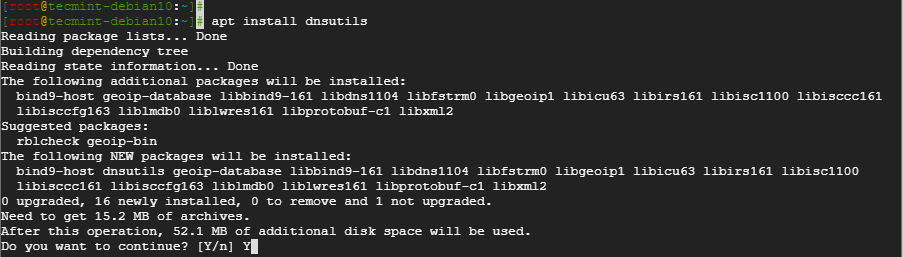
Install dig & nslookup in Debian/Ubuntu
You can easily install dig & nslookup on your Debian-based distribution system using the apt package manager, as shown below.
$ sudo apt install dnsutilsBelow is the output of the above command.
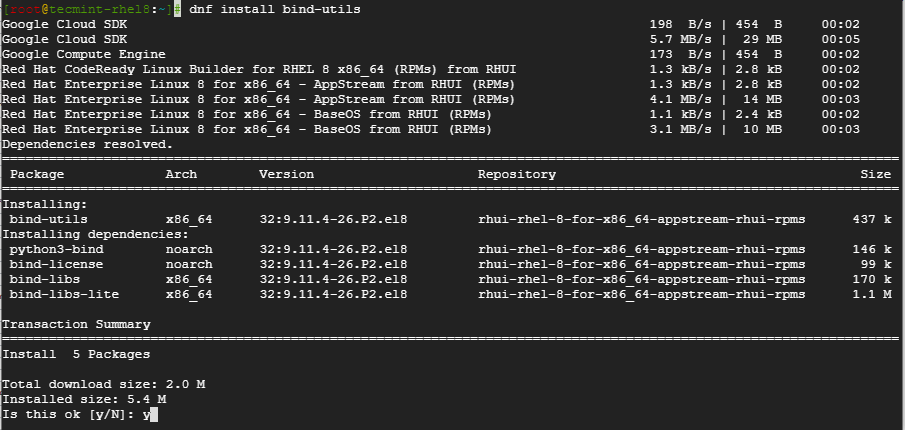
Install dig & nslookup in RHEL/Fedora
Both commands can be easily installed on RHEL-based distributions using the DNF command, as shown below.
$ sudo dnf install bind-utilsBelow is the output of the above command.

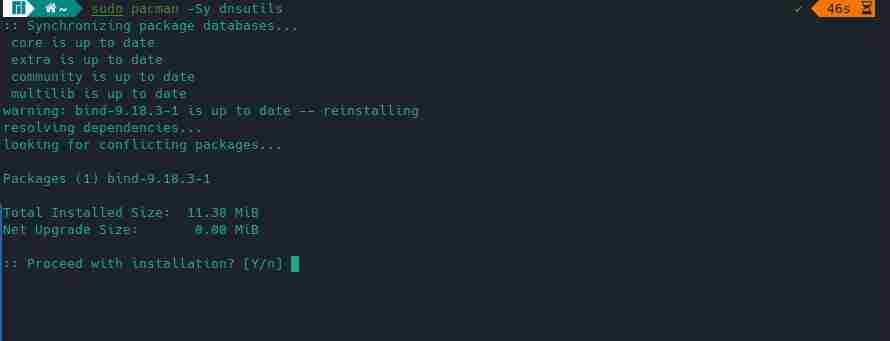
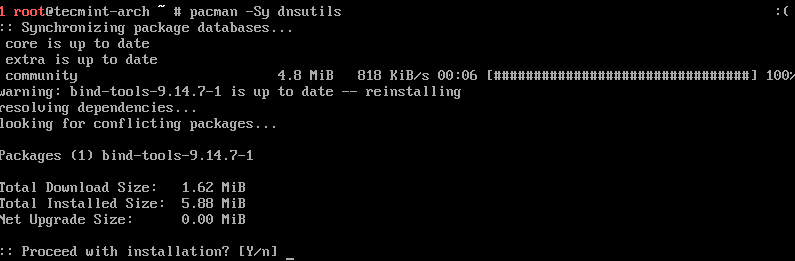
Install dig & nslookup in Arch/Manjaro
For arch-based distributions, the user can install it using the default pacman package manager, as shown below.
$ sudo pacman -Sy dnsutilsBelow is the output of the above command.
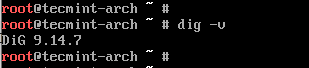
Testing dig & nslookup Commands are Working
After the installation is finished, you can verify whether the package was successfully installed or not by running the below command.
Below is the output of the above command.

If the package is successfully installed, you will get the above output with the current version of the package without any errors such as “Command ‘dig’ not found“.
How To Use The dig Command
Once you have installed the dig command, let’s see how you can use it on your Linux machine to fetch the DNS information with the given examples, but before that, let’s spend some time getting to know the basic syntax of the dig command.
dig command syntax
The dig syntax consists of the hostname/IP address, name, and record as follows:
$ dig [HOSTNAME] [NAME] [TYPE-RECORD]- HOSTNAME consists of the domain name or IP address of the server.
- NAME is DNS (Domain Name Server) of the server to query.
- TYPE-RECORD is the DNS record to retrieve (default A is retrieved if not specified). Other known records are A , MX , TXT , CNAME , and NS .
dig command output decode
The output of the dig command can be tricky for new users, but don’t worry; I’ll try my best to explain the output section thoroughly to avoid any confusion.
So, now let me start digging into my own domain to show you how the output looks, and then I’ll divide the output section to give you a proper understanding of each section.
$ dig trendoceans.comAs shown below, you can replace the domain name with something else for which you want to know the information related to the DNS name server.
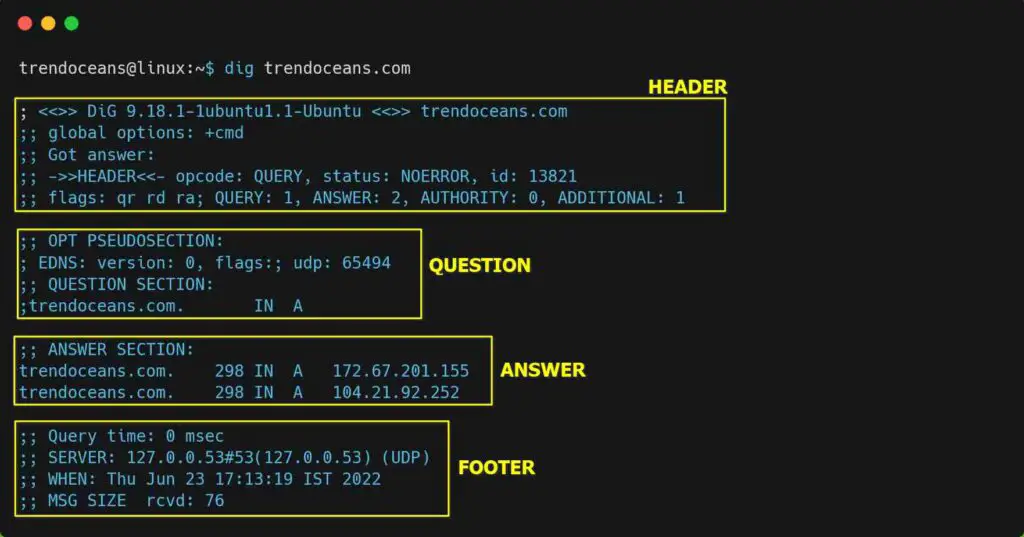
- The header consists of information related to the dig version, status, id, and other additional information.
- The question area consists of the query you request while executing the dig command.
- The answer section is the important part, where you can see the information about the query you have asked. In a sequence of domain/server names, TTL (Time To Live), IN stands for Internet, default record type (A), and the last IP address of the domain name.
- The last footer area consists of the information, date, and message size, which you can take as a summary of the response.
dig command usage
The use of the dig command is pretty simple.
You just need to know exactly where you want to dig with the right tools, i.e., the available options, not the spade and all.
If you are just interested in querying the A record (default), add +short at the end of the command, as shown below, to suppress unwanted information.
$ dig trendoceans.com +short OR $ dig trendoceans.com A +shortBelow is the output of the above command.

When you want to check the Mail Exchange (MX) record for the domain, then use the MX as shown below.
$ dig trendoceans.com MX +shortBelow is the output of the above command.

You can also execute the below command to output the specified domain name server (NS).
$ dig trendoceans.com NS +shortBelow is the output of the above command.

By default, dig commands will query the name servers listed in /etc/resolv.conf to perform a DNS lookup for you. If you want to change the default behaviour, specify the hostname or IP address of the name server after the @ symbol.
The below command will send the DNS query to the Google name server.
$ dig @8.8.8.8 trendoceans.comIf you want to list DNS AAA (Ipv6) records for the respective domain, use the below command:
$ dig trendoceans.com AAAAA dig command also gives you the flexibility to customize the default request, so you can get a personalized result without typing the frequently used options again and again.
To customize, you need to create a file named .digrc in your home directory, or if the file is already present, you can add the options shown below:
$ cat ~/.digrc +nostats +nocomments +nocmd +noquestion +answerSave the file and test the output.
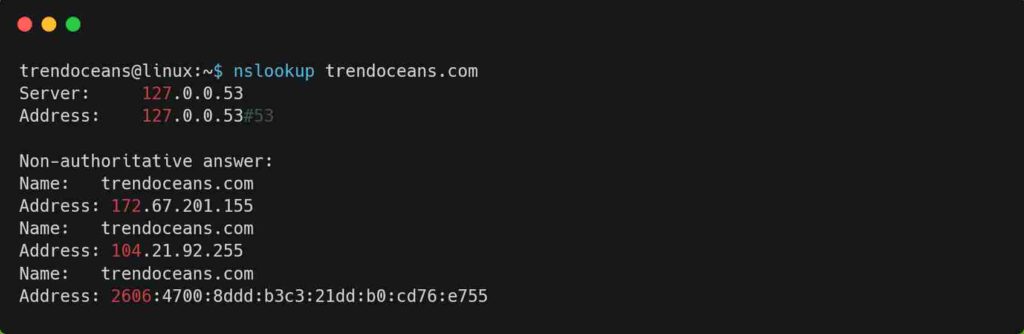
How to use the nslookup command
You can use the nslookup command to query the name server for various domain records, as shown below.
$ nslookup trendoceans.comBelow is the output of the above command.
The rest of the commands are easy to follow, and you can find them in the below list of examples.
Examples of dig & nslookup commands
Get a detailed answer for the given domain name (A records):
$ dig +noall +answer [example.com] # Using dig command $ nslookup [example.com] # Using nslookup commandQuery a specific DNS record type for the given domain name:
$ dig [example.com] [A|MX|TXT|CNAME|NS] +short # Using dig command $ nslookup -type=[A|MX|TXT|CNAME|NS] [example.com] # Using nslookup commandDisplay all the records for the given domain name:
$ dig [example.com] ANY # Using dig command $ nslookup -vc -type=ANY [example.com] # Using nslookup commandSpecify a custom name server instead of the default for the given domain name (example, Google DNS):
$ dig @8.8.8.8 [example.com] # Using dig command $ nslookup [example.com] 8.8.8.8 # Using nslookup commandFind authoritative name servers for the zone and display SOA records for the given domain name:
$ dig +nssearch [example.com]Perform the entire trace path to resolve a domain name:
$ dig +trace [example.com]The query for a mail server (MX record) in the domain, showing details of the transaction:
$ nslookup -type=MX -debug [example.com]Query a given name server on a specific port number for a TXT record of the domain:
$ nslookup -port=[port_number] -type=TXT [example.com] [name_server]I think I should now end here for you to explore the dig and nslookup commands on your own in your Linux system.
Wrap up
That’s all for this guide, where I have shown you how to use the dig and nslookup commands in Linux with some common examples.
If you want to add something more to it, then the comment section is open for you, so please share the trick that you use with dig and nslookup.
Your comment will be greatly appreciated.
Innovative tech mind with 12 years of experience working as a computer programmer, web developer, and security researcher. Capable of working with a variety of technology and software solutions, and managing databases.
How to Install and Use dig and nslookup Commands in Linux
In this article, you will learn how to install the dig command and nslookup command on Linux. These commands are used for network troubleshooting and gathering information about domain names.
Dig, short for Domain Information Gopher, is a DNS lookup utility used for probing DNS servers and troubleshooting problems associated with DNS servers. Due to its ease of use, system administrators rely on the tool to troubleshoot DNS issues.
Nslookup is used for handling DNS lookups and displays crucial information such as MX records, and the IP address associated with a domain name.
Newer Linux system ship both dig and nslookup utilities by default. However, older Linux systems may not. The two come bundled inside the bind-utils package.
Let’s see how we can install DNS troubleshooting utilities in Linux.
On this page:
Installing dig & nslookup in CentOS/RHEL
On Red Hat Linux /CentOS, install dig and nslookup using the dnf command.
Upon successful installation, verify the version using the command below.

Installing dig & nslookup on Debian / Ubuntu
On Debian and any of its derivatives including Debian, the installation is done using the apt command.
Again, to verify the installation, run the command.

Installing dig & nslookup on ArchLinux
For ArchLinux, the command for installing dig and nslookup will be.
To check the version of dig installed, run.
Using the dig command
dig command can be used to query a domain name and retrieve information as shown:
The command displays a host of information such as the version of the dig command utility, the DNS server, and its corresponding IP address.
Sample Output
; > DiG 9.11.3-1ubuntu1.9-Ubuntu > fossmint.com ;; global options: +cmd ;; Got answer: ;; ->>HEADERTo get more specific and display only the IP of the domain name append the +short argument as shown:
# dig fossmint.com +short 104.17.179.254 104.17.171.254To check the MX record of the domain name run.
# dig fossmint.com MX +short 50 mx3.zoho.com. 20 mx2.zoho.com. 10 mx.zoho.com.Using the nslookup Command
To retrieve information about a domain name using the nslookup utility, use the following command.
Sample Output
Server: 127.0.0.53 Address: 127.0.0.53#53 Non-authoritative answer: Name: fossmint.com Address: 104.27.179.254 Name: fossmint.com Address: 104.27.171.254 Name: fossmint.com Address: 2606:4700:30::681b:b0fe Name: fossmint.com Address: 2606:4700:30::681b:b1feConclusion
In this article, you learned how to install dig and nslookup command utilities in different Linux distributions and also the basic usage of the commands. We do hope that you can now comfortably install the utilities when confronted with a system without them.