Radius Server for Linux
MultiFactor Radius Adapter is a software component, RADIUS server for Linux.
The component is distributed under an open-source license and is available free of charge. The current version can be found in our GitHub repository: code and build.
Please note the licence. It does not entitle you to modify the source code of the Component or create derivative products based on it. The source code is provided for evaluation purposes.
Requirements for component installation
- The component is installed on a Linux server, tested on CentOS, Ubuntu, Debian, Astra Linux;
- Minimum server requirements: 1 CPU, 2 GB RAM, 8 GB HDD (to run the OS and adapter for 100 simultaneous connections — approximately 1500 users);
- Port 1812 (UDP) must be open on the server to receive requests from Radius clients;
- The server with the component installed needs access to api.multifactor.ru via TCP port 443 (TLS) directly or via HTTP proxy;
- To communicate with Active Directory, the component needs access to the domain server via TCP port 389 (LDAP scheme) or 636 (LDAPS scheme);
- To communicate with the Network Policy Server, the component needs access to NPS via UDP port 1812.
The component uses the ASP.NET Core runtime environment version 3.1, which is free, open-source, developed by Microsoft and the open-source community. The runtime environment does not impose any restrictions on its use.
To install, run the commands:
$ sudo rpm -Uvh https://packages.microsoft.com/config/centos/7/packages-microsoft-prod.rpm
$ sudo yum install aspnetcore-runtime-3.1
$ sudo dnf install aspnetcore-runtime-3.1
$ wget https://packages.microsoft.com/config/ubuntu/18.04/packages-microsoft-prod.deb -O packages-microsoft-prod.deb
$ sudo dpkg -i packages-microsoft-prod.deb

$ sudo apt-get update; \
sudo apt-get install -y apt-transport-https && \
sudo apt-get update && \
sudo apt-get install -y aspnetcore-runtime-3.1
$ wget https://packages.microsoft.com/config/debian/10/packages-microsoft-prod.deb -O packages-microsoft-prod.deb
$ sudo dpkg -i packages-microsoft-prod.deb

$ sudo apt-get update; \
sudo apt-get install -y apt-transport-https && \
sudo apt-get update && \
sudo apt-get install -y aspnetcore-runtime-3.1
$ sudo apt install ca-certificates

$ wget -qO- https://packages.microsoft.com/keys/microsoft.asc | gpg --dearmor > microsoft.asc.gpg
$ sudo mv microsoft.asc.gpg /etc/apt/trusted.gpg.d/
$ wget -q https://packages.microsoft.com/config/debian/9/prod.list
$ sudo mv prod.list /etc/apt/sources.list.d/microsoft-prod.list
$ sudo chown root:root /etc/apt/trusted.gpg.d/microsoft.asc.gpg
$ sudo chown root:root /etc/apt/sources.list.d/microsoft-prod.list

$ echo deb https://download.astralinux.ru/astra/current/orel/repository/ orel non-free main contrib | sudo tee -a /etc/apt/sources.list

$ sudo apt update
$ sudo apt install dotnet-sdk-3.1
Create a folder, download and unzip the current version of the component from GitHub:
$ sudo mkdir /opt/multifactor /opt/multifactor/radius /opt/multifactor/radius/logs $ VER=1.0.16 $ sudo wget https://github.com/MultifactorLab/multifactor-radius-adapter/releases/download/$ /release_linux_x64.zip $ sudo unzip release_linux_x64.zip -d /opt/multifactor/radius Create a system user mfa and give it rights to the application:
$ sudo useradd -r mfa $ sudo chown -R mfa: /opt/multifactor/radius/ $ sudo chmod -R 700 /opt/multifactor/radius/ $ sudo vi /etc/systemd/system/multifactor-radius.service [Unit] Description=Multifactor Radius Adapter [Service] WorkingDirectory=/opt/multifactor/radius/ ExecStart=/usr/bin/dotnet /opt/multifactor/radius/multifactor-radius-adapter.dll Restart=always # Restart service after 10 seconds if the service crashes: RestartSec=10 KillSignal=SIGINT SyslogIdentifier=multifactor-radius User=mfa Environment=ASPNETCORE_ENVIRONMENT=Production Environment=DOTNET_PRINT_TELEMETRY_MESSAGE=false # How many seconds to wait for the app to shut down after it receives the initial interrupt signal. # If the app doesn't shut down in this period, SIGKILL is issued to terminate the app. # The default timeout for most distributions is 90 seconds. TimeoutStopSec=30 [Install] WantedBy=multi-user.target $ sudo systemctl enable multifactor-radius The component’s parameters are stored in /opt/multifactor/radius/multifactor-radius-adapter.dll.config in XML format.
add key="adapter-server-endpoint" value="0.0.0.0:1812"/> add key="radius-shared-secret" value=""/> add key="first-factor-authentication-source" value="ActiveDirectory"/> add key="multifactor-api-url" value="https://api.multifactor.ru"/> add key="multifactor-nas-identifier" value=""/> add key="multifactor-shared-secret" value=""/> add key="logging-level" value="Debug"/> Active Directory Connection Parameters
To check the first factor in the Active Directory domain, the following parameters apply:
add key="active-directory-domain" value="ldaps://10.0.0.4"/> add key="active-directory-group" value="VPN Users"/> add key="active-directory-2fa-group" value="2FA Users"/> 
When the use-active-directory-user-phone option is enabled, the component will use the phone recorded in the General tab. The format of the phone can be anything.

When the use-active-directory-mobile-user-phone option is enabled, the component will use the phone recorded in the Telephones tab in the Mobile field. The format of the phone can also be any format.
External RADIUS Server Connection
To check the first factor in RADIUS, for example in Network Policy Server, the following parameters are applicable:
add key="adapter-client-endpoint" value="192.168.0.1"/> add key="nps-server-endpoint" value="192.168.0.10:1812"/> Optional RADIUS attributes
You can specify attributes the component will pass further upon successful authentication, including verification that the user is a member of a security group.
RadiusReply> Attributes> add name="Class" value="Super" /> add name="Fortinet-Group-Name" value="Users" when="UserGroup=VPN Users"/> add name="Fortinet-Group-Name" value="Admins" when="UserGroup=VPN Admins"/> Attributes> RadiusReply> After configuring the configuration, run the component:
$ sudo systemctl start multifactor-radius You can check the status with the command:
$ sudo systemctl status multifactor-radius The logs of the component are located in the /opt/multifactor/radius/logs folder as well as in the system log.
Further information about Active Directory
- The Linux version of the adapter for now does not know how to handle multiple domains with trust between them.
- A simple user password authentication is used to work with Active Directory. We strongly recommend using the LDAPS scheme to encrypt traffic between the adapter and
Аутентификация пользователей управления с помощью сервера RADIUS
VigorSwitch предоставляет различные способы аутентификации управляющего пользователя. Пользователи будут вводить свое имя пользователя и пароль, которые хранятся на сервере RADIUS. Сервер Radius обеспечивает эффективность и доступность всей вашей сети, а также упрощает управление пользователями. В этом документе показано, как настроить привязку VigorSwitch к серверу RADIUS на маршрутизаторе DrayOS или сервере Freeradius.
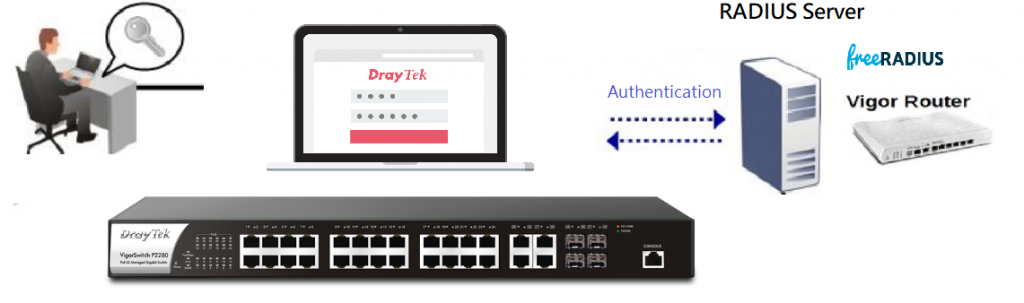
Если у вас уже есть сервер RADIUS, перейдите к разделу Как добавить сервер RADIUS в VigorSwitch?
Настройка роутера DrayOS
Вы можете обратиться к этой статье базы знаний DrayTek, чтобы настроить сервер RADIUS на маршрутизаторе DrayOS.
Настройка сервера Freeradius
Вы можете установить Freeradius на свой Linux-сервер или виртуальную машину.
$ sudo apt-get install freeradius
Получите статус Freeradius, нам понадобится режим отладки на Freeradius, поэтому остановим сервис заранее.
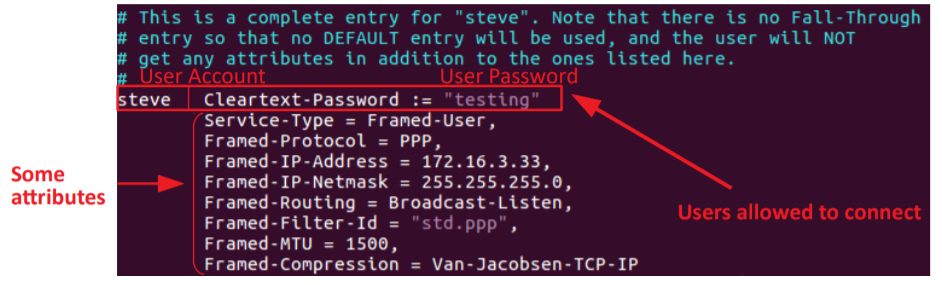
Измените каталог на путь к файлу Freeradius. Отредактируйте пользовательский файл, используя $ vim users

Вы увидите некоторую пользовательскую конфигурацию в файле; нам нужно удалить пометку аннотации в профиле Стива для тестирования.
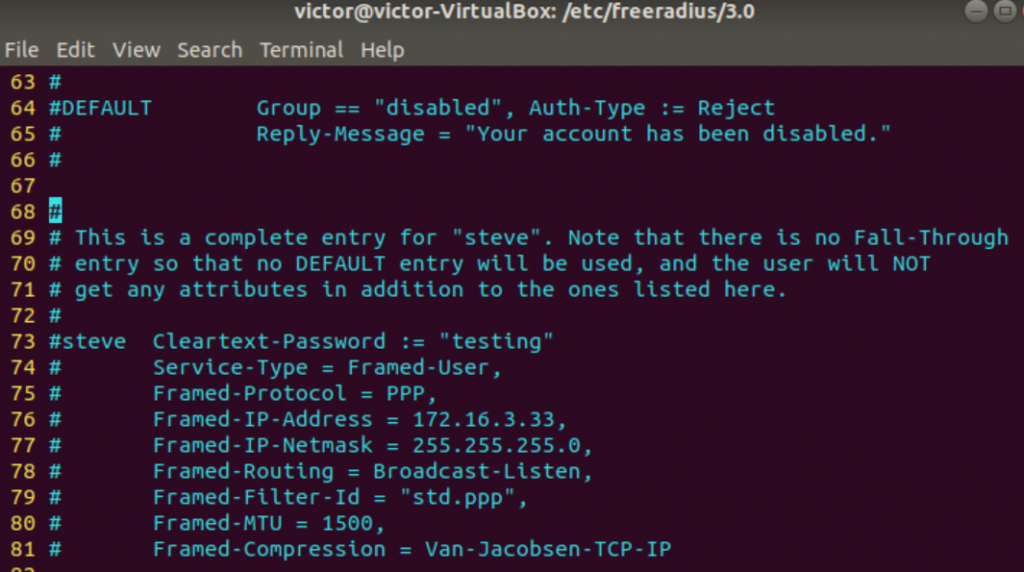
С другой стороны, вы можете добавить свои собственные выделенные учетные записи пользователей. Затем сохраните файл, чтобы применить изменение конфигурации.
Проверим, работает ли наша учетная запись. Включите режим отладки с помощью $ freeradius -X
Откройте другой терминал $ sudo radtest steve testing localhost 1812 testing123
(Формат: Sudo radtest username password RADIUS_Server_IP RADIUS_Server_Port RADIUS_Pre-SharedKey)
Received Access-Accept означает, что вы успешно прошли аутентификацию.
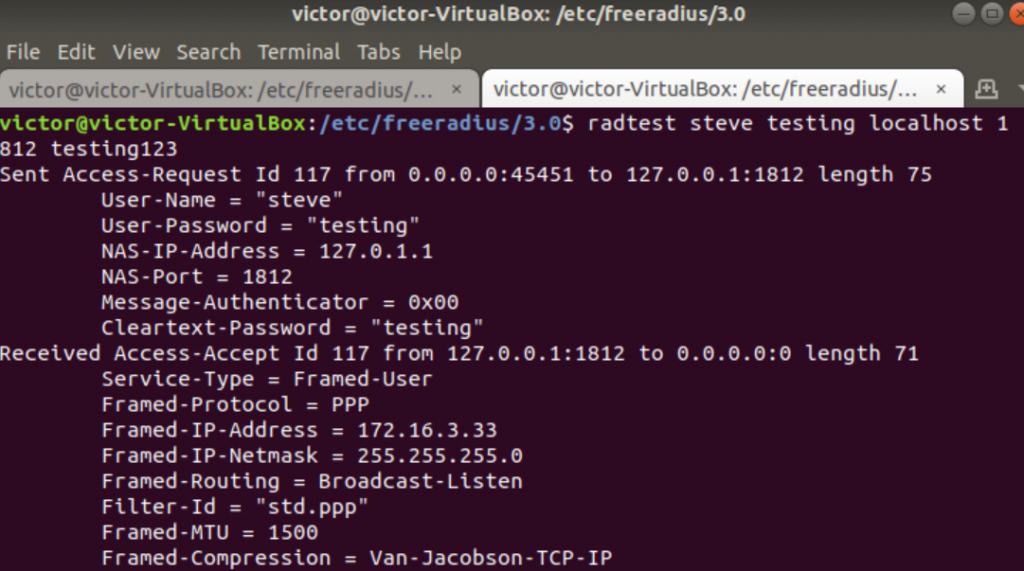
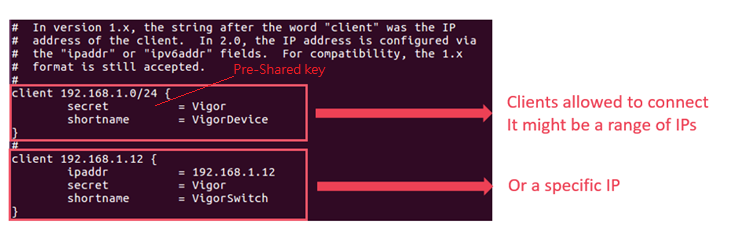
Test123 — это предварительный общий ключ между сервером RADIUS и клиентами. Ключ можно настроить, отредактировав файл client.conf в пути Freeradius. $ vim /etc/freeradius/3.0/client.conf
Чтобы коммутатор мог использовать RADIUS для аутентификации пользователей. Введите IP-адрес и информацию о VigorSwitch.
После настройки, описанной выше, ваш сервер Freeradius готов к аутентификации VigorSwitch.
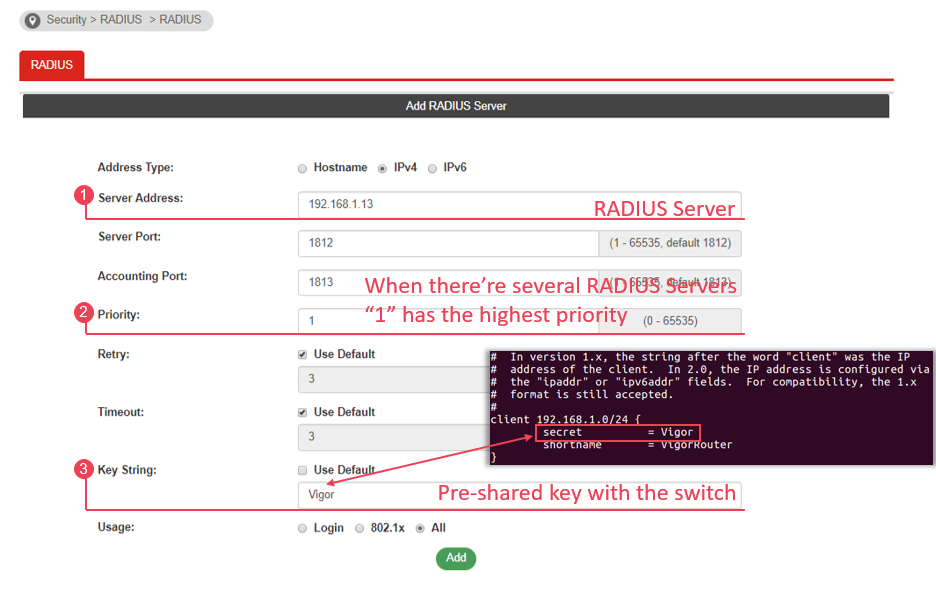
- Перейдите в раздел Безопасность >> RADIUS.
- Прокрутите вниз до Добавить сервер RADIUS.
- Установите адрес сервера, приоритет и ключевую строку.
Затем перейдите к Seciruty>> Management Access Authentication>> Method Profile
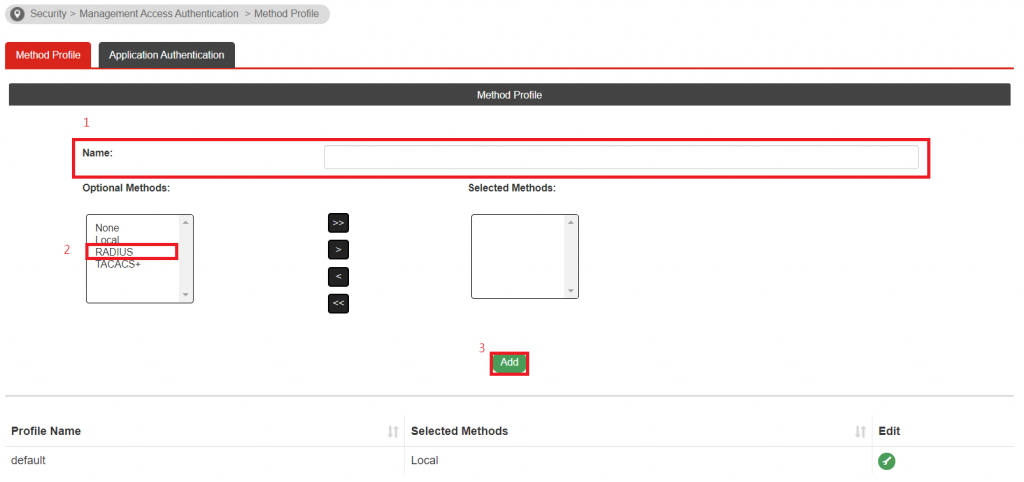
- Добавьте название профиля
- Выберите RADIUS в качестве необязательного метода и переместите его в список выбранных методов
- Нажмите Добавить, чтобы создать новый профиль.
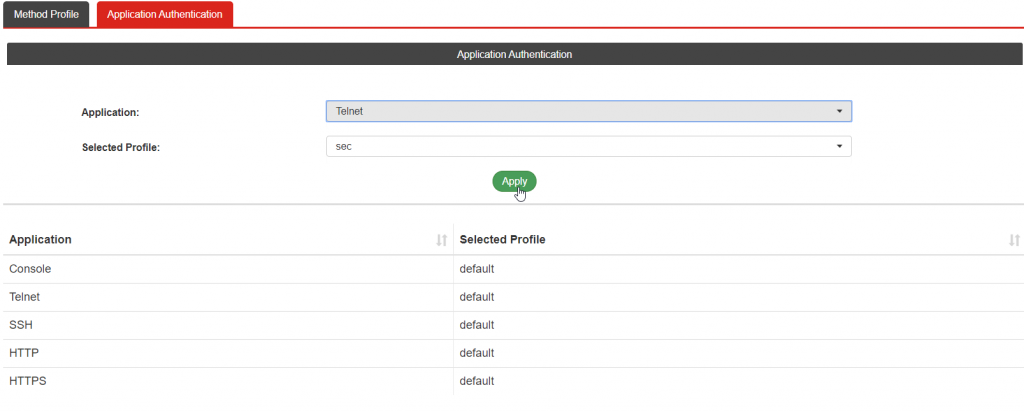
- Переключитесь на вкладку Application Authentication
- Выберите приложение и примените профиль метода
Затем вы можете использовать свою учетную запись RADIUS для входа в интерфейс управления!