- Задачи cron и автоматизация в Linux
- Что такое cron?
- Что собой представляют задачи cron?
- Доступ к cron
- Как добавлять задачи cron в Linux
- Синтаксис задач cron
- Примеры cron-задач
- Как создавать задачу cron
- Возможные проблемы и их решение
- 1. Проверьте расписание
- 2. Просмотрите логи cron
- 3. Перенаправьте output в файл
- Итоги
- How to Automate tasks in Linux using Crontab
- The Crontab file
- The anatomy of a crontab file
- Managing cron jobs
- Crontab examples in Scheduling tasks.
- Using special strings to save time on writing cron jobs
- Crontab Restrictions
- Backing up crontab entries
Задачи cron и автоматизация в Linux

Если вы заняты в сфере IT, у вас часто может возникать потребность в автоматизации каких-то повторяющихся задач. Например, если нужно ежедневно делать бэкапы, ежемесячно архивировать логи, еженедельно удалять файлы для очистки пространства.
И если ваша рабочая ОС — Linux, для автоматизации всех этих процессов можно использовать такой инструмент как cron.
Что такое cron?
Cron — это утилита для составления расписания задач, имеющаяся в Unix-подобных системах. Функционал этой утилиты включается демоном crond и выполняется в фоне. Для запуска скриптов cron читает crontab («таблицы cron).
Вы можете настроить задачу cron, чтобы запланировать автоматическое выполнение скриптов или запуск команд. Для этого используется специальный синтаксис.
Когда речь идет об отдельных пользователях и их задачах, cron руководствуется файлом /var/spool/cron/crontabs.

Что собой представляют задачи cron?
Любая задача, которую вы запланировали в cron, называется задачей cron. Эти задачи помогают нам автоматизировать рутинные действия, выполняемые регулярно с определенной периодичностью.
Давайте рассмотрим подробнее работу cron-задач.
Доступ к cron
Чтобы пользователь имел доступ к задачам cron, админ должен разрешить это в файле /etc/cron.allow.
Если вы получаете уведомление, как на скриншоте ниже, значит, вам не разрешено использовать cron.
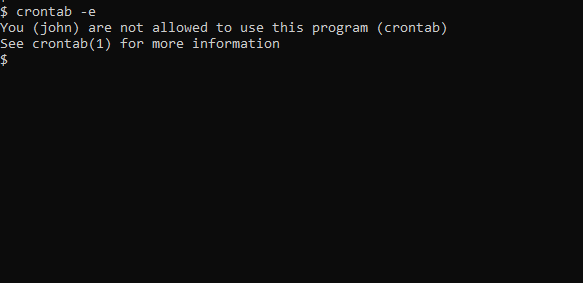
Чтобы разрешить Джону доступ к cron, включите его имя в /etc/cron.allow. После этого он сможет создавать и редактировать cron-задачи.

Пользователям также можно запретить доступ к cron-задачам, внеся их имена в файл /etc/cron.d/cron.deny.
Как добавлять задачи cron в Linux
Для начала нужно проверить статус сервиса cron. Если cron не установлен, вы можете без проблем загрузить его при помощи менеджера пакетов. Для проверки статуса введите следующую команду:
# Check cron service on Linux system sudo systemctl status cron.service
Синтаксис задач cron
Для добавления и вывода задач crontab используется следующие флаги:
- crontab -e: редактирование содержимого crontab для добавления, удаления или изменения задач.
- crontab -l: вывод всех cron-задач текущего пользователя.
- crontab -u username -l: вывод задач другого пользователя.
- crontab -u username -e: редактирование задач другого пользователя.
Выведя на экран задачи cron, вы увидите что-то типа этого:
# Cron job example * * * * * sh /path/to/script.sh
— звездочки * * * * * представляют минуты, часы, дни, месяцы и дни недели (соответственно).
| Значение | Описание | |
|---|---|---|
| Минуты | 0-59 | Команда будет выполняться в указанную минуту. |
| Часы | 0-23 | Команда будет выполняться в указанный час. |
| Дни | 1-31 | Команда будет выполняться в указанный день месяца. |
| Месяцы | 1-12 | Месяц, в котором должна выполняться команда. |
| Дни недели | 0-6 | Дни недели, по которым должна запускаться команда. Здесь 0 — воскресенье. |
— sh говорит о том, что это bash-скрипт, и запускаться он должен из /bin/bash.
— /path/to/script.sh указывает путь к скрипту.
От редакции Techrocks. Нам показалось, что в пояснении синтаксиса не хватает подробностей, поэтому дополняем.
Указать периодичность меньше минуты нельзя, потому что cron читает расписание раз в минуту.
Время и дату выполнения можно указывать:
- звездочками * — тогда задача выполняется каждую/й — в зависимости от того, на какой позиции стоит звездочка
- целыми числами — чтобы указать точно время или дату
- целыми числами через запятую — перечисляем нужные минуты, часы и т. д.
- диапазонами, через дефис (например, 1-10) — чтобы задача выполнялась в определенный диапазон времени или дат
- с определенным шагом.
На последнем пункте остановимся подробнее. Для указания шага используется синтаксис */целое-число . Указанное целое число — шаг.
Например, если на позиции месяца стоит */4 , это значит, что задача будет выполняться каждый четвертый месяц . А если на позиции минут стоит 0-59/2 , это значит, что задача будет выполняться каждые две минуты.
Ниже представлена схема синтаксиса cron-задач.
* * * * * sh /path/to/script/script.sh | | | | | | | | | | | Команда или скрипт, которые нужно выполнить | | | | | | | | | | | | | | | | | | | День недели(0-6) | | | | | | | Месяц(1-12) | | | | | Число месяца(1-31) | | | Час(0-23) | Минута(0-59)
Примеры cron-задач
В таблице представлены три примера cron-задач.
| Расписание | Значение |
|---|---|
| 5 0 * 8 * | В 00:05 в августе |
| 5 4 * * 6 | В 04:05 в субботу |
| 0 22 * * 1-5 | В 22:00 ежедневно, с понедельника по пятницу |
Если вам не удается с лету понять, на когда назначено выполнение задач, не огорчайтесь. Вы можете попрактиковаться в генерации расписаний cron на crontab guru.
Как создавать задачу cron
В этом разделе мы рассмотрим пример того, как можно запланировать автоматический запуск простого скрипта.
1. Создайте скрипт с именем date-script.sh. Он должен выводить системную дату и время и добавлять их в файл. Скрипт выглядит так:

2. Сделайте этот скрипт исполняемым, отредактировав права при помощи chmod.
3. Добавьте скрипт в crontab при помощи crontab -e.
Мы указали, что скрипт должен выполняться каждую минуту:

4. Проверьте результат, просмотрев содержимое файла date-out.txt. В этом файле ежеминутно должна добавляться запись с системным временем.

Возможные проблемы и их решение
Cron-задачи очень полезны, но они не всегда срабатывают так, как вы задумали. К счастью, есть несколько эффективных способов справиться с этим.
1. Проверьте расписание
Для начала нужно проверить, что за расписание установлено для задачи. Сделать это можно при помощи команд crontab -l или crontab -u username -l (мы говорили о них ранее).
2. Просмотрите логи cron
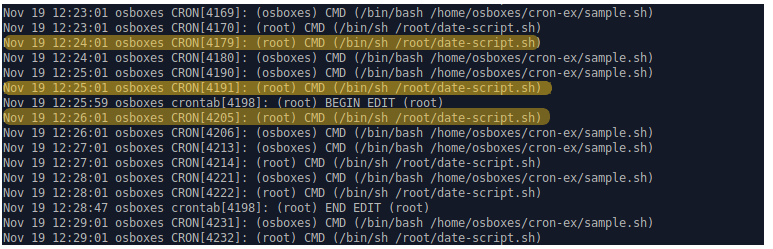
Проверьте, запускается ли cron в намеченное время. Это можно посмотреть в логах, в var/log/cron. В некоторых дистрибутивах логи можно найти в /var/log/syslog.
Если в логах есть записи в соответствующее время, это означает, что сам cron запускается по расписанию.
Ниже представлен пример логов для задач cron. Обратите внимание на первый столбец с метками времени. В конце строк указаны запускаемые скрипты.
3. Перенаправьте output в файл
Вы можете перенаправить результаты работы cron в файл, чтобы поискать затем возможные ошибки.
# Redirect cron output to a file * * * * * sh /path/to/script.sh &> log_file.log
Итоги
Автоматизация задач уменьшает количество рутинной работы. Кроме того, машина может запускать задачи точно по указанному времени, и это не требует никакого вмешательства человека.
Автоматизация в Linux завязана на задачах cron, так что эту утилиту определенно стоит изучить. Поэкспериментируйте с ней!
How to Automate tasks in Linux using Crontab
Sometimes, you may have tasks that need to be performed on a regular basis or at certain predefined intervals. Such tasks include backing up databases, updating the system, performing periodic reboots and so on. Such tasks in linux are referred to as cron jobs (Crontab). Cron jobs are used for automation of tasks that come in handy and help in simplifying the execution of repetitive and sometimes mundane tasks. Cron is a daemon that allows you to schedule these jobs which are then carried out at specified intervals. In this tutorial, you will learn how to schedule jobs using cron jobs.

The Crontab file
A crontab file, also known as a cron table, is a simple text file that contains rules or commands that specify the time interval of execution of a task. There are two categories of crontab files:
1) System-wide crontab file
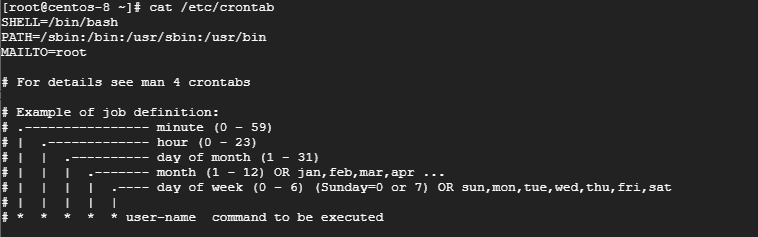
These are usually used by Linux services & critical applications requiring root privileges. The system crontab file is located at /etc/crontab and can only be accessed and edited by the root user. It’s usually used for the configuration of system-wide daemons. The crontab file looks as shown:
2) User-created crontab files
Linux users can also create their own cron jobs with the help of the crontab command. The cron jobs created will run as the user who created them.
All cron jobs are stored in /var/spool/cron (For RHEL and CentOS distros) and /var/spool/cron/crontabs (For Debian and Ubuntu distros), the cron jobs are listed using the username of the user that created the cron job
The cron daemon runs silently in the background checking the /etc/crontab file and /var/spool/cron and /etc/cron.d*/ directories
The crontab command is used for editing cron files. Let us take a look at the anatomy of a crontab file.
The anatomy of a crontab file
Before we go further, it’s important that we first explore how a crontab file looks like. The basic syntax for a crontab file comprises 5 columns represented by asterisks followed by the command to be carried out.
This format can also be represented as shown below:
m h d moy dow /path/to/script
Let’s expound on each entry
- m: This represents minutes. It’s specified from 0 to 59
- h: This denoted the hour specified from 0 to 23
- d: This represents the day of the month. Specified between 1 to 31`
- moy: This is the month of the year. It’s specified between 1 to 12
- doy: This is the day of the week. It’s specified between 0 and 6 where 0 = Sunday
- Command: This is the command to be executed e.g backup command, reboot, & copy
Managing cron jobs
Having looked at the architecture of a crontab file, let’s see how you can create, edit and delete cron jobs
Creating cron jobs
To create or edit a cron job as the root user, run the command
To create a cron job or schedule a task as another user, use the syntax
For instance, to run a cron job as user Pradeep, issue the command:
If there is no preexisting crontab file, then you will get a blank text document. If a crontab file was existing, The -e option allows to edit the file,
Listing crontab files
To view the cron jobs that have been created, simply pass the -l option as shown
Deleting a crontab file
To delete a cron file, simply run crontab -e and delete or the line of the cron job that you want and save the file.
To remove all cron jobs, run the command:
That said, let’s have a look at different ways that you can schedule tasks
Crontab examples in Scheduling tasks.
All cron jobs being with a shebang header as shown
This indicates the shell you are using, which, for this case, is bash shell.
Next, specify the interval at which you want to schedule the tasks using the cron job entries we specified earlier on.
To reboot a system daily at 12:30 pm, use the syntax:
To schedule the reboot at 4:00 am use the syntax:
NOTE: The asterisk * is used to match all records
To run a script twice every day, for example, 4:00 am and 4:00 pm, use the syntax.
To schedule a cron job to run every Friday at 5:00 pm use the syntax:
If you wish to run your cron job every 30 minutes then use:
To schedule cron to run after every 5 hours, run
To run a script on selected days, for example, Wednesday and Friday at 6.00 pm execute:
0 18 * * wed,fri /path/to/script
To schedule multiple tasks to use a single cron job, separate the tasks using a semicolon for example:
Using special strings to save time on writing cron jobs
Some of the cron jobs can easily be configured using special strings that correspond to certain time intervals. For example,
1) @hourly timestamp corresponds to 0 * * * *
It will execute a task in the first minute of every hour.
2) @daily timestamp is equivalent to 0 0 * * *
It executes a task in the first minute of every day (midnight). It comes in handy when executing daily jobs.
3) @weekly timestamp is the equivalent to 0 0 1 * mon
It executes a cron job in the first minute of every week where a week whereby, a week starts on Monday.
3) @monthly is similar to the entry 0 0 1 * *
It carries out a task in the first minute of the first day of the month.
4) @yearly corresponds to 0 0 1 1 *
It executes a task in the first minute of every year and is useful in sending New year greetings 🙂
Crontab Restrictions
As a Linux user, you can control who has the right to use the crontab command. This is possible using the /etc/cron.deny and /etc/cron.allow file. By default, only the /etc/cron.deny file exists and does not contain any entries. To restrict a user from using the crontab utility, simply add a user’s username to the file. When a user is added to this file, and the user tries to run the crontab command, he/she will encounter the error below.

To allow the user to continue using the crontab utility, simply remove the username from the /etc/cron.deny file.
If /etc/cron.allow file is present, then only the users listed in the file can access and use the crontab utility.
If neither file exists, then only the root user will have privileges to use the crontab command.
Backing up crontab entries
It’s always advised to backup your crontab entries. To do so, use the syntax
# crontab -l > /home/james/backup.txt
Checking cron logs
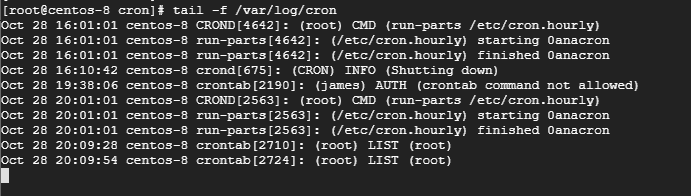
Cron logs are stored in /var/log/cron file. To view the cron logs run the command:

To view live logs, use the tail command as shown:
In this guide, you learned how to create cron jobs to automate repetitive tasks, how to backup as well as how to view cron logs. We hope that this article provided useful insights with regard to cron jobs. Please don’t hesitate to share your feedback and comments.